Page 129 of 180

NOTE:
AFTER INFLATION, THE VEHICLE MAY NEED TO BE DRIVEN FOR 20 MINUTES
BEFORE THE FLASHING LIGHT WILL TURN OFF.
Please note that the TPMS is not a substitute for proper tire maintenance, and it is the driver’s
responsibility to maintain correct tire pressure, even if under-inflation has not reached the level to
trigger illumination of the TPMS low tire pressure telltale.
Yo u r v e h i c l e h a s a l s o b e e n e q u i p p e d w i t h a T P M S m a l f u n c t i o n i n d i c a t o r t o i n d i c a t e w h e n t h e
system is not operating properly. The TPMS malfunction indicator is combined with the low tire
pressure telltale.
When the system detects a malfunction, the telltale will flash for approximately one minute and
then remain continuously illuminated. This sequence will continue upon subsequent vehicle
start-ups as long as the malfunction exists. When the malfunction indicator is illuminated, the
system may not be able to detect or signal low tire pressure as intended. TPMS malfunctions may
occur for a variety of reasons, including the installation of replacement or alternate tires or wheels
on the vehicle that prevent the TPMS from functioning properly. Always check the TPMS
malfunction telltale after replacing one or more tires or wheels on your vehicle to ensure that the
replacement or alternate tires and wheels allow the TPMS to continue to function properly.
NOTE:
Tire pressures change by approximately 1 psi (7 kPa) per 12° F (7° C) of air temperature change.
Keep this in mind when checking tire pressure inside a garage, especially in the Winter. Example:
If garage temperature is 68°F (20°C), and the outside temperature is 32°F (0°C), then the cold
tire inflation pressure should be increased by 3 psi (21 kPa), which equals 1 psi (7 kPa) for every
12°F (7°C) for this outside temperature condition.
CAUTION!
The TPMS has been optimized for the original equipment tires and wheels. TPMS pressures
and warning have been established for the tire size equipped on your vehicle. Undesirable
system operation or sensor damage may result when using replacement equipment that is not
of the same size, type, and/or style. Aftermarket wheels can cause sensor damage. Do not use
tire sealant from a can, or balance beads if your vehicle is equipped with a TPMS, as damage
to the sensors may result.
–EngineTemperatureWarningLight
This light warns of an overheated engine condition.
If the light turns on or flashes continuously while driving, safely pull over and stop the vehicle. If
the A/C system is on, turn it off. Also, shift the transmission into NEUTRAL and idle the vehicle.
If the temperature reading does not return to normal, turn the engine off immediately.
We r e c o m m e n d t h a t y o u d o n o t o p e r a t e t h e v e h i c l e o r e n g i n e d a m a g e w i l l o c c u r. H a v e t h e
vehicle serviced immediately.
WHAT TO DO IN EMERGENCIES
127
Page 130 of 180

WARNING!
Ahotenginecoolingsystemisdangerous.Youorotherscouldbebadlyburnedbysteamor
boiling coolant.
–BrakeWarningLight
This light monitors various brake functions, including brake fluid level and parking brake appli-
cation. If the brake light turns on, it may indicate that the parking brake is applied, that the brake
fluid level is low, or that there is a problem with the anti-lock brake system reservoir.
If the light remains on when the parking brake has been disengaged, and the fluid level is at the
full mark on the master cylinder reservoir, it indicates a possible brake hydraulic system malfunc-
tion or that a problem with the Brake Booster has been detected by the Anti-Lock Brake System
(ABS)/Electronic Stability Control (ESC) system. In this case, the light will remain on until the
condition has been corrected. If the problem is related to the brake booster, the ABS pump will
run when applying the brake, and a brake pedal pulsation may be felt during each stop.
The dual brake system provides a reserve braking capacity in the event of a failure to a portion of
the hydraulic system. A leak in either half of the dual brake system is indicated by the Brake
Wa r n i n g L i g h t , w h i c h w i l l t u r n o n w h e n t h e b r a k e f l u i d l e v e l i n t h e m a s t e r c y l i n d e r h a s d r o p p e d
below a specified level. The light will remain on until the cause is corrected.
Ve h i c l e s e q u i p p e d w i t h t h e A n t i - L o c k B r a k e S y s t e m ( A B S ) a r e a l s o e q u i p p e d w i t h E l e c t r o n i c
Brake Force Distribution (EBD). In the event of an EBD failure, the Brake Warning Light will turn
on along with the ABS Light. Immediate repair to the ABS system is required.
Operation of the Brake Warning Light can be checked by turning the ignition switch from the
OFF position to the ON/RUN position. The light should illuminate for approximately two
seconds. The light should then turn off unless the parking brake is applied or a brake fault is
detected. If the light does not illuminate, have the light inspected by an authorized dealer.
The light also will turn on when the parking brake is applied with the ignition switch in the
ON/RUN position.
NOTE:
This light shows only that the parking brake is applied. It does not show the degree of brake
application.
WARNING!
Driving a vehicle with the red brake light on is dangerous. Part of the brake system may have
failed. It will take longer to stop the vehicle. You could have a collision. Have the vehicle
checked immediately.
Malfunction Indicator Light (MIL)
Certain conditions, such as a poor fuel quality, etc., may illuminate the MIL after engine start. The
vehicle should be serviced if the light stays on through several typical driving cycles. In most
situations, the vehicle will drive normally and not require towing.
WHAT TO DO IN EMERGENCIES
128
Page 131 of 180

If the MIL flashes when the engine is running, serious conditions may exist that could lead to
immediate loss of power or severe catalytic converter damage. We recommend you do not
operate the vehicle. Have the vehicle serviced immediately.
–ElectronicStabilityControl(ESC)OFFIndicatorLight
This light indicates the Electronic Stability Control (ESC) is off.
Charging System Light
This light shows the status of the electrical charging system. If the charging system light remains
on, it means that the vehicle is experiencing a problem with the charging system.
We r e c o m m e n d y o u d o n o t c o n t i n u e d r i v i n g i f t h e c h a r g i n g s y s t e m l i g h t i s o n . H a v e t h e v e h i c l e
serviced immediately.
–OilPressureWarningLight
This light indicates low engine oil pressure. If the light turns on while driving, stop the vehicle and
shut off the engine as soon as possible. A chime will sound when this light turns on.
We r e c o m m e n d y o u d o n o t o p e r a t e t h e v e h i c l e o r e n g i n e d a m a g e w i l l o c c u r. H a v e t h e v e h i c l e
serviced immediately.
–Anti-LockBrake(ABS)Light
This light monitors the Anti-Lock Brake System (ABS).
If the light is not on during starting, stays on or turns on while driving, we recommend you contact
the nearest authorized dealer and have the vehicle serviced immediately.
–ElectronicThrottleControl(ETC)IndicatorLight
This light informs you of a problem with the system.
If a problem is detected, the light will come on while the engine is running. Cycle the ignition
when the vehicle has completely stopped and the shift lever is placed in the PARK position; the
light should turn off.
If the light remains lit with the engine running, your vehicle will usually be drivable. However, see
an authorized dealer immediately. If the light is flashing when the engine is running, immediate
service is required, and you may experience reduced performance, an elevated/rough idle or
engine stall, and your vehicle may require towing.
–AirBagWarningLight
If the light is not on during starting, stays on, or turns on while driving, have the vehicle serviced
by an authorized dealer immediately.
SERVICE AWD SYSTEM Message
If the SERVICE AWD SYSTEM warning message appears after engine start up, or during
driving, it means the AWD system is not functioning properly. We recommend you do not
operate the vehicle. Have the vehicle serviced immediately.
WHAT TO DO IN EMERGENCIES
129
Page 132 of 180

INSTRUMENT CLUSTER INDICATOR LIGHTS
–TurnSignalIndicator
The arrows will flash with the exterior turn signals when the turn signal lever is operated. A tone
will chime, and a DID message will appear if either turn signal is left on for more than 1 mile
(1.6 km).
NOTE:
If either indicator flashes at a rapid rate, check for a defective outside light bulb.
–HighBeamIndicator
Indicates that headlights are on high beam.
–FrontFogLightIndicator
This indicator will illuminate when the front fog lights are on.
–VehicleSecurityLight
This light will flash rapidly for approximately 15 seconds when the vehicle security alarm is arming.
The light will flash at a slower speed continuously after the alarm is set. The security light will also
come on for about three seconds when the ignition is first turned on.
Electronic Speed Control Set
Indicates that the Electronic Speed Control has been set.
-AdaptiveCruiseControl(ACC)ONIndicator
•Ifyourvehicleisequippedwithadaptivecruisecontrol,thecontrolsoperateexactlythesame
as the normal (fixed speed) cruise control with one difference. You can set a specified distance
you would like to maintain between you and the vehicle in front of you.
• If the ACC sensor detects a vehicle ahead, ACC will apply limited braking or acceleration
automatically to maintain a preset following distance, while matching the speed of the vehicle
ahead.
•Ifthesensordoesnotdetectavehicleaheadofyou,ACCwillmaintainafixedsetspeed.
•Referto“SpeedControl”in“OperatingYourVehicle”forfurtherinformationonAdaptive
Cruise Control (ACC) ON operation and proper use.
NOTE:
Adaptive Cruise Control (ACC) increases the driving convenience provided by cruise control
while traveling on highways and major roadways. However, it is not a safety system and not
designed to prevent collisions.
WHAT TO DO IN EMERGENCIES
130
Page 133 of 180
OFFIndicatorLight
This light indicates the Electronic Stability Control (ESC) is off.
–DoorAjarIndicator
This indicator will illuminate when a door(s) is left ajar")
–ElectronicStabilityControl(ESC)OFFIndicatorLight
This light indicates the Electronic Stability Control (ESC) is off.
–DoorAjarIndicator
This indicator will illuminate when a door(s) is left ajar and not fully closed.
–SportShifting
This light will illuminate whenSPORT MODEis selected. Sport Mode will provide improved
throttle response and modified shifting for an enhanced driving experience as well as the greatest
amount of steering feel. (SPORT MODEwill enable AWD (if equipped) in the AWD Sport
mode providing an enhanced AWD driving performance).
Oil Change Due
Yo u r v e h i c l e i s e q u i p p e d w i t h a n e n g i n e o i l c h a n g e i n d i c a t o r s y s t e m . T h e “ O i l C h a n g e D u e ”
message will display for 5 seconds along with a single chime to indicate the next scheduled oil
change interval. The engine oil change indicator system is duty cycle based, which means the
engine oil change interval may fluctuate dependent upon your personal driving style.
Resetting The Light After Servicing
Vehicles Equipped With Keyless Enter-N-Go
1. Without pushing the brake pedal, push the ENGINE START/STOP button and cycle the
ignition to the ON/RUN position (do not start the engine).
2. Fully depress the accelerator pedal, slowly, three times within 10 seconds.
3. Without pushing the brake pedal, push the ENGINE START/STOP button once to return the
ignition to the OFF/LOCK position.
Vehicles Not Equipped With Keyless Enter-N-Go
1. Turn the ignition switch to the ON/RUN position (do not start the engine).
2. Fully depress the accelerator pedal, slowly, three times within 10 seconds.
3. Turn the ignition switch to the OFF/LOCK position.
NOTE:
If the indicator message illuminates when you start the vehicle, the oil change indicator system did
not reset. If necessary, repeat this procedure.
NOTE:
Resetting the oil life can also be done within the "Oil Life" menu under “Vehicle Info.”
WHAT TO DO IN EMERGENCIES
131
Page 134 of 180

IF YOUR ENGINE OVERHEATS
In any of the following situations, you can reduce the potential for overheating by taking the
appropriate action:
•Onthehighways—slowdown.
• In city traffic — while stopped, shift the transmission to NEUTRAL, but do not increase engine
idle speed.
NOTE:
There are steps that you can take to slow down an impending overheat condition:
•Ifyourairconditioner(A/C)ison,turnitoff.TheA/Csystemaddsheattotheenginecooling
system and turning the A/C off can help remove this heat.
• You can also turn the temperature control to maximum heat, the mode control to floor and the
blower control to high. This allows the heater core to act as a supplement to the radiator and
aids in removing heat from the engine cooling system.
CAUTION!
Driving with a hot cooling system could damage your vehicle. If the temperature gauge reads
HOT (H), pull over and stop the vehicle. Idle the vehicle with the air conditioner turned off
until the pointer drops back into the normal range. If the pointer remains on HOT (H), and
you hear continuous chimes, turn the engine off immediately, and call for service.
WARNING!
Yo u o r o t h e r s c a n b e b a d l y b u r n e d b y h o t e n g i n e c o o l a n t ( a n t i f r e e z e ) o r s t e a m f r o m y o u r
radiator. If you see or hear steam coming from under the hood, do not open the hood until the
radiator has had time to cool. Never try to open a cooling system pressure cap when the
radiator or coolant bottle is hot.
JACKING AND TIRE CHANGING
Jack Location/Spare Tire Stowage
The jack and spare tire are both stowed under an access cover in the trunk. Follow these steps to
access the jack and spare tire.
NOTE:
The spare tire must be removed in order to access the jack.
1. Open the trunk.
WHAT TO DO IN EMERGENCIES
132
Page 135 of 180
2. Lift the access cover using the pull strap. To hold the cover up and into place, hang the hook
that is located on the end of the strap over the trunk upper weather strip located in the channel
below the rear window.
1—JackBeneathSpareTire2 — Spare Tire3 — Pull Strap
3. Remove the fastener securing the spare tire.
4. Remove the spare tire.
Spare Tire/Tools Location
Spare Tire Fastener
WHAT TO DO IN EMERGENCIES
133
Page 136 of 180
5. Remove the fastener securing the jack.
6. Remove the scissors jack and lug wrench
from the spare wheel as an assembly. Turn
the jack screw to the left to loosen the lug
wrench, and remove the wrench from the
jack assembly.
Preparations For Jacking
1. Park the vehicle on a firm, level surface as far from the edge of the roadway as possible. Avoid
icy or slippery areas.
2. Turn on the Hazard Warning flasher.
3. Set the parking brake.
4. Place the shift lever into PARK.
5. Turn OFF the ignition.
6. Block the front and rear of the wheel diagonally opposite of the jacking position. For example,
if changing the right front tire, block the left rear wheel.
NOTE:
Passengers should not remain in the vehicle
when the vehicle is being jacked.
Jack Fastener
Wheel Blocked
WHAT TO DO IN EMERGENCIES
134
 1
1 2
2 3
3 4
4 5
5 6
6 7
7 8
8 9
9 10
10 11
11 12
12 13
13 14
14 15
15 16
16 17
17 18
18 19
19 20
20 21
21 22
22 23
23 24
24 25
25 26
26 27
27 28
28 29
29 30
30 31
31 32
32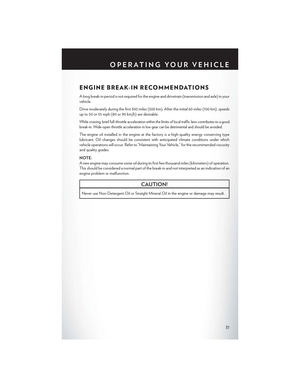 33
33 34
34 35
35 36
36 37
37 38
38 39
39 40
40 41
41 42
42 43
43 44
44 45
45 46
46 47
47 48
48 49
49 50
50 51
51 52
52 53
53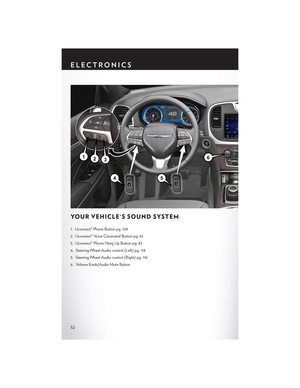 54
54 55
55 56
56 57
57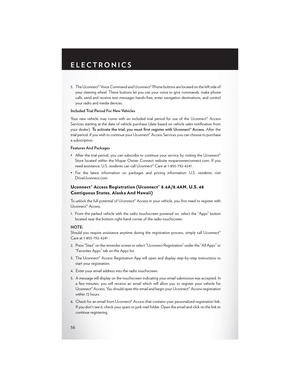 58
58 59
59 60
60 61
61 62
62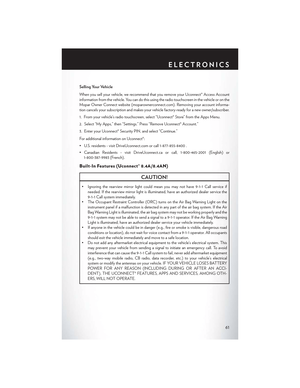 63
63 64
64 65
65 66
66 67
67 68
68 69
69 70
70 71
71 72
72 73
73 74
74 75
75 76
76 77
77 78
78 79
79 80
80 81
81 82
82 83
83 84
84 85
85 86
86 87
87 88
88 89
89 90
90 91
91 92
92 93
93 94
94 95
95 96
96 97
97 98
98 99
99 100
100 101
101 102
102 103
103 104
104 105
105 106
106 107
107 108
108 109
109 110
110 111
111 112
112 113
113 114
114 115
115 116
116 117
117 118
118 119
119 120
120 121
121 122
122 123
123 124
124 125
125 126
126 127
127 128
128 129
129 130
130 131
131 132
132 133
133 134
134 135
135 136
136 137
137 138
138 139
139 140
140 141
141 142
142 143
143 144
144 145
145 146
146 147
147 148
148 149
149 150
150 151
151 152
152 153
153 154
154 155
155 156
156 157
157 158
158 159
159 160
160 161
161 162
162 163
163 164
164 165
165 166
166 167
167 168
168 169
169 170
170 171
171 172
172 173
173 174
174 175
175 176
176 177
177 178
178 179
179
