2015 AUDI TT ROADSTER oil
[x] Cancel search: oilPage 27 of 244

Set Clock ¢ page 2 5
Computer¢ page 25
Acoustic par k assist* ¢ page 79
Speed warning ¢ page 77
Language ¢
page 2 5
Units (distance, fue l consump-
tion, temperature) ¢
page 25
Tire press ure moni toring
c> page 198
Lap timer* c>page 28
Lighting* ¢ page 48
Wiper (service pos it io n)
¢page 56
Window c> page 40
Doors (unlo ck ing and locking
mode, for example Auto- lock)
¢ page 34, c> page 34
Check
Service c> page 28
Chassis numbe r c> page 2 22
Engine oil temperature*
¢
page 26, c> page 26
Registe red keys ¢ page 32
Menu off
All of the messages shown in
vehicles withou t menu display ap-
pe ar o n the display screen.
Navigating the menu
Use the rocker switch on the windshield wiper
lever and the
I Reset ! button to operate the
menu and carry out inquiries and selections.
~-- @
Fig. 1 2 Wiper leve r: Controls for the men u disp lay
To open the menu
.. Press the I Reset ! button @ until the menu
display
i=> page 24 , fig . 11 appears
Dr iver in formation system 25
Selections and settings
.. Press the rocker switch @to reac h a men u
disp lay. The swi tch is operated the same as
the display (up/down).
Entering and confirming
.,. Press the I Reset I butto n @ .
Returning to the Start menu
.. Press the I Reset I button longer tha n 2 sec
onds to return from any menu level to the
Sta rt menu .
U sing the rocker switc h, you can select the
menus in the display or change settings. A
cursor appea rs on the left in front of these
lected values .
By pressing the
I Reset! button, you activate
the selection you made or confirm the values
you set.
Selected fu nctions are identified wit h
a check mark or ar e car ried out directly .
Selecting settings
Fig. 13 D isplay: Menu Sett ings, co mpute r selected
(page
l)
Se lect you r settings a s foll ows:
.,. Press the
I Reset I butto n. The Sta rt menu ap
pears ¢
page 24 , fig . 11 .
.. Press the rocker switch unt il Set is dis
played .
.. Press the
I Reset I butto n. All the menu s a p
pe a r .
.. Press the rocker switch until the desire d line
is highlig hted (curso r)
¢ fig . 13 .
.. Press the I Reset I button.
.. If necessary, scro ll by selecting and activat
ing the symbol for "Next page" o r "Previous
page" .
~
Page 28 of 244
26 Driver information system
When you have selected the Computer menu
and activated it by pressing the
I Reset! but
ton, two computer levels appear (computer 1
and computer 2). Now you have to select the
level you want using the rocker switch and ac
tivate it w ith the
! Reset I button .
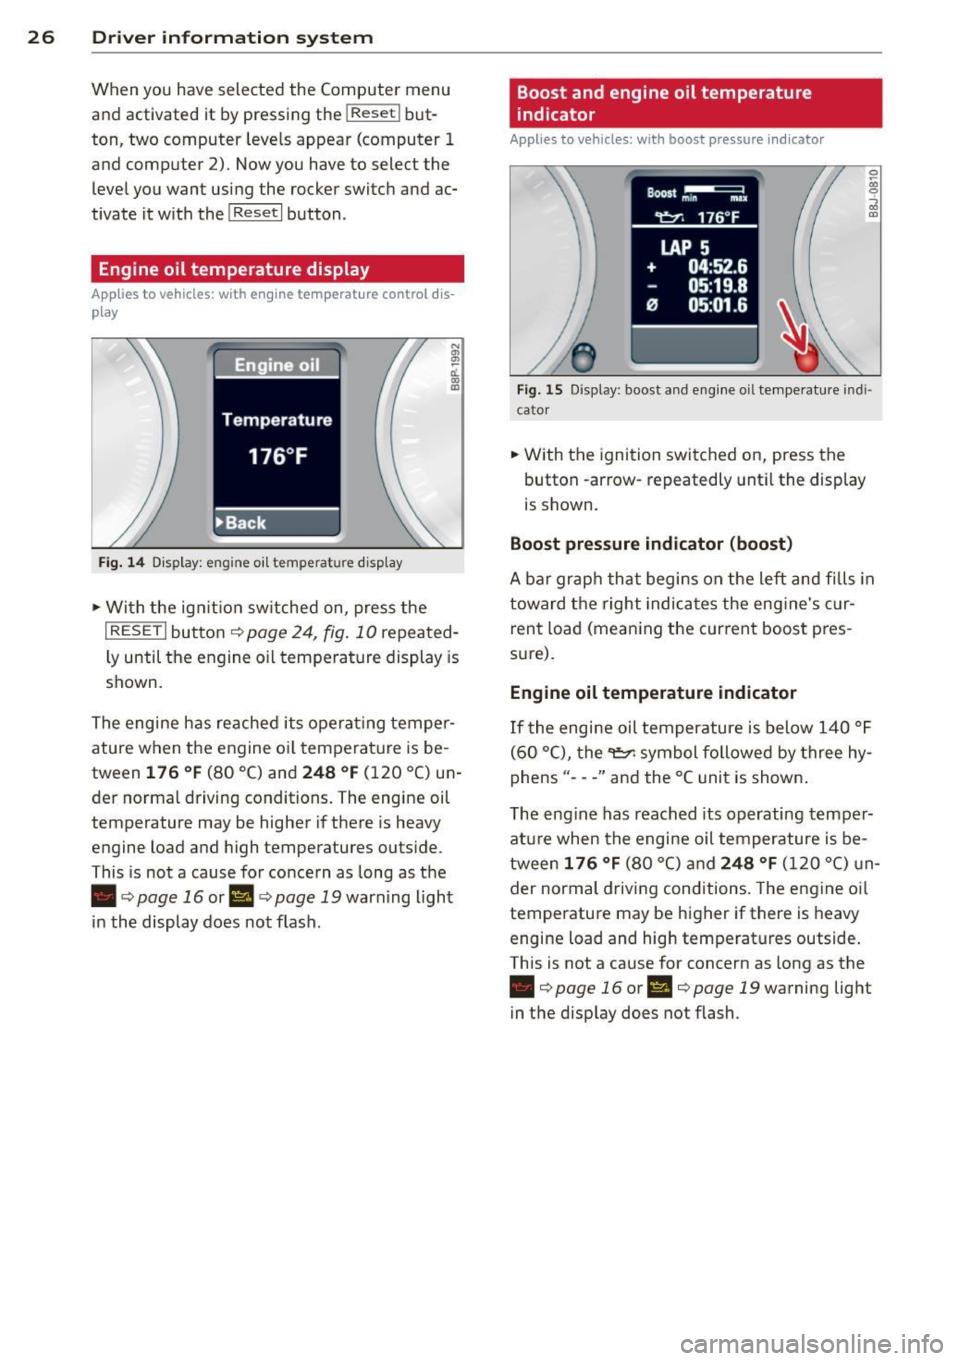
Engine oil temperature display
Applies to vehicles: with engine temperature control dis
play
Engine oil
Temperature
176 °F
•Back
Fig. 14 Display: engine o il temperature d isp lay
• With the ign ition sw itched on, press the
N
"' l!! a'.. 0) (D
I RESET I button¢ page 24, fig. 10 repeated
ly until the engine oil temperature display is
shown.
The engine has reached its operating temper
ature when the engine oil temperature is be
tween
176 °F (80 °C) and 248 °F (120 °C) un
der normal driving conditions. The engine oil
temperature may be higher if there is heavy
engine load and high temperatures outside.
This is not a cause for concern as long as the
• ¢
page 16 or Ill¢ page 19 warn ing light
in the display does not flash.
Boost and engine oil temperature
indicator
Applies to vehicles: with boost pressure indicator
0 /xi 0
;;i OJ
Fig. 15 Display: boost and engine oi l temperature indi·
ca tor
• With the ignition switched on, press the
button -arrow· repeatedly until the display
is shown.
Boost pressure indicator (boost)
A bar graph that begins on the left and fills in
toward the right indicates the eng ine's c ur
rent load (meaning the current boost pres
s ur e).
Engine oil temperature indicator
If the engine oil temperature is below 140 °F
(60 °C), the
"t::?1 symbol followed by three hy
phens"- --" and the °C unit is shown .
The engine has reached its operating temper
ature when the engine oil temperature is be
tween
176 °F (80 °() and 248 °F (120 °() un
der normal driving conditions. The engine oil
temperature may be higher if there is heavy
engine load and high temperatures outside.
This is not a cause for concern as long as the
• ¢page 16 orl'I c::;,page 19 warning light
in the display does not flash.
Page 30 of 244

28 Driver information system
-The fuel economy messages are not dis
played in every instance, but rather in in
terva ls over a period of ti me.
Service interval display
The service interval display reminds you when
your nex t service is due.
Fig. 19 Sect ion of instrument cluster: Serv ice in terva l
d isp lay
The schedule for the next oil change or inspec
tion is calculated automatically and displayed
accordingly. The display works in two stages :
Service reminder
30 days before the next service is due, a serv
ice reminder appears in the display when you
turn on the ignition.
After about
5 seconds the display switches
back to normal. The distance and time re
maining are updated each time the ignition is
turned on until the date due for service is
reached.
Service due
When the due date for service is reached , the
message
Service due! appears in the instru
ment cluster immediately after you turn on
the ignition. Additionally, a warning tone
sounds . After about
5 seconds the display
switches back to normal.
Calling up the service schedules
If or when an oil change or inspection is due,
can be shown in the instrument cluster by se
lecting the serv ice interval display. Select
Check > Service > Oil change or Service by us
ing the
! R ES ET I button and the rocker switch
c> page 25 , fig . 12.
Resetting the service interval display
Your authorized Audi dealer will reset the cor
responding service schedule after performing
the appropriate service on your veh icle. You
also have the possibility to reset the oil
change schedule after having performed an
o il change according to Audi specifications.
- Switch the ignition on.
- Pull the knob
c> fig. 19. The message. Serv-
ice due!
appears.
- Pull the knob until the display
Oil change in
-----mi (km)---day s appears . If the I RESET I
button is not pulled within 5 seconds, the
disp lay reset mode closes.
(D Note
If you disconnect the battery terminals, no
ca lculations can be made for the service
interval display during this time and no
service reminder will appear. Remember
that observing the proper service intervals
i s vitally important to extending the life of
your vehicle, particularly the engine, and
maintain ing its value . Even if the mileage
driven is low, the maximum period of one
year from one service to the next must not
be exceeded.
'
(D Tips
-Do not reset the display between oil
changes, otherwise the display w ill be in
correct.
- Th e information in the Service Reminder
remains stored even when the vehicle
battery is disconnected.
Lap timer
I ntrod ucti on
App lies to vehicles: wit h lap timer
You can record and evaluate lap times with
the lap timer in the display c>page
29,
fig. 21. The time is measured in minutes, sec
onds and
1/10 seconds. The hours are also
shown when the lap t ime exceeds
60 min utes .
T he maximum individual measurement is 99
hours. ..,.
Page 75 of 244
you leave your vehicle. This makes a vehicle
theft even more difficult ¢ .&. .
Ign ition key safety lock
Afte r switch ing off the ignition, the ig nit ion
key ca n only be removed from the ig nition
l ock when the se lector lever is in the "P"
(Park) position . After you have removed the
key, the selector lever is locked and cannot be
moved.
Ign ition on (D
If it is diffic ult to turn the key afte r you have
inse rted it into the ignition lock, turn the
steering whee l back and forth. This will take
the load
off the steering lock mechanism and
you will be able to turn the key freely and start the engine.
Starting th e engine @
In this position the engine starts . While the
engine is starting, the power supply to the headlights and other e lectrica l consumers is
temporari ly interrupted to conserve battery
power. After the engine has started, release
the key and it will return to posit io n
(D .
Before the starter can be operated again the
key must be turned back to position @. The
non-repeat lock prevents you from damaging
the starter when the engine is runn ing .
A WARNING
-Never remove the key from the ign ition
lock whi le the vehicle is mov ing . The
steering wheel will lock causing loss of
co ntrol.
- If you have to leave your veh icle - even
for just a m inute - a lways remove t he ig
ni tion key and take it with you. This is es
pecially important if you are going to
leave ch ildren behind in the vehicle. The
children co uld start the engine or use
other vehicle controls. Unsupervised use
of vehicle controls (for example, power
windows) can cause serious personal in
jur ies .
-
On th e ro ad 73
(D Tips
If the vehicle battery has been disconnect
ed and then reconnected, then yo u must
l eave the key in posit ion
(D for about 5
seconds before you can start the engine.
Starting and stopping
the engine
' Starting the engine
The engine can only be started with an origi
nal Audi key .
.,. Se t the par king brake.
.,. Move the selector lever in P or
N q .&_ .
.,. Turn the ignition key to position @
~ page 72, fig. Bl -do not depress the gas
peda l when starting the engine!
.,. Let go of the key as soon as the engine
starts .
A cold engine may at first be loud after it has
been started. This is due to the hydraulic
valves bu ild ing up the oil pressure. Th is nor
mal and no need for concern .
If the engine does not start immediately, stop
trying after 10 seconds and then try to restart
the engine about 30 seconds later.
A WARNING
-Never start or let the eng ine run in a con-
fined o r enclosed area . Exhaust fumes
from the engine co ntain carbon monoxide,
a colorless and odo rless gas. Ca rbon mon
oxide can be f atal if inhaled.
- Never leave the engine id ling unattend
ed. An una ttended veh icle w ith a runn ing
engine poses a danger o f personal injury
or theft .
(D Note
-Avo id high engine speeds, fast accelera
tion or heavy engine loads while the en
gine is still cold. This could damage the
engine.
- The e ngine cannot be started by pushing
or towing the vehicle . .,..
Page 81 of 244

Audi magnetic ride
Applies to vehicles: with magnetic ride
Damping can be adjusted to the driver's pref
erence and it adapts automatically to the cur
rent driving situation.
Fig. 87 Ce nter console : Switc h for Au di magnet ic ride
• Press the sw itch Q fig . 87 to tu rn sport set-
t ing on or off.
Aud i magnetic ride is an electronically con
trolled damping system. This chassis system
assists the dr iver by adapting to the particular
situation through imperceptible control proc
esses. The
da mping provides individua l modu
lation of damping forces. For example, with
damping characteristics set to provide greater
comfort, damping is set somewhat harder for
a brief period only
as required, when rounding
a curve and when braking.
St andard setti ng
Select the standard sett ing if you prefer a sus
pension setting emphasizing comfort .
Sport setting
Select the sport setting if you prefer a sporty
suspens ion setting . The LED in the switch
R
comes on to indicate sport setting.
@ T ips
The warning/indicator light R in the in
strument cluster comes on in the event of
a ma lfunction. Drive to the closest author
ized Audi dealer as soon as possible and
have the malfunction repaired.
On th e road 7 9
Sport mode
Applies to vehicles: wit h Sport button
Fig . 88 Butto n in the center console
.,. To switch sport mode on, press the button
in the center console . The indicator light
turns on.
• To switch sport mode off, press the button
in the center console again. The indicator
light turns on .
A more agile and sporty driving style is possi
ble when driving the vehicle in "sport mode".
T his mode affects throttle response and the
sound of the engine and the damping charac
teristics of the Audi magnetic ride for dynamic
suspension tuning .
(1} Tips
If there is a malfunction in the retractable
rear spoiler* or the Audi magnetic ride*, it
may not be poss ible to activate sport
mode.
Acoustic parking system
Rear acoustic park assist
Applies to vehicles: with 4-channe l acoustic park assist
Acoustic park assist gives a warning about
obstacles behind the vehicle.
D es cription
The rear acoustic park assist (4-channel
acoustic park assist) determines the distance
of the vehicle from an obstacle using ultra
sonic sensors. The sensors are in the rear
bumper. The volume and the pitch of the
Page 145 of 244
Switching ESC off (sport mod e)
I n ce rtain sit uat ions, it m ight make sense to
allow some slip. For example :
- Rocking the vehicle to free it when it is stuck
- Driving in deep snow or on loose ground
- Driving with snow cha ins
Press the[!] button . The ESC ind icator light
II turns on and Stab iliz ation p rogr am off
appears in the display. ASR deactivates com
p letely and the stabilizat ion effects from the
ESC system are lim ited .
Sw itchin g on
Press the[!] button again. The message
Sta b i
liz ation p rog ram on
appears briefly in the dis
p lay.
A WARNING
Only switch ESC sport mode on when your
driving abilities and the traffic s ituation
permit . Please note that the dr iv ing
w heels can spin and the vehicle can break
away in ESC sport mode, especia lly when
t he road is slippery.
(D Tips
If the re a re faults in the rear spo iler sys
tem or in Audi magnet ic r ide, it may not be
possible to act ivate ESC sport mode o r
normal mode may act ivate aga in a utoma t
ically.
Rear spoiler
Appl ies to vehicles: with retractable rear spoiler
The rear spoiler improves vehicle handling
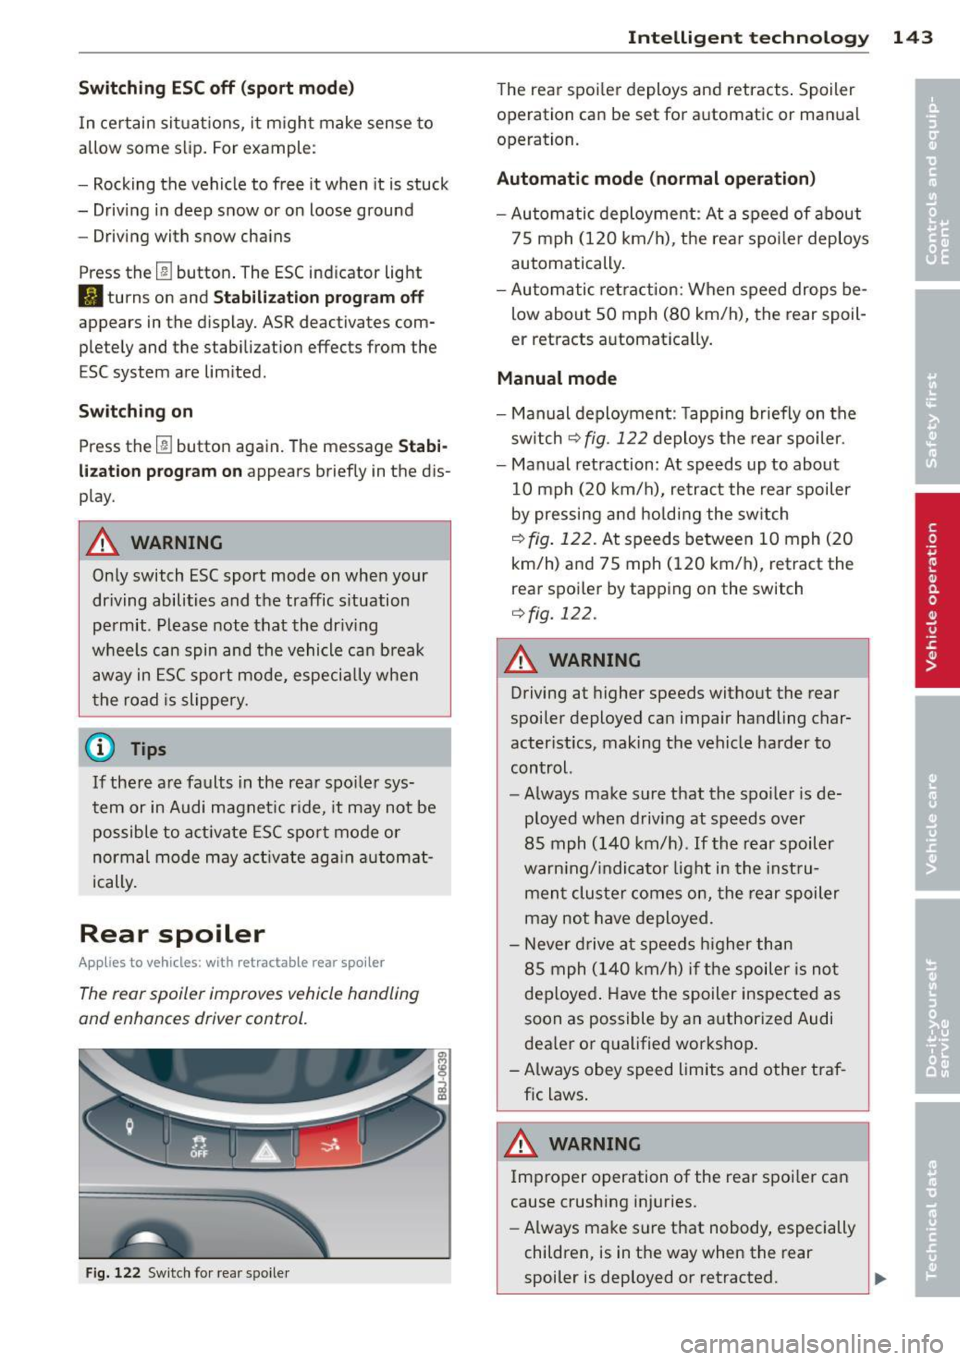
and enhances driver control.
Fig. 122 Switch for rear spo ile r
Intelligen t technolog y 143
The rear spoi ler deploys and retracts . Spoiler
operation can be set for automatic or man ual
operation.
Aut omatic mode (normal ope ration )
- Automatic deployment : At a speed of about
75 mph (120 km/h), the rea r spo ile r deploys
automatically .
- Au tomatic retraction: When speed drops be
low about SO mph (80 km/h), the rear spoil
er retracts a utomatica lly.
Manual mode
- Man ual deployment : T app ing br iefly on the
sw itch
¢ fig . 122 deploys the rear spoiler.
- Manual retraction : At speeds up to about
10 mph (20 km/h), retract the rear spoiler
by pressing and holding the sw itch
¢ fig. 122. At speeds between 10 mph (20
km/h) and 75 mph (120 km/h), retract the
rear spoi ler by tapping on the switch
¢ fig. 122 .
A WARNING
-
Driving at higher speeds without the rear
spoiler deployed can impair handling char
acter istics, making the vehicle harder to
control.
- Always make su re that the spo ile r is de
ployed when driving at speeds over
85 mph (140 km/h) . If th e rear spoil er
warn ing/ indicator light in the inst ru
men t cluster comes on, the rear spoiler
may not have deployed.
- Never d rive a t speeds higher than
85 mph (140 km/h) i f th e spoiler is not
deployed . Have the spoiler inspected as
soon as possible by an authorized Audi
dea ler or qualified workshop.
- A lways obey speed limits and other traf
fic laws .
A WARNING
Improper operation of the rear spoi ler can
cause crushing injuries .
- Always make sure that nobody, especially
children, is in the way when the rear
spoiler is dep loyed or retracted.
Page 146 of 244

144 Intelligent technology
-Never push the ve hicle or app ly force to
the rea r spo ile r - i t co uld be damaged .
- To prevent damage to the rear spoiler do
not lean o r place a nyth ing o n it.
- Only ope rate the rear spoi ler manually
when the rear lid is closed and t he rear
spo ile r moving parts are not blocked.
Otherwise, damage could occur.
C lean the spoi le r compartment every 2 to
3 months . The spoiler compartment must
always be free of ice, snow, leaves or other
debris.
Braking
General information
What affects braking efficiency?
Operating conditions and d riving habit s
The brakes on today's automob iles are st ill
subject to wea r, depend ing largely on operat
i ng cond itions and dr iv ing habits
c:> & . On
ve hicles that a re e ithe r dr iven mostly in stop
and-go city traffic o r a re driven ha rd , the
b rake pads should be checked by yo ur auth or
iz ed A udi dealer more often th an specifie d in
the
Warranty & Maintenance booklet . Fail ure
to have your b ra ke pads inspected can res ult
in red uced b rake performance.
O n steep slopes, yo u sh ou ld use t he b ra ki ng
effect of the engine . This way, yo u preven t un
necessa ry wear on the brake system . If you
must use yo ur brakes, do not ho ld the bra kes
down continuously . P u mp the brakes at inter
va ls.
N oises may occur w hen braking depending on
the speed, bra king force and outside condi
tions s uch as temperature and h umidity.
Moisture or road salt
Unde r cert a in co ndi tions, for examp le, w hen
d riving through wate r or ve ry heavy rain , or
even after washing yo ur vehicle , the braking effect can be
reduced due to mois ture (or in
freez ing cond itions ice) on the brake pads. A
f ew cautio us brake applications s hou ld dry off
the brake pads or remove any ice coatings.
T he effec tiveness of the brakes can be red uce d
whe n the vehicle is d riven on a sa lt -covered
road and the b rakes are not used . Likewise,
yo u clean off acc umulated salt coat ing from
brake d iscs and pads with a few cautio us ap
plicat ions o f th e b rake
c:> & .
Corrosion
The re may be a tendency for dirt to build up
on the brake pads and corros ion to form on
t h e d iscs if the car is not driven regu larly or
o n ly for short trips w ith litt le use of the
brakes .
If the brakes are not used frequently, or if cor
ros ion has formed on the discs, it is adv isable
to clean off t he pads a nd d iscs by braking
firmly a few times from a moderately h igh
s p eed
c:> & .
Faults in the brake system
If you shou ld notice a sudden increase i n
brake pedal trave l, then one of the two brake
c ircuits may have fa iled
c:> & .
Low brake fluid level
Malfunctions ca n occ ur in the bra ke system if
t h e b rake fluid level is too low. The brake flu id
level is monitored electronica lly.
Brake booster
T he br ake boos ter inc reases the pressure tha t
yo u genera te with the b ra ke peda l. It works
o nl y when t he engine is runnin g
.c:> .&
Brake lining wear status
Br ake lining wear may be che cked by visual in
spe ct io n of th e condition o f the br ake pa ds
t h ro ugh the open ing s in the wheel. If neces
sa ry, the w heel may be removed fo r thi s i n
spect ion
c:> page 208, What should I be
aware of when changing a tire?.
Page 147 of 244

A WARNING
-You should perform brak ing maneuvers
for the purpose of cleaning the brake
system only if road cond it ions permit .
Other road users must not be put at r isk -
yo u may cause an acc ident!
- Before descending a steep grade, reduce
speed and shift transm iss ion into a lowe r
gear or lowe r driving range. Do not ride
the brakes or hold the pedal down too
long or too often . This cou ld cause the
brakes to get hot and diminish braking
efficiency.
- Do not "ride the b rakes" by resting your
foot on the pedal when yo u do not intend
to brake . Th is may cause the brakes to
overheat, premature wear and increased
stopp ing distance.
- Under certain climat ic and operating
condit ions such as passing throug h wa
ter, driving in heavy rai n or after wash ing
the vehicle, the effect iveness of the
brakes can be reduced. In winter, ice can
accumulate on the brake pads, lini ngs,
discs and d rums. Carefully apply brakes
f or a test . B rakes wi ll dry and ice coat
ings wi ll be cleaned
off after a few ca re
ful brake applications.
- Driv ing for an ex tended pe riod of time on
salt -covered roa ds without using your
brakes can also affect braking efficiency.
Clean
off accumulated salt coating from
brake discs and pads with a few cautious
brake applicat ions.
- If you damage the front spoiler, or if you install a different spoiler, be sure the air
flow to the front brakes is not obstruct
ed . Otherwise the brake system could
overheat reducing the eff ectiveness of
the ent ire brake system.
- Failure of one bra ke c ircuit will impair
the brak ing capability resulting in an in
cr eased stopp ing distan ce. Avoid dr iv ing
the ve hicle and have it towed to the near
est Aud i dea le r or q ualified workshop .
- Never le t the vehicle ro ll to a stop w ith
the engine shu t off.
Int ellig ent technolog y 145
-If the brake booster is not working, the
brake peda l must be pressed considera
bly harder to make up for the lack of
booster assistance.
Electro-mechanical
power assist
The ele ctro-mechanical power assist helps
the driver when steering .
The degree of power assist is electronically
matched to veh icle speed.
The powe r steering system assists the driver
so that he can steer the vehicle with reduced
physical effort.
Power steer ing will not work if the engine is
off . As a result, the steering wheel will be hard
to turn .
A WARNING
If the system develops a problem, you
must seek qualified professiona l assis
tance.
(D Note
-
If there is an electronic malfunction, ser
votronic
will still function like a conven
tiona l powe r steering system, providing a
constant steering support force tha t is no
l onger proportionate to the vehicle speed.
This is most noticeable when t urning the
steering wheel at low speeds (for example
when parking), - more effort w ill be re
quired than usual.
- Be aware of the different than usual
steering response and adjust your steer
ing force accordingly.
- Have the problem checked and set right
by an authori zed Aud i dea ler as soon as
possible.
- If a steering malfunction occurs, th is is
signa led w ith the
ls4 or .• indicator
lights and a warn ing tone, see. •
•