2015 AUDI TT ROADSTER start stop button
[x] Cancel search: start stop buttonPage 31 of 244
A WARNING
Please devote your fu ll attent ion to driv
ing. As th e driver, you have complete re
sponsibility for safety in traffic. Only use
the funct ions in such a way that you always
ma in ta in complete control over your veh i
cle i n all t raff ic sit uat ions .
{D) Tips
When the lap t imer stopwatch is running,
you can call up the t rip computer info rma
tion wi th the
I RESET I b utton .
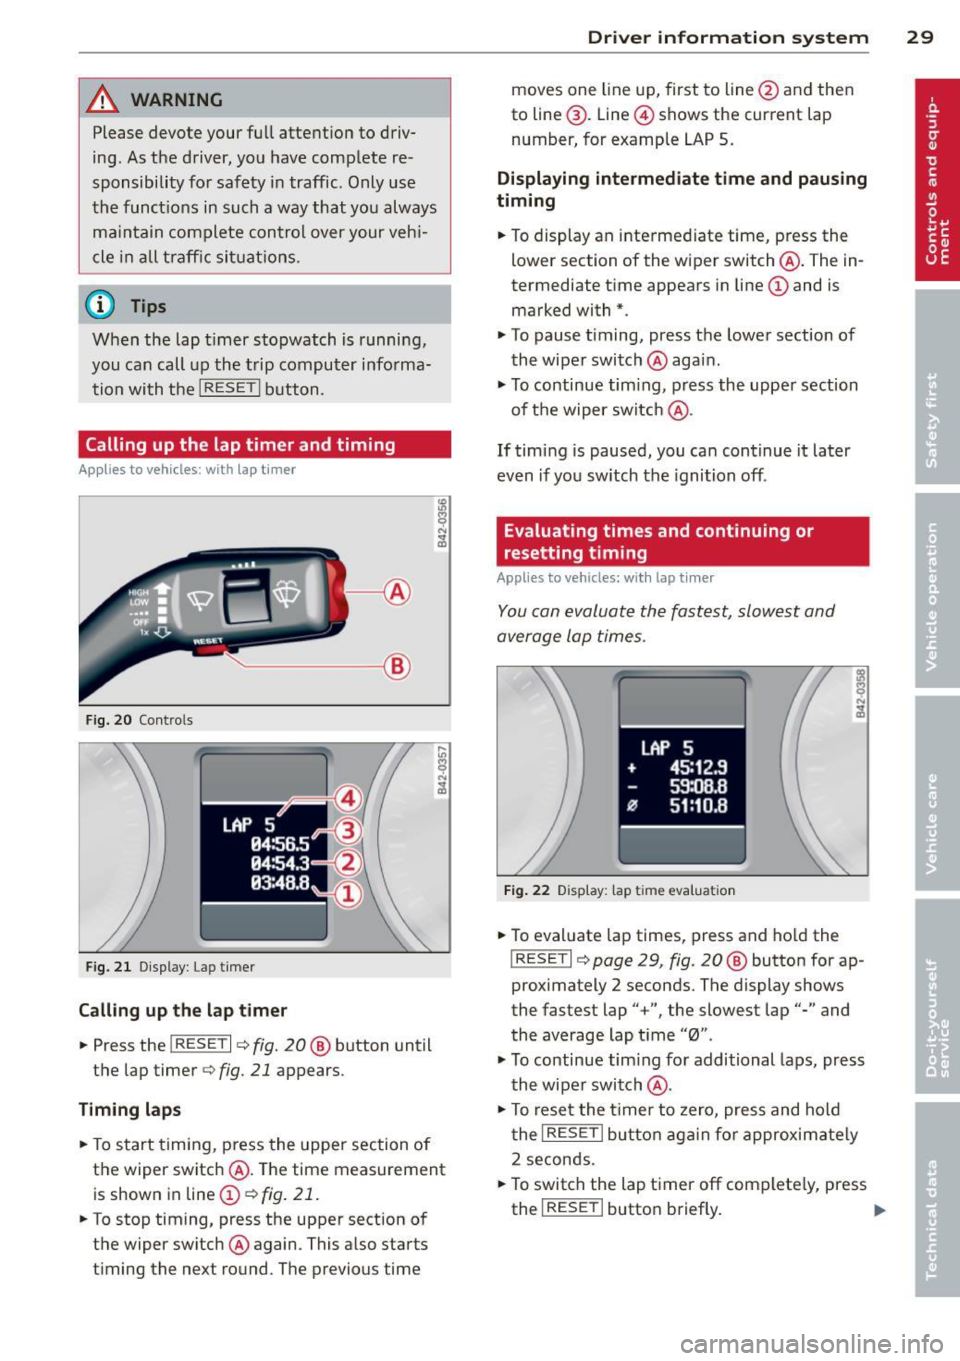
Calling up the lap timer and timing
Appl ies to vehicles: with lap timer
------- @
Fig. 20 Contro ls
F ig. 2 1 Display : Lap t imer
Call ing up the l ap t imer
.. Press the I RESET I c:> fig. 20@ button until
the lap timer
c:> fig. 21 appears .
Timing lap s
.. To start timing , press the upper section of
the wiper switch @. T he time measurement
is shown in line@
c:> fig. 21 .
.. To stop timing, press the upper section of
the wiper switch @again. This also starts
timing the next round . The previous time
Dr iver in formation system 29
moves one line up, first to line @and then
to line @. Line @ shows the current lap
number, for example LAP 5 .
Displaying intermediate time and paus ing
timing
.. To display an inte rmediate time, press the
lower section of the wiper switch @. The in
termediate t ime appears in line@and is
marked with* .
.. To pause t iming, press the lower section of
the wiper switch @again .
.. To continue tim ing , press the upper section
of t he wiper switch @.
If tim ing is paused, you ca n continue it later
even if you sw itch the ignition off.
Evaluating times and continuing or
resetting timing
Applies to vehicles: with lap tim er
You can evaluate the fastest, slowest and
average lap times .
LAP 5
+ 45:12 .9
59:08 .B
flJ 51:10 .B
F ig . 2 2 D isplay : lap tim e evalua tion
.. To evaluate lap times, press and ho ld the
! RESETI c:> page 29 , fig. 20 @ button for ap
proximately 2 seconds . The display shows
the fastest lap" +", the slowest lap"-" and
the average lap t i me "0" .
.,. To continue tim ing fo r additional laps, press
t h e wiper switch @.
.. To rese t the t ime r to zero, pres s and hold
t he
I RESE T I button aga in fo r approxima tely
2 seconds .
.. To switch the lap timer off complete ly, press
the
I RESE T I button briefly. II-
Page 38 of 244
36 Opening and closing
-The operation of the remote control key
can be temporarily disrupted by interfer
ence from transmitters in the vicinity of
the vehicle working in the same frequen
cy range (e.g. a cell phone, radio equip
ment) .
- In order to make sure the locking func
tion is working, you should always keep
your eye on the vehicle to make sure it is
properly locked .
- Do not use the remote control if you are
inside the car, otherwise you may unin
tentionally lock the vehicle, and then you
would set off the anti-theft alarm when
you try to start the engine or open a
door. In case this happens anyhow, push
the unlock button
CD .
- Use the panic function only if you are in
an emergency situation.
Resetting the remote control
The remote control must be reset if the vehi
cle does not unlock .
.,,. Press the unlock button CD on the remote
control.
.,,. Manually unlock the driver's door lock with
the mechanical key within 30 seconds.
.,,. Press either the lock-1'.D or the unlock
CD but
ton to complete th e reset sequence.
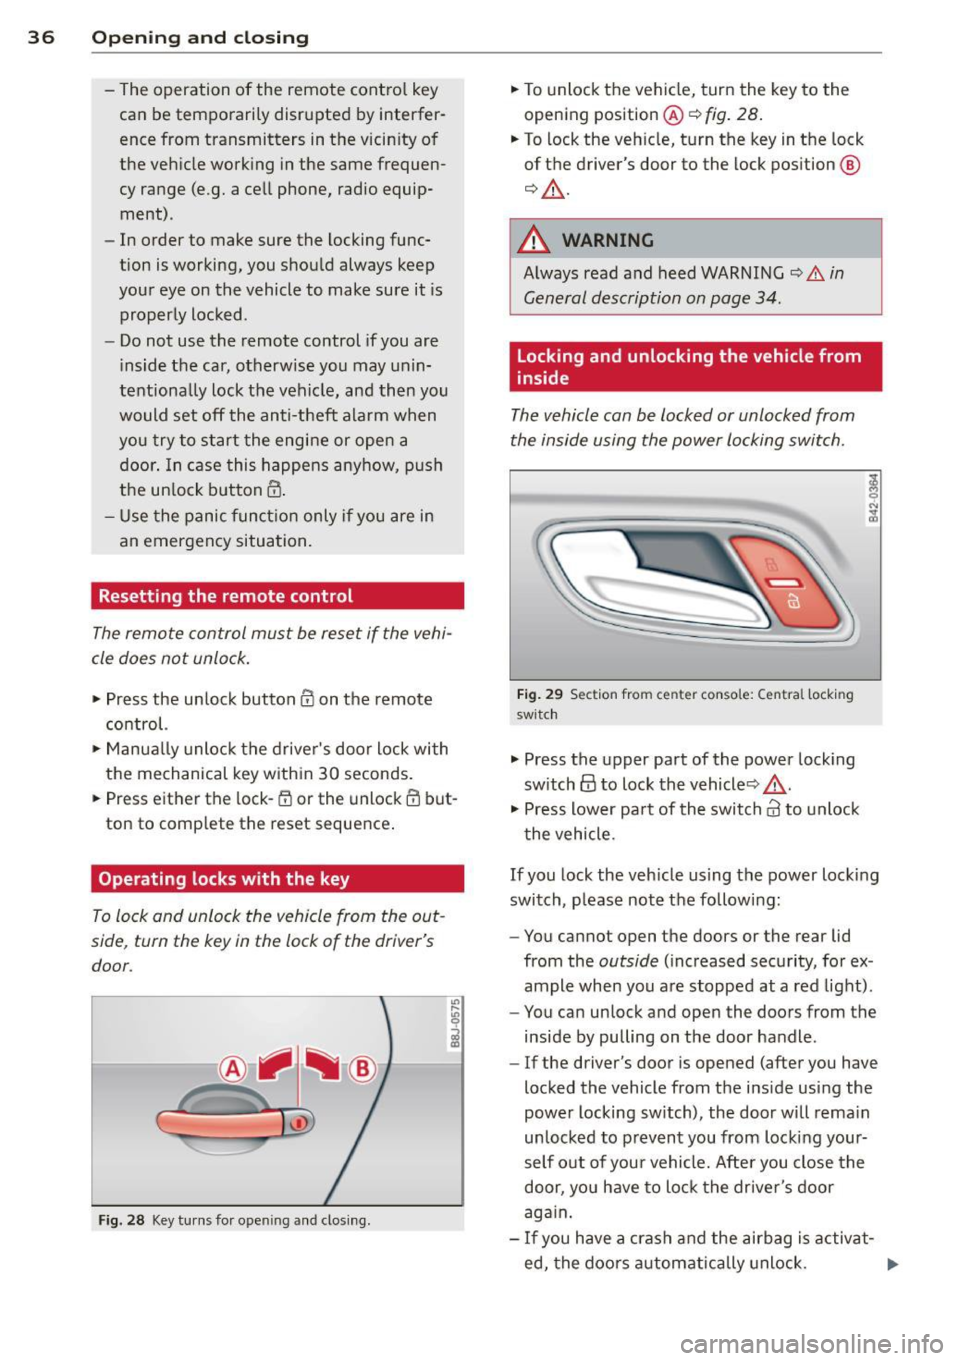
Operating locks with the key
To lock and unlock the vehicle from the out
side , turn the key in the lock of the driver's
door .
Fig. 28 Key turns for ope ning and clo sing.
.,,. To unlock the vehicle, turn the key to the
opening position@¢
fig. 28.
.,,. To lock the vehicle, turn the key in the lock
of the driver's door to the lock position
@
¢ &_ .
A WARNING
Always read and heed WARNING¢.&. in
General description on page 34.
Locking and unlocking the vehicle from
inside
The vehicle can be locked or unlocked from
the inside using the power locking switch .
Fig. 29 Sec tion from center conso le: Ce ntra l locking
switch
.,,. Press the upper part of the power locking
switch
@ to lock the vehicle ¢&_ .
.,,. Press lower pa rt of the switch
crl to unlock
the vehicle .
If you lock the vehicle using the power locking
switch , please note the following:
- You cannot open the doors or the rear lid
from the
outside (increased security, for ex
ample when you are stopped at a red light).
- You can unlock and open the doors from the
inside by pulling on the door handle .
-If the driver's door is opened (after you have
locked the vehicle from the inside using the
power locking switch), the door will remain
unlocked to prevent you from locking your
self out of your vehicle. After you close the
door, you have to lock the driver 's door
again.
- If you have a crash and the airbag is activat-
ed, the doors automatically unlock. ..,.
Page 41 of 244

When will the anti theft ala rm system be
triggered?
When the vehicle is locked , the alarm system
monitors and protects the following parts of
the vehicle:
- engine compartment
- luggage compartment
- doo rs
- ignition
When the system is activated, the alarm will
be triggered if one of the doors, the engine
hood or the rear lid are opened, or if the ign i
tion is turned on.
The anti-theft alarm system will also go off
when the battery is disconnected.
You can a lso trigger the alarm by pressing the
PANIC button on your remote-control key.
This will alert other people in case of emer
gency. Press the
PANIC button again to turn
off the alarm .
How is the anti-theft alarm switched off
when triggered?
The alarm system is switched off when you
unlock the vehicle using the remote-control key or when the ignition is sw itched on . The
a larm will also switch itse lf off when it comes
to the end of its cycle.
Emergency flasher
The emergency flasher will blink briefly when
the doors, engine hood and rear lid are prop
erly closed.
If the emergency flashers do not blink, check
the doors, engine hood and rear lid to make
sure they are properly closed. If you close a
door, the hood or the rear lid with the ant i
theft alarm switched on, the emergency flash
ers will blink only after you have closed the
door or lid.
(1) Tips
For the anti-theft alarm system to func
tion properly, make sure all vehicle doors
and windows are closed before leaving the
vehicle.
Opening and closing 39
Power windows
Controls
The driver can operate all windows .
Fig. 35 Driver's door: power w indow switches
If the respective switch is pushed or pulled
the window w il l open or clos e. The power win
dow switches have a two-position function :
Opening the windows
.,. Press the switch and hold it down until the
w indow has reached the desired position .
.,. Press the switch
briefly to open the window
automatically. By briefly pressing the switch
again, the downward travel of the window
can be stopped in any position<=-> .&_.
Closing the windows
.,. Pull the sw itch and hold it unti l the window
has reached the desired position .
.,. Pull the switch
briefly to close the window
automatically. By briefly press ing the switch
aga in, the upward travel of the window can
be stopped in any position
~ .&_ .
Switch @<=->fig .
35 operates the window in
the driver's door.
Switch @ operates the window in the front
passenger 's door.
&_ WARNING
- Do not leave children unattended in the
vehicle, especially with access to vehicle
keys . Unsupervised use of the keys can
result in start ing of the engine and use
of vehicle systems such as power win
dows, etc. wh ich could result in serious
injury.
Page 76 of 244
7 4 On the road
@ For the sake of the environment
To avoid unnecessary engine wear and to reduce exhaust emissions, do not let your
veh icle stand and warm up. Be ready to
drive off immediately after start ing your
veh icle. Maintain moderate speed until the
engine is comp letely warm. Remember,
the engine performs best at operating
temperature.
Stopping the engine
• Turn the ign ition key to position@
~ page 72, fig. 81.
&_ WARNING
-Never turn off the engine before the ve
hicle has come to a complete stop. The
full function of the brake booster and the
power steering is not guaranteed. You
must use more force to turn or brake if
necessary. Because you cannot steer and
brake as you usually would, this could
lead to crashes and serious injuries.
- The radiator fan can continue to run for
up to 10 minutes even after you have
turned off the engine and removed the
ignition key . The radiator fan can also
turn on again if the engine coolant heats up because of intense sunlight or heat
build-up in the engine compartment.
(D Note
Do not stop the engine immediate ly after
hard or extended driving. Keep the engine
running for approximately two minutes to
prevent excessive heat build-up.
Parking brake
Parking brake
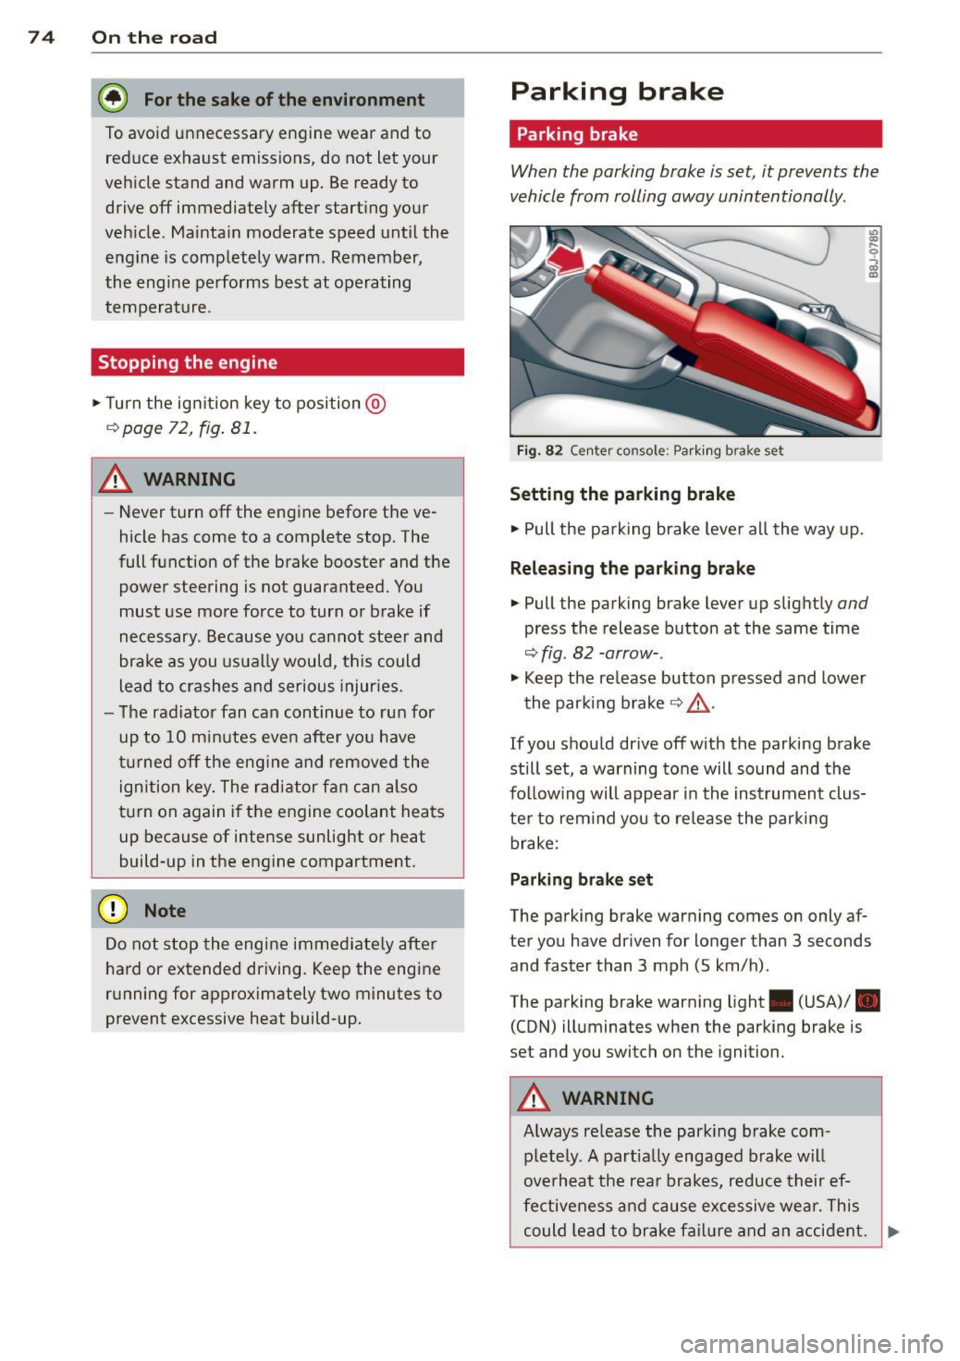
When the parking brake is set, it prevents the
vehicle from rolling away unintentionally.
Fi g. 82 Center console: Park ing brake set
Setting the parking brake
• Pull the pa rking brake lever all the way up.
Releasing the parking brake
• Pull the parking brake lever up slightly and
press the release button at the same time
~fig. 82 -arrow-.
• Keep the release button pressed and lower
the parking brake~.&,.
If you should drive off with the parking brake
still set, a warning tone will sound and the
fol low ing will appear in the instrument clus
ter to remind you to release the parking
brake:
Parking brake set
The parking brake warning comes on only af
ter you have driven for longer than 3 seconds
and faster than 3 mph (5 km/h).
The parking brake warning light . (USA)/ .
(CON) illuminates when the parking brake is
set and you switch on the ignition.
&_ WARNING
Always release the park ing brake com-
pletely. A partially engaged brake will
overheat the rear brakes, reduce their ef
fectiveness and cause excessive wear. This
could lead to brake failure and an accident. .,..
Page 85 of 244
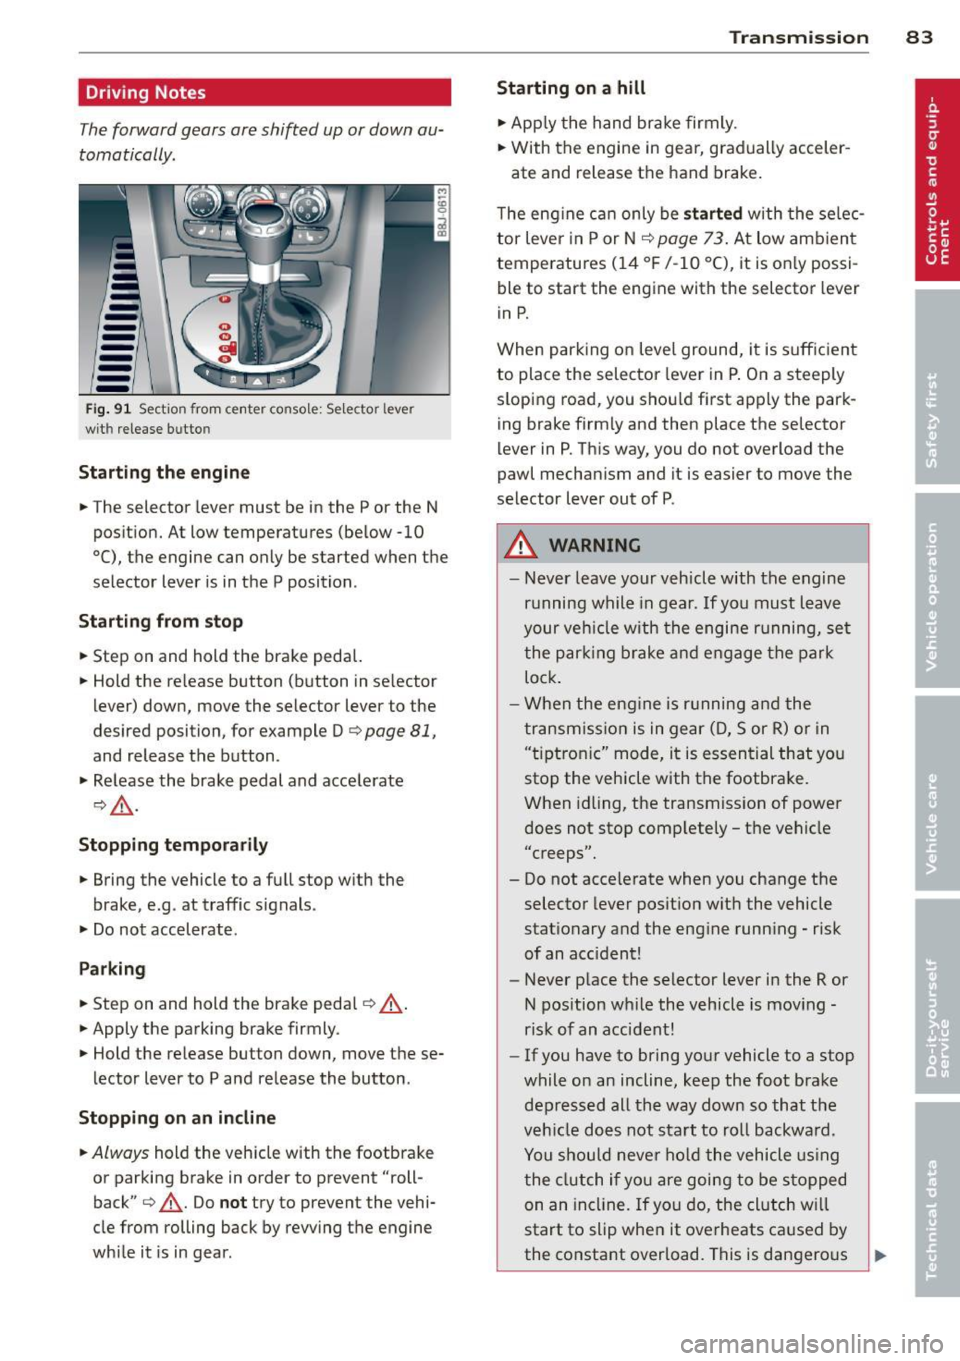
Driving Notes
The forward gears are shifted up or down au
tomatically.
--
-
-
-
-
-
--Fig . 91 Sect io n from center co nsole: Sele ctor leve r
wit h release bu tto n
Starting the engine
.. The selector lever must be in the P or the N
position. At low temperatures (below -10
0 (), the engine can only be started when the
selector lever is in the P position .
Starting from stop
.. Step on and hold the brake pedal.
.. Hold the release button (button in se lector
lever) down, move the selector lever to the
desired position, for example D
c:> page 81,
and release the button .
.. Release the brake pedal and accelerate
¢,& .
Stopping temporarily
.. Bring the vehicle to a full stop with the
brake, e.g . at traffic signals .
.. Do not accelerate .
Parking
.. Step on and hold the brake pedal¢_& .
.. Apply the parking brake firmly.
.. Hold the release button down, move these
lector lever to P and release the button.
Stopping on an incline
.. Always hold the vehicle with the footbrake
or parking brake in order to prevent "roll
back"
¢ _& . Do not try to prevent the vehi
cle from rolling back by rewing the engine
while it is in gear.
Transmission 83
Starting on a hill
.. Apply the hand brake firmly.
.. With the engine in gear, gradually acceler-
ate and release the hand brake.
The engine can only be
started with the selec
tor lever in P or N
c:> page 7 3. At low amb ient
temperatures (14
°F /-10 °C), it is only possi
ble to start the engine with the selector lever
in P.
When parking on level ground, it is sufficient
to place the selector lever in P. On a steeply
sloping road, you should first apply the park
ing brake firmly and then place the selector
lever in P. This way, you do not overload the
pawl mechanism and it is easier to move the
selector lever out of P .
A WARNING
- Never leave your vehicle with the engine
running while in gear . If you must leave
your veh icle with the engine running, set
the parking brake and engage the park
lock .
- When the engine is running and the
transmission is in gear (D, Sor R) or in
"t iptroni c" mode, it is essential that you
stop the vehicle with the footbrake .
When idling, the transmission of power
does not stop completely - the vehicle
"creeps".
- Do not accelerate when you change the selector lever position with the vehicle
stationary and the engine running - risk
of an accident!
- Never place the selector lever in the R or
N position while the vehicle is moving -
risk of an accident!
- If you have to bring your vehicle to a stop
while on an incline, keep the foot brake depressed all the way down so that the
vehicle does not start to roll backward .
You should never hold the vehicle using
the clutch if you are going to be stopped
on an incline. If you do, the clutch w ill
start to slip when it overheats caused by
the constant overload. This is dangerous .,.
Page 91 of 244
Phase 1:
p rogramming th e overh ead keypad
1. Make sure yo ur vehicle is wit hin ope rating
range of the remote contro lled garage
door opener .
2. Set the parking brake
q A in General in
formation on page 88 .
3. Tur n the ignition on . Do not sta rt the en
g ine!
4. P ress and hold the two o utside Home Link
b uttons
(D and @for app rox ima tely 20
seconds until indicator light @
q fig . 97
begins to flash. Then release both but
tons . Do not hold the buttons for longer
than 30 seconds.
.,. This procedure only needs to be performed
once . It erases the factory-set defau lt codes
and does not have to be repeated to pro
gram add it ional remote controls .
S. Pr ess and hold t he Home link button (D ,
® or@ unt il the indicato r ligh t@
starts flashing
slowly . Release the bu tton.
.,. The system will remain in programming
mode for 5 minutes . Co to the front of the
vehicle and proceed with phase 2 .
Phase 2:
programming the bumper mounted trans
mitter
6. Hold the original remote control at a dis
tance between 0 -6 in . (0 -15 cm) from the
bumper below the appropriate head light
for your vehicle
q fig . 98 (use th e sho rtest
d istance possible) .
7. A im t he remote con trol jus t be low the
driver side head ligh t.
8 . Pr ess and hold the activa tion button on
the remote cont ro l.
.,. May be different in Canada.
If so, press and
re -press (cycle) the act ivat ion button on your
remote control every two seconds.
9 . The emergency flashers will flash
three
time s
(after about 15 -60 seconds) when
the prog ramm ing is successful. Release
the butto n on the re m ote control.
.,. To program more devi ces, repeat steps 4 to
9.
Homelink 89
10. Press and ho ld the t rained Home link b ut
ton and observe t he indicator light @
qfig. 97.
.,. If the ind icator light is solid/contin uous,
programm ing is comp lete and your device
should activate w hen you press and release
t he t ra ined Homel ink button .
.,. If the ind icator light blinks rapidly fo r 2 sec
onds and is t hen a so lid/continuous light,
p roceed w it h phase 3 to progr am a roll ing
code device.
Phase 3: rolling code programming
.,. A second pe rson o n a ladde r who can safely
reach th e garage door opene r motor is rec
ommended .
11. Loc ate t he "lea rn" bu tton on t he g arage
doo r opener motor ( re fer to the operating
inst ruct ions for the opener, as t he loca
t ion of t his button may va ry by man ufac
turer) .
12 . Press and release the learn b utton on the
garage door opener motor .
.,. Note : once the b utton is p ressed, there are
30 seconds in w hich to initiate the next
step.
13 . On t he Home link keypad ins ide t he ve hi
cl e, firmly press and hold t he Home link
bu tton prev iously progr ammed in phases
1 and 2 fo r two seconds and release . R e
peat this seque nce
twice.
.,. Some vehicles may require the press/ho ld/
re lease sequence up to three t imes to com
plete t he trai ning process .
.,. Homelink should now activate your rolling
code equipped device .
If the S minute time limit is exceeded , the
emergency flashers will flash one time to in
dicate that the p rocess has been te rm ina ted .
In this case, repeat steps 4 t hrough 9.
If the emergency flashers do not flash
three
times (afte r about lS -60 seconds) , program
ming was not successful. In this case, repeat
steps 4 through 9 .
Remote contro l units for garage door openers
in Canada are set to stop transmitting radio
fr eque ncy signa ls afte r two seconds . This t ime
Ill-
Page 201 of 244

remain continuous ly illuminated . This se
quence will continue upon subsequent vehicle
start-ups as long as the ma lfunction ex ists.
When the malfunct ion indicator is ill uminat
ed, the system may not be able to detect or
signa l low tire pressure as intended. TPMS
malfunct ions may occur for a variety of rea
sons, including the installat ion of replace
ment or alternate tires or wheels on the veh i
cle that prevent the TPMS from funct io ni ng
properly. Always check the TPMS malfunct ion
tellta le afte r replacing one or more t ires or
wheels on your veh icle to ensure that the re
p lacement or a lternate tires and wheels allow
the TPMS to continue to function properly.
Tire pressure indicator appears
Applies to vehicles: with tire pressure monitoring system
The tire pressure indicator in the instrument
cluster informs you if the tire pressure is too
low or if there is a system malfunction.
F ig. 1 41 Disp lay : under in fla tion warn ing
Using the ABS sensors, the tire pressure moni
toring system compares the t ire tread circum
fe rence and vibration characteristics of the in
d iv idual tires . If the pressure decreases in one
or mo re tires, th is is indicated in the instru
ment clus ter with a warning symbol
[I] and a
message
'* fig. 141. The dr iver message in the
d isp lay goes out after 5 seconds . The driver
message can be d isplayed again by pressing
the
! CHECK I button @¢ page 10, fig . 3 . If on
ly one tire is affected, the display will indicate
its pos ition.
The ti re pressure monito ring m ust be reset in
the menu display each time the pressures are
ad justed (e.g. when switching between parti-
Tire s an d wheel s 199
al and fu ll load pressure) or after changing o r
replacing a tire on your vehicle '*
page 200.
The TPMS indicator on ly mon itors the t ire
pressure that you have previously stored . You
can f ind the recommended tire pressures for
your vehicle on the label on the driver's door
pillar ¢
page 184 .
Tire tread circumference and vibration charac
teristics can change and cause a tire pressure
warning if:
- the t ire press ure in one or more tires is too
low,
- the tire has structural damage,
- the t ire press ure was changed, wheels rotat -
ed or rep laced but the TPMS was not reset
¢ page 200.
Warning symbo ls
[I] Loss of press ure in at least one tire'*& .
Check the tire or tires and rep lace or repa ir if
necessary . The indicator light
[I] in the instru
ment cluster a lso i lluminates
¢ page 13.
Check/correct the press ures of all four tires
and reset TPMS in the menu display .
mm (T ire Pressure Monitoring System) Ti re
pre ssure! System malfun ction . Ifll appears
after switching the ign it ion on or while dr iving
and the indicator light
[I] in the instrument
clus ter blinks fo r approximately one m inute
and then stays on, there is a system malfunc
tion . Attemp t to store the correct t ire pres
su re '*
page 200 . If the ind icator light does
not turn off or if i t turns on shortly thereafte r,
immedia tely drive your vehicle to an au thor
ized Audi dea ler or author ized repai r fac ility to
have the malfunction corrected .
A WARNING
=
-If the tire pressure indicator appears in
the instrument cluster display, one or
more of your t ires is significant ly under
inflated. Reduce your speed immediately
and avoid any hard steer ing or b rak ing
maneuvers. Stop as soon as possib le and
check the tires and their pressu res . In
flate the tire pressure to the prope r pres-
sure as indicated on the vehicle's tire .,..
•
•
Page 202 of 244

200 Tires and wheels
pressure label¢ page 184. Driving on a
significantly under-inflated tire causes the tire to overheat and can lead to tire
failure . Under-inflation also is likely to
impair the vehicle's handling and stop
ping ability .
- The driver is responsible for mainta ining
the correct tire pressures. You must
check the tire pressures regularly.
- Under certain conditions (such as a spor
ty driving style, winter conditions or un
paved roads), the pressure monitor indi
cator may be delayed.
- Ask your author ized Audi dealer if run
flat tires may be used on your veh icle.
Your vehicle registration becomes inval id
if you use these tires when not permit
ted. Damage to your vehicle or accidents
cou ld also resu lt.
- If you switch between standard and run
flat tires, an authorized Audi dealer or
qualified workshop must reprogram the
control module .
@ Tips
-The tire pressure monitoring system may
stop working when there is an ESC mal
funct ion .
- Using snow chains may result in a system
malfunction.
- The tire pressure monitoring system on
your Audi was developed using tires with
the "AO" or "RO" identif ication on the
tire sidewall ¢
page 191. We recom
mend using these tires.
Reset tire pressure monitoring system
(Stepl)
Applies to vehicles: with tire pressure monitoring system
If the tire pressure is adjusted, wheels are ro
tated or changed, the TPMS must be reset in
the menu display.
----- ®
Fig. 142 Wiper lever: Contro ls fo r the menu displ ay
Fig. 143 Disp lay: S tar t m en u
I Reset I button @ and rocker switch @
¢
fig . 142 functions:
To open the menu
" Press the I Rese t I button @ until the men u
disp lay
¢ fig . 143 appears
Selections and settings
" Press the rocker switch @ to reach a menu
disp lay. The switch is operated the same as
the display (up/down) .
Entering and confirming
" Press the I Re set I bu tton @.
Returning to the Start menu
" Press the I Reset I button longer than 2 sec
onds to return from any m enu l evel to the
Start menu.