Page 113 of 230
5-12
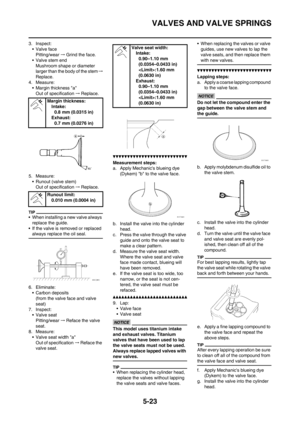
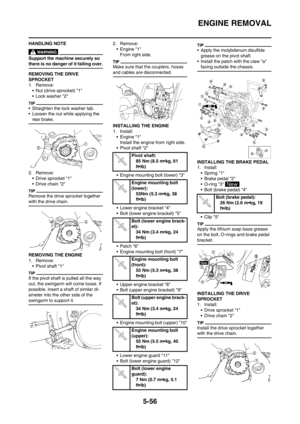
AIR INDICTOIN SYSTEM
REMOVING THE AIR INDUCTION SYSTEM
Order Part name Q'ty Remarks
1 Bracket 1
2 Air cut-off valve assembly 1
3Air induction hose (air cut-off valve - front of cyl-
inder head)1
4 Air induction pipe 1
5 Gasket 1
6Air induction hose (air cut-off valve - rear of cylin-
der head)1
7Air induction hose (air cut-off valve - air filter
case)1
7 Nm (0.7 m kg, 5.1 ft lb)10 Nm (1.0 m kg, 7.2 ft lb)
4 Nm (0.4 m kg, 2.9 ft lb)
Page 114 of 230

5-13
AIR INDICTOIN SYSTEM
CHECKING THE AIR INDUCTION
SYSTEM
1. Inspect:
• Air induction hose
Crack/damage→Replace.
• Air induction pipe
Crack/damage→Replace.
2. Check:
• Operation of air cut valve
Pass air through the pipe and
check the air cut valve for opera-
tion.
Does not meet the following con-
dition→Replace the air cut valve
assembly.
• Blow in air to check for operation.
• When using vacuum, check by the
use of the vacuum/pressure pump
gauge set "1".
When using vacuum on the pipe
"c", take care not to exceed the
specified value.
a. From air filter
b. To cylinder head (exhaust
port)
c. From cylinder head (intake
port)
A. Check for induction from air
filter.
B. Check for prevention of back-
flow into air filter.
C. Check for prevention of after-
burn. (When throttle is closed
at sudden deceleration) "a" to "b" Air passes.
"b" to "a" Air does not pass.
"a" to "b"Air does not pass
when specified pres-
sure is on "c".
Vacuum/pressure pump
gauge set:
YS-42423/90890-06756
Vacuum specifying pres-
sure:
46.7–86.7 kPa (350–650
mmHg, 13.8–25.6 inHg)
Page 115 of 230
5-14
CAMSHAFTS
CAMSHAFTS
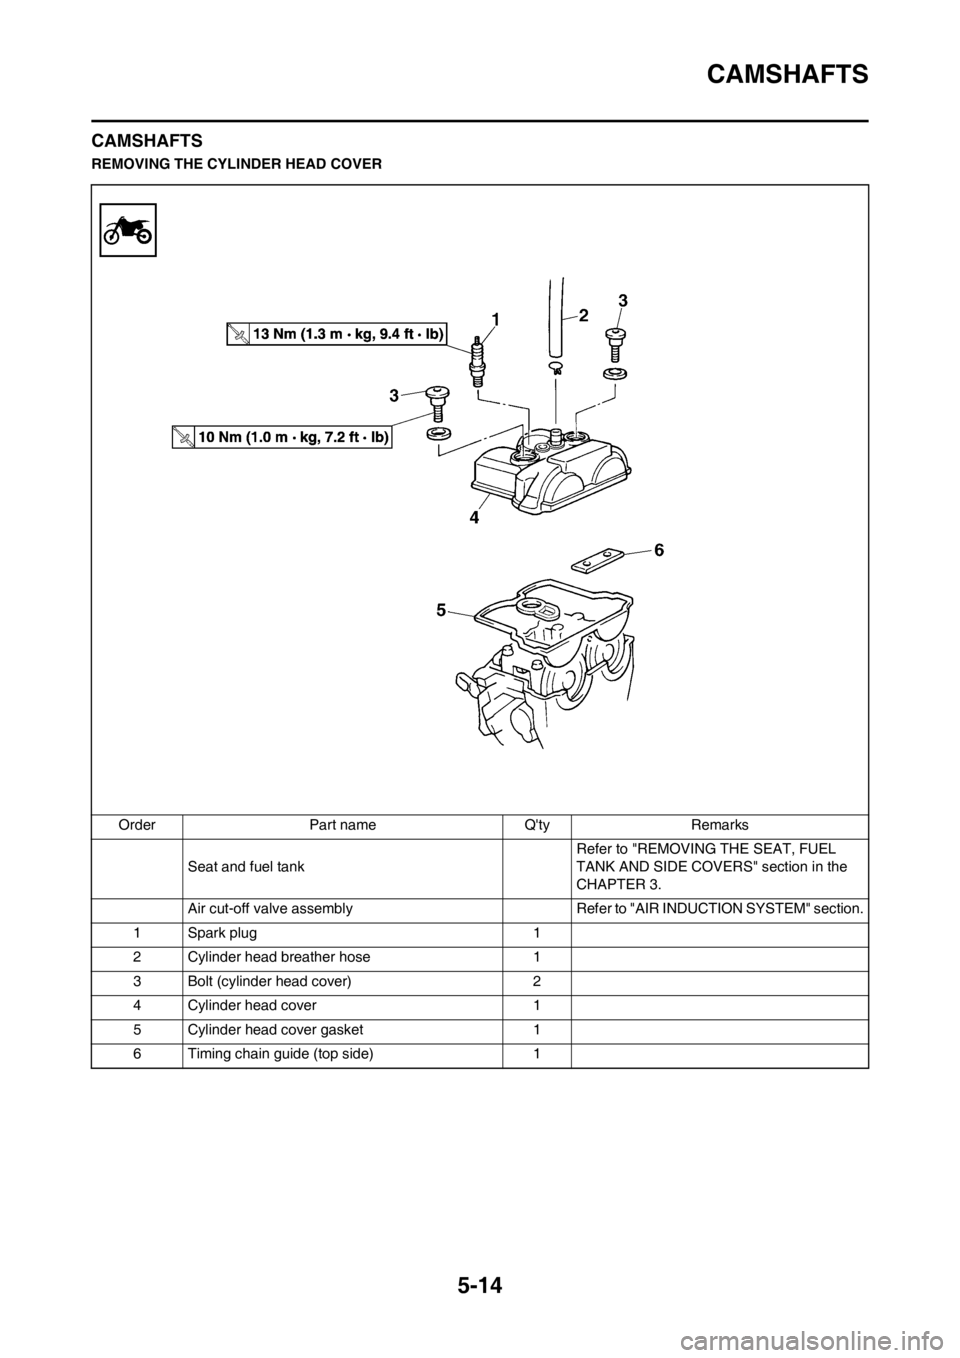
REMOVING THE CYLINDER HEAD COVER
Order Part name Q'ty Remarks
Seat and fuel tank Refer to "REMOVING THE SEAT, FUEL
TANK AND SIDE COVERS" section in the
CHAPTER 3.
Air cut-off valve assembly Refer to "AIR INDUCTION SYSTEM" section.
1 Spark plug 1
2 Cylinder head breather hose 1
3 Bolt (cylinder head cover) 2
4 Cylinder head cover 1
5 Cylinder head cover gasket 1
6 Timing chain guide (top side) 1
Page 116 of 230
5-15
CAMSHAFTS
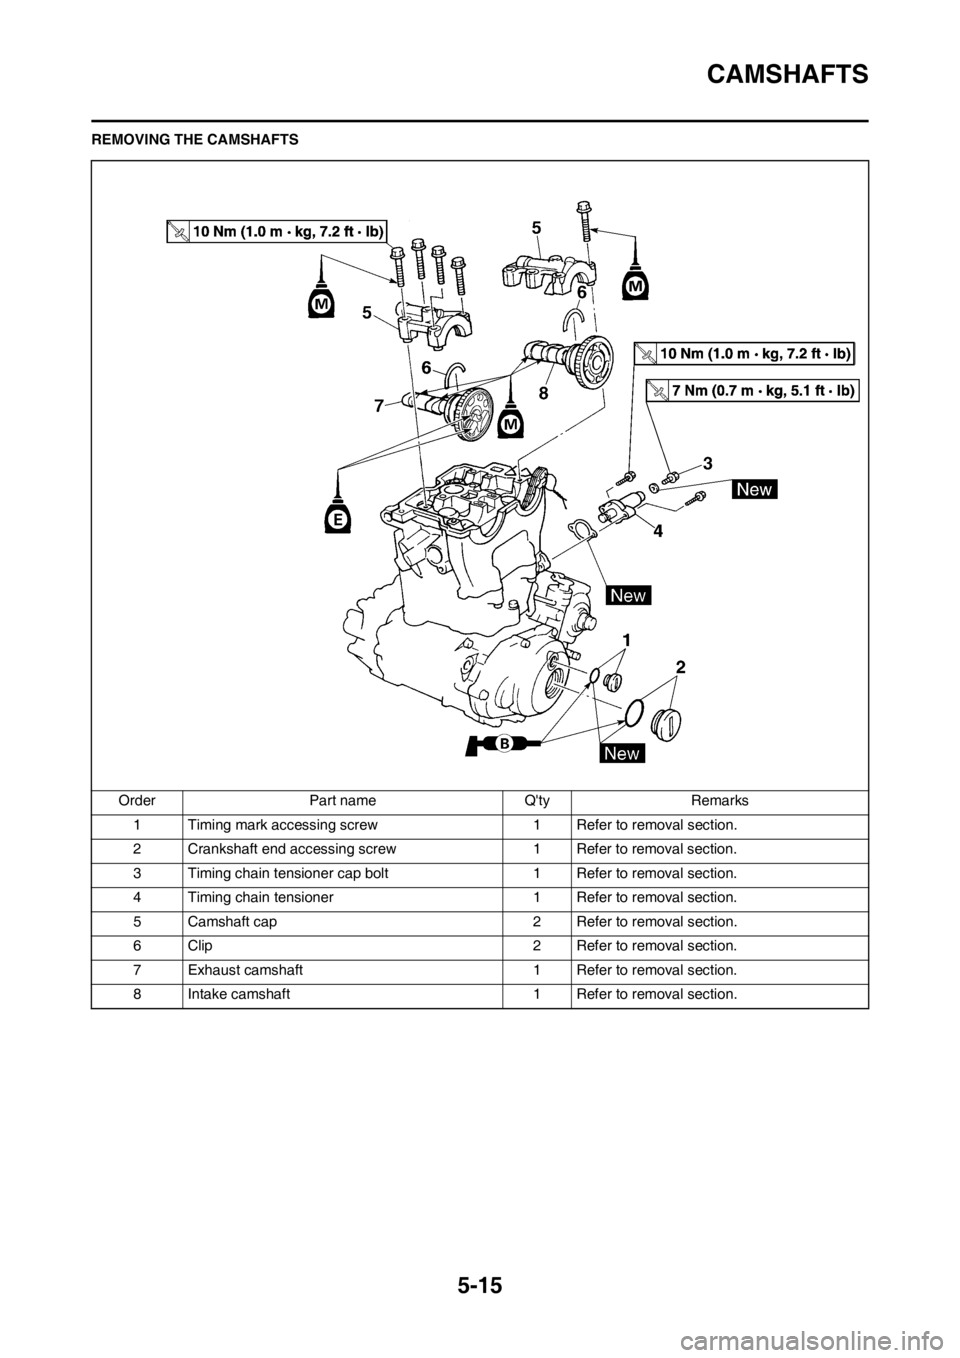
REMOVING THE CAMSHAFTS
Order Part name Q'ty Remarks
1 Timing mark accessing screw1 Refer to removal section.
2 Crankshaft end accessing screw 1 Refer to removal section.
3 Timing chain tensioner cap bolt 1 Refer to removal section.
4 Timing chain tensioner 1 Refer to removal section.
5 Camshaft cap 2 Refer to removal section.
6 Clip 2 Refer to removal section.
7 Exhaust camshaft 1 Refer to removal section.
8 Intake camshaft 1 Refer to removal section.
Page 117 of 230

5-16
CAMSHAFTS
REMOVING THE CAMSHAFT
1. Remove:
• Timing mark accessing screw "1"
• Crankshaft end accessing screw
"2"
2. Align:
• T.D.C. mark
With align mark.
Checking steps:
a. Turn the crankshaft counterclock-
wise with a wrench.
b. Align the T.D.C. mark "a" on the
rotor with the align mark "b" on the
crankcase cover when piston is at
T.D.C. on compression stroke.
In order to be sure that the piston is at
Top Dead Center, the punch mark "c"
on the exhaust camshaft and the
punch mark "d" on the intake cam-
shaft must align with the cylinder
head surface, as shown in the illustra-
tion.
3. Remove:
• Timing chain tensioner cap bolt
"1"
• Timing chain tensioner "2"
• Gasket
4. Remove:
• Bolt (camshaft cap) "1"
• Camshaft cap "2"
• Clip
Remove the bolts (camshaft cap) in a
crisscross pattern, working from the
outside in.
The bolts (camshaft cap) must be
removed evenly to prevent dam-
age to the cylinder head, cam-
shafts or camshaft caps.
5. Remove:
• Exhaust camshaft "1"
• Intake camshaft "2"
Attach a wire "3" to the timing chain to
prevent it from falling into the crank-
case.
CHECKING THE CAMSHAFT
1. Inspect:
•Cam lobe
Pitting/scratches/blue discolor-
ation→Replace.
2. Measure:
• Cam lobe length "a" and "b"
Out of specification→Replace.
3. Measure:
• Runout (camshaft)
Out of specification→Replace.
Cam lobes length:
Intake "a":
29.650–29.750 mm
(1.1673–1.1713 in)
:
29.550 mm (1.1634 in)
Intake "b":
22.450–22.550 mm
(0.8839–0.8878 in)
:
22.350 mm (0.8799 in)
Exhaust "a":
30.399–30.499 mm
(1.1968–1.2007 in)
:
30.299 mm (1.1929 in)
Exhaust "b":
22.450–22.550 mm
(0.8839–0.8878 in)
:
22.350 mm (0.8799 in)
Runout (camshaft):
Less than 0.015 mm
(0.0006 in)
Page 118 of 230

5-17
CAMSHAFTS
4. Measure:
• Camshaft-to-cap clearance
Out of specification→Measure
camshaft outside diameter.
Measurement steps:
a. Install the camshaft onto the cylin-
der head.
b. Position a strip of Plastigauge
®
"1" onto the camshaft.
c. Install the clip, dowel pins and
camshaft caps.
• Tighten the bolts (camshaft cap) in
a crisscross pattern from innermost
to outer caps.
• Do not turn the camshaft when
measuring clearance with the Plas-
tigauge
®.
d. Remove the camshaft caps and
measure the width of the Plasti-
gauge
® "1".
5. Measure:
• Camshaft outside diameter "a"
Out of specification→Replace the
camshaft.
Within specification→Replace
camshaft case and camshaft
caps as a set.CHECKING THE CAMSHAFT
SPROCKET
1. Inspect:
• Camshaft sprocket "1"
Wear/damage→Replace the
camshaft assembly and timing
chain as a set.
CHECKING THE
DECOMPRESSION SYSTEM
1. Check:
• Decompression system
Checking steps:
a. Check that the decompression
mechanism cam "1" moves
smoothly.
b. Check that the decompression
mechanism cam lever pin "2" proj-
ects from the camshaft.
CHECKING THE TIMING CHAIN
TENSIONER
1. Check:
• While pressing the tensioner rod
lightly with fingers, use a thin
screwdriver "1" and wind the ten-
sioner rod up fully clockwise.
• When releasing the screwdriver
by pressing lightly with fingers,
make sure that the tensioner rod
will come out smoothly.
• If not, replace the tensioner as-
sembly.INSTALLING THE CAMSHAFT
1. Install:
• Exhaust camshaft "1"
• Intake camshaft "2"
Installation steps:
a. Turn the crankshaft counterclock-
wise with a wrench.
• Apply the molybdenum disulfide oil
on the camshafts.
• Apply the engine oil on the decom-
pression system.
• Squeezing the decompression le-
ver allows the crankshaft to be
turned easily.
b. Align the T.D.C. mark "a" on the
rotor with the align mark "b" on the
crankcase cover when piston is at
T.D.C. on compression stroke.
c. Fit the timing chain "3" onto both
camshaft sprockets and install the
camshafts on the cylinder head. Camshaft-to-cap clear-
ance:
0.028–0.062 mm
(0.0011–0.0024 in)
:0.08 mm (0.003
in)
Bolt (camshaft cap):
10 Nm (1.0 m•kg, 7.2
ft•lb)
Camshaft outside diame-
ter:
21.959–21.972 mm
(0.8645–0.8650 in)
Page 119 of 230

5-18
CAMSHAFTS
The camshafts should be installed
onto the cylinder head so that the
punch mark "c" on the exhaust cam-
shaft and the punch mark "d" on the
intake camshaft must align with the
cylinder head surface, as shown in
the illustration.
Do not turn the crankshaft during
the camshaft installation. Damage
or improper valve timing will re-
sult.
d. Install the clips, camshaft caps "4"
and bolts (camshaft cap) "5".
• Before installing the clips, cover the
cylinder head with a clean rag to
prevent the clips from into the cylin-
der head cavity.
• Apply the molybdenum disulfide oil
on the thread of the bolts (camshaft
cap).
• Tighten the bolts to the specified
torque in two or three steps in the
proper tightening sequence as
shown.
The bolts (camshaft cap) must be
tightened evenly, or damage to the
cylinder head, camshaft caps, and
camshaft will result.
2. Install:
• Timing chain tensioner
Installation steps:
a. While pressing the tensioner rod
lightly with fingers, use a thin
screwdriver and wind the tension-
er rod up fully clockwise.
b. With the rod fully wound and the
chain tensioner UP mark "a" fac-
ing upward, install the gasket "1"
and the timing chain tensioner "2",
and tighten the bolt "3" to the
specified torque.
c. Release the screwdriver, check
the tensioner rod to come out and
tighten the gasket "4" and the cap
bolt "5" to the specified torque.
3. Turn:
• Crankshaft
Counterclockwise several turns.
4. Check:
• Rotor T.D.C. mark
Align with the crankcase align
mark.
• Camshaft match marks
Align with the cylinder head sur-
face.
Out of alignment→Adjust.5. Install:
• Timing mark accessing screw "1"
• Crankshaft end accessing screw
"2"
6. Install:
• Timing chain guide (top side) "1"
• Cylinder head cover gasket "2"
• Cylinder head cover "3"
• Bolt (cylinder head cover) "4"
Apply the sealant on the cylinder
head cover gasket.
7. Install:
• Cylinder head breather hose
• Spark plug Bolt (camshaft cap):
10 Nm (1.0 m•kg, 7.2
ft•lb)
Bolt (timing chain ten-
sioner):
10 Nm (1.0 m•kg, 7.2
ft•lb)
Tensioner cap bolt:
7 Nm (0.7 m•kg, 5.1
ft•lb)
Bolt (cylinder head cov-
er):
10 Nm (1.0 m•kg, 7.2
ft•lb)
Yamaha bond No. 1215:
90890-85505
(Three bond No.1215®)
Spark plug:
13 Nm (1.3 m•kg, 9.4
ft•lb)
Page 120 of 230
5-19
CYLINDER HEAD
CYLINDER HEAD
REMOVING THE CYLINDER HEAD
Order Part name Q'ty Remarks
Seat and fuel tank Refer to "REMOVING THE SEAT, FUEL
TANK AND SIDE COVERS" section in the
CHAPTER 3.
Exhaust pipe and silencerRefer to "REMOVING THE EXHAUST PIPE
AND SILENCER" section in the CHAPTER 3.
Radiator hose 1 Disconnect at cylinder head side.
Carburetor Refer to "CARBURETOR" section.
Air cut-off valve assembly Refer to "AIR INDUCTION SYSTEM" section.
Camshaft Refer to "CAMSHAFTS" section.
Upper engine bracket Refer to "ENGINE REMOVAL" section.
1 Radiator pipe 1
2 Oil delivery pipe 1
3Nut 2
4 Bolt [L = 135 mm (5.31 in)] 2
5 Bolt [L = 145 mm (5.71 in)] 2
6 Cylinder head 1
7 Timing chain guide (exhaust side) 1