2014 SUBARU TRIBECA ESP
[x] Cancel search: ESPPage 77 of 426
1-46Seat, seatbelt and SRS airbags
refer to“Seatbelts”F1-17.
.Do not sit or lean unnecessarilyclose to the SRS airbag. Becausethe SRS airbag deploys withconsiderable speed–faster thanthe blink of an eye–and force toprotect in high speed collisions,the force of an airbag can injurean occupant whose body is tooclose to SRS airbag.
It is also important to wear yourseatbelt to help avoid injuriesthat can result when the SRSairbag contacts an occupant notin proper position such as onethrown forward during pre-acci-dent braking.
Even when properly positioned,there remainsa possibility thatan occupant may suffer minorinjury such as abrasions andbruises to the face or armsbecause of the SRS airbag de-ployment force.
.The SRS airbags deploy withconsiderable speed and force.Occupants who are out of properposition when the SRS airbagdeploys could suffer very seriousinjuries. Because the SRS airbagneeds enough space for deploy-
ment, the driver should alwayssit upright and well back in theseat as far from the steeringwheel as practical while stillmaintaining full vehicle controland the front passenger shouldmove the seat as far back aspossible and sit upright and wellback in the seat.
.Do not place any objects over ornear the SRS airbag cover orbetween you and the SRS airbag.If the SRS airbag deploys, thoseobjects could interfere with itsproper operation and could bepropelled inside the vehicle andcause injury.
WARNING
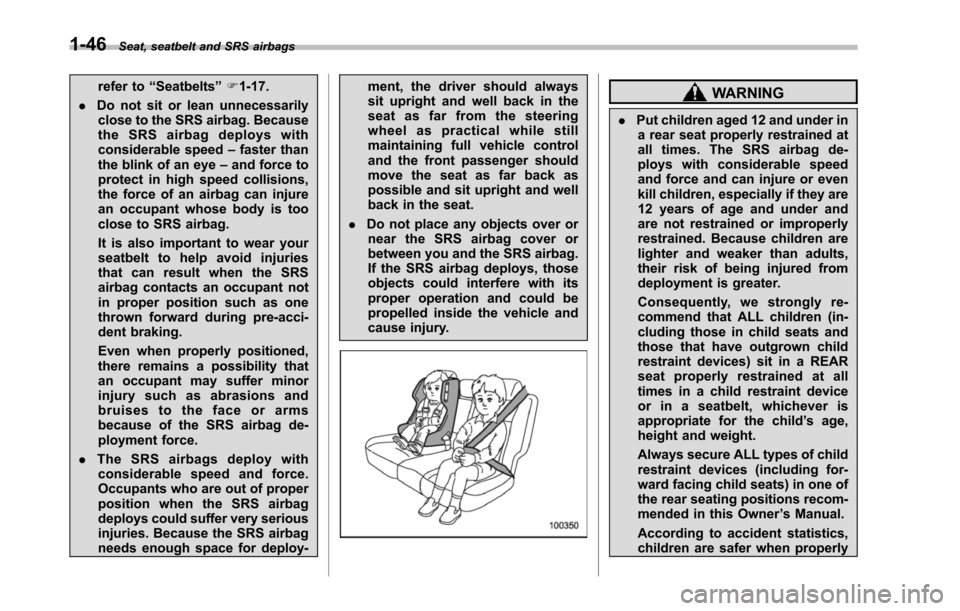
.Put children aged 12 and under ina rear seat properly restrained atall times. The SRS airbag de-ploys with considerable speedand force and can injure or evenkill children, especially if they are12 years of age and under andare not restrained or improperlyrestrained. Because children arelighter and weaker than adults,their risk of being injured fromdeployment is greater.
Consequently, we strongly re-commend that ALL children (in-cluding those in child seats andthose that have outgrown childrestraintdevices) sit in a REARseat properly restrained at alltimes in a child restraint deviceor in a seatbelt, whichever isappropriate for the child’s age,height and weight.
Always secure ALL types of childrestraint devices (including for-ward facing child seats) in one ofthe rear seating positions recom-mended in this Owner’s Manual.
According to accident statistics,children are safer when properly
Page 85 of 426
1-54Seat, seatbelt and SRS airbags
the child restraint system. Turn the ignitionswitch to the“ON”position and make surethat the front passenger’s frontal airbagON indicator turns off and the OFFindicator illuminates.
If the ON indicator still remains illuminatedwhile the OFF indicator turns off, take thefollowing actions.
.Ensure that no article is placed on theseat other than the child restraint systemand the child occupant.
.Ensure that there is no article left in theseatback pocket.
If the ON indicator still remains illuminatedwhile the OFF indicator turns off aftertaking relevant corrective actions de-scribed above, relocate the child restraintsystem to one of the rear seating positionsrecommended in this Owner’s Manual andimmediately contact your SUBARU dealerfor an inspection.
NOTE
When a child who has outgrown a childrestraint system or a small adult isseated in the front passenger’s seat,the SUBARU advanced frontal airbagsystem may or may not activate thefront passenger’s SRS frontal airbagdepending on the occupant’s seatingposture. If the front passenger’s SRS
frontal airbag is activated (the ONindicator remains illuminated whilethe OFF indicator turns off), take thefollowing actions.
.Ensure that no article is placed onthe seat other than the occupant..Ensure that there is no article left inthe seatback pocket.
If the ON indicator still remains illumi-nated while the OFF indicator turns offdespite the fact that the actions notedabove have been taken, seat the child/small adult in the rear seat and im-mediately contact your SUBARU dealerfor an inspection. Even if the systemhas passed the dealer inspection, it isrecommended that on subsequent tripsthe child/small adult always take therear seat.
Children who have outgrown a childrestraint system should always wear theseatbelt irrespective of whether the airbagis deactivated or activated.
!Conditions in which front passen-ger’s SRS frontal airbag is activated
The front passenger’s SRS frontal airbagwill be activated for deployment uponimpact when any of the following condi-tions is met regarding the front passen-ger’s seat.
.When the seat is occupied by an adult.
.When a heavy article is placed on theseat.
When the front passenger’s seat is occu-pied by an adult, observe the followingprecautions. Failure to do so may lessenthe load on the front passenger’s seat,deactivatingthe front passenger’s SRSfrontal airbag despite the fact that the seatis occupied by an adult.
.Do not allow the second-row seatoccupant to lift the front passenger’s seatcushion using his/her feet.
.Do not place any article under the frontpassenger’s seat, or squeeze any articlefrom behind and under the seat. This maylift the seat cushion.
.Do not squeeze any article betweenthe front passenger’s seat and side trim/pillar, door or center console box. Thismay lift the seat cushion.
!If the passenger’s frontal airbagOFF indicator illuminates andthe ON indicator turns off evenwhen the front passenger’s seatis occupied by an adult
This can be caused by the adult incor-rectly sitting in the front passenger’s seat.Turn the ignition switch to the“LOCK”position. Ask the front passenger to setthe seatback to the upright position, sit up
Page 92 of 426
plement the seatbelt by reducing theimpact to the occupant’s head.
The SRS curtain airbag does not operatefor third-row seat occupants.
WARNING
The SRS side airbag and SRScurtain airbag are designed as onlya supplement to the primary protec-tion provided by the seatbelt. Theydo not do away with the need tofasten seatbelts. It is also importantto wear your seatbelt to help avoidinjuries that can result when anoccupant is not seated in a properupright position.
WARNING
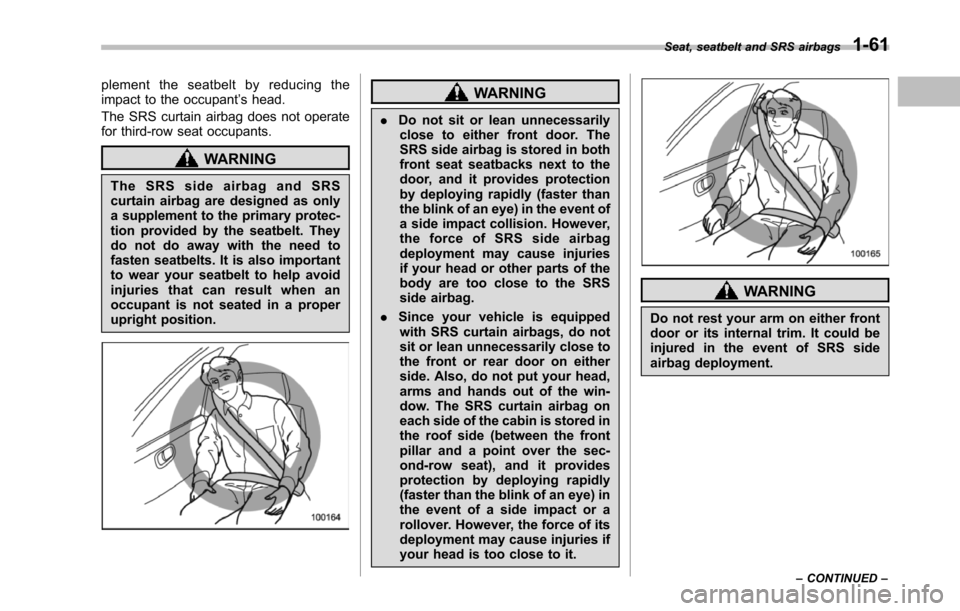
.Do not sit or lean unnecessarilyclose to either front door. TheSRS side airbag is stored in bothfront seat seatbacks next to thedoor, and it provides protectionby deploying rapidly (faster thanthe blink of an eye) in the event ofa side impact collision. However,the force of SRS side airbagdeployment may cause injuriesif your head or other parts of thebody are too close to the SRSside airbag.
.Since your vehicle is equippedwith SRS curtain airbags, do notsit or lean unnecessarily close tothe frontor rear door on eitherside. Also, do not put your head,arms and hands out of the win-dow. The SRS curtain airbag oneach side of the cabin is stored inthe roof side (between the frontpillar and a point over the sec-ond-row seat), and it providesprotection by deploying rapidly(faster than the blink of an eye) inthe event of a side impact or arollover. However, the force of itsdeployment may cause injuries ifyour head is too close to it.
WARNING
Do not rest your arm on either frontdoor or its internal trim. It could beinjured in the event of SRS sideairbag deployment.
Seat, seatbelt and SRS airbags1-61
–CONTINUED–
Page 110 of 426
Door locks
&Locking and unlocking from
the outside
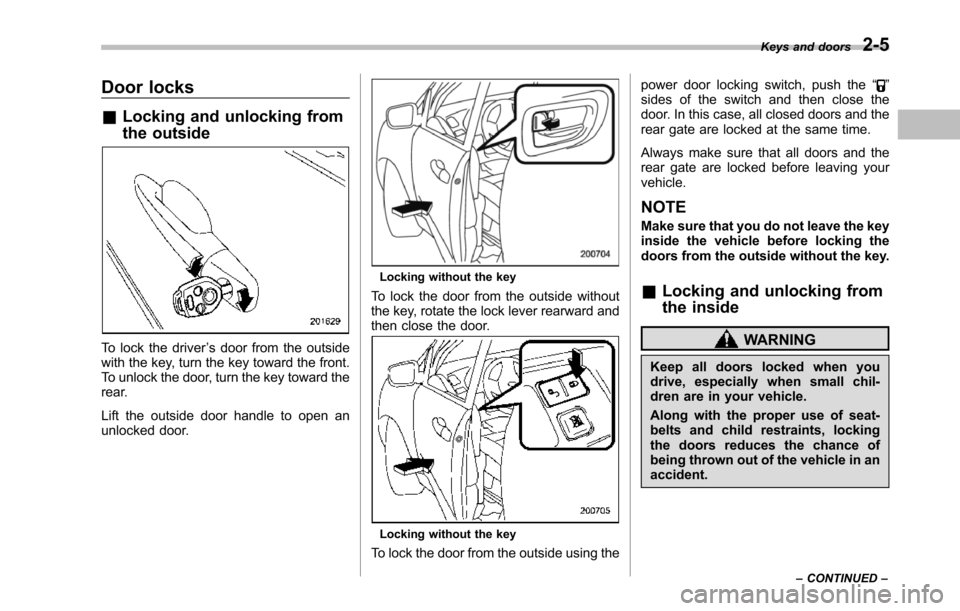
To lock the driver’s door from the outsidewith the key, turn the key toward the front.To unlock the door, turn the key toward therear.
Lift the outside door handle to open anunlocked door.
Locking without the key
To lock the door from the outside withoutthe key, rotate the lock lever rearward andthen close the door.
Locking without the key
To lock the door from the outside using the
power door locking switch, push the“”sides of the switch and then close thedoor. In this case, all closed doors and therear gate are locked at the same time.
Always make sure that all doors and therear gate are locked before leaving yourvehicle.
NOTE
Make sure that you do not leave the keyinside the vehicle before locking thedoors from theoutside without the key.
&Locking and unlocking from
the inside
WARNING
Keep all doors locked when youdrive, especially when small chil-dren are in your vehicle.
Along with the proper use of seat-belts and child restraints, lockingthe doors reduces the chance ofbeing thrown out of the vehicle in anaccident.
Keys and doors2-5
–CONTINUED–
Page 114 of 426
to the following two conditions: (1) Thisdevice may not cause harmful inter-ference, and (2) this device mustaccept any interference received, in-cluding interference that may causeundesired operation.
Changes or modifications not ex-pressly approved by the party respon-sible for compliance could void theuser’s authority to operate the equip-ment.
The transmitter for the remote keylessentry system is located inside the keyhead.
The remote keyless entry system has thefollowing functions.
.Locking and unlocking the doors andrear gatewithout a key
.Unlocking the rear gate without key
.Sounding a panic alarm
.Arming and disarming the alarm sys-tem. For detailed information, refer to“Alarm system”F2-16.
The operable distance of the remotekeyless entry system is approximately 30feet (10 meters). However, this distancewill vary depending on environmentalconditions.
The system’s operable distance will beshorter in areas near a facility or electronic
equipment emitting strong radio wavessuch as a power plant, broadcast station,TV tower, or remote controller of homeelectronic appliances.
NOTE
The remote keyless entry system doesnot operate when the ignition key isinserted in the ignition switch or whenany of the doors or the rear gate is notfully closed.
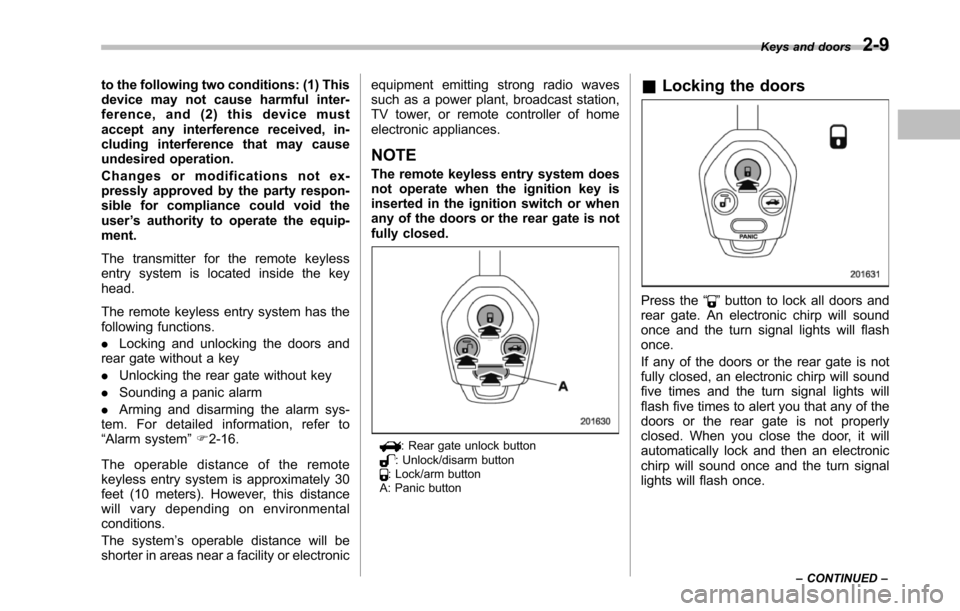
: Rear gate unlock button: Unlock/disarm button: Lock/arm buttonA: Panic button
&Locking the doors
Press the“”button to lock all doors andrear gate. An electronic chirp will soundonce and the turn signal lights will flashonce.
If any of the doors or the rear gate is notfully closed, an electronic chirp will soundfive times and the turn signal lights willflash five times to alert you that any of thedoorsor the rear gate is not properlyclosed. When you close the door, it willautomatically lock and then an electronicchirp will sound once and the turn signallights will flash once.
Keys and doors2-9
–CONTINUED–
Page 115 of 426
2-10Keys and doors
&Unlocking the doors
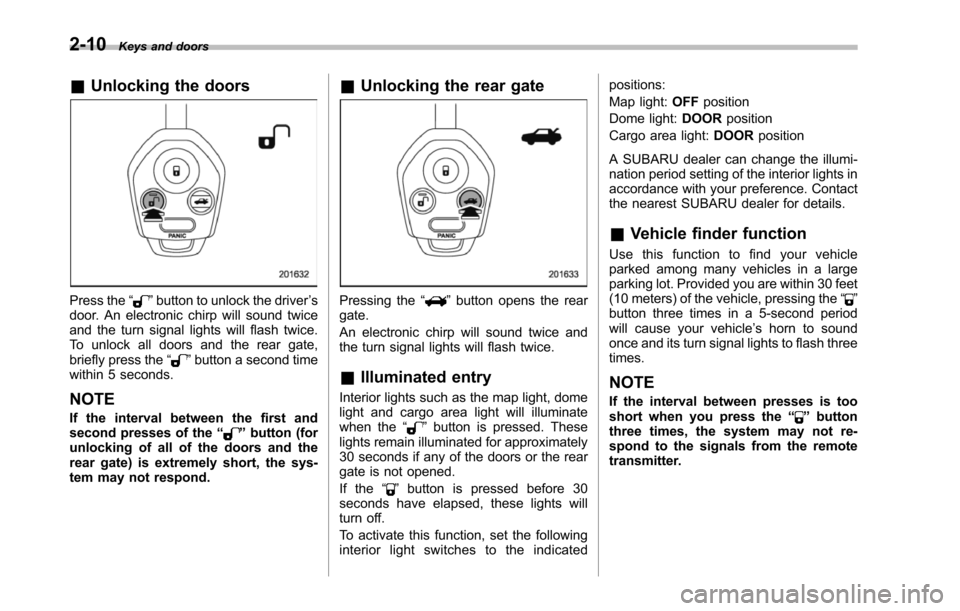
Press the“”button to unlock the driver’sdoor. An electronic chirp will sound twiceand the turn signal lights will flash twice.To unlock all doors and the rear gate,briefly press the“”button a second timewithin 5 seconds.
NOTE
If the interval between the first andsecond presses of the“”button (forunlocking of all of the doors and therear gate) is extremely short, the sys-tem may not respond.
&Unlocking the rear gate
Pressing the“”button opens the reargate.
An electronic chirp will sound twice andthe turn signal lights will flash twice.
&Illuminated entry
Interior lights such as the map light, domelight and cargo area light will illuminatewhen the“”button is pressed. Theselights remain illuminated for approximately30 seconds if any of the doors or the reargate is not opened.
If the“”button is pressed before 30seconds have elapsed, these lights willturn off.
To activate this function, set the followinginterior light switches to the indicated
positions:
Map light:OFFposition
Dome light:DOORposition
Cargo area light:DOORposition
A SUBARU dealer can change the illumi-nationperiod setting of the interior lights inaccordance with your preference. Contactthe nearest SUBARU dealer for details.
&Vehicle finder function
Use this function to find your vehicleparked among many vehicles in a largeparking lot. Provided you are within 30 feet(10 meters) of the vehicle, pressing the“”buttonthree times in a 5-second periodwill cause your vehicle’s horn to soundonce and its turn signal lights to flash threetimes.
NOTE
If the interval between presses is tooshort when you press the“”buttonthree times, the system may not re-spond to the signals from the remotetransmitter.
Page 123 of 426
2-18Keys and doors
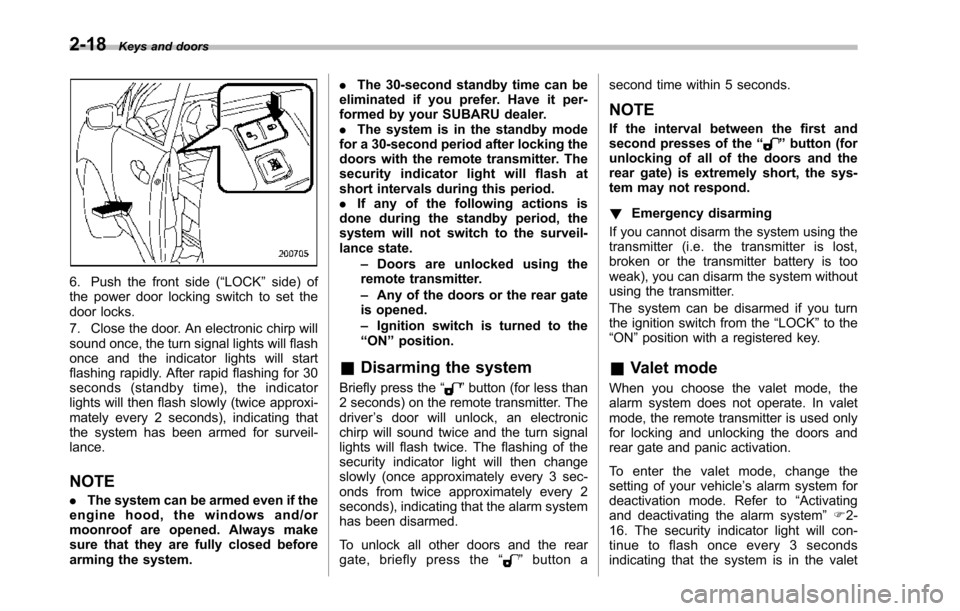
6. Push the front side (“LOCK”side) ofthe power door locking switch to set thedoor locks.
7. Close the door. An electronic chirp willsound once,the turn signal lights will flashonce and the indicator lights will startflashing rapidly. After rapid flashing for 30seconds (standby time), the indicatorlights will then flash slowly (twice approxi-mately every 2 seconds), indicating thatthe system has been armed for surveil-lance.
NOTE
.The system can be armed even if theengine hood, the windows and/ormoonroof are opened. Always makesure that they are fully closed beforearming the system.
.The 30-second standby time can beeliminated if you prefer. Have it per-formed by your SUBARU dealer..The system is in the standby modefor a 30-second period after locking thedoors with the remote transmitter. Thesecurity indicator light will flash atshort intervals during this period..If any of the following actions isdoneduring the standby period, thesystem will not switch to the surveil-lance state.–Doors are unlocked using theremote transmitter.–Any of the doors or the rear gateis opened.–Ignition switch is turned to the“ON”position.
&Disarming the system
Briefly press the“”button (for less than2 seconds) on the remote transmitter. Thedriver’s door will unlock, an electronicchirp will sound twice and the turn signallights willflash twice. The flashing of thesecurity indicator light will then changeslowly (once approximately every 3 sec-onds from twice approximately every 2seconds), indicating that the alarm systemhas been disarmed.
To unlock all other doors and the reargate, briefly press the“”button a
second time within 5 seconds.
NOTE
If the interval between the first andsecond presses of the“”button (forunlocking of all of the doors and therear gate) is extremely short, the sys-tem may not respond.
!Emergency disarming
If you cannot disarm the system using thetransmitter (i.e. the transmitter is lost,broken or the transmitter battery is tooweak), you can disarm the system withoutusing the transmitter.
The system can be disarmed if you turnthe ignition switch from the“LOCK”to the“ON”position with a registered key.
&Valet mode
When you choose the valet mode, thealarm system does not operate. In valetmode, the remote transmitter is used onlyfor locking and unlocking the doors andrear gate and panic activation.
To enter the valet mode, change thesetting of your vehicle’s alarm system fordeactivation mode. Refer to“Activatingand deactivatingthe alarm system”F2-16. The security indicator light will con-tinue to flash once every 3 secondsindicating that the system is in the valet
Page 139 of 426
3-6Instruments and controls
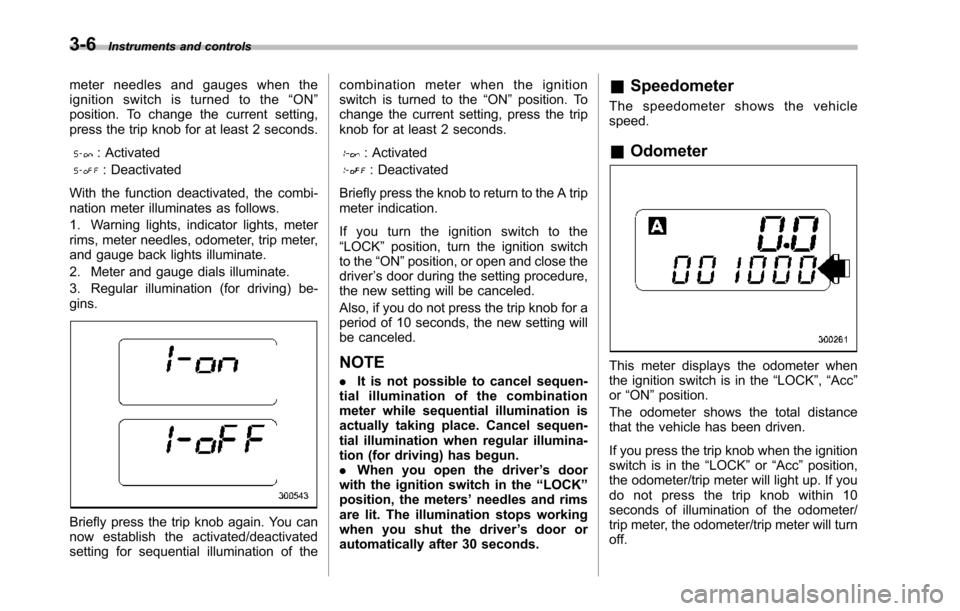
meter needles and gauges when theignition switch is turned to the“ON”position. To change the current setting,press the trip knob for at least 2 seconds.
: Activated
: Deactivated
With the function deactivated, the combi-nation meter illuminates as follows.
1. Warning lights, indicator lights, meterrims, meter needles, odometer, trip meter,and gauge back lights illuminate.
2. Meter and gauge dials illuminate.
3. Regular illumination (for driving) be-gins.
Briefly press the trip knob again. You cannow establish the activated/deactivatedsetting for sequential illumination of the
combination meter when the ignitionswitch is turned to the“ON”position. Tochange the current setting, press the tripknob for at least 2 seconds.
: Activated
: Deactivated
Briefly press the knob to return to the A tripmeter indication.
If you turn the ignition switch to the“LOCK”position, turn the ignition switchto the“ON”position, or open and close thedriver’s door during the setting procedure,the new setting will be canceled.
Also, if you do not press the trip knob for aperiod of 10 seconds, the new setting willbe canceled.
NOTE
.It is not possible to cancel sequen-tial illumination of the combinationmeter while sequential illumination isactually taking place. Cancel sequen-tial illumination when regular illumina-tion (for driving) has begun..When you open the driver’s doorwith the ignition switch in the“LOCK”position, the meters’needles and rimsare lit. The illumination stops workingwhen you shut the driver’s door orautomatically after 30 seconds.
&Speedometer
The speedometer shows the vehiclespeed.
&Odometer
This meter displays the odometer whenthe ignition switch is in the“LOCK”,“Acc”or“ON”position.
The odometer shows the total distancethatthe vehicle has been driven.
If you press the trip knob when the ignitionswitch is in the“LOCK”or“Acc”position,the odometer/trip meter will light up. If youdo not press the trip knob within 10seconds of illumination of the odometer/trip meter, the odometer/trip meter will turnoff.