2014 SUBARU TRIBECA interior lights
[x] Cancel search: interior lightsPage 111 of 426
2-6Keys and doors
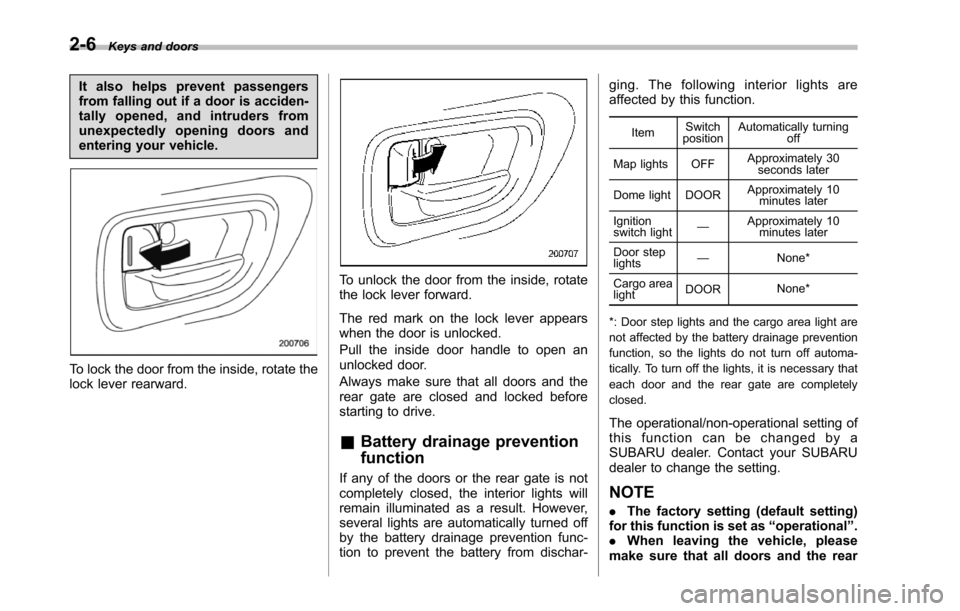
It also helps prevent passengersfrom falling out if a door is acciden-tally opened, and intruders fromunexpectedly opening doors andentering your vehicle.
To lock the door from the inside, rotate thelock lever rearward.
To unlock the door from the inside, rotatethe lock lever forward.
The red mark on the lock lever appearswhen the door is unlocked.
Pull the inside door handle to open anunlocked door.
Always make sure that all doors and therear gate are closed and locked beforestarting to drive.
&Battery drainage prevention
function
If any of the doors or the rear gate is notcompletely closed, the interior lights willremain illuminated as a result. However,several lights are automatically turned offby the battery drainage prevention func-tion to prevent the battery from dischar-
ging. The following interior lights areaffected by this function.
ItemSwitchpositionAutomatically turningoff
Map lights OFFApproximately 30seconds later
Dome light DOORApproximately 10minutes later
Ignitionswitch light—Approximately 10minutes later
Door steplights—None*
Cargo arealightDOORNone*
*: Door step lights and the cargo area light arenot affected by the battery drainage preventionfunction, so the lights do not turn off automa-tically. To turn off the lights, it is necessary thateach door and the rear gate are completelyclosed.
The operational/non-operational setting ofthis function can be changed by aSUBARU dealer. Contact your SUBARUdealer to change the setting.
NOTE
.The factory setting (default setting)for this function is set as“operational”..When leaving the vehicle, pleasemakesure that all doors and the rear
Page 115 of 426
2-10Keys and doors
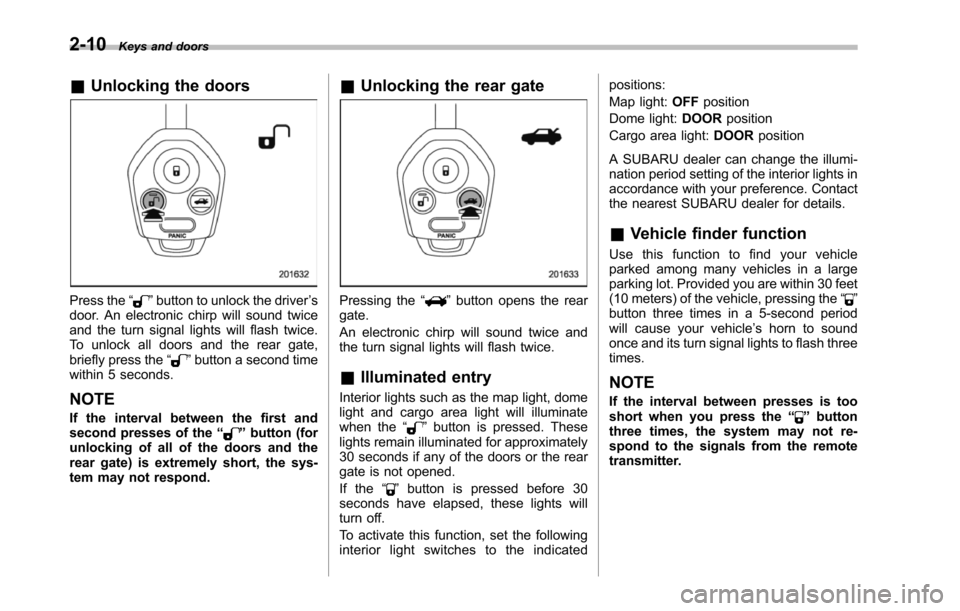
&Unlocking the doors
Press the“”button to unlock the driver’sdoor. An electronic chirp will sound twiceand the turn signal lights will flash twice.To unlock all doors and the rear gate,briefly press the“”button a second timewithin 5 seconds.
NOTE
If the interval between the first andsecond presses of the“”button (forunlocking of all of the doors and therear gate) is extremely short, the sys-tem may not respond.
&Unlocking the rear gate
Pressing the“”button opens the reargate.
An electronic chirp will sound twice andthe turn signal lights will flash twice.
&Illuminated entry
Interior lights such as the map light, domelight and cargo area light will illuminatewhen the“”button is pressed. Theselights remain illuminated for approximately30 seconds if any of the doors or the reargate is not opened.
If the“”button is pressed before 30seconds have elapsed, these lights willturn off.
To activate this function, set the followinginterior light switches to the indicated
positions:
Map light:OFFposition
Dome light:DOORposition
Cargo area light:DOORposition
A SUBARU dealer can change the illumi-nationperiod setting of the interior lights inaccordance with your preference. Contactthe nearest SUBARU dealer for details.
&Vehicle finder function
Use this function to find your vehicleparked among many vehicles in a largeparking lot. Provided you are within 30 feet(10 meters) of the vehicle, pressing the“”buttonthree times in a 5-second periodwill cause your vehicle’s horn to soundonce and its turn signal lights to flash threetimes.
NOTE
If the interval between presses is tooshort when you press the“”buttonthree times, the system may not re-spond to the signals from the remotetransmitter.
Page 121 of 426
2-16Keys and doors
Alarm system
The alarm system helps to protect yourvehicle and valuables from theft. The hornsounds and the turn signal lights flash ifsomeone attempts to break into yourvehicle.
The system can be armed and disarmedwith the remote transmitter.
The system does not operate when thekey is inserted into the ignition switch.
Your vehicle’s alarm system has been setfor activation at the time of shipment fromthe factory. You can set the system fordeactivation yourself or have it done byyour SUBARU dealer.
&System operation
The alarm system will give the followingalarms when triggered.
.The vehicle’s horn will sound for 30seconds.
.The turn signal lights will flash for 30seconds.
If any of the doors or the rear gate remainsopen after the 30-second period, the hornwill continueto sound for a maximum of 3minutes. If any of the doors or the reargate is closed while the horn is sounding,the horn will stop sounding with a delay of
up to 30 seconds.
The alarm is triggered by:
.Opening any of the doors or the reargate
.Physical impact to the vehicle, such asforced entry (only vehicles with shocksensors (dealer option))
NOTE
The alarm system can be set to triggerthe illumination of the following interiorlights.
.Dome light (illuminates only whenthe dome light switch is in the“DOOR”position).Map lights
The notifications regarding the domelight and the map lights are deactivatedas the factory setting. A SUBARUdealer can activate the system. Contactyour SUBARU dealer for details.
&Activating and deactivating
the alarm system
To change the setting of your vehicle’salarm system for activation or deactiva-tion, do the following.
1. Disarm the alarm system. Refer to“Disarming the system”F2-18.
2. Sit in the driver’s seat and shut all
doors and the rear gate.
3. Turn the ignition switch to the“ON”position.
4. Hold down the UNLOCK side of thedriver’s power door locking switch, openthe driver’s door within the following 1second, and wait 10 seconds withoutreleasing the switch. The setting will thenbe changed as follows.
If the system was previously activated:
The odometer/trip meter screen displays“AL oF”and the horn sounds twice,indicating that the system is now deacti-vated.
If the system was previously deacti-vated:
The odometer/trip meter screen displays“AL on”and the horn sounds once,indicating that the system is now acti-vated.
NOTE
Yo u m a y h a v e t h e a b o v e s e t t i n gchange done by your SUBARU dealer.
Page 223 of 426
6-2Interior equipment
Interior light
When leaving your vehicle, make sure thelights are turned off to avoid batterydischarge.
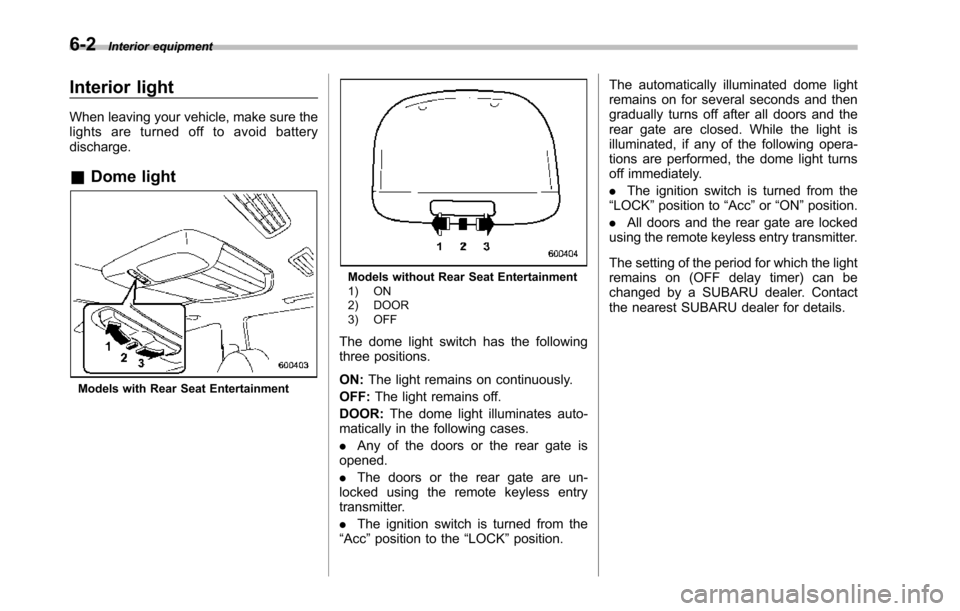
&Dome light
Models with Rear Seat Entertainment
Models without Rear Seat Entertainment1) ON2) DOOR3) OFF
The dome light switch has the followingthree positions.
ON:The light remains on continuously.
OFF:The light remains off.
DOOR:The dome light illuminates auto-matically in the following cases.
.Any of the doors or the rear gate isopened.
.The doors or the rear gate are un-locked using the remote keyless entrytransmitter.
.The ignition switch is turned from the“Acc”position to the“LOCK”position.
The automatically illuminated dome lightremains on for several seconds and thengradually turns off after all doors and therear gate are closed. While the light isilluminated, if any of the following opera-tions are performed, the dome light turnsoff immediately.
.The ignition switch is turned from the“LOCK”positionto“Acc”or“ON”position.
.All doors and the rear gate are lockedusing the remote keyless entry transmitter.
The setting of the period for which the lightremains on (OFF delay timer) can bechanged by a SUBARU dealer. Contactthe nearest SUBARU dealer for details.
Page 224 of 426
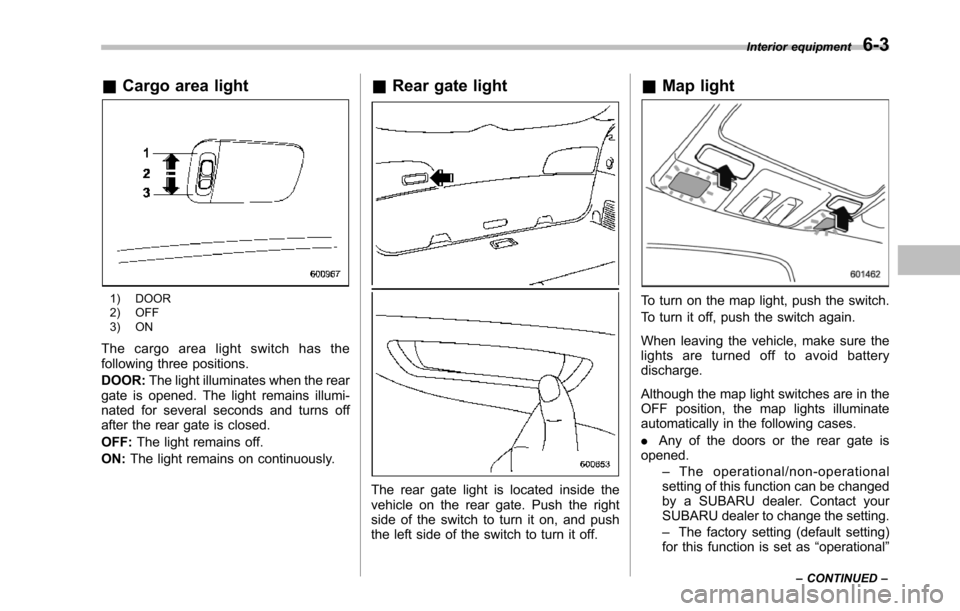
&Cargo area light
1) DOOR2) OFF3) ON
The cargo area light switch has thefollowing three positions.
DOOR:The light illuminates when the reargate is opened. The light remains illumi-nated for several seconds and turns offafter the rear gate is closed.
OFF:The light remains off.
ON:The light remains on continuously.
&Rear gate light
The rear gate light is located inside thevehicle on the rear gate. Push the rightside of the switch to turn it on, and pushthe left side of the switch to turn it off.
&Map light
To turn on the map light, push the switch.
To turn it off, push the switch again.
When leaving the vehicle, make sure thelights are turned off to avoid batterydischarge.
Although the map light switches are in theOFF position, the map lights illuminateautomatically in the following cases.
.Any of the doors or the rear gate isopened.–The operational/non-operationalsetting of this function can be changedby a SUBARU dealer. Contact yourSUBARU dealer to change the setting.–The factory setting (default setting)for this function is set as“operational”
Interior equipment6-3
–CONTINUED–
Page 225 of 426

6-4Interior equipment
(automatic illumination - ON)..The doors are unlocked using theremote keyless entry transmitter.
.The ignition switch is turned from the“Acc”position to the“LOCK”position.
The automatically illuminated map lightsremain illuminated for several secondsand then gradually turn off after all doorsare closed.
While the lights are illuminated, if any ofthe following operations are performed,the map lights turn off immediately.
.The ignition switch is turned from the“LOCK”position to the“Acc”or“ON”position.
.All doors and the rear gate are lockedusing the remote keyless entry transmitter.
The setting of the period for which the lightremains illuminated (OFF delay timer) canbe changed by a SUBARU dealer. Con-tact your SUBARU dealer for details.
NOTE
If any of the doors or the rear gate isnot completely closed, the map lightswill remain illuminated as a result.However, the map lights are automati-cally turned off by the battery drainageprevention function to prevent thebattery from discharging. For details,
refer to“Battery drainage preventionfunction”F2-6.
&Automatic ambient light for
center console area (if
equipped)
The automatic ambient light illuminateswhen the ignition switch is in the“ON”position and the light control switch is inthe“”position or“”position. Thelight dimly illuminates the area around thecenter console. The light turns off whenthe light control switch is in the“OFF”position. Also, the brightness of the light isadjusted by the illumination brightnesscontrol dial.
Sun visors
To block out glare, swing down the visors.
To use the sun visor at a side window,swing it down and move it sideways.
Page 257 of 426
7-10Starting and operating
transmitter within a few seconds immedi-ately following remote engine start shut-down.
&Pre-heating or pre-cooling
the interior of the vehicle
Before exiting the vehicle, set the tem-perature controls to the desired settingand operation. After the system starts thevehicle, the heater or air-conditioning willactivate and heat or cool the interior toyour setting.
&Service mode
In service mode, the remote start functionis temporarily disabled to prevent thesystem from unexpectedly starting theengine while being serviced.
!To engage the service mode
Turn the ignition switch to the“ON”position, depress and hold the brake pedalthen, press and release the“”button onthe remote engine start transmitter threetimes. The system will pause for 1 secondand then flash the parking lights and honkthe hornthree times indicating that thesystem is in service mode. When attempt-ing to activate the remote start systemwhile in service mode, the parking lightswill flash and the horn will honk two timesand will not start.
!To disengage the service mode
Turn the ignition switch to the“ON”position, depress and hold the brakepedal, then press and release the“”button on the remote engine start trans-mitter three times. The system will pausefor 1 second and flash the parking lightsone time indicating that the system hasexited service mode.
NOTE
When taking your vehicle in for service,it is recommended that you inform theservice personnel that your vehicle isequippedwith a remote engine startsystem.
&Remote engine start trans-
mitter programming and pro-
grammable feature option
New transmitters can be programmed tothe remote engine start system in theevent that remote engine start transmittersare lost, stolen or damaged. The remoteengine start system also has one pro-grammable feature that can be adjustedfor user preference.
The remote engine start system can beprogrammed to either make an audiblehorn chirp upon remote start activation ornot. Remote engine start transmitter pro-gramming and feature programming can
be adjusted using the following procedure.
1. Open the driver’s door (the driver’sdoor must remain opened throughout theentire process).
2. Insert the key into the vehicle’s ignitionswitch and turn to the“ON”position.
3. Locate the small black programmingbutton behind the fuse box cover, on thedriver’s side left under the dashboardpanel.
4. Press and hold the black programmingbutton for 10 to 15 seconds. The horn willhonk and the parking lights will flash threetimes to indicate that the system hasentered programming mode. At this pointyou can perform either action (step 5 orstep 6).
5. To program a remote transmitter:press and release the“”button on eachtransmitter. The horn will honk and theparking lights will flash one time to indicatea successful transmitter learn each timethe“”button is pressed. You canprogram up to eight transmitters.
6. To toggle the Horn Confirmation chirpsON/OFF: press and release the brake totoggle the feature. The horn will chirp andthe parking lights will flash one time toindicate Confirmation Horn Chirps are“OFF”. The horn will honk and the parkinglights will flash 2 times to indicate Con-firmation Horn Chirps are“ON”. Depres-
Page 415 of 426
14-6Index
High beam............................................................ 3-22Immobilizer............................................................ 3-21Security.......................................................... 2-4, 3-21Select lever/Gear position....................................... 3-21SPORT mode........................................................ 3-21Traction control system OFF.................................... 3-19Turn signal............................................................ 3-21Vehicle Dynamics Control OFF................................ 3-19Vehicle Dynamics Control operation................. 3-18, 3-19Inside mirror.............................................................. 3-38Interior lights............................................................... 6-2
JJack and jack handle.................................................. 9-19Jack-up point............................................................... 9-6Jump starting............................................................. 9-11
KKey ............................................................................ 2-2Number.................................................................. 2-2Reminder chime....................................................... 3-4Replacement........................................................... 2-4Keyless entry system................................................... 2-8
LLeather seat materials................................................ 10-5License plate light..................................................... 11-41LightBackup................................................................ 11-40Cargo area.................................................... 6-3, 11-44Control switch........................................................ 3-27
Daytime running..................................................... 3-29Dome............................................................ 6-2, 11-42Door step............................................................ 11-43Front fog..................................................... 3-32, 11-39Front side marker......................................... 3-28, 12-12Ignition switch......................................................... 3-4License plate....................................................... 11-41Map .............................................................. 6-3, 11-43Parking............................................................... 11-38Rear combination................................................. 11-39Rear gate............................................................... 6-3Stop.................................................................... 11-39Ta i l . . . . . . . . . . . . . . . . . . . . . . . . . . . . . . . . . . . . . . . . . . . . . . . . . . . . . . . . . . . . 11 - 3 9 , 11 - 4 0Turn signal.................................................. 3-29, 11-39Vanity mirror.................................................. 6-5, 11-43Loading your vehicle................................................... 8-12Low fuel warning light................................................. 3-17Low tire pressure warning light..................................... 3-14Lower and tether anchorage........................................ 1-37Lumbar support........................................................... 1-7
MMain fuse................................................................ 11-35MaintenancePrecautions........................................................... 11-3Schedule............................................................... 11-3Seatbelt................................................................. 1-26Tools..................................................................... 9-19Malfunctionindicator light (check engine warning light)....3-12ManualTransmission oil..................................................... 12-6