2014 SUBARU TRIBECA manual transmission
[x] Cancel search: manual transmissionPage 8 of 426
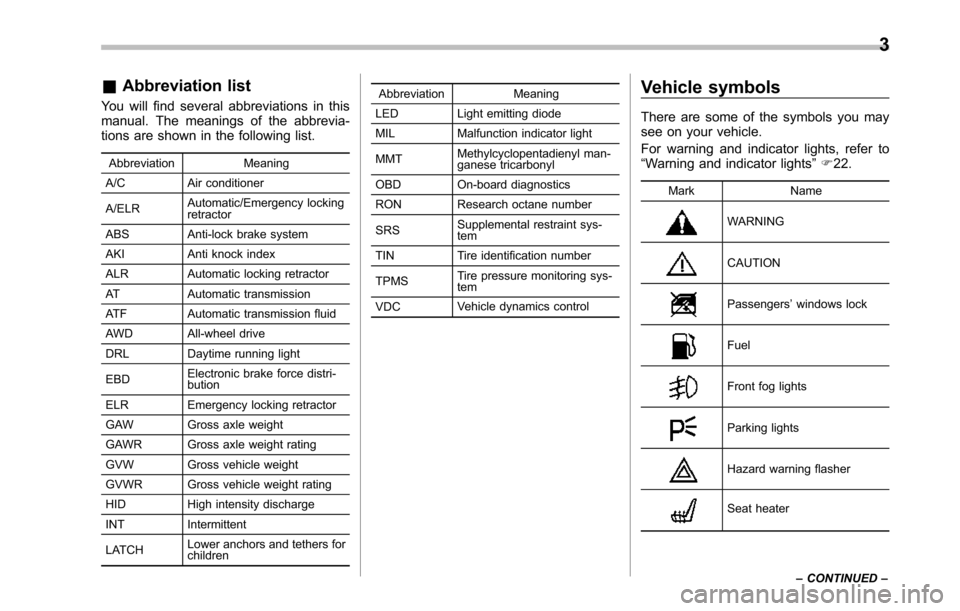
&Abbreviation list
You will find several abbreviations in thismanual. The meanings of the abbrevia-tions are shown in the following list.
Abbreviation Meaning
A/C Air conditioner
A/ELRAutomatic/Emergency lockingretractor
ABSAnti-lock brake system
AKI Anti knock index
ALR Automatic locking retractor
AT Automatic transmission
ATF Automatic transmission fluid
AWD All-wheel drive
DRL Daytime running light
EBDElectronicbrake force distri-bution
ELR Emergency locking retractor
GAW Gross axle weight
GAWR Gross axle weight rating
GVW Gross vehicle weight
GVWRGross vehicle weight rating
HID Highintensity discharge
INT Intermittent
LATCHLower anchors and tethers forchildren
Abbreviation Meaning
LED Light emitting diode
MIL Malfunction indicator light
MMTMethylcyclopentadienyl man-ganese tricarbonyl
OBD On-board diagnostics
RON Research octane number
SRSSupplemental restraint sys-tem
TIN Tire identification number
TPMSTire pressure monitoring sys-tem
VDCVehicle dynamics control
Vehicle symbols
There are some of the symbols you maysee on your vehicle.
For warning and indicator lights, refer to“Warning and indicator lights”F22.
Mark Name
WARNING
CAUTION
Passengers’windows lock
Fuel
Front fog lights
Parking lights
Hazard warning flasher
Seat heater
3
–CONTINUED–
Page 248 of 426
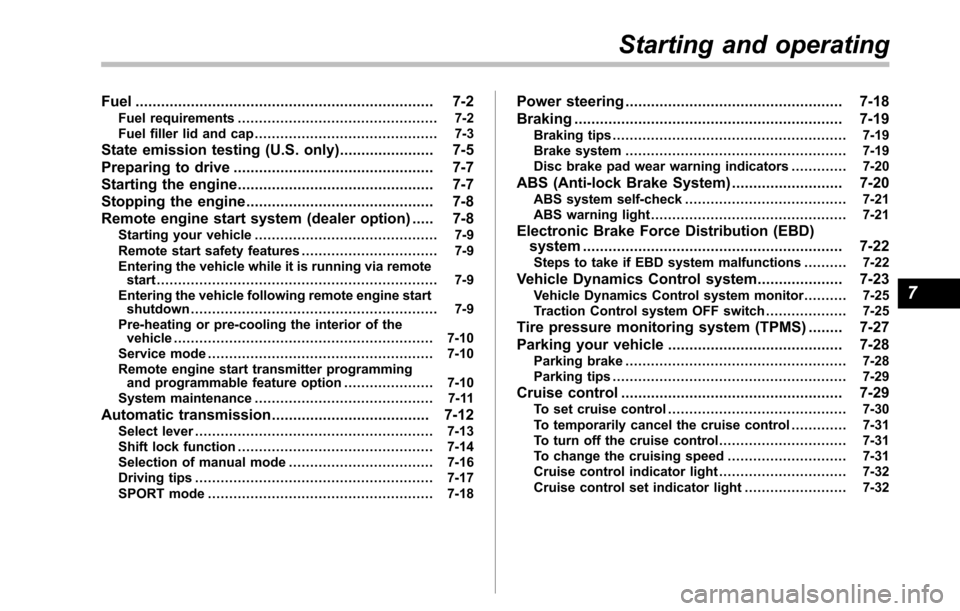
Fuel...................................................................... 7-2Fuel requirements............................................... 7-2Fuel filler lid and cap........................................... 7-3
State emission testing (U.S. only)...................... 7-5
Preparing to drive............................................... 7-7
Starting the engine.............................................. 7-7
Stopping the engine............................................ 7-8
Remote engine start system (dealer option)..... 7-8Starting your vehicle........................................... 7-9Remote start safety features................................ 7-9Entering the vehicle while it is running via remotestart.................................................................. 7-9Entering the vehicle following remote engine startshutdown.......................................................... 7-9Pre-heating or pre-cooling the interior of thevehicle............................................................. 7-10Service mode..................................................... 7-10Remote engine start transmitter programmingand programmable feature option..................... 7-10System maintenance.......................................... 7-11
Automatic transmission..................................... 7-12Select lever........................................................ 7-13Shift lock function.............................................. 7-14Selectionof manual mode.................................. 7-16Driving tips........................................................ 7-17SPORT mode..................................................... 7-18
Power steering................................................... 7-18
Braking............................................................... 7-19Braking tips....................................................... 7-19Brake system.................................................... 7-19Disc brake pad wear warning indicators............. 7-20
ABS (Anti-lock Brake System).......................... 7-20ABS system self-check...................................... 7-21ABS warning light.............................................. 7-21
Electronic Brake Force Distribution (EBD)system............................................................. 7-22Steps to take if EBD system malfunctions.......... 7-22
Vehicle Dynamics Control system.................... 7-23Vehicle Dynamics Control system monitor.......... 7-25Traction Control system OFF switch................... 7-25
Tire pressure monitoring system (TPMS)........ 7-27
Parking your vehicle......................................... 7-28Parking brake.................................................... 7-28Parking tips....................................................... 7-29
Cruise control.................................................... 7-29To set cruise control.......................................... 7-30To temporarily cancel the cruise control............. 7-31To turn off the cruise control.............................. 7-31To change the cruising speed ............................ 7-31Cruise control indicator light.............................. 7-32Cruise control set indicator light........................ 7-32
Starting and operating
7
Page 259 of 426
7-12Starting and operating
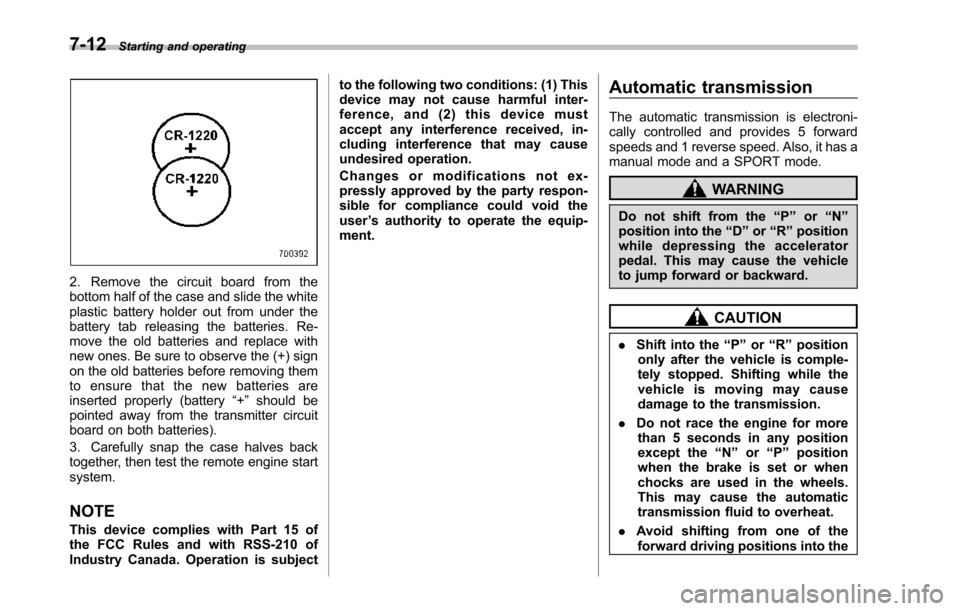
2. Remove the circuit board from thebottom half of the case and slide the whiteplastic battery holder out from under thebattery tab releasing the batteries. Re-move the old batteries and replace withnew ones. Be sure to observe the (+) signon the old batteries before removing themto ensure that the new batteries areinserted properly (battery“+”should bepointed away from the transmitter circuitboard on both batteries).
3. Carefully snap the case halves backtogether, then test the remote engine startsystem.
NOTE
This device complies with Part 15 ofthe FCC Rules and with RSS-210 ofIndustry Canada. Operation is subject
to the following two conditions: (1) Thisdevice may not cause harmful inter-ference, and (2) this device mustaccept any interference received, in-cluding interference that may causeundesired operation.
Changes or modifications not ex-pressly approved by the party respon-sible for compliance could void theuser’s authority to operate the equip-ment.
Automatic transmission
The automatic transmission is electroni-cally controlled and provides 5 forwardspeeds and 1 reverse speed. Also, it has amanual mode and a SPORT mode.
WARNING
Do not shift from the“P”or“N”position into the“D”or“R”positionwhile depressing the acceleratorpedal.This may cause the vehicleto jump forward or backward.
CAUTION
.Shift into the“P”or“R”positiononly after the vehicle is comple-tely stopped. Shifting while thevehicle is moving may causedamage to the transmission.
.Do not race the engine for morethan 5 seconds in any positionexcept the“N”or“P”positionwhen the brake is set or whenchocks are used in the wheels.This may cause the automatictransmission fluid to overheat.
.Avoid shifting from one of theforward driving positions into the
Page 260 of 426
“R”position or vice versa untilthe vehicle has completelystopped. Such shifting maycause damage to the transmis-sion.
.When parking the vehicle, firstsecurely apply the parking brakeand then place the select lever inthe“P”position. Avoid parkingfor a long time with the selectlever in any other position asdoing so could result in a deadbattery.
NOTE
.When the engine coolant tempera-ture is still low, the automatic transmis-sion will upshift to higher enginespeeds than when the coolant tempera-ture is sufficiently high in order toshorten the warm-up time and improvedriveability. The gearshift timing willautomatically shift to the normal timingafter the engine has warmed up..Immediately after ATF (automatictransmission fluid) is replaced, youmay feel that the automatic transmis-sion operation is somewhat unusual.This results from invalidation of datawhich the on-board computer hascollected and stored in memory to
allow the transmission to shift at themost appropriate times for the currentcondition of your vehicle. Optimizedshifting will be restored as the vehiclecontinues to be driven for a while.
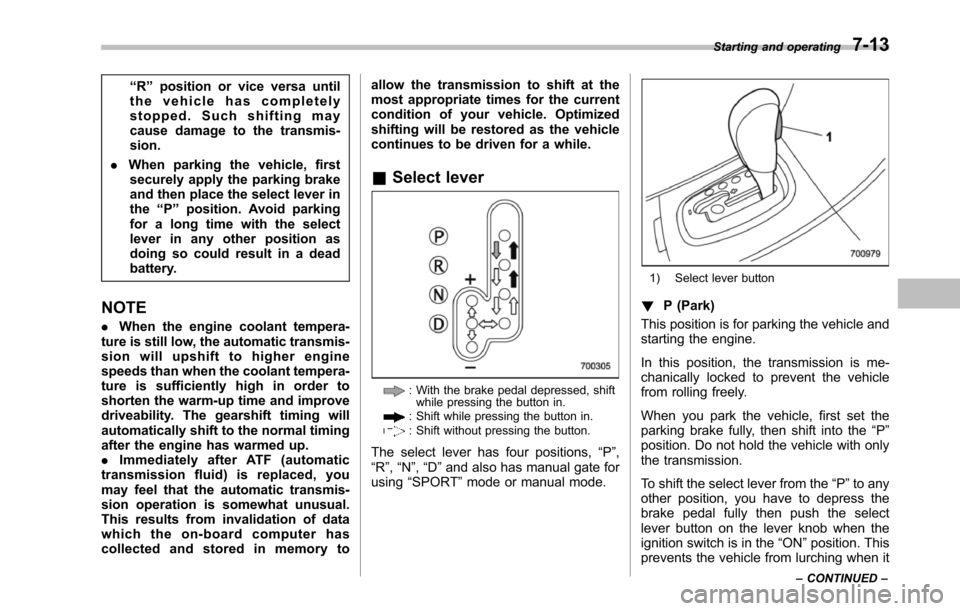
&Select lever
: With the brake pedal depressed, shiftwhile pressingthe button in.: Shift while pressing the button in.: Shift without pressing the button.
The select lever has four positions,“P”,“R”,“N”,“D”and also has manual gate forusing“SPORT”mode or manual mode.
1) Select lever button
!P (Park)
This position is for parking the vehicle andstarting the engine.
In this position, the transmission is me-chanically locked to prevent the vehiclefrom rolling freely.
When you park the vehicle, first set theparking brake fully, then shift into the“P”position. Do not hold the vehicle with onlythe transmission.
To shift the select lever from the“P”to anyother position, you have to depress thebrake pedal fully then push the selectlever button on the lever knob when theignition switch is in the“ON”position. Thisprevents the vehicle from lurching when it
Starting and operating7-13
–CONTINUED–
Page 261 of 426
7-14Starting and operating
is started.
If the select lever does not move from the“P”position with the brake pedal de-pressed, the select lever button pushedin, and the ignition switch in the ONposition, refer to“Shift lock function”F7-14.
!R (Reverse)
This position is for backing the vehicle.
To shift from the“N”to“R”position, stopthe vehicle completely then move thelever to the“R”position while pushingthe select leverbutton.
!N (Neutral)
This position is for restarting a stalledengine.
In this position the wheels and transmis-sion are not locked. In this position, thetransmission is neutral; the vehicle will rollfreely, even on the slightest incline unlessthe parking brake or foot brake is applied.
Avoid coasting with the transmissionneutral.
During coasting, there is no engine brak-ing effect.
NOTE
When the ignition switch has beenturned to the“LOCK”position, move-ment of the select lever from the“N”
position to the“R”position is possiblefor a limited time period by depressingthe brake pedal and then becomesimpossible. If the select lever becomesimpossible to be moved after a limitedtime period, turn the ignition switch tothe“ON”position. You will then be ableto move the select lever to the“P”position.
WARNING
Do not drive the vehicle with theselect lever in the“N”(Neutral)position. Engine braking has noeffect in this condition and the riskof an accident is consequently in-creased.
!D (Drive)
This position is for normal driving.
The transmission automatically shifts intoa suitable gear from 1st to 5th according tothe vehicle speed and the accelerationyou require.
When more acceleration is required in thisposition, depress the accelerator pedalfully to the floor and hold that position. Thetransmission will automatically downshiftto 4th, 3rd, 2nd or 1st gear. When yourelease the pedal, the transmission will
return to the original gear position.
To use the SPORT mode, move the leverfrom this position into the manual gate.
To use the manual mode, move the leverfrom this position into the manual gatethen move it toward the“+”end or“!”end.
!While climbing a grade
When drivingup a hill, undesired upshift to4th or 5th gear is prevented from takingplace when the accelerator is released.This minimizes the chance of subsequentdownshifting to a lower gear when accel-erating again. This prevents repeatedupshifting and downshifting resulting in asmoother operation of the vehicle.
NOTE
The transmission may downshift to 2ndor 1st gear, depending on the way theaccelerator pedal is depressed to ac-celerate the vehicle again.
&Shift lock function
The shift lock function helps prevent theimproper operationof the select lever.
.The select lever cannot be operatedunless the ignition switch is turned to the“ON”position and the brake pedal isdepressed.
.The select lever cannot be moved from
Page 264 of 426
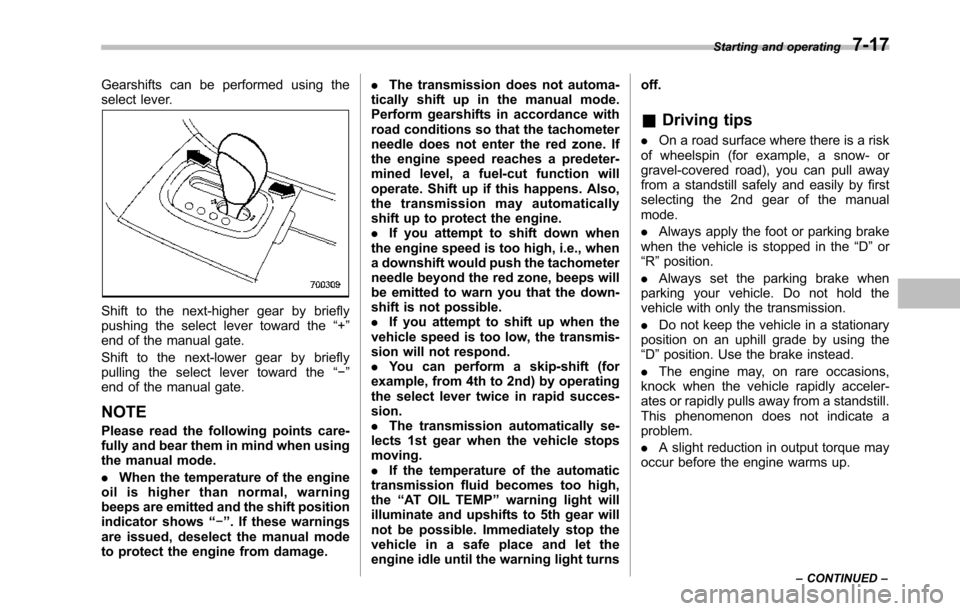
Gearshifts can be performed using theselect lever.
Shift to the next-higher gear by brieflypushing the select lever toward the“+”end of the manual gate.
Shift to the next-lower gear by brieflypulling the select lever toward the“!”end of the manual gate.
NOTE
Pleaseread the following points care-fully and bear them in mind when usingthe manual mode.
.When the temperature of the engineoil is higher than normal, warningbeeps are emitted and the shift positionindicator shows“!”. If these warningsare issued, deselect the manual modeto protect the engine from damage.
.The transmission does not automa-tically shift up in the manual mode.Perform gearshifts in accordance withroad conditions so that the tachometerneedle does not enter the red zone. Ifthe engine speed reaches a predeter-mined level, a fuel-cut function willoperate. Shift up if this happens. Also,the transmission may automaticallyshift up to protect the engine..If you attempt to shift down whenthe engine speed is too high, i.e., whena downshift would push the tachometerneedle beyond the red zone, beeps willbe emitted to warn you that the down-shift is not possible..If you attempt to shift up when thevehicle speed is too low, the transmis-sion will not respond..You can perform a skip-shift (forexample, from 4th to 2nd) by operatingthe select lever twice in rapid succes-sion..The transmission automatically se-lects 1st gear when the vehicle stopsmoving..If the temperature of the automatictransmission fluid becomes too high,the“AT OIL TEMP”warning light willilluminate and upshifts to 5th gear willnot be possible. Immediately stop thevehicle in a safe place and let theengineidle until the warning light turns
off.
&Driving tips
.On a road surface where there is a riskof wheelspin (for example, a snow- orgravel-covered road), you can pull awayfrom a standstill safely and easily by firstselecting the 2nd gear of the manualmode.
.Always apply the foot or parking brakewhen thevehicle is stopped in the“D”or“R”position.
.Always set the parking brake whenparking your vehicle. Do not hold thevehicle withonly the transmission.
.Do not keep the vehicle in a stationaryposition on an uphill grade by using the“D”position. Usethe brake instead.
.The engine may, on rare occasions,knock when the vehicle rapidly acceler-ates or rapidly pulls away from a standstill.This phenomenon does not indicate aproblem.
.A slight reduction in output torque mayoccur before the engine warms up.
Starting and operating7-17
–CONTINUED–
Page 265 of 426
7-18Starting and operating
&SPORT mode
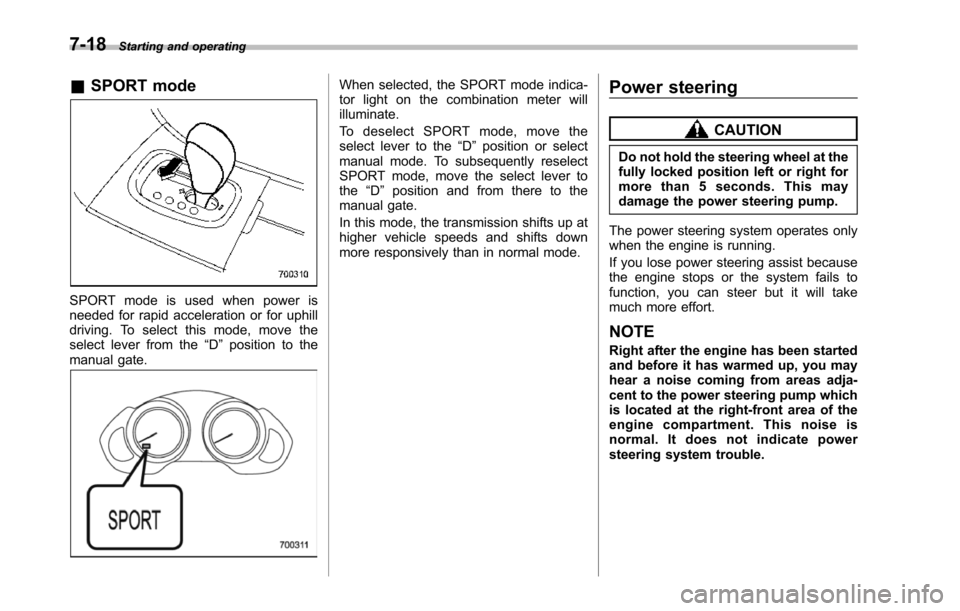
SPORT mode is used when power isneeded for rapid acceleration or for uphilldriving. To select this mode, move theselect lever from the“D”position to themanual gate.
When selected, the SPORT mode indica-tor light on the combination meter willilluminate.
To d e s e l e c t S P O R T m o d e , m o v e t h eselect lever to the“D”position or selectmanual mode. To subsequently reselectSPORT mode, move the select lever tothe“D”position and from there to themanual gate.
In this mode, the transmission shifts up athigher vehicle speeds and shifts downmore responsivelythan in normal mode.
Power steering
CAUTION
Do not hold the steering wheel at thefully locked position left or right formore than 5 seconds. This maydamage thepower steering pump.
The power steering system operates onlywhen the engine is running.
If you lose power steering assist becausethe engine stops or the system fails tofunction, you can steer but it will takemuch more effort.
NOTE
Right after the engine has been startedand before it has warmed up, you mayhear a noise coming from areas adja-centto the power steering pump whichis located at the right-front area of theengine compartment. This noise isnormal. It does not indicate powersteering system trouble.
Page 286 of 426
depth of the water and the bottom of thestream bed for firmness and ensure thatthe bed of the stream is flat. Drive slowlyand completely through the stream. Thewater should be shallow enough that itdoes not reach the vehicle’s undercar-riage. Water entering the engine air intakeor the exhaust pipe or water splashingonto electrical parts may damage yourvehicle and may cause it to stall. Neverattempt to drive through rushing water;regardless of its depth, it can wash awaythe ground from under your tires, resultingin possible loss of traction and evenvehicle rollover.
.Always check your brakes for effec-tiveness immediately after driving in sand,mud or water. Do this by driving slowlyand stepping on the brake pedal. Repeatthat process several times to dry out thebrake discsand brake pads.
.Do not drive or park over or nearflammable materials such as dry grass orfallen leaves,as they may burn easily. Theexhaust system is very hot while theengine is running and right after enginestops. This could create a fire hazard.
.After driving through tall grass, mud,rocks, sand, rivers, etc., check that thereis no grass, bush, paper, rags, stones,sand, etc. adhering to or trapped on theunderbody. Clear off any such matter from
the underbody. If the vehicle is used withthese materials trapped or adhering to theunderbody, a mechanical breakdown orfire could occur.
.Secure all cargo carried inside thevehicle and make certain that it is notpiled higher than the seatbacks. Duringsudden stops or jolts, unsecured cargocould be thrown around in the vehicle andcause injury. Do not pile heavy loads onthe roof. Those loads raise the vehicle’scenter of gravity and make it more proneto tip over.
.If you must rock the vehicle to free itfrom sand or mud, depress the acceleratorpedal slightly andmove the select leverback and forth between“D”and“R”repeatedly. Do not race the engine. Forthe best possible traction, avoid spinningthe wheels when trying to free the vehicle.
.When the road surface is extremelyslippery, you can obtain better traction bystarting the vehicle with the transmissionin 2nd than 1st.
.Never equip your vehicle with tireslarger than thosespecified in this manual.
.Wash the vehicle’s underbody after off-road driving. Suspension components areparticularly prone to dirt buildup, so theyneed to be washed thoroughly.
.Frequent driving of an AWD modelunder hard-driving conditions such as
rough roads or off roads will necessitatemore frequent replacement of engine oil,brake fluid and transmission oil than thatspecified in the maintenance scheduledescribed in the“Warranty and Mainte-nance Booklet”.
Remember that damage done to yourSUBARU while operating it off-road andnot using common sense precautionssuch as those listed above is not eligiblefor warranty coverage.
Driving tips8-7