2014 SUBARU TRIBECA instrument panel
[x] Cancel search: instrument panelPage 6 of 426
Warranties
&Warranties for U.S.A.
All SUBARU vehicles distributed bySubaru of America, Inc. and sold at retailby an authorized SUBARU dealer in theUnited States come with the followingwarranties.
.SUBARU Limited Warranty
.Emission Control Systems Warranty
.Emissions Performance Warranty
All warranty information, including detailsof coverage and exclusions, is in the“Warranty and Maintenance Booklet”.Please read these warranties carefully.
&Warranties for Canada
All SUBARU vehicles distributed bySubaru Canada, Inc. and sold at retail byan authorized SUBARU dealer in Canadacome with the following warranties.
.SUBARU Limited Warranty
.Anti-CorrosionWarranty
.Emission Control Warranty
All warranty information, including detailsof coverage and exclusions, is in the“Warranty and Service Booklet”. Pleaseread these warranties carefully.
CAUTION
.If your vehicle is equipped with anavigation system and/or RearSeat Entertainment System, thedisplays contain mercury. There-fore, the displays of the naviga-tion system and/or Rear SeatEntertainment System must beremoved beforevehicle disposal.Once the displays have beenremoved, please reuse, recycleor dispose of them as hazardouswaste.
.If your vehicle is equipped withHigh Intensity Discharge (HID)headlights, the HID headlightscontain mercury. Therefore, it isnecessary to remove HID head-lights before vehicle disposal.Once removed, please reuse, re-cycle or dispose of the HID head-lights as hazardous waste.
How to use this Owner’s
Manual
&Using your Owner’s Manual
Before you operate your vehicle, carefullyread this manual. To protect yourself andextend the service life of your vehicle,follow the instructions in this manual.Failure to observe these instructions mayresult in serious injury and damage to yourvehicle.
This manual is composed of fourteenchapters. Each chapter begins with a brieftable of contents, so you can usually tell ataglanceifthatchaptercontainstheinformation you want.
Chapter 1: Seat, seatbelt and SRSairbags
This chapter informs you how to use theseat and seatbelt and contains precau-tions for the SRS airbags.
Chapter 2: Keys and doors
This chapter informs you how to operatethe keys, locks and windows.
Chapter 3: Instruments and controls
This chapter informs you about the opera-tion of instrument panel indicators andhow to use the instruments and otherswitches.
1
–CONTINUED–
Page 9 of 426
4
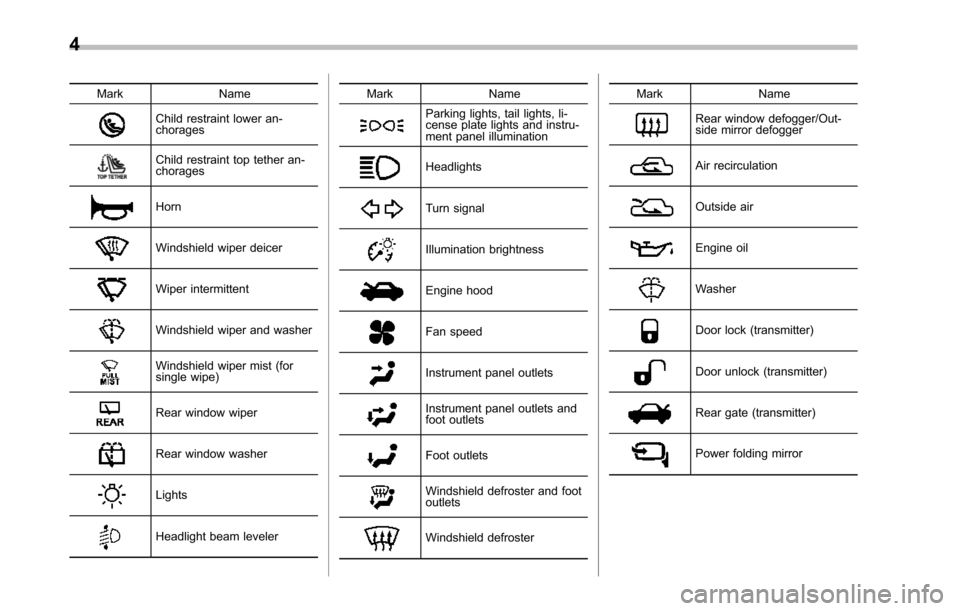
Mark Name
Child restraint lower an-chorages
Child restraint top tether an-chorages
Horn
Windshield wiper deicer
Wiper intermittent
Windshield wiper and washer
Windshield wiper mist (forsingle wipe)
Rear window wiper
Rear window washer
Lights
Headlight beam leveler
Mark Name
Parking lights, tail lights, li-cense plate lights and instru-ment panel illumination
Headlights
Turn signal
Illumination brightness
Engine hood
Fan speed
Instrument panel outlets
Instrument panel outlets andfoot outlets
Foot outlets
Windshield defroster and footoutlets
Windshield defroster
Mark Name
Rear window defogger/Out-side mirror defogger
Air recirculation
Outside air
Engine oil
Washer
Door lock (transmitter)
Door unlock (transmitter)
Rear gate (transmitter)
Power folding mirror
Page 22 of 426
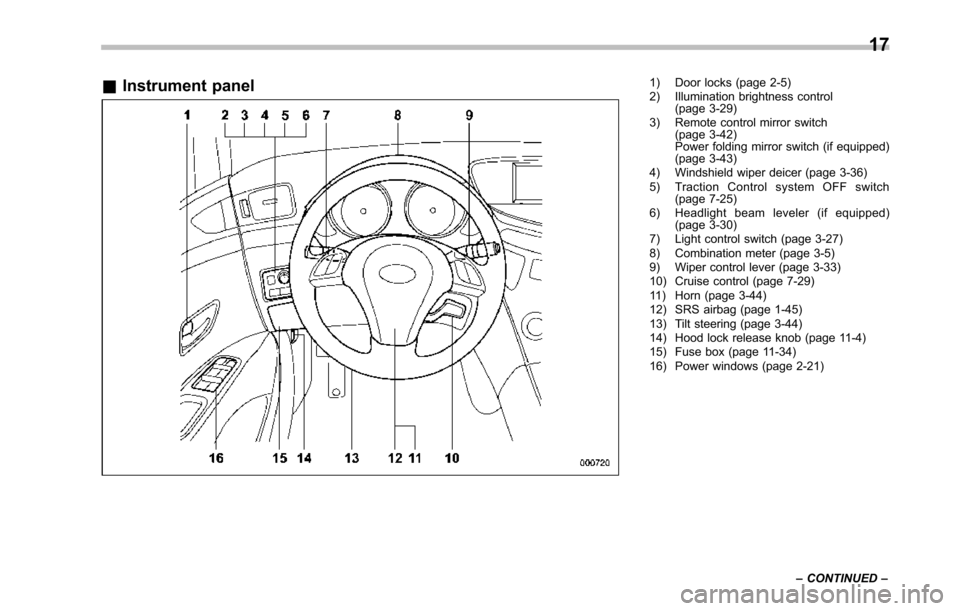
&Instrument panel1) Door locks (page 2-5)2) Illumination brightness control(page 3-29)3) Remote control mirror switch(page 3-42)Power folding mirror switch (if equipped)(page 3-43)4) Windshield wiper deicer (page 3-36)5) Traction Control system OFF switch(page 7-25)6) Headlight beam leveler (if equipped)(page 3-30)7) Light control switch (page 3-27)8) Combination meter (page 3-5)9) Wiper control lever (page 3-33)10) Cruise control (page 7-29)11) Horn (page 3-44)12) SRS airbag (page 1-45)13) Tilt steering (page 3-44)14) Hood lock release knob (page 11-4)15) Fusebox (page 11-34)16) Power windows (page 2-21)
17
–CONTINUED–
Page 83 of 426
1-52Seat, seatbelt and SRS airbags
.Do not apply any strong impact to thefront passenger’s seat such as by kicking.
.Do not spill liquid on the front passen-ger’s seat. If liquid is spilled, wipe it offimmediately.
.Do not remove or disassemble the frontpassenger’s seat.
.Do not install any accessory (such asan audio amplifier) other than a genuineSUBARU accessory under the front pas-senger’s seat.
.Do not place anything (shoes, umbrel-la, etc.) under the front passenger’s seat.
.The front passenger’s seat must not beused with the head restraint removed.
.Do not leave any article including achild restraint system on the front passen-ger’s seat or the seatbelt tongue andbuckle engaged when you leave yourvehicle.
.Do not place a magnet near theseatbelt buckle and the seatbelt retractor.
If the seatbelt buckle switch and/or frontpassenger’s occupant detection systemhave failed, the SRS airbag systemwarning light will illuminate. Have thesystem inspected by your SUBARU deal-er immediately if the SRS airbag systemwarning light illuminates.
If your vehicle has sustained impact, thismay affect the proper function of the
SUBARU advanced frontal airbag system.Have your vehicle inspected at yourSUBARU dealer.
NOTE
The front passenger’s SRS side airbag,SRS curtain airbag and seatbelt pre-tensioner are not controlled by theSUBARU advanced frontal airbag sys-tem.
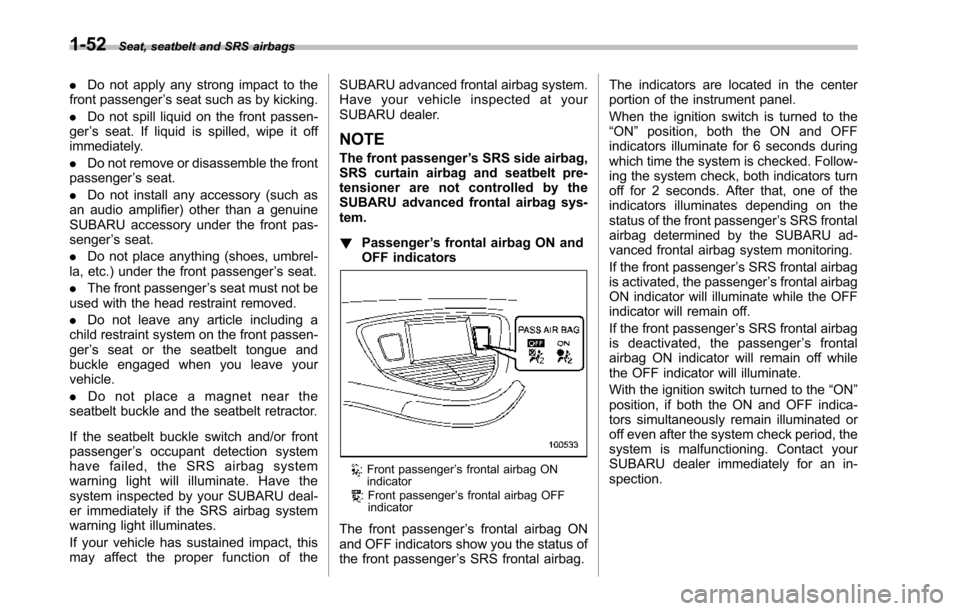
!Passenger’s frontal airbag ON andOFF indicators
: Front passenger’s frontal airbag ONindicator: Front passenger’s frontal airbag OFFindicator
The front passenger’s frontal airbag ONand OFF indicators show you the status ofthe front passenger’s SRS frontal airbag.
The indicators are located in the centerportion of the instrument panel.
When the ignition switch is turned to the“ON”position, both the ON and OFFindicators illuminate for 6 seconds duringwhich time the system is checked. Follow-ing the system check, both indicators turnoff for 2 seconds. After that, one of theindicators illuminates depending on thestatus of the front passenger’s SRS frontalairbag determined by the SUBARU ad-vanced frontal airbag system monitoring.
If the front passenger’s SRS frontal airbagis activated, the passenger’s frontal airbagON indicator will illuminate while the OFFindicator will remain off.
If the front passenger’s SRS frontal airbagis deactivated, the passenger’s frontalairbag ON indicator will remain off whilethe OFFindicator will illuminate.
With the ignition switch turned to the“ON”position, if both the ON and OFF indica-tors simultaneously remain illuminated oroff even after the system check period, thesystem is malfunctioning. Contact yourSUBARU dealer immediately for an in-spection.
Page 86 of 426
straight in the center of the seat cushion,correctly fasten the seatbelt, position his/her legs out forward, and adjust the seat tothe rearmost position. Turn the ignitionswitch to the“ON”position. If the OFFindicator remains illuminated while the ONindicator remains off, take the followingactions.
.Turn the ignition switch to the“LOCK”position.
.Ensure that there are no articles,books, shoes, or other objects trappedunder the seat, at the rear of the seat, oron the side of the seat.
.Next, turn the ignition switch to the“ON”position andwait 6 seconds to allowthe system to complete self-checking.Following the system check, both indica-tors turn off for 2 seconds. Now, the ONindicator should illuminate while the OFFindicator remains off.
If the OFF indicator still remains illumi-nated while the ON indicator remains off,ask the occupant to move to the rear seatand immediately contact your SUBARUdealer for an inspection.
!How to contact the vehicle manu-facturer concerning modificationsfor persons with disabilities thatmay affect the advanced airbagsystem (U.S. only)
Changing or moving any parts of the frontseats, seatbelts, front bumper, front sideframe, instrument panel, combination me-ter, steering wheel, steering column, tire,suspension or floor panel can affect theoperation of the SUBARU advanced air-bag system. If you have any questions,you may contact the following SUBARUdistributors.
Subaru of America, Inc.
Customer Dealer Services Department
P.O. Box 6000
Cherry Hill, NJ 08034-6000
1-800-SUBARU3 (1-800-782-2783)
Servco Subaru Inc., dba Subaru Hawaii
2850 Pukoloa Street, Suite 202, Honolulu,HI 96819
808-839-2273
Shen’s Corporation dba Prestige Automo-bile
491, East Marine Drive, Route 1 Dededo,Guam
671-633-2698
Trebol Motors
P.O. Box 11204, San Juan, Puerto Rico00910
787-793-2828
There are currently no SUBARU distribu-tors in any other U.S. territories. If you arein such an area, please contact theSUBARU distributor or dealer from whichyou bought your vehicle.
Seat, seatbelt and SRS airbags1-55
–CONTINUED–
Page 94 of 426

Ahands-freemicrophoneorother accessory in such a loca-tion could be propelled throughthe cabin with great force by thecurtain airbag, or it could preventcorrect deployment of the curtainairbag. In either case, the resultcould be serious injuries.
WARNING
Do not hang coat hangers or otherhard or pointed objects on the coathooks. If such items were hangingon the coat hooks during deploy-ment of the SRS curtain airbags,they could cause serious injuries bycoming off the coat hooks and beingthrown through the cabin or by
preventing deployment of the cur-tain airbags.
Before hanging clothing on the coathooks, make sure there are no sharpobjects in the pockets. Hang cloth-ing directly on the coat hooks with-out using hangers.
WARNING
Do not put any kind of cover orclothes or other objects over eitherfront seatback and do not attachlabels or stickers to the front seatsurface on or near the SRS sideairbag. They could prevent properdeployment of the SRS side airbag,reducingprotection available to the
front seat’s occupant.
!Operation
The SRS side airbag and SRS curtainairbag can function only when the ignitionswitch is in the“ON”position.
The driver’s and front passenger’s SRSside airbags and SRS curtain airbagsdeploy independently of each other be-cause each has its own impact sensor.Therefore, they may not both deploy in thesame accident. Also, the SRS side airbagand SRS curtain airbag deploys indepen-dently of the driver’s and front passen-ger’s SRS frontal airbags in the steeringwheel and instrument panel.
An impact sensor, which senses impactforce, is located in each of the left and
Seat, seatbelt and SRS airbags1-63
–CONTINUED–
Page 138 of 426
Hazard warning flasher
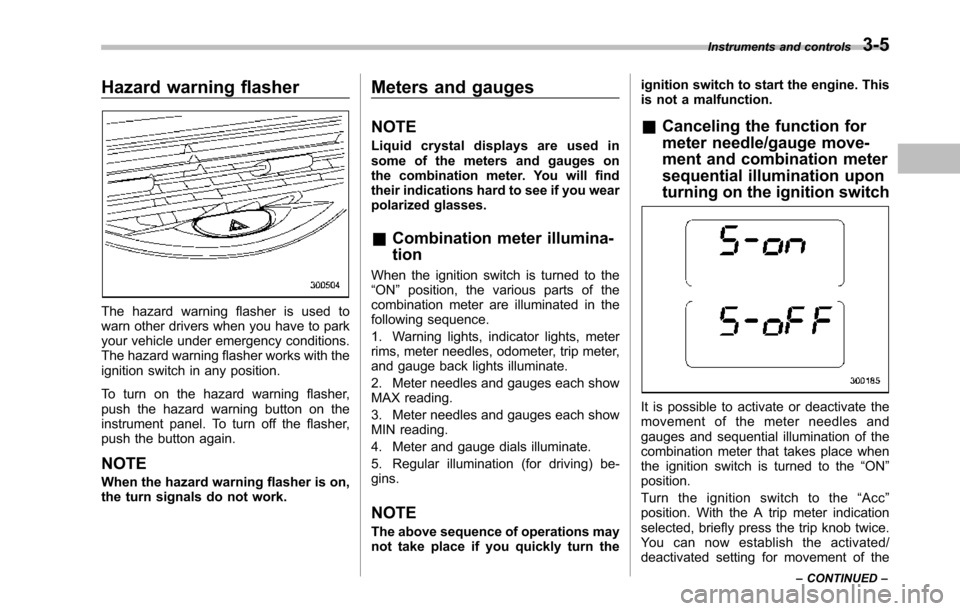
Thehazard warning flasher is used towarn other drivers when you have to parkyour vehicle under emergency conditions.The hazard warning flasher works with theignition switch in any position.
To turn on the hazard warning flasher,push the hazard warning button on theinstrumentpanel. To turn off the flasher,push the button again.
NOTE
When the hazard warning flasher is on,the turn signals do not work.
Meters and gauges
NOTE
Liquid crystal displays are used insome of the meters and gauges onthe combination meter. You will findtheir indications hard to see if you wearpolarized glasses.
&Combination meter illumina-
tion
When the ignition switch is turned to the“ON”position, the various parts of thecombinationmeter are illuminated in thefollowing sequence.
1. Warning lights, indicator lights, meterrims, meter needles, odometer, trip meter,and gauge back lights illuminate.
2. Meter needles and gauges each showMAX reading.
3. Meter needles and gauges each showMIN reading.
4. Meter and gauge dials illuminate.
5. Regular illumination (for driving) be-gins.
NOTE
The above sequence of operations maynot take place if you quickly turn the
ignition switch to start the engine. Thisis not a malfunction.
&Canceling the function for
meter needle/gauge move-
ment and combination meter
sequential illumination upon
turning on the ignition switch
It is possible to activate or deactivate themovement of the meter needles andgauges and sequential illumination of thecombination meter that takes place whenthe ignition switch is turned to the“ON”position.
Turn the ignition switch to the“Acc”position. With the A trip meter indicationselected, briefly press the trip knob twice.Yo u c a n n o w e s t a b l i s h t h e a c t i v a t e d /deactivated setting for movement of the
Instruments and controls3-5
–CONTINUED–
Page 161 of 426
3-28Instruments and controls
&Headlights
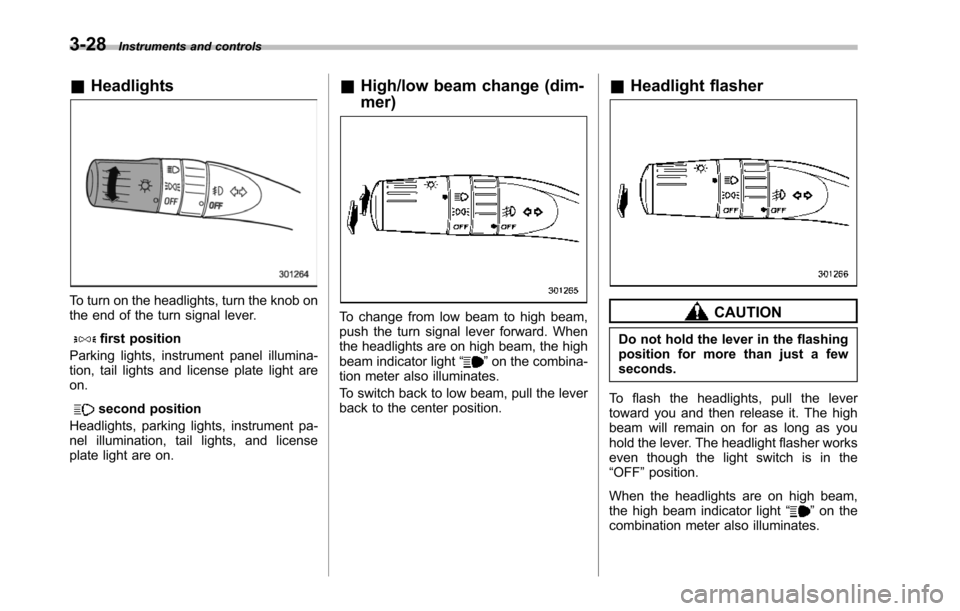
To turn on the headlights, turn the knob onthe end of the turn signal lever.
first position
Parking lights, instrument panel illumina-tion, tail lights and license plate light areon.
second position
Headlights, parking lights, instrument pa-nel illumination, tail lights, and licenseplate light are on.
&High/low beam change (dim-
mer)
To change from low beam to high beam,push the turn signal lever forward. Whenthe headlights are on high beam, the highbeamindicator light“”on the combina-tion meter also illuminates.
To switch back to low beam, pull the leverback to the center position.
&Headlight flasher
CAUTION
Do not hold the lever in the flashingposition for more than just a fewseconds.
To flash the headlights, pull the levertoward you and then release it. The highbeam will remain on for as long as youhold the lever. The headlight flasher workseven though the light switch is in the“OFF”position.
When the headlights are on high beam,the high beam indicator light“”on thecombinationmeter also illuminates.