2014 SUBARU TRIBECA oil change
[x] Cancel search: oil changePage 57 of 426
1-26Seat, seatbelt and SRS airbags
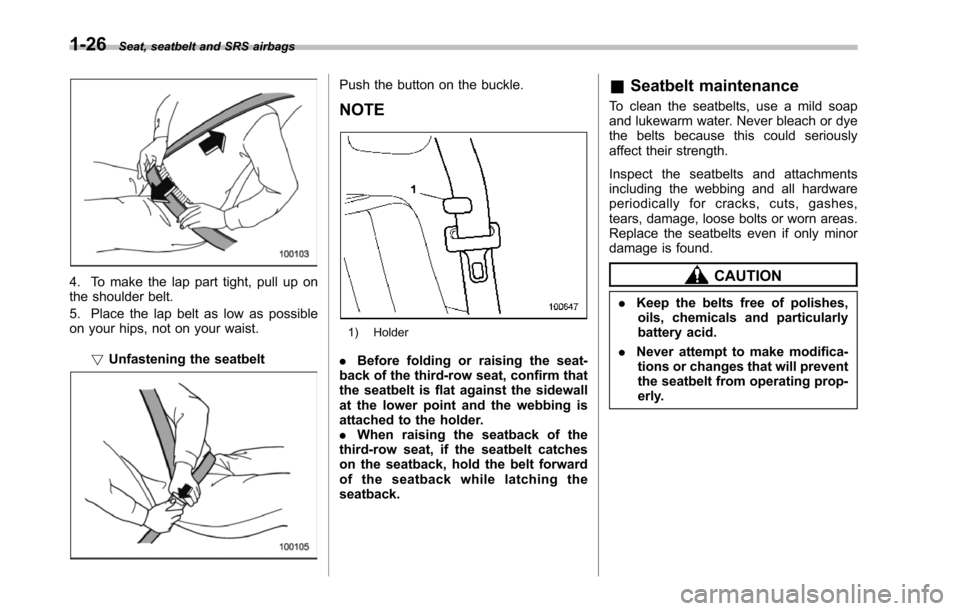
4. To make the lap part tight, pull up onthe shoulder belt.
5. Place the lap belt as low as possibleon your hips, not on your waist.
!Unfastening the seatbelt
Push the button on the buckle.
NOTE
1) Holder
.Before folding or raising the seat-backof the third-row seat, confirm thatthe seatbelt is flat against the sidewallat the lower point and the webbing isattached to the holder..When raising the seatback of thethird-rowseat, if the seatbelt catcheson the seatback, hold the belt forwardof the seatback while latching theseatback.
&Seatbelt maintenance
To clean the seatbelts, use a mild soapand lukewarm water. Never bleach or dyethe belts because this could seriouslyaffect their strength.
Inspect the seatbelts and attachmentsincluding the webbing and all hardwareperiodically for cracks, cuts, gashes,tears, damage, loose bolts or worn areas.Replacethe seatbelts even if only minordamage is found.
CAUTION
.Keep the belts free of polishes,oils, chemicals and particularlybattery acid.
.Never attempt to make modifica-tions or changes that will preventthe seatbelt from operating prop-erly.
Page 258 of 426
sing the brake pedal repeatedly will togglethe feature ON or OFF each time.
7. To exit the remote transmitter andfeature programming mode, turn the igni-tion switch to the“LOCK”position, removethe key from the ignition switch and testoperation of the remote transmitter(s) andhorn confirmation feature.
&System maintenance
!Changing the batteries
CAUTION
.Do not let dust, oil or water get onor in the remote engine starttransmitter when replacing thebattery.
.Be careful not to damage theprinted circuit board in the re-mote engine start transmitterwhen replacing the battery.
.Be careful not to allow children totouch the battery and any re-moved parts; children couldswallowthem.
.There is a danger of explosion ifan incorrect replacement batteryis used. Replace only with thesame or equivalent type of bat-tery.
.Batteries should not be exposedto excessive heat such as sun-shine, fire or the like.
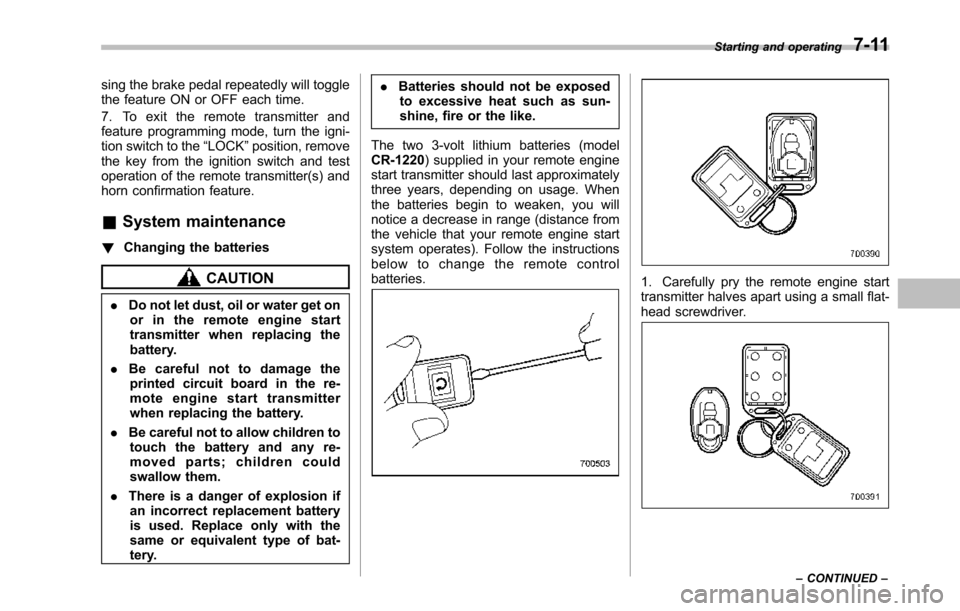
The two 3-volt lithium batteries (modelCR-1220) supplied in your remote enginestart transmitter should last approximatelythree years, depending on usage. Whenthebatteries begin to weaken, you willnotice a decrease in range (distance fromthe vehicle that your remote engine startsystem operates). Follow the instructionsbelow to change the remote controlbatteries.1. Carefully pry the remote engine starttransmitter halves apart using a small flat-head screwdriver.
Starting and operating7-11
–CONTINUED–
Page 306 of 426
–all cargo in the trailer is securedsafely in position.–the side mirrors provide a goodrearward field of view without a sig-nificant blind spot..Sufficient time should be taken to learnthe“feel”of the vehicle/trailer combinationbefore starting out on a trip. In an area freeof traffic, practice turning, stopping andbacking up.
!Driving with a trailer
.You should allow for considerably morestopping distance when towing a trailer.Avoid sudden braking because it mayresult in skidding or jackknifing and loss ofcontrol.
.Avoid uneven steering, sharp turns andrapid lane changes.
.Slow down before turning. Make alonger than normal turning radius becausethe trailer wheels will be closer than thevehicle wheels to the inside of the turn. Ina tight turn, the trailer could hit yourvehicle.
.Crosswinds will adversely affect thehandling of your vehicle and trailer, caus-ing sway. Crosswinds can be due toweather conditions or the passing of largetrucks or buses. If swaying occurs, firmlygrip the steering wheel and slow downimmediately but gradually.
.When passing other vehicles, consid-erable distance is required because of theadded weight and length caused byattaching the trailer to your vehicle.
1) Left turn2) Right turn
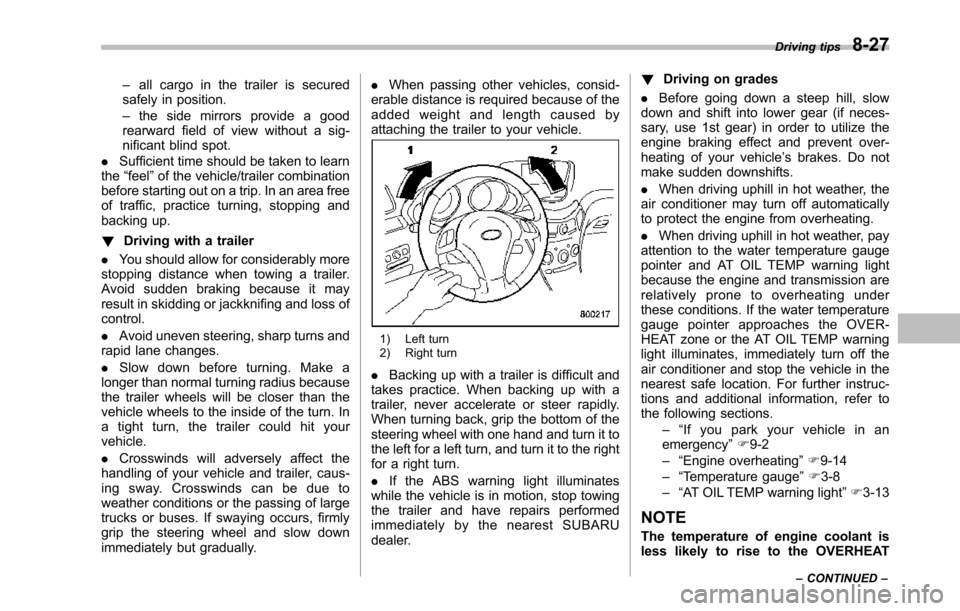
.Backing up with a trailer is difficult andtakes practice. When backing up with atrailer, never accelerate or steer rapidly.When turning back, grip the bottom of thesteering wheel with one hand and turn it tothe left for a left turn, and turn it to the rightfor a right turn.
.If the ABS warning light illuminateswhile the vehicle is in motion, stop towingthe trailer and have repairs performedimmediately by the nearest SUBARUdealer.
!Driving on grades
.Before going down a steep hill, slowdown and shift into lower gear (if neces-sary, use 1st gear) in order to utilize theengine braking effect and prevent over-heating of your vehicle’s brakes. Do notmake sudden downshifts.
.When driving uphill in hot weather, theair conditioner may turn off automaticallyto protect the engine from overheating.
.When driving uphill in hot weather, payattention to the water temperature gaugepointer and AT OIL TEMP warning lightbecause the engine and transmission arerelatively prone to overheating underthese conditions. If the water temperaturegauge pointer approaches the OVER-HEAT zone or the AT OIL TEMP warninglight illuminates, immediately turn off theair conditioner and stop the vehicle in thenearest safe location. For further instruc-tions and additional information, refer tothe following sections.–“If you park your vehicle in anemergency”F9-2–“Engine overheating”F9-14–“Temperature gauge”F3-8–“AT OIL TEMP warning light”F3-13
NOTE
The temperature of engine coolant isless likely to rise to the OVERHEAT
Driving tips8-27
–CONTINUED–
Page 340 of 426
Engine oil
NOTE
.The engine oil consumption rate isnot stabilized, and therefore cannot bedetermined until the vehicle has tra-veled at least several thousand miles(kilometers). Even after break-in, whenthe vehicle is used under severe driv-ing conditions such as those men-tioned in the“Warranty and Mainte-nance Booklet”,engineoiliscon-sumed or deteriorated more quicklythan under normal driving conditions.If you drive your vehicle under thesesevere conditions, you should checkthe oil level at least at every secondfuel fill-up time, and change the oilmore frequently. Please refer to the“Warranty and Maintenance Booklet”for more details..If the oil consumption rate seemsabnormally high after the break-inperiod, for example more than 1 quartper 1,200 miles or 1 liter per 2,000kilometers, we recommend that youcontact your SUBARU dealer.
&Checking the oil level
Check the engine oil level at each fuelstop.
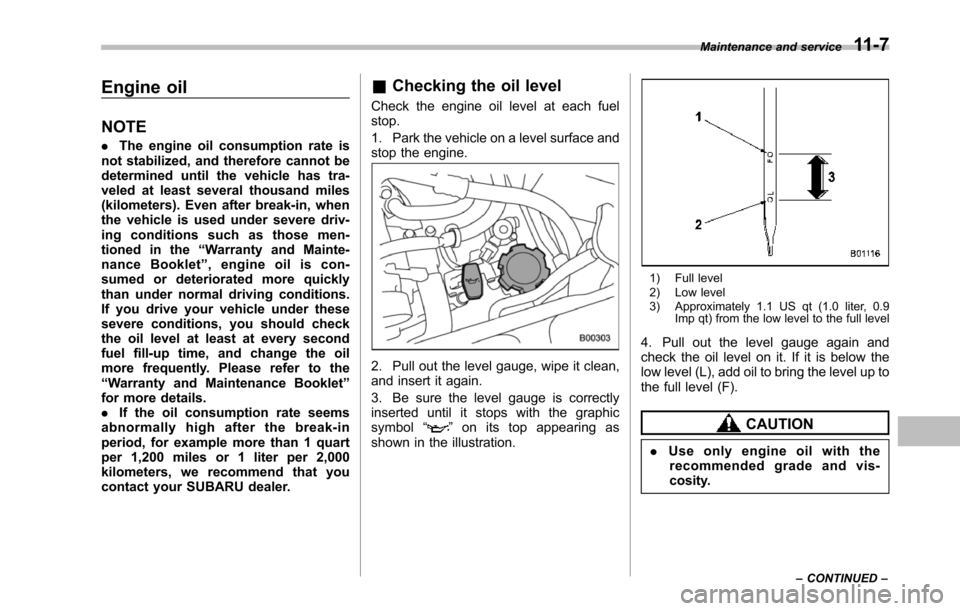
1. Park the vehicle on a level surface andstop the engine.
2. Pull out the level gauge, wipe it clean,and insert it again.
3. Be sure the level gauge is correctlyinserted until it stops with the graphicsymbol“”on its top appearing asshown in the illustration.
1) Full level2) Low level3) Approximately 1.1 US qt (1.0 liter, 0.9Imp qt) from the low level to the full level
4. Pull out the level gauge again andcheck the oil level on it. If it is below thelow level (L), add oil to bring the level up tothe fulllevel (F).
CAUTION
.Use only engine oil with therecommended grade and vis-cosity.
Maintenance and service11-7
–CONTINUED–
Page 341 of 426
11-8Maintenance and service
.Be careful not to spill engine oilwhen adding it. If oil touches theexhaust pipe, it may cause a badsmell, smoke, and/or a fire. Ifengine oil gets on the exhaustpipe, be sure to wipe it off.
If you check the oil level just after stoppingthe engine, wait a few minutes for the oil todrain back into the oil pan before checkingthe level.
To prevent overfilling the engine oil, do notadd any additional oil above the full levelwhen the engine is cold.
&Changing the oil and oil filter
CAUTION
.If you change your own oil, besure to drain all the oil from thefilter before disposal.
.Do not dispose of used engine oilby placing it in the trash, or bypouring it onto the ground, intosewers, or into any body of water.Check with your local govern-ment office for the proper dis-posal options available to you.
Change the oil and oil filter according tothe maintenance schedule in the“War-
ranty and Maintenance Booklet”.
The engine oil and oil filter must bechanged more frequently than listed inthe maintenance schedule when drivingon dusty roads, when short trips arefrequently made, or when driving inextremely cold weather.
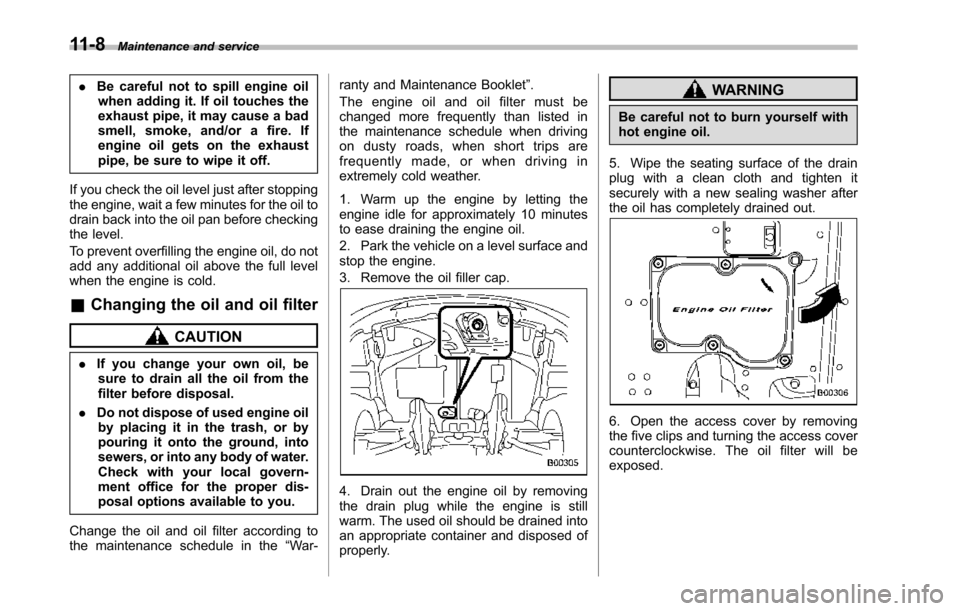
1. Warm up the engine by letting theengine idle for approximately 10 minutesto ease draining the engine oil.
2. Park the vehicle on a level surface andstop the engine.
3. Remove the oil filler cap.
4. Drain out the engine oil by removingthe drain plug while the engine is stillwarm. The used oil should be drained intoan appropriate container and disposed ofproperly.
WARNING
Be careful not to burn yourself withhot engine oil.
5. Wipe the seating surface of the drainplug with a clean cloth and tighten itsecurely with a new sealing washer afterthe oil has completely drained out.
6. Open the access cover by removingthe five clips and turning the access covercounterclockwise. The oil filter will beexposed.
Page 343 of 426
11-10Maintenance and service
mended engine oil for optimum engineperformance. Conventional oil may beused if synthetic oil is unavailable.
Cooling system
WARNING
Never attempt to remove the radia-tor cap until the engine has beenshut off and has cooled downcompletely. Since the coolant isunder pressure, you may sufferserious burns from a spray of boil-ing hot coolant when the cap isremoved.
CAUTION
.Vehicles are filled at the factorywith SUBARU Super Coolant thatdoes not require the first changefor 11 years/137,500 miles (11years/220,000 km). This coolantshould not be mixed with anyother brand or type of coolantduring this period. Mixing with adifferent coolant will reduce thelife of the coolant. Should it benecessary to top off the coolantfor any reason, use onlySUBARU Super Coolant.
If the SUBARU Super Coolant isdiluted with another brand ortype, the maintenance interval is
shortened to that of the mixingcoolant.
.Do not splash the engine coolantover painted parts. The alcoholcontained in the engine coolantmay damage the paint surface.
&Hose and connections
Your vehicle employs an electric coolingfan which is thermostatically controlled tooperate when the engine coolant reachesa specific temperature.
If the radiator cooling fan does not operateeven when the engine coolant tempera-ture gauge exceeds the normal operatingrange, the cooling fan circuit may bedefective.Check the fuse and replace itif necessary. If the fuse is not blown, havethe cooling system checked by yourSUBARU dealer.
If frequent addition of coolant is neces-sary, there may be a leak in the enginecooling system. It is recommended thatthe cooling system and connections bechecked for leaks, damage, or looseness.
Page 360 of 426
WARNING
.When replacing a tire, you mustuse a tire that is of the same size,circumference, speed symboland load index as the originaltires listed on the tire placard.Using tires of other sizes, cir-cumferences or constructionsmay result in severe mechanicaldamage to the drive train of yourvehicle and may affect ride,handling, braking, speedometer/odometer calibration, and clear-ance betweenthe body and tires.It also may be dangerous andlead to loss of vehicle control.
.You must install four tires that areof the same size, circumference,construction, manufacturer,brand(tread pattern), degree ofwear, speed symbol and loadindex. Mixing tires of differenttypes, sizes or degrees of wearcan result in damage to thevehicle’spowertrain.Useofdifferent types or sizes of tirescan also dangerously reducecontrollability and braking per-formance and can lead to anaccident.
.Use only radial tires. Do not use
radial tires together with beltedbias tires and/or bias-ply tires.Doing so can dangerously re-duce controllability, resulting inan accident.
&Wheel replacement
When replacing wheels due, for example,to damage, make sure the replacementwheels match the specifications of thewheels that are fitted as standard equip-ment. Replacement wheels are availablefrom SUBARUdealers.
WARNING
Use only those wheels that arespecified for your vehicle. Wheelsnot meeting specifications couldinterfere with brake caliper opera-tion and may cause the tires to rubagainst the wheel well housing dur-ing turns. The resulting loss ofvehicle control could lead to anaccident.
Aluminum wheels
.Aluminum wheels can be scratchedand damaged easily. Handle them care-fully to maintain their appearance, perfor-mance, and safety.
.When any of the wheels are removedand replaced for tire rotation or to changea flat tire, always check the tightness ofthe wheel nuts after driving approximately600 miles (1,000 km). If any nut is loose,tighten it to the specified torque.–For the wheel nut tightening torque,refer to“Tires”F12-8.–For the wheel nut tightening proce-dure, refer to“Changing a flat tire”F9-6..Never apply oil to the threaded parts,wheel nuts, or tapered surface of thewheel.
.Never let the wheel rub against sharpprotrusions or curbs.
.When wheel nuts, balance weights, orthe center cap is replaced, be sure toreplace them with genuine SUBARU partsdesigned for the specific wheel.
Maintenance and service11-27
Page 425 of 426
GAS STATION REFERENCE
&Fuel
Useunleaded gasolinewith an octane rating of87 AKI (90RON) or higher.
&Fuel octane rating
This octane rating is the average of the Research Octane andMotor Octane numbers and is commonly referred to as theAntiKnock Index (AKI). Refer to“Fuel octane rating”F7-2.
&Fuel capacity
16.9 US gal (64 liters, 14.1 Imp gal)
&Engine oil
Use only the following oils..API classification SM or SN with the words“ENERGYCONSERVING”or“RESOURCE CONSERVING”.or ILSAC GF-4 or GF-5, which can be identified with theILSAC certification mark (Starburst mark)
For the complete viscosity requirements, refer to“Engine oil”F12-4.
&Engine oil capacity
6.9 US qt (6.5 liters, 5.7 Imp qt)
The indicated oil quantity is only a guideline and is estimatedbased on a case when the engine oil is changed with an oilfilter. After refilling the engine with oil, the oil level should bechecked using an oil level gauge. For more details aboutmaintenance and service, refer to“Engine oil”F11-7.
&Cold tire pressure
Refer to“Tires”F12-8.