2014 SUBARU TRIBECA homelink
[x] Cancel search: homelinkPage 222 of 426
Interior light......................................................... 6-2Dome light.......................................................... 6-2Cargo area light.................................................. 6-3Rear gate light.................................................... 6-3Map light............................................................. 6-3Automatic ambient light for center console area(if equipped)...................................................... 6-4
Sun visors........................................................... 6-4Sun visor extension plate.................................... 6-5Vanity mirror with light........................................ 6-5
Storage compartment......................................... 6-6Glove box........................................................... 6-6Center console box............................................. 6-6Rear console....................................................... 6-7Overhead console............................................... 6-8
Cupholder........................................................... 6-8Front passenger’s cup holder.............................. 6-8Second-row seat cup holders.............................. 6-9Third-row seat cup holders.................................. 6-9
Bottle holders...................................................... 6-9
Accessory power outlets................................... 6-10
Coat hook........................................................... 6-12
Shopping bag hook............................................ 6-13
Floor mat............................................................ 6-13
Cargo area cover (if equipped)......................... 6-14Using the cover................................................. 6-14To remove the cover.......................................... 6-15To install the cover housing............................... 6-15
Convenient tie-down hooks.............................. 6-16
Under-floor storage compartment.................... 6-16
HomeLink®Wireless Control System (ifequipped)........................................................ 6-17Garage door opener programming in theU.S.A............................................................... 6-18Programming rolling-code-protected garage dooropeners in the U.S.A........................................ 6-19Programmingfor entrance gates and garage dooropeners in Canada........................................... 6-20Programming other devices............................... 6-21Operating the HomeLink®Wireless ControlSystem............................................................ 6-21ErasingHomeLink®button memory.................... 6-21In case a problem occurs................................... 6-21
Rear view camera (if equipped)........................ 6-21How to use the rear view camera....................... 6-22Viewing range on the screen.............................. 6-23Help line............................................................ 6-24
Interior equipment
6
Page 238 of 426
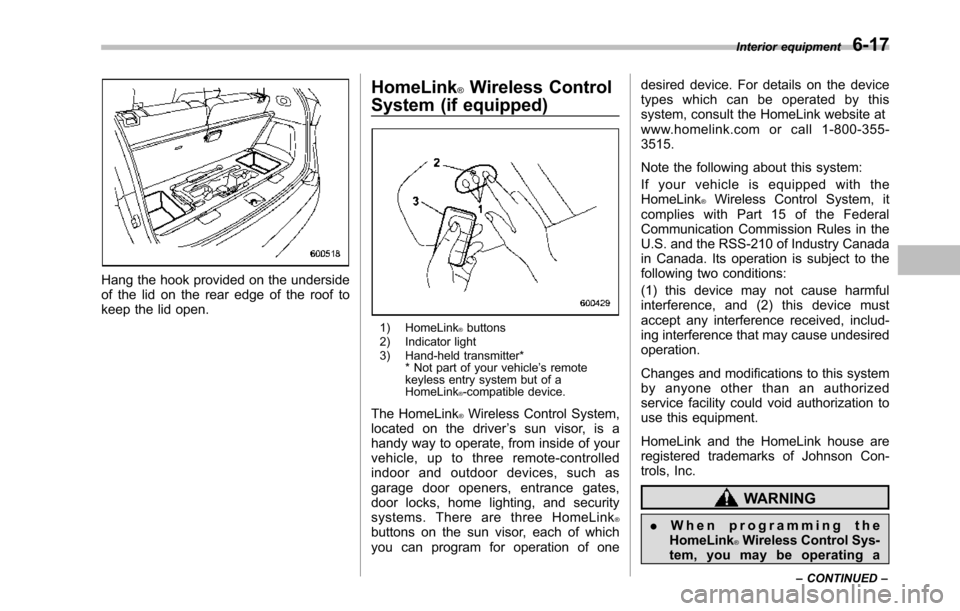
Hang the hook provided on the undersideof the lid on the rear edge of the roof tokeepthe lid open.
HomeLink®Wireless Control
System (if equipped)
1) HomeLink®buttons2) Indicator light3) Hand-held transmitter** Not part of your vehicle’s remotekeyless entry system but of aHomeLink®-compatible device.
The HomeLink®Wireless Control System,located on the driver’s sun visor, is ahandy way to operate, from inside of yourvehicle, up to three remote-controlledindoor and outdoor devices, such asgarage door openers, entrance gates,door locks, home lighting, and securitysystems. There are three HomeLink®buttons on the sun visor, each of whichyou can program for operation of one
desired device. For details on the devicetypes which can be operated by thissystem, consult the HomeLink website atwww.homelink.com or call 1-800-355-3515.
Note the following about this system:
If your vehicle is equipped with theHomeLink®Wireless Control System, itcomplies with Part 15 of the FederalCommunication Commission Rules in theU.S. and the RSS-210 of Industry Canadain Canada. Its operation is subject to thefollowing two conditions:
(1) this device may not cause harmfulinterference, and (2) this device mustaccept any interference received, includ-ing interference that may cause undesiredoperation.
Changes and modifications to this systemby anyone other than an authorizedservice facility could void authorization touse this equipment.
HomeLink and the HomeLink house areregistered trademarks of Johnson Con-trols, Inc.
WARNING
.When programming theHomeLink®Wireless Control Sys-tem, you may be operating a
Interior equipment6-17
–CONTINUED–
Page 239 of 426
6-18Interior equipment
garage door opener or otherdevice. Make sure that peopleand objects are out of the wayof the garage door opener orother device to prevent potentialharm or damage.
.Do not use the HomeLink®Wire-less Control System with anygarage door opener that lacksthe safety stopand reverse fea-ture as required by applicablesafety standards. A garage dooropener which cannot detect anobject, signaling the door to stopand reverse, does not meet thesesafetystandards. Using a garagedoor opener without these fea-tures increases risk of seriousinjury or death. For more infor-mation, consult the HomeLinkwebsite at www.homelink.comor call 1-800-355-3515.
CAUTION
When programming the HomeLink®WirelessControl System to operatea garage door opener or an entrancegate, unplug the device’smotorfrom the outlet during programmingto prevent motor burnout.
NOTE
.After programming your HomeLink®Wireless Control System for the de-sired devices, retain the hand-heldtransmitters for further programmingor device testing in the event of aproblem..It is recommended that you insert anew battery in the hand-held transmit-ter of a device to ensure correctprogramming.
&Garage door opener pro-
gramming in the U.S.A.
NOTE
When programming the HomeLink®Wireless ControlSystem for a garagedoor opener, it is suggested that youpark the vehicle outside the garage.
1. Unplug the motor of the garage dooropener from the outlet.
NOTE
When reprogramming any of theHomeLink®buttons that are alreadyprogrammed for other devices, performthe procedure in step 2.
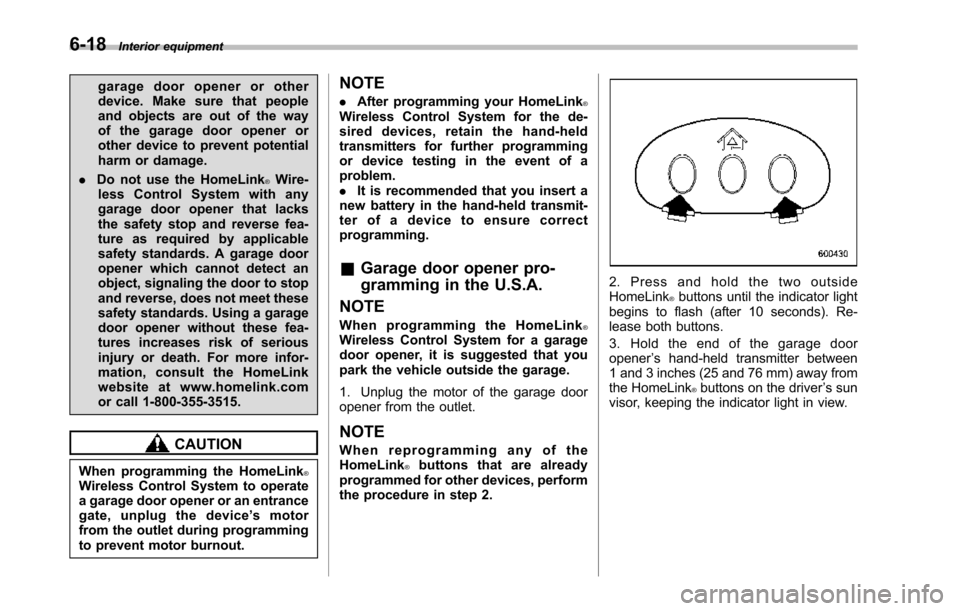
2. Press and hold the two outsideHomeLink®buttons until the indicator lightbegins to flash (after 10 seconds). Re-lease both buttons.
3. Hold the end of the garage dooropener’s hand-held transmitter between1 and 3 inches (25 and 76 mm) away fromthe HomeLink®buttons on the driver’s sunvisor, keeping the indicator light in view.
Page 240 of 426
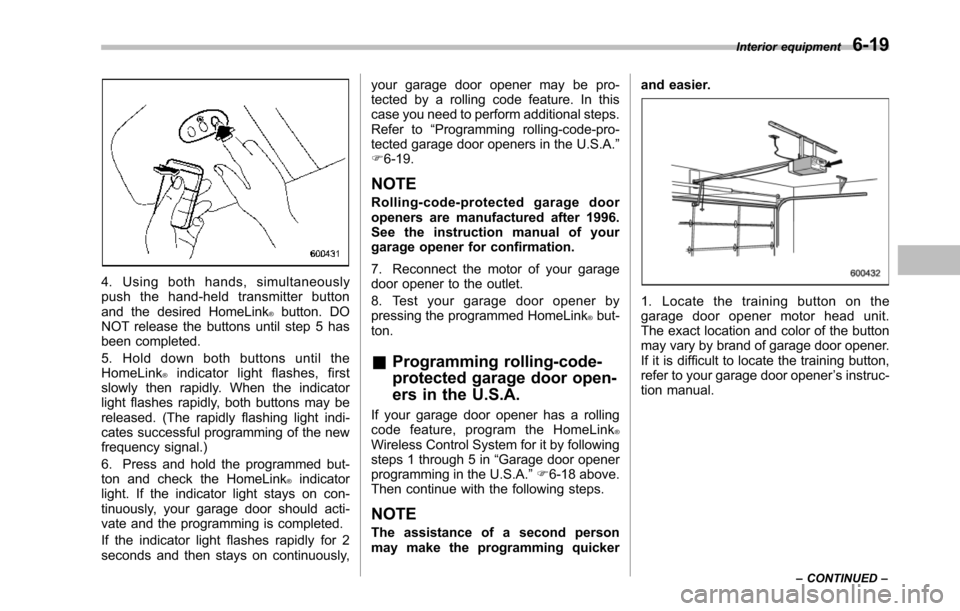
4. Using both hands, simultaneouslypush the hand-held transmitter buttonand the desired HomeLink®button. DONOT release the buttons until step 5 hasbeen completed.
5. Hold down both buttons until theHomeLink®indicator light flashes, firstslowly then rapidly. When the indicatorlight flashes rapidly, both buttons may bereleased. (The rapidly flashing light indi-cates successful programming of the newfrequency signal.)
6. Press and hold the programmed but-ton and checkthe HomeLink®indicatorlight. If the indicator light stays on con-tinuously, your garage door should acti-vate and the programming is completed.
If the indicator light flashes rapidly for 2seconds and then stays on continuously,
your garage door opener may be pro-tected by a rolling code feature. In thiscase you need to perform additional steps.Refer to“Programming rolling-code-pro-tected garage door openers in the U.S.A.”F6-19.
NOTE
Rolling-code-protected garage dooropeners are manufactured after 1996.See the instruction manual of yourgarage opener for confirmation.
7. Reconnect the motor of your garagedoor opener to the outlet.
8. Test your garage door opener bypressing the programmed HomeLink®but-ton.
&Programming rolling-code-
protected garage door open-
ers in the U.S.A.
If your garage door opener has a rollingcode feature, program the HomeLink®Wireless Control System for it by followingsteps1 through 5 in“Garagedoor openerprogramming in the U.S.A.”F6-18 above.Then continue with the following steps.
NOTE
The assistance of a second personmay make the programming quicker
and easier.
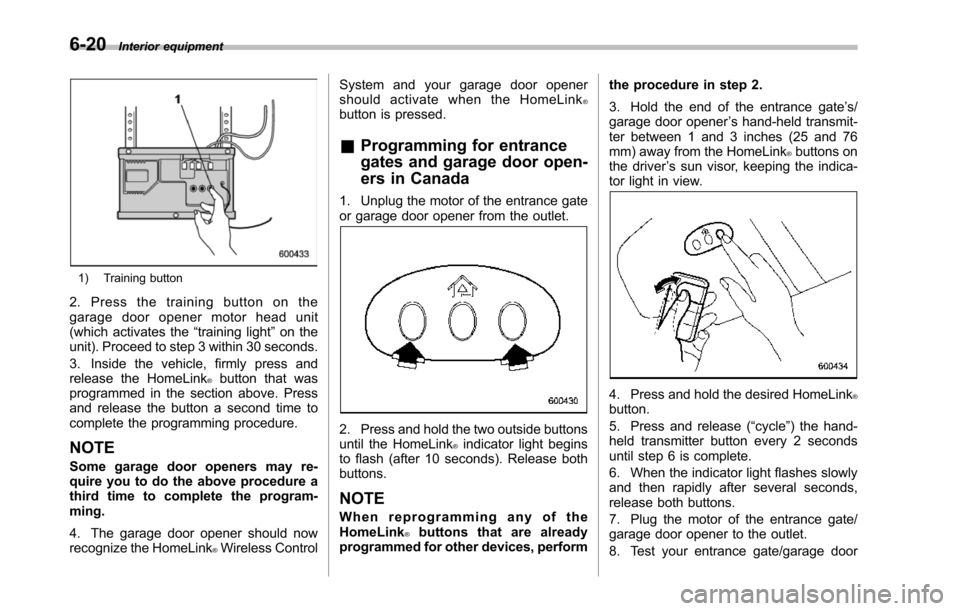
1. Locate the training button on thegarage door opener motor head unit.The exactlocation and color of the buttonmay vary by brand of garage door opener.If it is difficult to locate the training button,refer to your garage door opener’s instruc-tion manual.
Interior equipment6-19
–CONTINUED–
Page 241 of 426
6-20Interior equipment
1) Training button
2. Press the training button on thegarage door opener motor head unit(which activates the“training light”on theunit). Proceed to step 3 within 30 seconds.
3. Inside the vehicle, firmly press andrelease the HomeLink®button that wasprogrammed in the section above. Pressand release thebutton a second time tocomplete the programming procedure.
NOTE
Some garage door openers may re-quire you to do the above procedure athird time to complete the program-ming.
4. The garage door opener should nowrecognize the HomeLink®Wireless Control
System and your garage door openershould activate when the HomeLink®button is pressed.
&Programming for entrance
gates and garage door open-
ers in Canada
1. Unplug the motor of the entrance gateor garage door opener from the outlet.
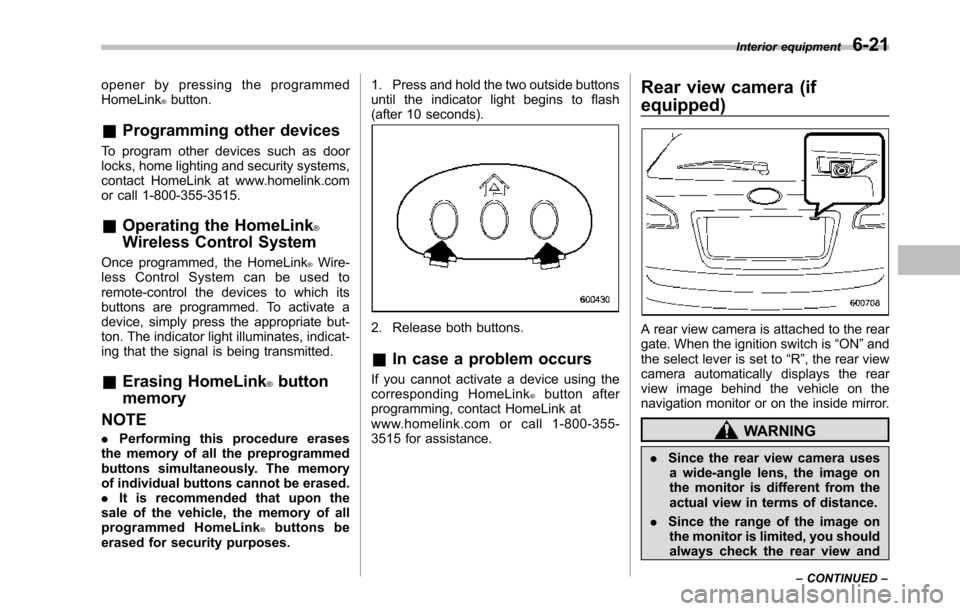
2. Press and hold the two outside buttonsuntil the HomeLink®indicator light beginsto flash (after 10 seconds). Release bothbuttons.
NOTE
When reprogramming any of theHomeLink®buttons that are alreadyprogrammed for other devices, perform
the procedure in step 2.
3. Hold the end of the entrance gate’s/garage door opener’s hand-held transmit-ter between 1 and 3 inches (25 and 76mm) away from the HomeLink®buttons onthe driver’s sun visor, keeping the indica-tor light in view.
4. Press and hold the desired HomeLink®button.
5. Press and release (“cycle”) the hand-held transmitter button every 2 secondsuntil step 6 is complete.
6. When the indicator light flashes slowlyand then rapidly after several seconds,release both buttons.
7. Plug the motor of the entrance gate/garage door opener to the outlet.
8. Test your entrance gate/garage door
Page 242 of 426
opener by pressing the programmedHomeLink®button.
&Programming other devices
To program other devices such as doorlocks, home lighting and security systems,contact HomeLink at www.homelink.comor call 1-800-355-3515.
&Operating the HomeLink®
Wireless Control System
Once programmed, the HomeLink®Wire-less Control System can be used toremote-controlthe devices to which itsbuttons are programmed. To activate adevice, simply press the appropriate but-ton.The indicator light illuminates, indicat-ing that the signal is being transmitted.
&Erasing HomeLink®button
memory
NOTE
.Performing this procedure erasesthe memory of all the preprogrammedbuttons simultaneously. The memoryof individual buttons cannot be erased..It is recommended that upon thesale of the vehicle, the memory of allprogrammed HomeLink®buttons beerased for security purposes.
1. Press and hold the two outside buttonsuntil the indicator light begins to flash(after 10 seconds).
2. Release both buttons.
&In case a problem occurs
If you cannot activate a device using thecorresponding HomeLink®button afterprogramming, contact HomeLink atwww.homelink.com or call 1-800-355-3515 for assistance.
Rear view camera (if
equipped)
A rear view camera is attached to the reargate. When the ignition switch is“ON”andthe select lever is set to“R”, the rear viewcamera automatically displays the rearview image behind the vehicle on thenavigation monitor or on the inside mirror.
WARNING
.Since the rear view camera usesa wide-angle lens, the image onthe monitor is different from theactual view in terms of distance.
.Since the range of the image onthe monitor is limited, you shouldalways check the rear view and
Interior equipment6-21
–CONTINUED–
Page 414 of 426
Seatbelt pretensioners............................................ 1-27Turn signal light.................................................... 11-39Front seats.................................................................. 1-2Active head restraint................................................. 1-6Forward and backward adjustment............................. 1-3Head restraint adjustment......................................... 1-5Lumbar support....................................................... 1-7Memory function...................................................... 1-4Power seat.............................................................. 1-3Reclining................................................................. 1-3Seat height adjustment............................................. 1-4Fuel........................................................................... 7-2Economy hints......................................................... 8-2Filler lid and cap...................................................... 7-3Gauge.................................................................... 3-8Requirements.................................................. 7-2, 12-3Fuses...................................................................... 11-34Main fuse............................................................. 11-35Fuses and circuits...................................................... 12-9
GGAWR (Gross Axle Weight Rating).............................. 8-13Glove box................................................................... 6-6GVWR (Gross Vehicle Weight Rating).......................... 8-13
HHazard warning flasher........................................... 3-5, 9-2Head restraint adjustmentFront seat............................................................... 1-5Second-row seat.................................................... 1-12Third-row seat....................................................... 1-16
HeadlightBeam leveler.......................................................... 3-30Bulb replacement................................................. 11-36Bulb wattage........................................................ 12-12Control switch........................................................ 3-27Flasher.................................................................. 3-28Indicator light......................................................... 3-22HID headlights......................................................... 11-36High beam indicator light............................................. 3-22High/low beam change (dimmer).................................. 3-28HomeLink®Wireless Control System............................. 6-17HookCoat..................................................................... 6-12Convenienttie-down............................................... 6-16Shopping bag........................................................ 6-13Towing and tie-down............................................... 9-15Horn......................................................................... 3-44Hose and connections............................................... 11-10
IIgnition switch............................................................. 3-3Light...................................................................... 3-4Illuminated entry......................................................... 2-10Illumination brightness control...................................... 3-29Immobilizer................................................................. 2-3Indicator light (security indicator light)................. 2-4, 3-21Indicator lightCruise control........................................................ 3-22Cruise control set................................................... 3-22Front fog light......................................................... 3-22Headlight............................................................... 3-22
Index14-5