2014 SUBARU TRIBECA engine
[x] Cancel search: enginePage 329 of 426

10-2Appearance care
Exterior care
&Washing
CAUTION
.When washing the vehicle, thebrakes may get wet. As a result,the brake stopping distance willbe longer. To dry the brakes,drive the vehicle at a safe speedwhile lightly pressing the brakepedal to heat up the brakes.
.Do not wash the engine compart-ment and areas adjacent to it. Ifwater enters the engine air in-take, electrical parts or the powersteering fluid reservoir, it willcause engine trouble or a mal-functionof the power steering.
.Do not use any organic solventswhen washing the surface of thebulb assembly cover. However, ifa detergent with organic solventsis used to wash the cover sur-face, completely rinse off thedetergent with water. Otherwise,the cover surface may be da-maged.
.Since your vehicle is equippedwith a rear wiper, automatic car-wash brushes could become
tangled around it, damaging thewiper arm and other compo-nents. Ask the automatic car-wash operator not to let thebrushes touch the wiper arm orto fix the wiper arm on the rearwindow glass with adhesive tapebefore operating the machine.
NOTE
When having your vehicle washed inan automatic car wash, make surebeforehand that the car wash is ofsuitable type.
The best way to preserve your vehicle’sbeauty is frequent washing. Wash thevehicleat least once a month to avoidcontamination by road grime.
Wash dirt off with a wet sponge and plentyof lukewarm or cold water. Do not washthe vehicle with hot water and in directsunlight.
Salt, chemicals, insects, tar, soot, treesap, and bird droppings should be washedoff by using a light detergent, as required.If you use a light detergent, make certainthat it is a neutral detergent. Do not usestrong soap or chemical detergents. Allcleaning agents should be promptlyflushed from the surface and not allowed
to dry there. Rinse the vehicle thoroughlywith plenty of lukewarm water. Wipe theremaining water off with a chamois or softcloth.
!Washing the underbody
Chemicals, salts and gravel used fordeicing road surfaces are extremely cor-rosive, accelerating the corrosion of un-derbody components, such as the exhaustsystem, fuel and brake lines, brakecables, floor pan and fenders, and sus-pension.
Thoroughly flush the underbody and in-side of the fenders with lukewarm or coldwater at frequent intervals to reduce theharmful effects of such agents.
Mud and sand adhering to the underbodycomponents may accelerate their corro-sion.
Afterdriving off-road or muddy or sandyroads, wash the mud and sand off theunderbody.
Carefully flushthe suspension and axleparts, as they are particularly prone tomud and sand buildup. Do not use asharp-edged tool to remove caked mud.
NOTE
Be careful not to damage brake hoses,sensor harnesses, and other partswhen washing suspension compo-
Page 334 of 426

Maintenance schedule....................................... 11-3
Maintenance precautions................................... 11-3Before checking or servicing in the enginecompartment.................................................... 11-4When you do checking or servicing in the enginecompartment while the engine is running.......... 11-4
Engine hood....................................................... 11-4
Engine compartment overview.......................... 11-6
Engine oil............................................................ 11-7Checking the oil level......................................... 11-7Changing the oil and oil filter.............................. 11-8Recommendedgrade and viscosity.................... 11-9Synthetic oil....................................................... 11-9
Cooling system................................................ 11-10Hose and connections...................................... 11-10Engine coolant................................................. 11-11
Air cleaner element.......................................... 11-12Replacing the air cleaner element..................... 11-12
Spark plugs...................................................... 11-13Recommended spark plugs.............................. 11-13
Drive belts........................................................ 11-13
Automatic transmission fluid.......................... 11-14Checking the fluid level.................................... 11-14Recommended fluid......................................... 11-15
Front differential gear oil................................. 11-15Checking the oil level....................................... 11-15Recommended grade and viscosity.................. 11-16
Rear differential gear oil.................................. 11-16Recommended grade and viscosity.................. 11-16
Power steering fluid........................................ 11-16Checking the fluid level.................................... 11-16Recommended fluid......................................... 11-17
Brake fluid........................................................ 11-17Checking the fluid level.................................... 11-17Recommended brake fluid............................... 11-18
Brakebooster.................................................. 11-18
Brake pedal...................................................... 11-19Checking the brake pedal free play.................. 11-19Checking the brake pedal reserve distance....... 11-19
Replacement of brake pad and lining............ 11-19Breaking-in of new brake pads and linings....... 11-20
Parking brake stroke....................................... 11-20
Tires and wheels.............................................. 11-21Types of tires................................................... 11-21Tire pressure monitoring system (TPMS).......... 11-21Tire inspection................................................. 11-22Tire pressuresand wear.................................. 11-23Wheel balance................................................. 11-25Wear indicators............................................... 11-25Tire rotation direction mark.............................. 11-25Tire rotation..................................................... 11-26Tire replacement.............................................. 11-26Wheel replacement.......................................... 11-27
Aluminum wheels............................................ 11-27
Windshield washer fluid.................................. 11-28
Replacement of wiper blades......................... 11-29Windshield wiper blade assembly..................... 11-30Windshield wiper blade rubber ......................... 11-30Rear window wiper blade assembly.................. 11-31
Maintenance and service
11
Page 336 of 426
Maintenance schedule
The scheduled maintenance items re-quired to be serviced at regular intervalsare shown in the“Warranty and Main-tenance Booklet”.
For details of your maintenance schedule,read the separate“Warranty and Main-tenance Booklet”.
Maintenance precautions
When maintenance and service are re-quired, it is recommended that all work bedone by an authorized SUBARU dealer.
If you perform maintenance and serviceby yourself, you should familiarize yourselfwith the information provided in thissection on general maintenance andservice for yourSUBARU.
Incorrect or incomplete service couldcause improper or unsafe vehicle opera-tion. Any problems caused by impropermaintenance and service performed byyou are not eligible for warranty coverage.
WARNING
.Te s t i n g o f a n A l l - W h e e l D r i v emodel must NEVER be per-formed on a single two-wheeldynamometer or similar appara-tus. Attempting to do so willresult in transmission damageand in uncontrolled vehiclemovement and may cause anaccident or injuries to personsnearby.
.Always select a safe area whenperforming maintenance on yourvehicle.
.Always be very careful to avoidinjury when working on the vehi-cle. Remember that some of thematerials in the vehicle may behazardous if improperly used orhandled, for example, batteryacid.
.Your vehicle should only be ser-viced by persons fully competentto do so. Serious personal injurymay result to persons not experi-enced in servicing vehicles.
.Always use the proper tools andmake certain that they are wellmaintained.
.Never get under the vehicle sup-ported only by a jack. Always usea safety stands to support thevehicle.
.Never keep the engine running ina poorly ventilated area, such asa garage or other closed areas.
.Do not smoke or allow openflames around the fuel or battery.This will cause a fire.
.Because the fuel system is underpressure, replacement of the fuelfilter should be performed onlyby your SUBARU dealer.
.Wear adequate eye protection to
Maintenance and service11-3
–CONTINUED–
Page 337 of 426
11-4Maintenance and service
guard against getting oil or fluidsin your eyes. If something doesget in your eyes, thoroughlywash them out with clean water.
.Do not tamper with the wiring ofthe SRS airbag system or seat-belt pretensioner system, or at-tempt to take its connectorsapart, as that may activate thesystem or it can render it inop-erative. NEVER use a circuittester for these wiring. If yourSRS airbag or seatbelt preten-sioner needs service, consultyour nearest SUBARU dealer.
&Before checking or servicing
in the engine compartment
WARNING
.Always stop the engine and setthe parking brake firmly to pre-vent the vehicle from moving.
.Always let the engine cool down.Engine parts become very hotwhen the engine is running andremain hot for some time afterthe engine is stopped.
.Do not spill engine oil, enginecoolant, brake fluid or any other
fluid on hot engine components.This may cause a fire.
.Always remove the key from theignition switch. When the ignitionswitch is in the“ON”position,the cooling fan may operatesuddenly even when the engineis stopped.
&When you do checking or
servicing in the engine com-
partment while the engine is
running
WARNING
A running engine can be dangerous.Keep your fingers, hands, clothing,hair and tools away from the coolingfan, belts and any other movingengine parts. Removing rings,watches and ties is advisable.
Engine hood
To open the hood:
1. If the wiper blades are lifted off thewindshield, return them to their originalpositions.
2. Pull the hood release knob under theinstrument panel.
Page 339 of 426
11-6Maintenance and service
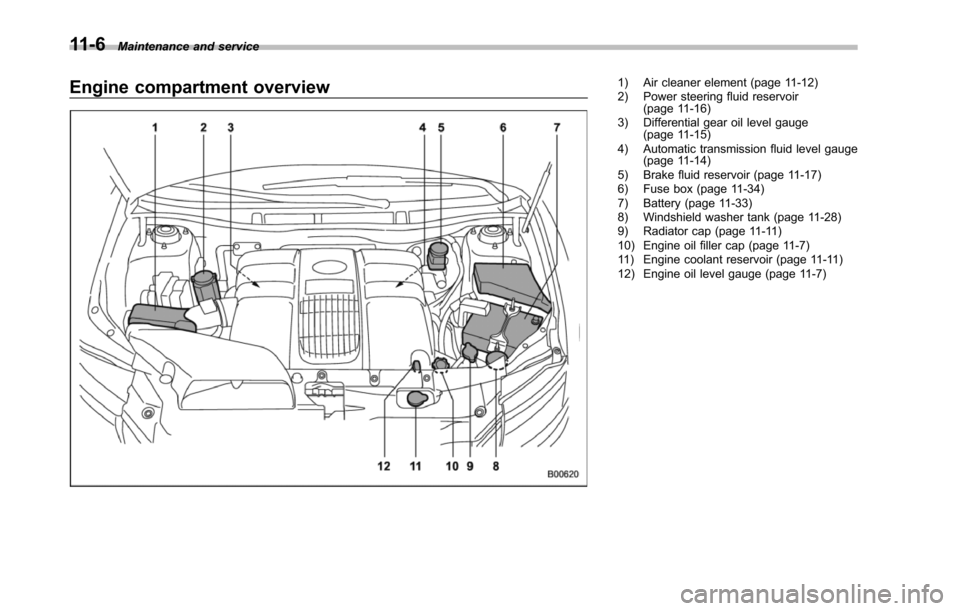
Engine compartment overview1) Air cleaner element (page 11-12)2) Power steering fluid reservoir(page 11-16)3) Differential gear oil level gauge(page 11-15)4) Automatic transmission fluid level gauge(page 11-14)5) Brake fluid reservoir (page 11-17)6) Fuse box (page 11-34)7) Battery (page 11-33)8) Windshield washer tank (page 11-28)9) Radiator cap (page 11-11)10) Engine oil filler cap (page 11-7)11) Engine coolant reservoir (page 11-11)12) Engineoil level gauge (page 11-7)
Page 340 of 426
Engine oil
NOTE
.The engine oil consumption rate isnot stabilized, and therefore cannot bedetermined until the vehicle has tra-veled at least several thousand miles(kilometers). Even after break-in, whenthe vehicle is used under severe driv-ing conditions such as those men-tioned in the“Warranty and Mainte-nance Booklet”,engineoiliscon-sumed or deteriorated more quicklythan under normal driving conditions.If you drive your vehicle under thesesevere conditions, you should checkthe oil level at least at every secondfuel fill-up time, and change the oilmore frequently. Please refer to the“Warranty and Maintenance Booklet”for more details..If the oil consumption rate seemsabnormally high after the break-inperiod, for example more than 1 quartper 1,200 miles or 1 liter per 2,000kilometers, we recommend that youcontact your SUBARU dealer.
&Checking the oil level
Check the engine oil level at each fuelstop.
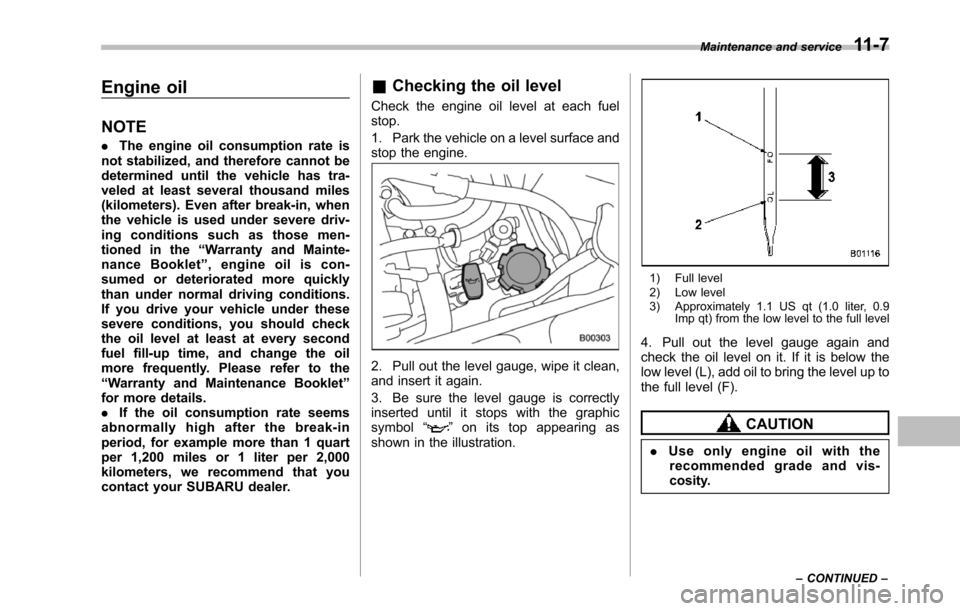
1. Park the vehicle on a level surface andstop the engine.
2. Pull out the level gauge, wipe it clean,and insert it again.
3. Be sure the level gauge is correctlyinserted until it stops with the graphicsymbol“”on its top appearing asshown in the illustration.
1) Full level2) Low level3) Approximately 1.1 US qt (1.0 liter, 0.9Imp qt) from the low level to the full level
4. Pull out the level gauge again andcheck the oil level on it. If it is below thelow level (L), add oil to bring the level up tothe fulllevel (F).
CAUTION
.Use only engine oil with therecommended grade and vis-cosity.
Maintenance and service11-7
–CONTINUED–
Page 341 of 426
11-8Maintenance and service
.Be careful not to spill engine oilwhen adding it. If oil touches theexhaust pipe, it may cause a badsmell, smoke, and/or a fire. Ifengine oil gets on the exhaustpipe, be sure to wipe it off.
If you check the oil level just after stoppingthe engine, wait a few minutes for the oil todrain back into the oil pan before checkingthe level.
To prevent overfilling the engine oil, do notadd any additional oil above the full levelwhen the engine is cold.
&Changing the oil and oil filter
CAUTION
.If you change your own oil, besure to drain all the oil from thefilter before disposal.
.Do not dispose of used engine oilby placing it in the trash, or bypouring it onto the ground, intosewers, or into any body of water.Check with your local govern-ment office for the proper dis-posal options available to you.
Change the oil and oil filter according tothe maintenance schedule in the“War-
ranty and Maintenance Booklet”.
The engine oil and oil filter must bechanged more frequently than listed inthe maintenance schedule when drivingon dusty roads, when short trips arefrequently made, or when driving inextremely cold weather.
1. Warm up the engine by letting theengine idle for approximately 10 minutesto ease draining the engine oil.
2. Park the vehicle on a level surface andstop the engine.
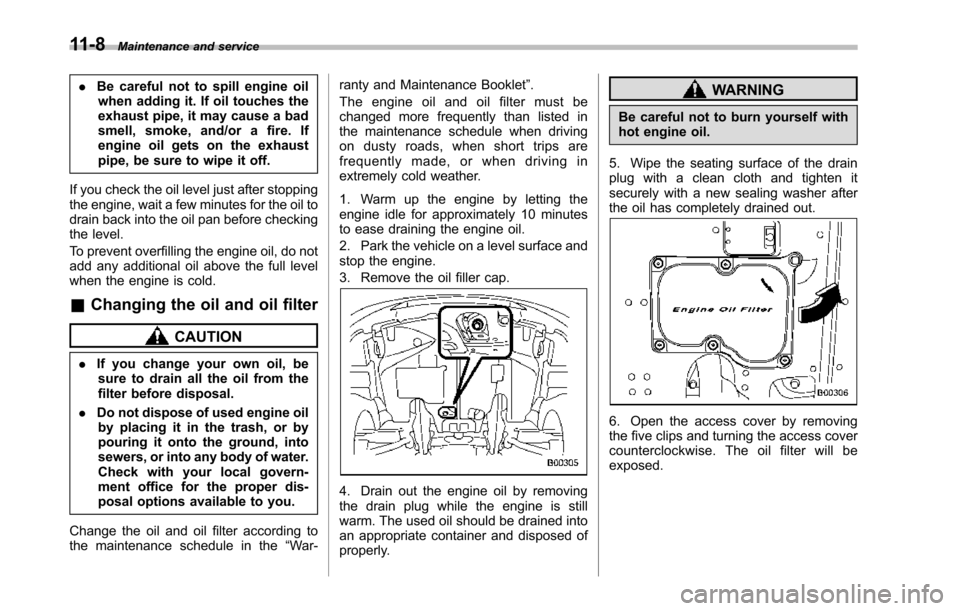
3. Remove the oil filler cap.
4. Drain out the engine oil by removingthe drain plug while the engine is stillwarm. The used oil should be drained intoan appropriate container and disposed ofproperly.
WARNING
Be careful not to burn yourself withhot engine oil.
5. Wipe the seating surface of the drainplug with a clean cloth and tighten itsecurely with a new sealing washer afterthe oil has completely drained out.
6. Open the access cover by removingthe five clips and turning the access covercounterclockwise. The oil filter will beexposed.
Page 342 of 426
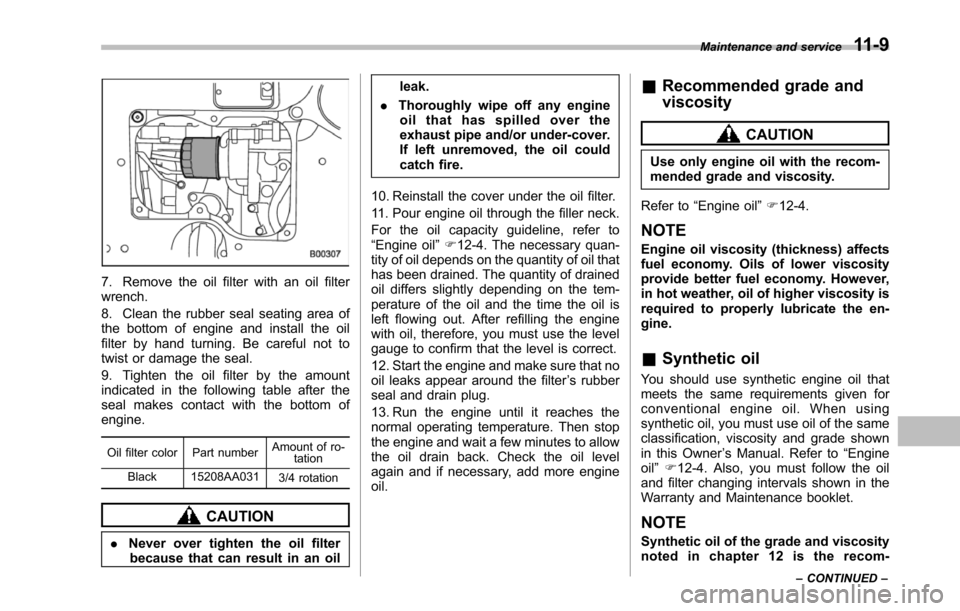
7. Remove the oil filter with an oil filterwrench.
8. Clean the rubber seal seating area ofthe bottom of engine and install the oilfilterby hand turning. Be careful not totwist or damage the seal.
9. Tighten the oil filter by the amountindicatedin the following table after theseal makes contact with the bottom ofengine.
Oil filter color Part numberAmount of ro-tation
Black 15208AA0313/4 rotation
CAUTION
.Never over tighten the oil filterbecause that can result in an oil
leak.
.Thoroughly wipe off any engineoil that has spilled over theexhaust pipe and/or under-cover.If left unremoved, the oil couldcatch fire.
10. Reinstall thecover under the oil filter.
11. Pour engine oil through the filler neck.
For the oil capacity guideline, refer to“Engine oil”F12-4. The necessary quan-tity of oil depends on the quantity of oil thathas been drained. The quantity of drainedoil differs slightly depending on the tem-perature of the oil and the time the oil isleft flowing out. After refilling the enginewith oil, therefore, you must use the levelgauge to confirm that the level is correct.
12.Start the engine and make sure that nooil leaks appear around the filter’s rubberseal and drain plug.
13. Run the engine until it reaches thenormal operating temperature. Then stopthe engine and wait a few minutes to allowthe oil drain back. Check the oil levelagain and if necessary, add more engineoil.
&Recommended grade and
viscosity
CAUTION
Use only engine oil with the recom-mended grade and viscosity.
Refer to“Engine oil”F12-4.
NOTE
Engine oil viscosity (thickness) affectsfuel economy. Oils of lower viscosityprovide better fuel economy. However,in hot weather, oil of higher viscosity isrequired to properly lubricate the en-gine.
&Synthetic oil
You should use synthetic engine oil thatmeets the samerequirements given forconventional engine oil. When usingsynthetic oil, you must use oil of the sameclassification,viscosity and grade shownin this Owner’s Manual. Refer to“Engineoil”F12-4. Also, you must follow the oiland filter changing intervals shown in theWarranty and Maintenance booklet.
NOTE
Synthetic oil of the grade and viscositynoted in chapter 12 is the recom-
Maintenance and service11-9
–CONTINUED–