Page 89 of 200
■Under certain circumstances, air at a temperature of about 5 °C can flow
out of the vents when the cooling system is switched on.■
To reduce health risks (e.g. common colds),")
WARNING (Continued)■Under certain circumstances, air at a temperature of about 5 °C can flow
out of the vents when the cooling system is switched on.■
To reduce health risks (e.g. common colds), the following instructions for
the use of the cooling system are to be observed. ■The difference between the indoor temperature and the outdoor air
temperature should not be greater than about 5 ° C.
■ The cooling system is to be turned off about 10 minutes before the end
of the journey.
■ Once a year, a disinfection of the air conditioner or the Climatronic is to
be carried out by a specialist company.
CAUTION
■ The air inlet in front of the windscreen must be free from ice, snow or leaves,
for example, to ensure that the heating and cooling system works properly.■
After switching on the cooling Condensation from the evaporator of the air
conditioning may drip down and form a puddle below the vehicle. This is not a
leak!
■
If the coolant temperature is too high, the cooling system is switched off to
ensure that the engine cools down.
Note
The used air streams out through the vents in the luggage compartment.
Air outlet vents
Fig. 83
Air outlet vents
Read and observe and on page 85 first.
Warmed, not warmed fresh or cooled air will flow out of the opened air outlet vents according to the setting of the control and the outside atmospheric con-
ditions.
The direction of airflow can be adjusted using the air outlet vents 3 and
4 » Fig. 83 and the outlets can also be opened and closed individually.
Changing the direction of air flow
›
To change the height of the air flow, turn the horizontal fins upward or
downward using the movable adjuster
A
» Fig. 83 .
›
To adjust the lateral direction of the air flow, turn the vertical fins with the
movable adjuster
A
to the left or to the right.
Opening
›
Turn the regulator
B
» Fig. 83 upwards.
Closing
›
Turn the regulator
B
» Fig. 83 downwards.
An overview of the available settings for adjusting the direction of the air
outlet
Setting the direction of the air outletActive air outlet vents1, 2 , 41, 2 , 4 , 54 , 53 , 4
Note
To ensure that the heating and air conditioning systems work properly, do not
block the air outlet vents.86Using the system
Page 90 of 200

Air distribution controlRead and observe
and on page 85 first.
Recirculated air mode mostly prevents polluted air outside the vehicle fromgetting into the vehicle, for example when driving through a tunnel or when
standing in a traffic jam.
In recirculated air mode air is sucked out of the interior of the vehicle and then
fed back into the interior.
Heating and air conditioning (manual air conditioning)
To turn the recirculation mode on or off, press the Symbol key
.
The air recirculation mode is automatically turned off by turning the air distri-
bution control
C
to position
» Fig. 84 on page 87 or » Fig. 85 on
page 88 .
Recirculated air mode can be switched on again from this setting by repeatedly
pressing the symbol button .
Climatronic (automatic air conditioning)
To switch on press the Symbol key
. The symbol
(pos.
7
» Fig. 86 on
page 88 ) appears in the display.
To switch off press the symbol key
again. The
symbol in the display
goes out.
WARNINGThe recirculation system cannot be switched on for a longer period of time,
because there is no supply of fresh air from the outside. “Stale air” may re-
sult in fatigue in the driver and occupants, reduce attention levels and also
cause the windows to mist up. The risk of having an accident increases.
Switch off recirculated air mode as soon as the windows start to mist up.
CAUTION
We recommend not smoking in the vehicle when the recirculating air operation
is switched on. The smoke sucked from inside the vehicle is deposited on the
evaporator of the air conditioner. This produces a permanent odour when the
air conditioning system is operating which can only be eliminated through con-
siderable effort and expense (replacement of compressor).NoteIf recirculated air mode is switched on for around 15 minutes, the symbol
will begin to flash in the Climatronic display as a sign that the recirculated air
mode is switched on long-term. If the recirculated air mode is not switched off,
the symbol flashes for around 5 minutes.
Heating
Fig. 84
Heating Controls
Read and observe
and on page 85 first.
Individual functions can be set or switched on by turning the knob or pressing the button. When the function is on the warning light illuminates in the but-
ton.
Functions of the individual controls » Fig. 84
Setting temperature ›
Lower temperature
›
Increase temperature
Set the blower level (level 0: Blower off, level 4: the highest blower speed)
Set the direction of the air outlet » page 86
›
Air flow to the windows
›
Air flow to the upper body
›
Air flow in the footwell
›
Airflow over the windows and into the footwell
Switch recirculation on/off » page 87
ABC87Heating and air conditioning
Page 91 of 200
Fig. 85
Controls of the air conditioning
Read and observe
and on page 85 first.
Individual functions can be set or switched on by turning the knob or pres")
Air conditioning (manual air conditioning)Fig. 85
Controls of the air conditioning
Read and observe
and on page 85 first.
Individual functions can be set or switched on by turning the knob or pressing the respective button. When the function is on the warning light illuminates in
the button.
Functions of the individual controls » Fig. 85
Setting temperature ›
Lower temperature
›
Increase temperature
Set the blower level (level 0: Blower off, level 4: the highest blower speed)
Set the direction of the air outlet » page 86
›
Air flow to the windows
›
Air flow to the upper body
›
Air flow in the footwell
›
Airflow over the windows and into the footwell
Switch recirculation on/off » page 87
Switch the cooling system on/off
Note
■ The warning light in the button lights up after activation, even if not all of
the conditions for the function of the cooling system have been met. By light-
ing up of the warning light in the button, the operational readiness of the cool-
ing system is signalled.■
During operation of the air conditioning, an increase in engine idle speed may
occur under certain circumstances in order to ensure sufficient heating com-
fort.
ABCClimatronic (automatic air conditioning)Fig. 86
Controls the Climatronic
Read and observe
and on page 85 first.
The Climatronic in automatic mode ensures the best-possible setting of the
temperature of the outflowing air, the blower stage and air distribution.
The system also takes sunlight into account, which eliminates the need to al-
ter the settings manually afterwards.
Individual functions can be set or switched on by turning the knob or pressing
the respective button. When the function is on the corresponding symbol ap-
pears in the display.
Functions of the various controls and display » Fig. 86
Setting temperature ›
Lower temperature
›
Increase temperature
Selected temperature
Degrees Celsius or Fahrenheit
Automatic operation of the air conditioning system is switched on
Intensive windshield defroster switched on
Direction of air flow
Recirculated air mode activated
Cooling system activated
Set blower speed
Set the temperature (turn to the left: Reduce fan speed, turn to the right:
Increase blower speed)
Interior temperature sensor
123456789101188Using the system
Page 92 of 200

Switching automatic mode onSwitching the intensive windshield defroster on/off - when this function
is switched on, the warning light illuminates in the button
Switching the airflow to the windows on and off
Switching the airflow to the upper body on and off
Switching the airflow to the footwell on and off
Switch recirculation on/off » page 87
Switch the cooling system on/off
After the cooling system is switched off, only the ventilation function remains active, whereby the lowest temperature that can be reached is the outside
temperature.
Setting temperature
The set temperature value appears in the display (pos. 2
» Fig. 86 ).
To switch between degrees Celsius and degrees Fahrenheit, the keys
and are to be pressed and held simultaneously.
The information appears in the display in the desired temperature measuring
unit (pos.
3
» Fig. 86 ).
The interior temperature can be set between +18 °C and +29 ℃. The interior
temperature is regulated automatically within this range.
If you select the temperature below +18 ℃, “LO” appears in the display.
If you select a temperature higher than +29 ℃, “HI” appears in the display.
At both end positions, Climatronic runs at maximum cooling/heating output
and the temperature is automatically not regulated.
Controlling blower
The Climatronic system controls the blower stages automatically in line with the interior temperature. However, the blower level can be manually adjusted
to suit your particular needs.
If the blower speed is reduced to a minimum, Climatronic is switched off.
The blower speed set is indicated by displaying the corresponding number of
segments (Pos.
9
» Fig. 86 ) in the display.
Automatic mode
The automatic mode is used in order to maintain a constant temperature and to demist the windows in the interior of the car.
To switch on press the button
. The display shows
(pos.
4
» Fig. 86 ).
Automatic mode can be
switched off by pressing one of the buttons for the air
distribution or by increasing/decreasing the blower speed. The temperature is
nevertheless regulated.WARNING■ Do not switch off the Climatronic system for longer than necessary.■Switch on the Climatronic system as soon as the windows mist up.
Note
■Do not stick anything on or cover the interior temperature sensor11 » Fig. 86 ; it could have an unfavourable effect on the Climatronic system.■
During operation of the Climatronic, an increase in engine idle speed can oc-
cur under certain circumstances in order to ensure adequate heating comfort.
■
As soon as the windscreen mists up, press the symbol button
. Press the
button
once the windscreen has demisted.
Efficient handling of the cooling system
Read and observe
and on page 85 first.
The air conditioning system compressor uses power from the engine when incooling mode, which will affect the fuel consumption.
It recommended to open the windows or the doors of a vehicle for which the
interior has been strongly heated through the effect of direct sunlight in order
to allow the heated air to escape.
The cooling system should not be on if the windows are open.
For the sake of the environment
Pollutant emissions are also reduced when fuel is saved » page 107.
malfunctions
Read and observe
and on page 85 first.
If the cooling system does not operate at outside temperatures higher than +5°C, there is a problem in the system. The reasons for this may be.
› One of the fuses has blown. Check the fuse and replace if necessa-
ry » page 169 .
› The cooling system has switched off automatically for a short time because
the coolant temperature of the engine is too hot » page 32.
89Heating and air conditioning
Page 93 of 200

If you are not able to resolve the operational problem yourself, or if the cooler
output has reduced, switch off the cooling system and seek assistance from a
specialist garage.Communication and multimedia
Universal telephone installation GSM II
Introduction
This chapter contains information on the following subjects:
Introductory information
91
Phone Phonebook
91
Operating the phone on the multifunction steering wheel
92
Symbols in the display
93
Connecting the mobile phone to the hands-free system
93
Telephone operation in the MAXI DOT display
94
ŠKODA permits the operation of mobile phones and two-way radio systems
with a professionally installed external aerial and a maximum transmission
power of up to 10 watts.
Please consult a ŠKODA Partner for information about the possibility of instal-
ling and operating mobile phones and two-way radio systems with a transmis-
sion power of more than 10 W.
Operating mobile phones or two-way radio systems may interfere with the
functionality of the electronic systems in your vehicle.
This could be for the following reasons.
› no external aerial.
› external aerial incorrectly installed.
› transmission power greater than 10 watts.
WARNING■
Concentrate fully at all times on your driving! As the driver, you are fully
responsible for the operation of your vehicle.■
The national regulations for using a mobile phone in a vehicle must be
observed.
■
If a mobile phone or a two-way radio system is operated in a vehicle with-
out an external aerial or an external aerial which has been installed incor-
rectly, this can increase the strength of the electromagnetic field inside the
vehicle.
■
Two-way radio systems, mobile phones or mounts must not be installed
on airbag covers or within the immediate deployment range of the airbags.
90Using the system
Page 94 of 200
■Never leave a mobile phone on a seat, on the dash panel or in any area
where it can become a projectile during a sudden braking manoeuvre, an
accident or a collision — risk of")
WARNING (Continued)■Never leave a mobile phone on a seat, on the dash panel or in any area
where it can become a projectile during a sudden braking manoeuvre, an
accident or a collision — risk of injury.■
The Bluetooth ®
function must be switched off by a specialist company
before the vehicle can be transported by air.
Note
■ We recommend that the installation of mobile phones and two-way radio
systems in a vehicle be carried out by a specialist garage.■
Not all mobile phones that enable Bluetooth ®
communication are compatible
with the universal telephone preinstallation GSM II. You can ask a ŠKODA Part- ner whether your telephone is compatible with the GSM II universal telephone
fitting.
■
The range of the Bluetooth ®
connection to the hands-free system is restric-
ted to the vehicle interior. The range is dependent on local factors, e.g. obsta-
cles between the devices and mutual interferences with other devices. If your
mobile phone is in a jacket pocket, for example, this can lead to difficulties
when establishing a connection with the hands-free-system or transferring
data.
Introductory information
Read and observe
on page 90 first.
The universal telephone preinstallation GSM II (hands-free system) includes a
convenience mode for the mobile phone via voice control, the multifunction
steering wheel, the radio or navigation system.
The universal telephone preinstallation GSM II comprises the following func-
tions.
› Phone Phonebook
» page 91.
› Convenience operation of the telephone via the multifunction steering
wheel » page 92 .
›Telephone operation in the MAXI DOT display
» page 94.
› Voice control of the telephone
» page 94.
› Music playback from the telephone or other multimedia units
» page 96.
All communication between a mobile phone and your vehicle's hands-free sys- tem is established with the help of Bluetooth ®
technology.
Phone Phonebook
Read and observe
on page 90 first.
A phone phonebook is part of the hands-free system. This phone phonebook
can be used depending on the type of mobile phone.
After the first connection of the telephone, the system begins to load the
phone book from the phone and the SIM card into the memory of the control
unit.
Each time the telephone has established a new connection with the hands-
free system, an update of the relevant phone book is performed. The updating
can take a few minutes. During this time the phone book, which was stored af-
ter the last update was completed, is available. Newly stored telephone num-
bers are only shown after the updating has ended.
The update is interrupted if a telephone event (e.g. incoming or outgoing call,
voice control dialogue) occurs during the updating procedure. After the tele-
phone event has ended, the updating starts anew.
The internal phonebook provides 2 500 free memory locations. Each contact
can contain up to 4 numbers.
If the number of contacts loaded exceeds 2 500, the phone book is not com-
plete.
91Communication and multimedia
Page 95 of 200

Operating the phone on the multifunction steering wheelFig. 87
Multifunction steering wheel: Control buttons for the telephone
Read and observe
on page 90 first.
To minimize driver distraction when operating the telephone, the basic tele-
phone's functions can be set by simply operating the buttons located on the
steering wheel » Fig. 87.
This applies only if your vehicle has been equipped with the universal tele-
phone installation at the factory.
The buttons control the functions for the operating mode of the current tele-
phone.
If the side lights are switched on, the buttons on the multifunction steering
wheel are illuminated.Button/
wheel » Fig. 87ActionOperation1Press briefly(MUTE )1Turn upwardsIncrease volume1Turn downwardsDecrease volume2Press brieflyAccept a call/end a call
Display of the basic Phone menu → a)
Main Phone menu → List of dialled numbers → Call selected contact2Press and hold buttonReject the incoming call3Turn up/downPrevious / next menu item3Press brieflyConfirm selected menu item3Press and hold buttonContinuously display first letter of the phone book3Quickly turn upwardsTo the previous initial letter in the telephone book3Quickly turn downwardsTo the next initial letter in the telephone book4Press brieflyReturn to a previous level in the menu4Press and hold buttonExit telephone menua)
The symbol The → symbol means briefly press button again.
92Using the system
Page 96 of 200
Signal strengtha)")
Symbols in the displayRead and observe
on page 90 first.
The following symbols are displayed in the MAXI DOT display:
SymbolMeaningCharge status of the telephone battery a)Signal strengtha)a phone is connected to the hands-free system.The hands-free system is visible to other devices.A multimedia unit is connected to the hands-free system.a)
This function is only supported by some mobile phones.
Connecting the mobile phone to the hands-free system
Read and observe
on page 90 first.
To connect a mobile phone with the hands-free system, the two devices mustbe paired. Detailed information on this is provided in the operating instructions
for your mobile phone.
The following steps must be carried out for pairing 1)
.
›
Activate Bluetooth ®
and the visibility of your mobile phone on your tele-
phone.
›
Switch on the ignition.
›
Select the Phone - New user menu in the MAXI DOT display and wait until
the hands-free system has completed the search.
›
Select the phone you wish to connect from the list of units found.
›
Confirm the PIN 2)
.
›
If the hands-free system announces (as standard SKODA_BT) on the display
of the mobile phone, enter the PIN 2)
within 30 seconds and wait, until the
connection is established 3)
.
› To finish pairing in the MAXI DOT display, confirm the creation of the new
user profile.
If there is no free space available to create a new user profile, delete an exist- ing user profile.
During the connecting procedure, no other mobile phone may be connected
with the hands-free system.
Up to four mobile phones can be paired with the hands-free system, whereby
only one mobile phone can communicate with the hands-free system.
The visibility of the hands-free system is automatically switched off 3 minutes
after the ignition is switched on and is also deactivated when the mobile
phone has connected to the hands-free system.
Restoring the visibility of the hands-free system
If you have not managed to connect your mobile phone with the hands-free
system within 3 minutes of switching on the ignition, the visibility of the
hands-free system can be re-established for 3 minutes in one of the following
ways.
› By turning the ignition off and on.
› By turning voice control off and on.
› In the MAXI DOT display under menu item
Bluetooth - Visibility .
Creating a connection with an already paired mobile phone
After switching on the ignition, the connection is automatically established for
the already paired mobile phone 3)
. Check on your mobile phone if the automat-
ic connection has been established.
Disconnecting the connection
The connection to a connected mobile phone can be ended in the following
ways.
› By withdrawing the ignition key.
› By disconnecting the hands-free system in the mobile phone.
› By disconnecting from the user in the MAXI DOT display under the menu item
Bluetooth - User . 1)
On vehicles fitted with the Amundsen+ navigation system, this function can be accessed via the naviga-
tion system menu; refer to the » operating instructions for the Amundsen+ navigation system .
2)
Depending on the Bluetooth®
version on the mobile phone, an automatically generated 6-digit PIN (SSP)
is either displayed, or the PIN 1234 has to be entered manually.
3)
Some mobile phones have a menu, in which the authorisation for establishing a Bluetooth ®
connection
is completed by inputting a PIN number. If the authorisation input is required, it must always be per-
formed when re-establishing the Bluetooth connection.
93Communication and multimedia
 1
1 2
2 3
3 4
4 5
5 6
6 7
7 8
8 9
9 10
10 11
11 12
12 13
13 14
14 15
15 16
16 17
17 18
18 19
19 20
20 21
21 22
22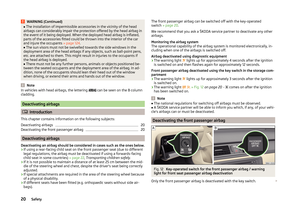 23
23 24
24 25
25 26
26 27
27 28
28 29
29 30
30 31
31 32
32 33
33 34
34 35
35 36
36 37
37 38
38 39
39 40
40 41
41 42
42 43
43 44
44 45
45 46
46 47
47 48
48 49
49 50
50 51
51 52
52 53
53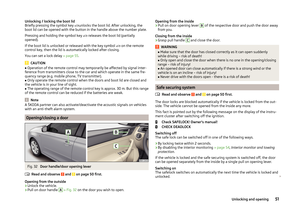 54
54 55
55 56
56 57
57 58
58 59
59 60
60 61
61 62
62 63
63 64
64 65
65 66
66 67
67 68
68 69
69 70
70 71
71 72
72 73
73 74
74 75
75 76
76 77
77 78
78 79
79 80
80 81
81 82
82 83
83 84
84 85
85 86
86 87
87 88
88 89
89 90
90 91
91 92
92 93
93 94
94 95
95 96
96 97
97 98
98 99
99 100
100 101
101 102
102 103
103 104
104 105
105 106
106 107
107 108
108 109
109 110
110 111
111 112
112 113
113 114
114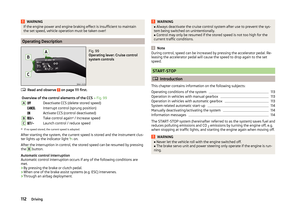 115
115 116
116 117
117 118
118 119
119 120
120 121
121 122
122 123
123 124
124 125
125 126
126 127
127 128
128 129
129 130
130 131
131 132
132 133
133 134
134 135
135 136
136 137
137 138
138 139
139 140
140 141
141 142
142 143
143 144
144 145
145 146
146 147
147 148
148 149
149 150
150 151
151 152
152 153
153 154
154 155
155 156
156 157
157 158
158 159
159 160
160 161
161 162
162 163
163 164
164 165
165 166
166 167
167 168
168 169
169 170
170 171
171 172
172 173
173 174
174 175
175 176
176 177
177 178
178 179
179 180
180 181
181 182
182 183
183 184
184 185
185 186
186 187
187 188
188 189
189 190
190 191
191 192
192 193
193 194
194 195
195 196
196 197
197 198
198 199
199