Page 97 of 200

Solving connection problems
If the hands-free system reports No paired phone found, check the operating
status of the mobile phone.
› Is the mobile phone switched on?
› Is the PIN code entered?
› Is Bluetooth ®
active?
› Is the visibility of the mobile phone active?
› Has the mobile phone already been paired with the hands-free system?
Telephone operation in the MAXI DOT display
Read and observe
on page 90 first.
The following menu items can be selected from the Phone menu.
› Phone book
› Dial number 1)
› Call register
› Voice mailbox
› Bluetooth 1)
› Settings 2)
› Back
Phone book
The Phone book menu item lists the contacts downloaded from the telephone
memory and the mobile phone SIM card.
Dial number
Any telephone number can be entered in the Dial number menu item. The re-
quired numbers must be selected one after the other using adjustment wheel
and confirmed by pressing the adjustment wheel. You can select digits 0 - 9,
symbols ,
, # and the Cancel, Call and Delete functions.
Call register
The following menu items can be selected in the Call register menu item.
■ Missed calls
■ Dialled numbers
■ Received calls
Voice mailbox
In the Voice mailbox menu item, you can set the number of the voice mailbox 1)
and then dial the number.
Bluetooth
The following menu items can be selected from the Bluetooth menu item.
■ User - Overview of the stored telephones
■ New user - Search for new mobile phones that are in the reception range
■ Visibility - Switches on the visibility of the hands-free system for other devi-
ces
■ Media player - Playback via Bluetooth ®
■ Active device - Connected device
■ Paired devices - List of paired devices
■ Find - Device search
■ Phone name - option to change the name of the phone (default SKODA_BT)
Settings
The following menu items can be selected from the Settings menu item.
■ Phone book - Phonebook
■ Update - Update the phone book 1)
■ List - Arrange the entries in the phone book
■ Surname - Arrange according to surname
■ Surname - Sort by contact name
■ Ring tone - Ring tone setting
Back
Return in the Start menu of the telephone.
Voice control
Introduction
This chapter contains information on the following subjects:
Dialogue
95
Voice commands
951)
On vehicles fitted with the Amundsen+ navigation system, this function can be accessed via the naviga-
tion system menu; refer to the » operating instructions for the Amundsen+ navigation system .
2)
This function is not available in vehicles fitted with the Amundsen+ navigation system.
94Using the system
Page 98 of 200

DialogueFig. 88
Multifunction steering wheel:
Voice control
The period of time during which the system is ready to receive voice com-
mands and to carry them out is called "dialogue". The system gives audible
feedback and guides you through the relevant functions if necessary.
Optimum understanding of the voice commands depends on several factors. › Speak at a normal volume without intonation or excessive pauses.
› Avoid poor pronunciation.
› Close the doors, windows and sliding roof in order to reduce or eliminate dis-
turbing noise from outside.
› It is recommended to speak louder at higher speeds, so that your voice is
louder than the increased surrounding noise.
› During the dialogue, limit background noise in the vehicle, e.g. passengers
talking at the same time.
› Do not speak when the system is making an announcement.
The microphone for voice control is housed in the moulded headliner and di-
rected towards the driver and front passenger. Therefore, the driver and the
front passenger can operate the equipment.
Entering a phone number
The telephone number can be entered as a continuous sequence of numbers
spoken one after the other (the whole number at once) or in the form of digit
blocks (separated by short pauses). After each string of digits (separated by a
brief pause in speaking), all of the digits detected up to now are repeated by
the system.
The digits 0-9 and symbols +,
, #
are permitted. The system does not recog-
nize any combination of connected numbers, e.g. "twenty-three".
Switching on voice control
Briefly press the button
1
» Fig. 88 on the multifunction steering wheel.
Switching off voice control
If the system is currently playing a message, the message that is currently be-
ing played must be terminated by briefly pressing button 1
» Fig. 88 on the
multifunction steering wheel.
If the system is expecting a voice command, you can end the dialogue yourself
as follows.
› With the
CANCEL voice command.
› Briefly press the button
1
» Fig. 88 on the multifunction steering wheel.
Note
■
The dialogue is immediately terminated in the event of an incoming call.■The voice control is only possible in vehicles fitted with a multifunction
steering wheel with telephone control.
Voice commands
Basic voice commands
Voice commandActionHELPAfter this command the system repeats all possible
commands.CALL XYZThis command calls up the contact from the phone
book.PHONE BOOKAfter this command, for example, the phone book
can be repeated back to you, a voice entry for the
contact can be updated or deleted, etc.CALL HISTORYLists of dialled numbers, missed calls, etc.DIAL NUMBERAfter this command, a telephone number can be
entered to establish a connection with the reques-
ted party.REDIALAfter this command the system calls the last dial-
led number.MUSIC a)Play music from the mobile phone or another
paired device.FURTHER OPTIONSAfter this command the system offers additional
context-dependent commands. 95Communication and multimedia
Page 99 of 200

On vehicles fitted with the Amundsen+ navigation system, this function can be accessed via th")
Voice commandActionSETTINGSSelection for setting Bluetooth®
, dialogue etc.CANCELThe dialogue is ended.a)
On vehicles fitted with the Amundsen+ navigation system, this function can be accessed via the naviga-
tion system menu; refer to the » operating instructions for the Amundsen+ navigation system .
If a voice command is not detected, the system answers with “ Pardon?”, and a
new entry can be made. After the 2nd error the system repeats the aid. After
the 3rd attempt the answer “ Cancelled.” is given and the dialogue is ended.
Store voice recording of a contact
If automatic name recognition does not work reliably for some contacts, you
can choose to save your own voice tag for the contact in the Phone book -
Voice tag - Record menu item.
Your own voice entry can also be saved using the voice control in the menu
FURTHER OPTIONS .
Multimedia
Introduction
This chapter contains information on the following subjects:
Music playback via Bluetooth ®
96
Operating the radio and navigation system on the multifunction steering
wheel
96
AUX and MDI inputs (AUX and USB)
97Music playback via Bluetooth ®
The universal telephone preinstallation GSM II makes it possible to play back
music via Bluetooth ®
from the devices such as MP3 player, mobile phone or
notebook.
To ensure that music can be played via Bluetooth ®
, you must first pair the de-
vice with the hands-free system in the Phone - Bluetooth - Media player
menu.
The music playback process is performed on the connected device.
The universal telephone preinstallation GSM II ensures that the music played
back via the hands-free system can be controlled with the remote con-
trol » page 95 , Voice commands .
Note
The device being connected must support the Bluetooth ®
A2DP profile; refer
to the operating instructions for the relevant device being connected.
Operating the radio and navigation system on the multifunction steering wheel
Fig. 89
Multifunction steering wheel: Navigation control buttons
The multifunction steering wheel features buttons for operating the basic
functions for the factory-fitted radio and navigation system » Fig. 89.
The radio and the navigation system can of course still be operated via the de-
vices. A description is included in the relevant operating instructions.
If the side lights are switched on, the buttons on the multifunction steering wheel are illuminated.
The buttons apply for the respective operating mode of the current radio, au-
dio, video or navigation system.
The following functions can be completed by pressing or turning the buttons. 96Using the system
Page 100 of 200
Interrupt current navigation an-
nouncement2Turn upwardsIncrease volume2Turn dow")
Button/
wheel » Fig. 89ActionRadioAudio sourcesNavigation1PressChange audio source2PressSwitch tone off/on (MUTE )Interrupt current navigation an-
nouncement2Turn upwardsIncrease volume2Turn downwardsDecrease volume3Press brieflySkip to next channelSkip to next trackNo functionInterrupt traffic report3Press and hold buttonNo functionFast forwardNo function4Press brieflySwitch to previous channelSwitch to start of track a)No functionInterrupt traffic report4Press and hold buttonNo functionFast rewindNo function5
Turn upwards
Switch to the previous station and at
the same time
display list of saved/available sta- tions
Skip to next track
Show the option to stop navigation
or display the list of recent destina- tions
5
Turn downwards
Switch to the next station and at thesame time
display list of saved/available sta- tions
Switch to start of track a)
6Press brieflyCall up the main menua)
To go to the previous track, press the adjustment wheel twice or rotate it by two positions.
AUX and MDI inputs (AUX and USB)Fig. 90
AUX input / MDI input (AUX and USB)
Depending on the equipment, your vehicle may have AUX or MDI inputs (AUX
and USB) for connecting external audio sources.
The inputs are used to connect external devices (e.g. MP3 player) as well as for
listening to music from these devices via the factory fitted radio or navigation
system.
For connecting Apple devices to the MDI input use a “USB extension cable and
a 3.5 mm jack” from the ŠKODA original accessories. Connected Apple devices
can be operated from this device.
A description of the inputs can be found in the relevant operating instructions
for the radio or navigation system. 97Communication and multimedia
Page 101 of 200

AUX input
For vehicles with an AUX input this depends on the equipment and is located
at one of the following locations.
› Between the front seats in the centre console
» Fig. 90 -
.
› Above the storage box of the front centre console
» Fig. 90 –
.
› On the front of the Amundsen+ navigation system.
The AUX input is indicated with the lettering
.
Audio devices can be connected via the standard 3.5 mm jack plug to the input.
USB input
If vehicles are equipped with the USB input, this will be located above the stor-
age compartment in the front centre console » Fig. 90 -
.
The USB input is indicated with the symbol .
USB devices can be connected at the input (such as storage sources).
SmartGate
Introduction
This chapter contains information on the following subjects:
Connection with SmartGate
98
Smart Gate website
99
Password Management
99
SmartGate is a system which transmits vehicle data via Wi-Fi.
The ŠKODA applications installed in a connected communications device (e.g.
phone, tablet, notebook) 1)
offer the possibility to further process the received
data.
Available applications and further information can be found on the ŠKODA
website..
WARNING■ The national legal regulations for using mobile communication devices in
a vehicle must be observed.■
Do not fit the equipment or mounts to be connected onto airbag covers
or within the immediate deployment range of the airbags.
■
Never leave a connected device in the deployment area of an airbag, on a
seat, on the dash panel or any another area, from which it can be thrown
during a sudden braking manoeuvre, an accident or a collision - there is a
risk of injury.
Note
The Wi-Fi range is limited to the interior of the vehicle.
Connection with SmartGate
Read and observe
on page 98 first.
For a successful connection the following conditions must be met. Wi-Fi is turned on in the device to be connected.
The ignition is switched on.
Connect
›
Can enable the connected device to search for available Wi-Fi networks (see
operating instructions for the connected device).
›
In the found networks menu, select the connection to the
“SmartGate_ ... ”network 2)
.
›
Enter the password (the password is preset at the factory to the complete
Vehicle Identification Number - enter capital letters).
Disconnecting the connection
The connection to SmartGate can be ended in the following ways.
›
By disconnecting the connected device from SmartGate.
›
By turning off the Wi-Fi in the connected device.
›
By switching off the ignition and removing the key for more than 5 s (for ve-
hicles with starter button - by turning off the engine and opening the driver's
door).
1)
The applications support communication devices with the Android operating system version 4.0.x and
later and iOS 7.xx and higher.
2)
The last six symbols of the VIN vehicle identification number of your vehicle are displayed at position ....
98Using the system
Page 102 of 200

Automatic connection
The connection to SmartGate is automatically restored under the following
conditions.
Wi-Fi is turned on in the device to be connected.
The ignition is switched on.
The device to be connected stores the password required for the connec-
tion check.
Connection problems
If the connection fails, check the following points.
› Are the conditions for a successful connection fulfilled?
› Is Smart Gate available in the list of available Wi-Fi networks?
› Has the password required for the connection check been entered?
› Is the password is required for the connection check correct?
› Is the device to be connected still connected to another Wi-Fi network?
If the above items are ok but the connection still fails, contact a ŠKODA part-
ner.
Note
Up to four devices can be connected to SmartGate at a time.
Smart Gate website
Read and observe
on page 98 first.
There is a special website for the SmartGate system.
The following address must be entered in the web browser of the connected
device.
HTTP://192.168.123.1
This website contains information about the vehicle, the Wi-Fi connection and
SmartGate.
In the Configuration area the Wi-Fi connection settings can be adjusted.
Save the setting changes
The setting changes are only applied after performing the following steps.
› The changes are saved by pressing the “Save” button.
› SmartGate is restarted by pressing the “Reboot ”button.
Password Management
Read and observe
on page 98 first.
Password management can be done in the connected device on the Smart-
Gate website » page 99, Smart Gate website .
The changes are applied after saving and restarting SmartGate » page 99,
Save the setting changes .
Change password
›
Enter a new password in the Configuration area in menu option WPA / WPA2 key.
The password must be 8-17 characters without diacritics or special characters
(for example, -, /, etc.).
Connection option without entering a password
›
In the Configuration area set the value Open in the menu item Security .
Forgot password
If you have forgotten your password, SmartGate must be reset to factory set-
tings in a specialized workshop.
99Communication and multimedia
Page 103 of 200

Driving
Starting-off and Driving
Starting and turning off the engine
Introduction
This chapter contains information on the following subjects:
Electronic immobilizer
100
Lock/unlock steering lock
101
Ignition on / off and start the engine
101
Switching off the engine
101
With the key in the ignition, the ignition can be switched on and off and the
engine can be started / stopped.
WARNING■ While driving with the engine stopped, the ignition must always be
switched on » page 101, Ignition on / off and start the engine .
■ With the ignition off, the steering may lock » page 101 - danger of an
accident!■
Do not withdraw the ignition key from the ignition lock until the vehicle
has come to a stop » page 103, Parking . Otherwise, the steering could be
blocked – risk of accident!
■
Never leave the key in the vehicle when you exit the vehicle. Unauthor-
ized persons, such as children, for example, could lock the car, turn on the
ignition or start the engine - there is a danger of injury, accidents and dam-
age!
■
Never leave the vehicle unattended with the engine running - there is
risk of accident, damage or theft!
■
Never switch off the engine before the vehicle is stationary – risk of acci-
dent!
WARNING■ Never (e.g. in garages) run the engine in a closed place - there is the dan-
ger of poisoning and death!■
Do not leave any items (e.g. cloths or tools) in the engine compartment.
This presents a fire hazard and the risk of engine damage.
■
Never cover the engine with additional insulation material (e.g. with a
cover) – risk of fire!
CAUTION
■ Only start the engine when the engine and the vehicle are stationary - there
is a danger of starter and engine damage!■
Do not push-start the engine – there is a risk of damaging the engine and
the catalytic converter. The battery from another vehicle can be used as a
jump-start aid » page 162.
Note
Do not warm up the engine while the vehicle is stationary. If possible, start
your journey as soon as the engine has started. Through this, the engine rea-
ches its operating temperature faster.
Electronic immobilizer
Read and observe
and on page 100 first.
The electronic immobilizer makes a possible attempted theft or unauthorizeduse of your vehicle more difficult.
An electronic chip is integrated in the head of the key. The immobiliser is deac-
tivated with the aid of this chip when the key is inserted in the ignition lock.
The electronic immobiliser is automatically activated when the ignition key is
withdrawn from the lock.
The engine will not start if a non-authorized ignition key is used.
The following message is shown in the information cluster display. Immobilizer active.
IMMOBILIZER
100Driving
Page 104 of 200
 deters any attempted theft of your vehicle.
Locking
›
Withdraw the ignition key.
›
Turn the st")
Lock/unlock steering lockRead and observe
and on page 100 first.
The steering lock (steering lock) deters any attempted theft of your vehicle.
Locking
›
Withdraw the ignition key.
›
Turn the steering wheel to the left or right until the steering lock clicks into
place.
Unlocking
›
Insert the key into the ignition lock.
›
Switch on the ignition » page 101.
The steering lock is unlocked.
If the ignition switch cannot be turned on, then turn the steering wheel back and forth slightly and thereby unlock the steering lock.
Ignition on / off and start the engine
Fig. 91
Positions of the vehicle key in the ignition lock
Read and observe and on page 100 first.
Positions of the vehicle key in the ignition lock » Fig. 91
Ignition switched off, engine switched off
Ignition switched on
Starting engine
Switching ignition on/off
›
Turn key to position
2
.
The ignition is switched on.
›
Turn key to position
1
.
123The ignition is switched off.
Procedure for starting the engine›
Firmly apply the handbrake.
›
For vehicles with manual transmission , shift gear stick to neutral, depress
the clutch pedal and hold it there until the engine starts.
›
On vehicles with automatic transmission , place the selector lever in position
P or N and depress the brake pedal until the engine starts.
›
Turn the key into position
3
to the stop and release immediately after the
engine has been started – do not apply the accelerator.
After letting go, the vehicle key will return to position
2
.
For vehicles with diesel engines the glow plug warning light
goes on during
starting. The engine can be started after the indicator light goes out.
If the engine does not start within 10 seconds, turn the key to position
1
. Re-
peat the start-up process after approx. half a minute.
Vehicles with the START-STOP system and manual gearbox
The engine will not start if the clutch pedal is not depressed.
The following message is shown in the information cluster display. Depress clutch to start!
CLUTCH
Vehicles with the START-STOP system and automatic gearbox
The engine will not start if the brake pedal is not depressed.
The following message is shown in the information cluster display. Depress brake to start.
BRAKE
Note
■ The engine running noises may louder at first be louder for a short time after
starting the cold engine. This is quite normal and is not an operating problem.■
You should not switch on any major electrical components during the heat-
ing period otherwise the vehicle battery will be drained unnecessarily.
Switching off the engine
Read and observe
and on page 100 first.
›
Stop the vehicle » page 103, Parking .
›
Turn key to position
1
» Fig. 91 on page 101 .
101Starting-off and Driving
 1
1 2
2 3
3 4
4 5
5 6
6 7
7 8
8 9
9 10
10 11
11 12
12 13
13 14
14 15
15 16
16 17
17 18
18 19
19 20
20 21
21 22
22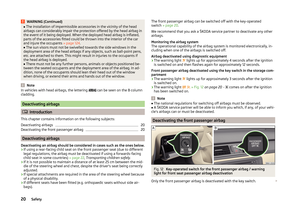 23
23 24
24 25
25 26
26 27
27 28
28 29
29 30
30 31
31 32
32 33
33 34
34 35
35 36
36 37
37 38
38 39
39 40
40 41
41 42
42 43
43 44
44 45
45 46
46 47
47 48
48 49
49 50
50 51
51 52
52 53
53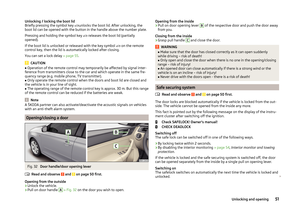 54
54 55
55 56
56 57
57 58
58 59
59 60
60 61
61 62
62 63
63 64
64 65
65 66
66 67
67 68
68 69
69 70
70 71
71 72
72 73
73 74
74 75
75 76
76 77
77 78
78 79
79 80
80 81
81 82
82 83
83 84
84 85
85 86
86 87
87 88
88 89
89 90
90 91
91 92
92 93
93 94
94 95
95 96
96 97
97 98
98 99
99 100
100 101
101 102
102 103
103 104
104 105
105 106
106 107
107 108
108 109
109 110
110 111
111 112
112 113
113 114
114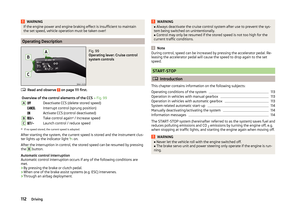 115
115 116
116 117
117 118
118 119
119 120
120 121
121 122
122 123
123 124
124 125
125 126
126 127
127 128
128 129
129 130
130 131
131 132
132 133
133 134
134 135
135 136
136 137
137 138
138 139
139 140
140 141
141 142
142 143
143 144
144 145
145 146
146 147
147 148
148 149
149 150
150 151
151 152
152 153
153 154
154 155
155 156
156 157
157 158
158 159
159 160
160 161
161 162
162 163
163 164
164 165
165 166
166 167
167 168
168 169
169 170
170 171
171 172
172 173
173 174
174 175
175 176
176 177
177 178
178 179
179 180
180 181
181 182
182 183
183 184
184 185
185 186
186 187
187 188
188 189
189 190
190 191
191 192
192 193
193 194
194 195
195 196
196 197
197 198
198 199
199