Page 33 of 64

Navigation
the town, and so on. For “town”, you can in-
dicate a town or a postcode.
After inputting the town and pressing the town centre button, the navigation systemwill guide you to the “centre” of the town in
question.
When narrowing down the destination ad-
dress, please note
that every entry restricts
the av
ailable range of subsequent selections.
If, for example, the street sought is not found
in the postcode entered previously, it will not
be in the previous option to select the street
either.
Function button: effect
Country: select the country desired.
Town: enter the town or postcode desired.
Street: enter the street desired.
House number: enter the number of the street desired.
Intersection: select an intersection of streets/roads.
Last destinations: opens the menu My destinations
››› page 33.
Start: starts guided navigation to the selected address. POI (Points of interest)
Starting guided navigation to a point of inter-
est.
Function button: effect
Search area: select the area in which you wish to search
for points of interest.
Near current location: looks for points of interest in
the area around your current location. Destination area
a) : looks for points of interest in the
area around the destination. Along the route
a) : looks for points of interest in the
area along the route. Near address
: looks for points of interest in the area
around the address entered. Select on map
: looks for points of interest in the
area around the destination selected on the map.
To select a destination on the map, press the func-
tion button Edit
.
Find categories: main category (e.g.
Car and travel), Cate-
gories (e.g. Airports) and then select the desired entry
from the list.
Save: stores the point of interest selected in the
destination memory ››› page 33.
Dial nr.
: establishes a telephone connection to the
number assigned to the point of interest. Start
: starts guided navigation at the selected
point of interest.
Find: search for a point of interest by entering its name.
a) The function button is displayed only when guided navigation
is activated.
Map/GPS coordinates
Select a destination on the map or using the
GPS coordinates and confirm by pressing
Accept .
Function button: effect
Save: stores the selected point of interest in the desti-
nation memory ››› page 33.
Edit: edits a destination, or enters another destination.
Start: starts guided navigation at the selected point of
interest. After starting navigation to the
destination
Fig. 28
Standard representation: route calcu-
lation. After starting guided navigation, the route to
the first destination will be calculated.
The route is calculated based on the require-
ments selected in the menu
Route options
››› page 37 .
»
31
Page 34 of 64

Navigation
Depending on the setup, upon starting gui-
ded navigation, 3 alternative routes
› ›
› Fig. 28 will be proposed. These 3 routes
correspond to the route options selected in
this function: Quick, short and economical
routes.
Route criteria: meaning
Blue route: Economical route: it is calculated seeking a
balance between savings in terms of kilometres and
time.
Red route: Quickest route to the destination, although it
involves diversions.
Orange route: Shortest route to the destination, al-
though it requires more time. The navigation route may
include unusual route sections, e.g. dirt roads. ●
Select the route desired by pressing on the
map.
The criteria setup in the menu Route options
will be modified accordingly.
If you do not select any route, navigation to
the destination will begin after approximately
one minute depending on the settings in Route options .
Navigation instructions (spoken
recommendations for driving)
After calculating the route, you will hear the
first navigation instruction. Before turning
you may hear up to 3 navigation instructions, for example: “Turn left shortly”, “Turn left in
300 metres” and “Turn left now”.
●
Press the setup button to repeat the last
navigation message.
The distances indicated largely depend on
the type of road and the speed at which you
are driving. For example, on motorways the
instructions are given significantly earlier
than in cities.
On roads with several lanes, on roads that di-
vide and on roundabouts, the corresponding
navigation instructions will also be given, for
example: “On the roundabout, take the sec-
ond exit”.
Upon reaching the destination, you will hear
the indication that you have arrived at your
destination.
During dynamic navigation to the destination
y ou w
ill be informed of any traffic incidents
received. An additional announcement is giv-
en if the route is recalculated due to traffic
congestion. An announcement will be given
when sections of the route are excluded man-
ually.
During an acoustic indication, you can modi-
fy the volume with the control to define a
minimum or maximum volume level. All fol-
lowing announcements will then be made at
this volume. For other acoustic indication setups, see
An-
nouncement setup ››› page 37. Note
● If you miss a turning during route guidance
and are currently unable to turn back, keep
on driving until the navigation system offers
a new route.
● The quality of the instructions given by the
unit will depend on the navigation data avail-
able and the traffic reports received. Route
Press the
Route function button in the main
navigation menu ›››
Fig. 27 .
The f u
nction button Route is only displayed
when the guided navigation is activated.
Function button: effect
Stop Route: stops the guided navigation underway.
New destination: Enter a new destination ››› page 30 and
accept it in the destination pop-up window as an inter-
mediate or final destination.
Route information: view information related to the route
underway.
Save: stores the destination currently selected in
the destination memory. Route list
: shows the roads you must drive along on
the route, as well as the respective section. 32
Page 35 of 64
 of the route underway to, for example, avoid con-
gestion. To unblock, press the function button Route")
NavigationFunction button: effect
Congestion ahead: blocks the section ahead (from 0.2 to
10 km) of the route underway to, for example, avoid con-
gestion. To unblock, press the function button Route
and then, Cancel congestion. My destinations (destination memory)
●
Press the My destinations button in the main
navigation menu ››› Fig. 27.
● Sel ect
the desired function button ( Store
position , Destinations and contacts
or Home
address ).
1. Store current position
● Press the function button Store position , to
store the position indicated as a target flag in
the Destination memory
.
To save the stored position
permanently,
change the name of the position in the desti-
nation memory . Otherwise the stored position
will be overwritten the next time a flagged
destination is stored.
In the following data entry mask you can
modify the name. To save the destination,
press the function button .
2. Destinations and contacts
Press the function button Options in the
menu of Destinations and contacts
.
Function button: effect
Last destinations: shows the destinations for which gui-
ded navigation has already been started.
Destination memory: Display of the destinations stored
manually and imported vCards ››› page 38.
Favourites list: display of the destinations stored as fa-
vourites.
Contacts: display of the entries in the telephone book
with addresses stored. 3. Home address
Only one address or position can be stored
as the home address at any one time. The
stored home address can be edited or over-
written.
If there is a private address already stored,
the guided navigation to this address will be-
gin.
If you have not yet stored any private ad-
dress, you can assign one.
Assigning a home address for the first time:
Position: press to save your current position as a
private address. Address
: press to enter the private address man-
ually.
Editing the address
You can edit the private address in the menu Navi-
gation setup ››› page 37. Points of interest (POI)
Fig. 29
Standard representation: point of in-
terest 10 categories of points of interest on
the map. The points of interest stored in the navigation
data memory are divided into different cate-
gories of points of interest. Each category of
points of interest has an icon that is dis-
played on the map.
In the menu
Map setup
you can select the cat-
egories of points of interest that you wish to
view. You can select up to 10 categories of
points of interest.
Selecting a point of interest on the map
Function button: effect
1: various points of interest in the area in question.
Press the icon to open the list of points of interest.» 33
Page 36 of 64

NavigationFunction button: effect
2: one point of interest in the area in question. Press
the icon to view the details of the point of interest. Searching for a point of interest
● In the navigation main menu, press the
function button POI .
● Press the Others function button.
Function button: effect
Search area: select the area in which you wish to search
for points of interest.
Near current location: looks for points of interest in
the area around your current location. Destination area
a) : looks for points of interest in the
area around the destination. Along the route
a) : looks for points of interest in the
area along the route. Near address
: looks for points of interest in the area
around the address entered. Select on map
: looks for points of interest in the
area around the destination selected on the map.
To select a destination on the map, press the func-
tion button Edit
.
Category: select main category (e.g.
Car and travel), cate-
gory (e.g. Airports) and finally the desired entry from the
list.
Save: stores the selected point of interest in the
destination memory. Dial nr.
b) : establishes a telephone connection to
the number assigned to the point of interest. Start
: starts guided navigation at the selected
point of interest.
Function button: effect
Find: search for a point of interest by entering its name.
a) The function button is displayed only when guided navigation
is activated.
b) The function button is only displayed when the point of inter-
est contains a telephone number.
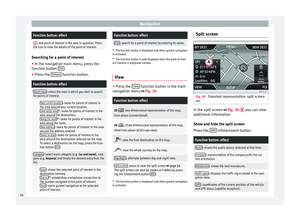
View ●
Press the View function button in the main
navigation menu ›››
Fig. 30 .
Function button: effect
2D : two-dimensional representation of the map,
from above (conventional).
3D : three-dimensional representation of the map,
tilted from above (bird's eye view).
a)
: view the final destination on the map.
a)
: view the whole journey on the map.
Day/Night: alternate between day and night view.
Split screen: press to view the split screen ››› page 34.
The split screen can also be shown or hidden by press-
ing the infotainment button NAV
.
a)
The function button is displayed only when guided navigation
is activated.
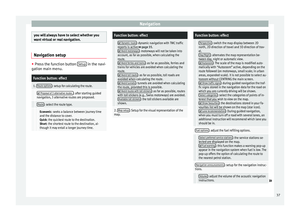
Split screen Fig. 30
Standard representation: split screen
on. In the split screen
›››
Fig. 30 A you can view
additional information.
Show and hide the split screen
Press the NAV infotainment button.
Function button: effect
Audio: shows the audio source selected at that time.
Compass: representation of the compass with the cur-
rent orientation.
Manoeuvres: shows the next manoeuvre.
Traffic signs: displays the traffic signs stored in the navi-
gation data.
GPS: coordinates of the current position of the vehicle
and GPS status (satellite reception). 34
Page 37 of 64

Navigation
To hide the split screen, press the function
button x or the infotainment button
NAV .
Visual presentation of the map Fig. 31
Standard representation: instructions
and function buttons on the map representa-
tion. Function buttons and indications on the map
representation
To view the function buttons
and
, press
the function button 2 .Function button: effect
1: view the height gauge.
2: view the scale of the map. Turn the setup button to
modify the scale of the map.
Function button: effect
: modify the orientation of the map (to the north, or
in the direction of travel). Function available only in 2D
representation.
: centre the position of the vehicle in the map frag-
ment.
: activate the map view for a moment. After a few sec-
onds, it automatically changes to the scale set previous-
ly.
: select the automatic scale. With this function acti-
vated, the icon is shown in blue. The map can also display any traffic incidents
received with an icon
››› Fig. 31 .
TMC tr
affic news and dynamic
navigation (TRAFFIC) The unit constantly receives TMC traffic re-
ports in the background, provided a TMC traf-
fic news station can be received at the cur-
rent location. The station listened to does not
have to be the TMC traffic news station.
Due to infrastructure issues, “TMC traffic re-
port” availability may be limited in certain
countries.The TMC traffic reports are shown on the map
with icons and are necessary for dynamic
navigation
››› table on page 36 .
V iew the
TMC traffic reports
● Press the infotainment button TRAFFIC to
view the current list of TMC traffic reports.
● Press the function button ... and select
All
or Route.
Function button: effect
All: all the TMC traffic reports received are displayed.
Route: view the TMC traffic news received concerning
the route underway. Dynamic navigation with TMC
For dynamic navigation to the destination,
you must activate
Dynamic route
in the route
options ›››
page 37 .
If durin
g dynamic navigation a TMC traffic re-
port is received that affects the calculated
route, the system will calculate an alternative
route if it believes it will save time.
If the detour will not save time, it will go
through the congested section. In both cases
there will be an acoustic warning.
Shortly before reaching a section for which a
traffic incident has been received, it will re-
mind you of it again. »
35
Page 38 of 64

Navigation
In certain circumstances, avoiding conges-
tion due to a TMC traffic report may not save
time if, for example, the detoured section is
already saturated with traffic. The quality of
the dynamic route guidance depends on the
information contained in the TMC traffic re-
ports. The radio stations broadcasting this in-
formation are responsible for the content.
The route to cover can also be blocked man-
ually to force a new route to be calculated
››› page 32 .
TMC tr
affic reports on the map
Icon: meaning
: queues
: traffic jam
: accident
: slippery ground
: danger of skidding
: danger
: roadworks
: strong wind
Icon: meaning
: road closed
In guided navigation, traffic incidents that af-
fect the calculated route are displayed in red,
while those that do not are displayed in grey.
The length of a traffic incident along the
route calculated is represented by a red line.
The TMC symbol is located at the start of the
traffic delay, provided it has been defined
clearly in the TMC traffic report.
Depending on the scale of the map, other
congestion icons may be hidden behind one
TMC icon. In this case, press the TMC icon
and a list will open with further traffic inci-
dents present.
● Select the desired entry by pressing it.
Guide to the destination in
demonstration mode (Demo) If, in the menu
Navigation setup
, Demo mode
is active ›››
page 37 , an additional pop-up
w indo
w will appear when guided navigation
starts.
● Pressing the function button Demo mode starts a “virtual” guided navigation to the fi-
nal destination indicated.●
If you press the function button
Normal mode , the “real” guided navigation
will begin.
The sequence of events and the operations in
virtual route guidance are similar to those in
real route guidance.
Virtual route guidance is repeated when you
reach the fictitious destination and always
starts again from the starting point if it is in-
terrupted.
If in the menu Navigation setup the starting
point of the Demo mode was determined
manually, the virtual guided navigation will
begin from this position.
A starting point introduced manually is over-
written with the current location of the vehi-
cle, if the vehicle starts to move and if the ve-
hicle's location can be determined by the
GPS.
When real route guidance is started following
virtual route guidance in demo mode, the
unit first has to reorient itself. This orienta-
tion can last some time depending on the
number of satellites that are received at that
time. Moving the vehicle may speed up the
reorientation process. Note
Deactivate the Demo mode after use, because
otherwise before starting guided navigation 36
Page 39 of 64

Navigation
you will always have to select whether you
want virtual or real navigation.
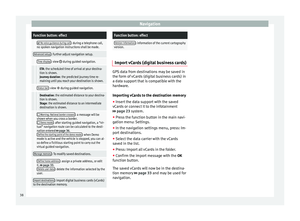
Navigation setup
●
Press the function button Setup in the navi-
gation main menu.Function button: effect
1. Route options: setup for calculating the route.
Proposal of 3 alternative routes.: after starting guided
navigation, 3 alternative routes are proposed.
Route: select the route type.
Economic: seeks a balance between journey time
and the distance to cover. Quick: the quickest route to the destination.Short: the shortest route to the destination, al-
though it may entail a longer journey time.
Function button: effect
Dynamic route: dynamic navigation with TMC traffic
reports is active ››› page 35.
Avoid motorways: motorways will not be taken into
account, as far as possible, when calculating the
route.
Avoid ferries and trains: as far as possible, ferries and
trains for vehicles are avoided when calculating the
route.
Avoid toll roads: as far as possible, toll roads are
avoided when calculating the route.
Avoid tunnels: tunnels are avoided when calculating
the route, provided this is possible.
Avoid routes with toll stickers: as far as possible, routes
with toll stickers (e.g., Swiss motorways) are avoided. Available toll stickers
: the toll stickers available are
shown.
2. Map setup: Setup for the visual representation of the
map.
Function button: effect
Perspective: switch the map display between 2D
north, 2D direction of travel and 3D direction of trav-
el. Day/Night
: alternates the map representation be-
tween day, night or automatic view.
Autozoom: The scale of the map is modified auto-
matically with “Autozoom” active, depending on the
route followed (on motorways, small scale; in urban
areas, expanded scale). It is not possible to select au-
tozoom without CENTRING the main screen.
Show traffic signs: during guided navigation the traf-
fic signs stored in the navigation data for the road on
which you are currently driving will be shown. Select categories
: select the categories of points of in-
terest that you wish to view on the map.
Show favourites: the destinations stored in your Fa-
vourites list will be shown on the map (star icon).
Lane recommendation: During guided navigation,
when you must turn off a road with several lanes, an
additional instruction will recommend which lane you
should be in.
Fuel options: adjust the fuel refilling options.
Select preferred service stations: the service stations se-
lected are displayed on the map.
Fuel warning: this function makes a warning pop-up
appear in the navigation system when fuel is low. The
pop-up offers the option of calculating the route to
the nearest petrol station.
Navigation announcements: setup for the navigation instruc-
tions.
Volume: adjust the volume of the acoustic navigation
instructions.» 37
Page 40 of 64

NavigationFunction button: effect
No voice guidance during call: during a telephone call,
no spoken navigation instructions shall be made.
Advanced setup: Further adjust navigation setup.
Time display: view during guided navigation.
ETA: the scheduled time of arrival at your destina-
tion is shown. Journey duration : the predicted journey time re-
maining until you reach your destination is shown.
Status bar: view during guided navigation.
Destination: the estimated distance to your destina-
tion is shown. Stage: the estimated distance to an intermediate
destination is shown.
Warning: National border crossed: a message will be
shown when you cross a border.
Demo mode: after starting guided navigation, a “vir-
tual” navigation route can be calculated to the desti-
nation entered ››› page 36.
Define the starting point of the demo mode
: when Demo
mode is active and the vehicle is stopped, you can al-
so define a fictitious starting point to carry out the
virtual guided navigation.
Manage memory: To modify saved destinations.
Define home address: assign a private address, or edit
it. ››› page 33.
Delete user data
: delete the information selected by the
user.
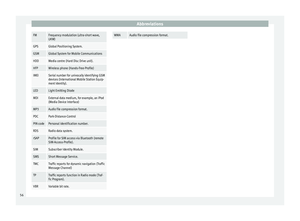
Import destinations: import digital business cards (vCards)
to the destination memory.
Function button: effect
Version information: information of the current cartography
version. Import vCards (digital business cards)
GPS data from destinations may be saved in
the form of vCards (digital business cards) in
a data support that is compatible with the
hardware.
Importing vCards to the destination memory
●
Insert the data support with the saved
vCards or connect it to the infotainment
››› page 23 system.
● Pr e
ss the function button in the main navi-
gation menu: Settings.
● In the navigation settings menu, press: Im-
port destinations.
● Select the data carrier with the vCards
saved in the list.
● Press: Import all vCards in the folder.
● Confirm the import message with the OK
function button.
The saved vCards will now be in the destina-
tion memory ›››
page 33 and may be used for
nav
igation. 38