2014 NISSAN TEANA tow
[x] Cancel search: towPage 2432 of 4801
EXT-18
< REMOVAL AND INSTALLATION >
FRONT BUMPER
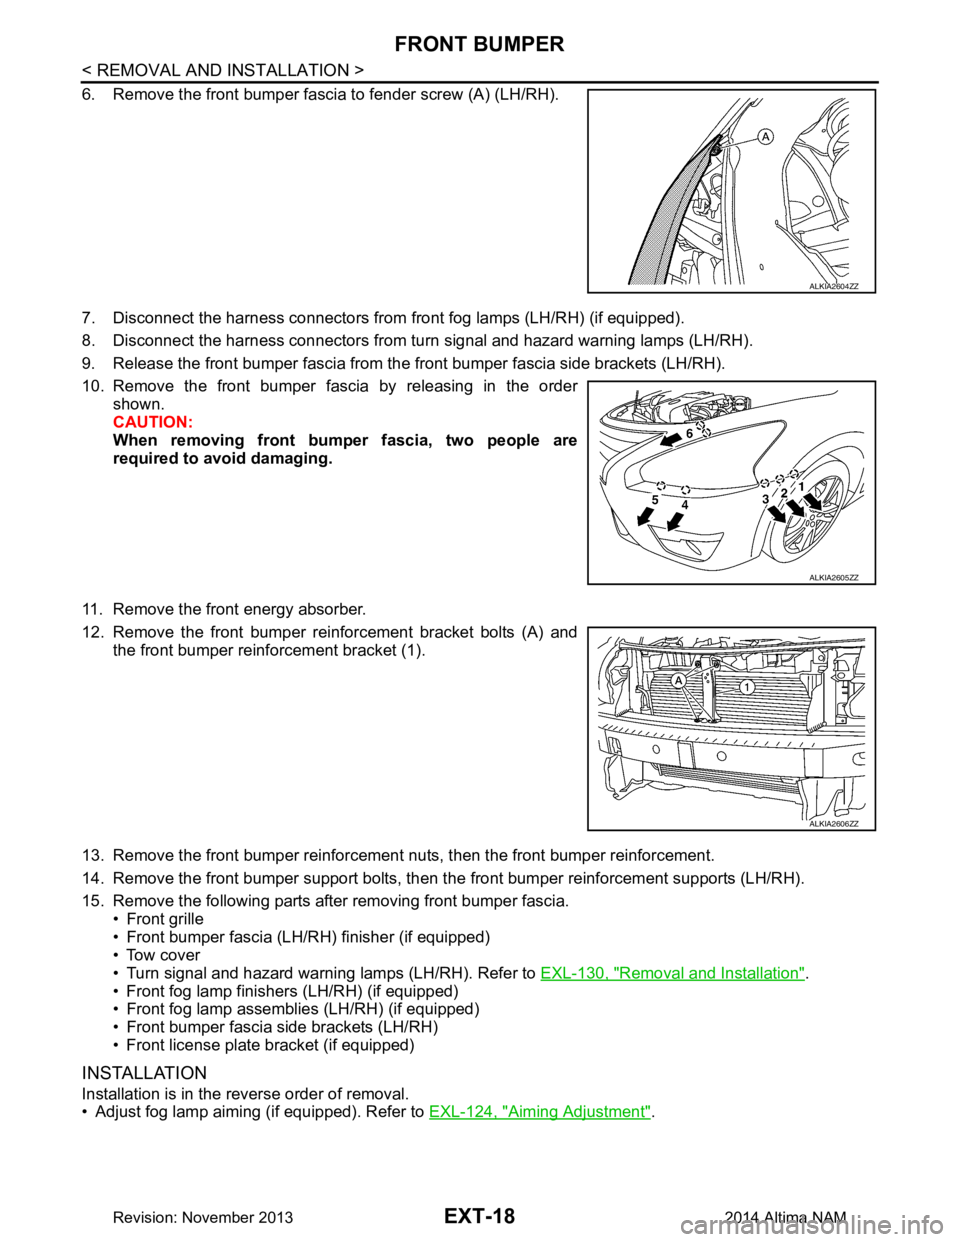
6. Remove the front bumper fascia to fender screw (A) (LH/RH).
7. Disconnect the harness connectors from front fog lamps (LH/RH) (if equipped).
8. Disconnect the harness connectors from turn signal and hazard warning lamps (LH/RH).
9. Release the front bumper fascia from the front bumper fascia side brackets (LH/RH).
10. Remove the front bumper fascia by releasing in the order shown.
CAUTION:
When removing front bumper fascia, two people are
required to avoid damaging.
11. Remove the front energy absorber.
12. Remove the front bumper reinforcement bracket bolts (A) and the front bumper reinforcement bracket (1).
13. Remove the front bumper reinforcement nuts, then the front bumper reinforcement.
14. Remove the front bumper support bolts, then t he front bumper reinforcement supports (LH/RH).
15. Remove the following parts after removing front bumper fascia. • Front grille
• Front bumper fascia (LH/RH) finisher (if equipped)
• Tow cover
• Turn signal and hazard warning lamps (LH/RH). Refer to EXL-130, "Removal and Installation"
.
• Front fog lamp finishers (LH/RH) (if equipped)
• Front fog lamp assemblies (LH/RH) (if equipped)
• Front bumper fascia side brackets (LH/RH)
• Front license plate bracket (if equipped)
INSTALLATION
Installation is in the reverse order of removal.
• Adjust fog lamp aiming (if equipped). Refer to EXL-124, "Aiming Adjustment"
.
ALKIA2604ZZ
ALKIA2605ZZ
ALKIA2606ZZ
Revision: November 20132014 Altima NAM
Page 2446 of 4801
EXT-32
< REMOVAL AND INSTALLATION >
DOOR SASH MOLDING
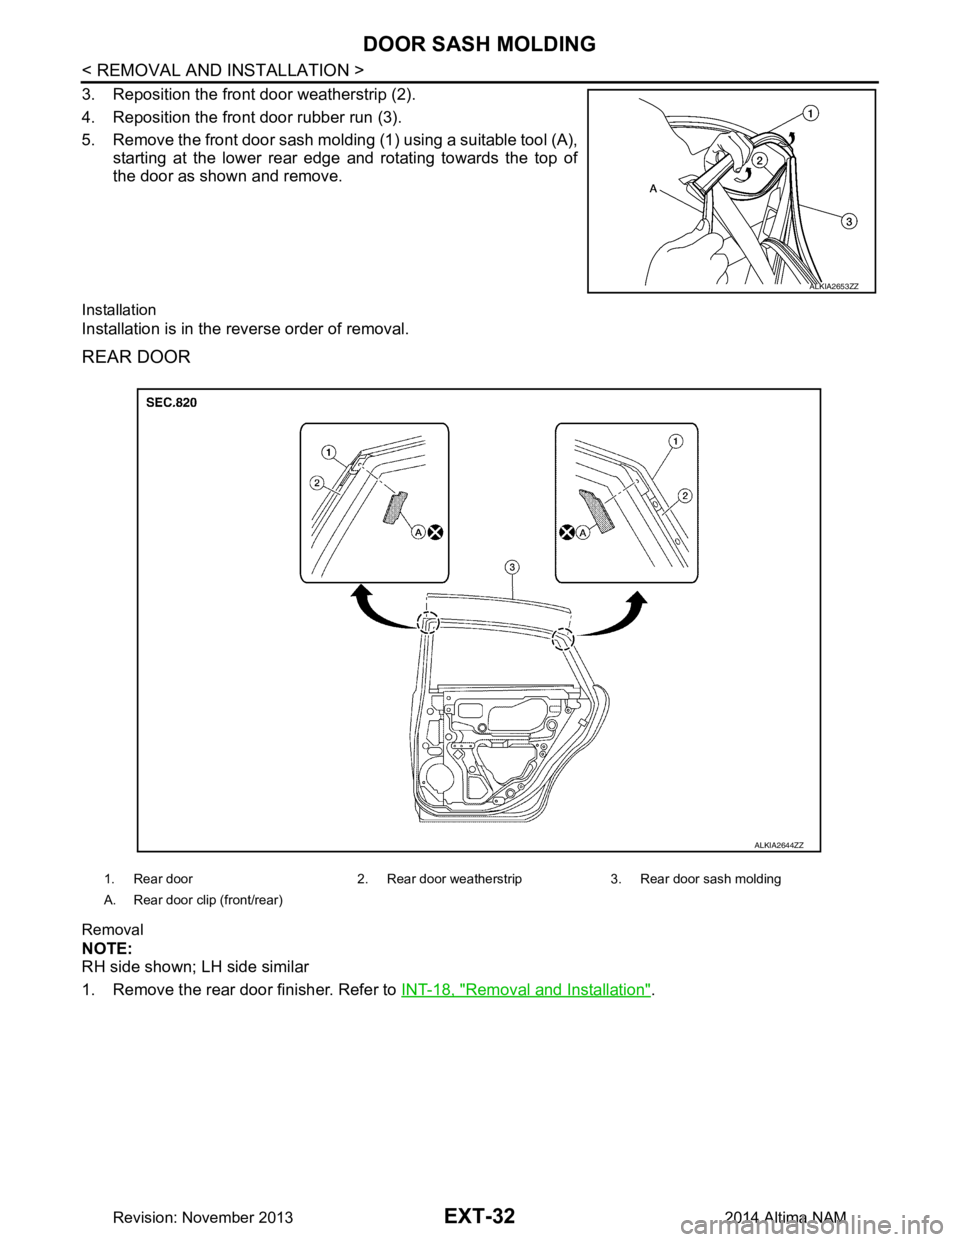
3. Reposition the front door weatherstrip (2).
4. Reposition the front door rubber run (3).
5. Remove the front door sash molding (1) using a suitable tool (A), starting at the lower rear edge and rotating towards the top of
the door as shown and remove.
Installation
Installation is in the reverse order of removal.
REAR DOOR
Removal
NOTE:
RH side shown; LH side similar
1. Remove the rear door finisher. Refer to INT-18, "Removal and Installation"
.
ALKIA2653ZZ
1. Rear door 2. Rear door weatherstrip 3. Rear door sash molding
A. Rear door clip (front/rear)
ALKIA2644ZZ
Revision: November 20132014 Altima NAM
Page 2447 of 4801
DOOR SASH MOLDINGEXT-33
< REMOVAL AND INSTALLATION >
C
D E
F
G H
I
J
L
M A
B
EXT
N
O P
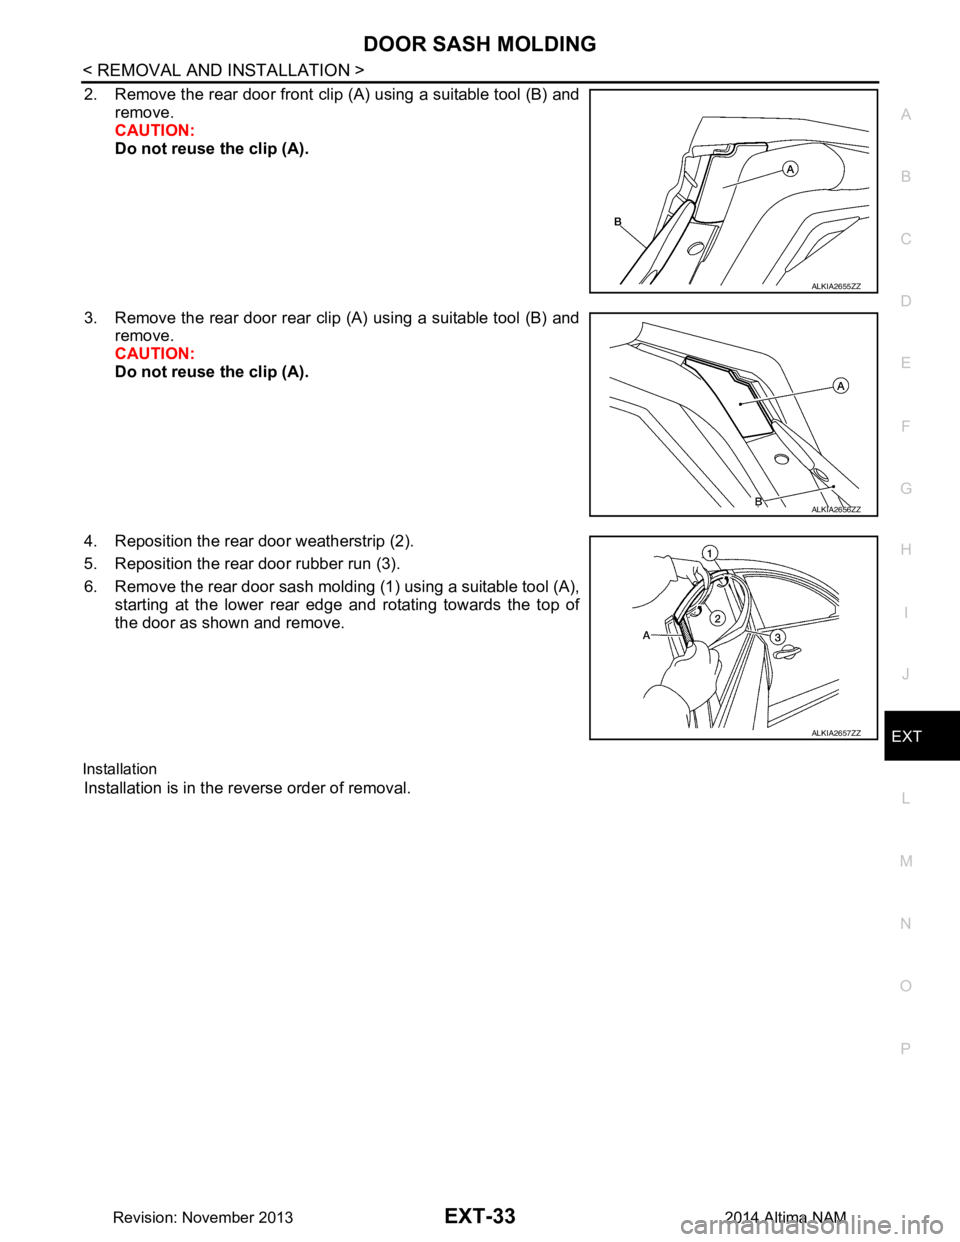
2. Remove the rear door front clip (A) using a suitable tool (B) and remove.
CAUTION:
Do not reuse the clip (A).
3. Remove the rear door rear clip (A) using a suitable tool (B) and remove.
CAUTION:
Do not reuse the clip (A).
4. Reposition the rear door weatherstrip (2).
5. Reposition the rear door rubber run (3).
6. Remove the rear door sash molding (1) using a suitable tool (A), starting at the lower rear edge and rotating towards the top of
the door as shown and remove.
Installation
Installation is in the reverse order of removal.
ALKIA2655ZZ
ALKIA2656ZZ
ALKIA2657ZZ
Revision: November 20132014 Altima NAM
Page 2449 of 4801
DOOR OUTSIDE MOLDINGEXT-35
< REMOVAL AND INSTALLATION >
C
D E
F
G H
I
J
L
M A
B
EXT
N
O P
DOOR OUTSIDE MOLDING
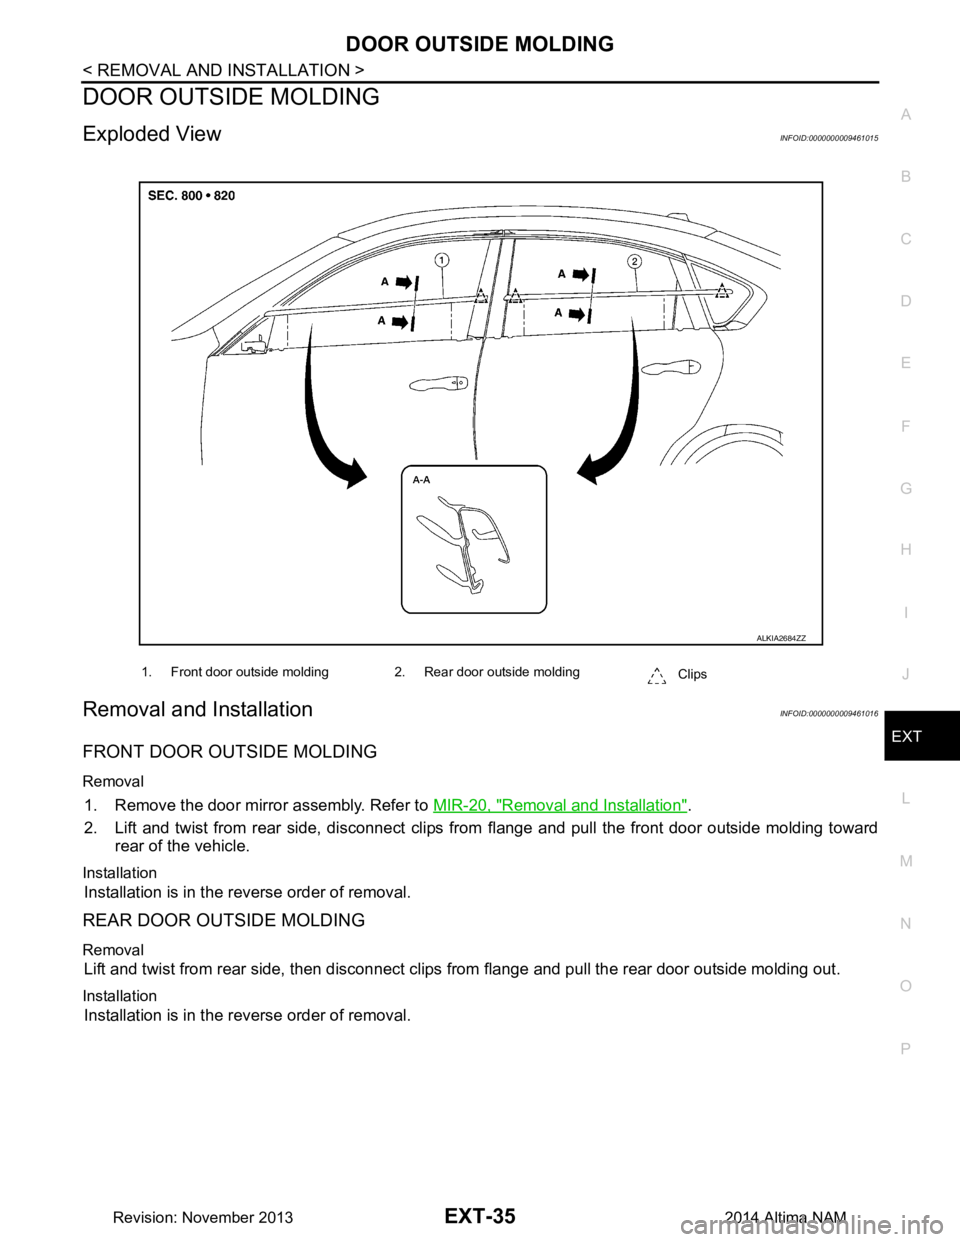
Exploded ViewINFOID:0000000009461015
Removal and InstallationINFOID:0000000009461016
FRONT DOOR OUTSIDE MOLDING
Removal
1. Remove the door mirror assembly. Refer to MIR-20, "Removal and Installation".
2. Lift and twist from rear side, disconnect clips fr om flange and pull the front door outside molding toward
rear of the vehicle.
Installation
Installation is in the reverse order of removal.
REAR DOOR OUTSIDE MOLDING
Removal
Lift and twist from rear side, then disconnect clips from flange and pull the rear door outside molding out.
Installation
Installation is in the reverse order of removal.
1. Front door outside molding 2. Rear door outside molding
Clips
ALKIA2684ZZ
Revision: November 20132014 Altima NAM
Page 2451 of 4801
LICENSE LAMP FINISHEREXT-37
< REMOVAL AND INSTALLATION >
C
D E
F
G H
I
J
L
M A
B
EXT
N
O P
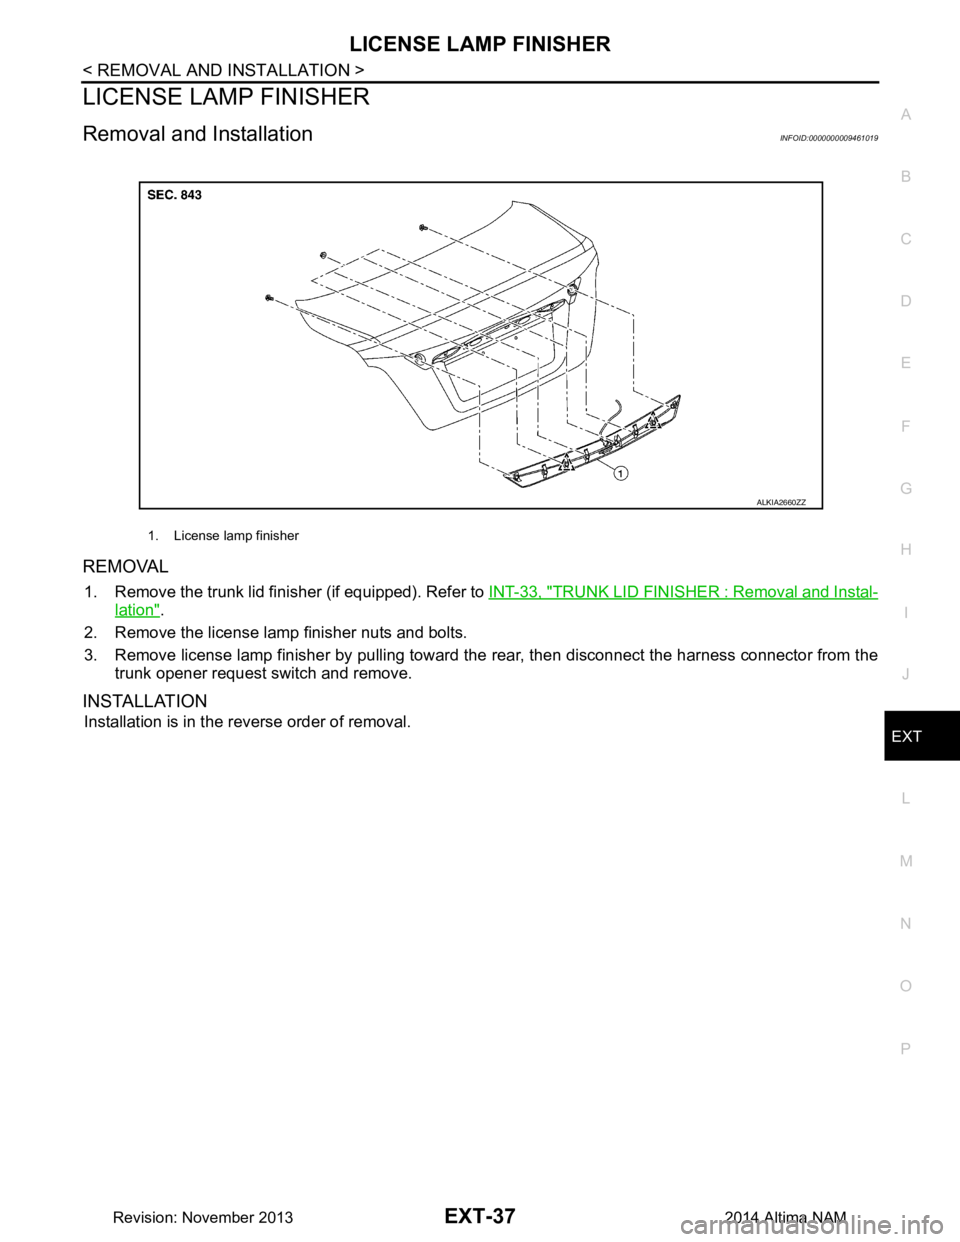
LICENSE LAMP FINISHER
Removal and InstallationINFOID:0000000009461019
REMOVAL
1. Remove the trunk lid finisher (if equipped). Refer to INT-33, "TRUNK LID FINISHER : Removal and Instal-
lation".
2. Remove the license lamp finisher nuts and bolts.
3. Remove license lamp finisher by pulling toward the rear, then disconnect the harness connector from the trunk opener request switch and remove.
INSTALLATION
Installation is in the reverse order of removal.
1. License lamp finisher
ALKIA2660ZZ
Revision: November 20132014 Altima NAM
Page 2510 of 4801
FRONT COIL SPRING AND STRUTFSU-9
< REMOVAL AND INSTALLATION >
C
D
F
G H
I
J
K L
M A
B
FSU
N
O P
REMOVAL AND INSTALLATION
FRONT COIL SPRING AND STRUT
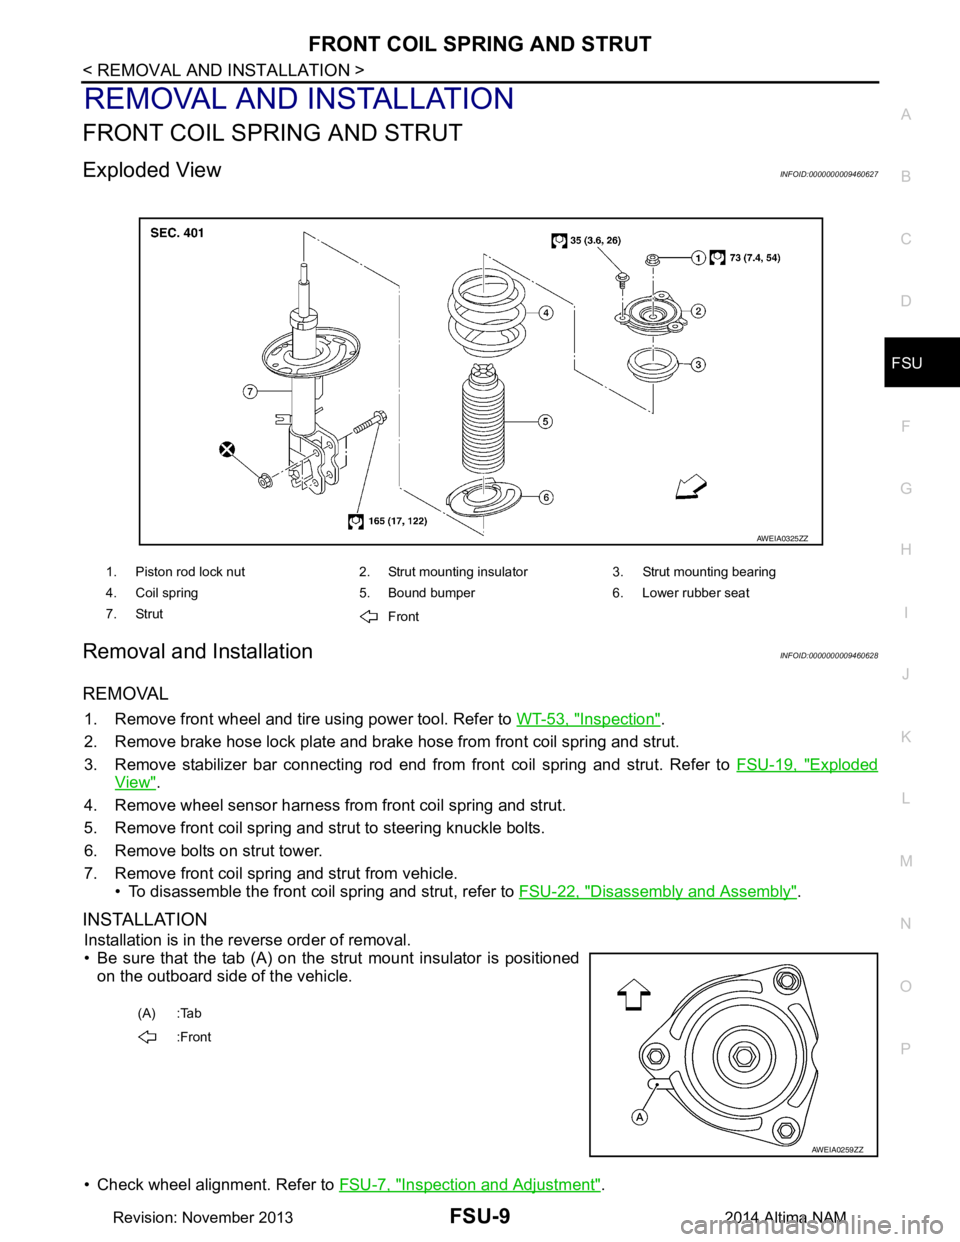
Exploded ViewINFOID:0000000009460627
Removal and InstallationINFOID:0000000009460628
REMOVAL
1. Remove front wheel and tire using power tool. Refer to WT-53, "Inspection".
2. Remove brake hose lock plate and brake hose from front coil spring and strut.
3. Remove stabilizer bar connecting rod end from front coil spring and strut. Refer to FSU-19, "Exploded
View".
4. Remove wheel sensor harness from front coil spring and strut.
5. Remove front coil spring and strut to steering knuckle bolts.
6. Remove bolts on strut tower.
7. Remove front coil spring and strut from vehicle. • To disassemble the front coil spring and strut, refer to FSU-22, "Disassembly and Assembly"
.
INSTALLATION
Installation is in the reverse order of removal.
• Be sure that the tab (A) on the strut mount insulator is positioned on the outboard side of the vehicle.
• Check wheel alignment. Refer to FSU-7, "Inspection and Adjustment"
.
1. Piston rod lock nut 2. Strut mounting insulator 3. Strut mounting bearing
4. Coil spring 5. Bound bumper 6. Lower rubber seat
7. Strut Front
AWEIA0325ZZ
(A) :Tab
:Front
AWEIA0259ZZ
Revision: November 20132014 Altima NAM
Page 2521 of 4801
FSU-20
< UNIT REMOVAL AND INSTALLATION >
FRONT SUSPENSION ASSEMBLY
Removal and Installation
INFOID:0000000009460637
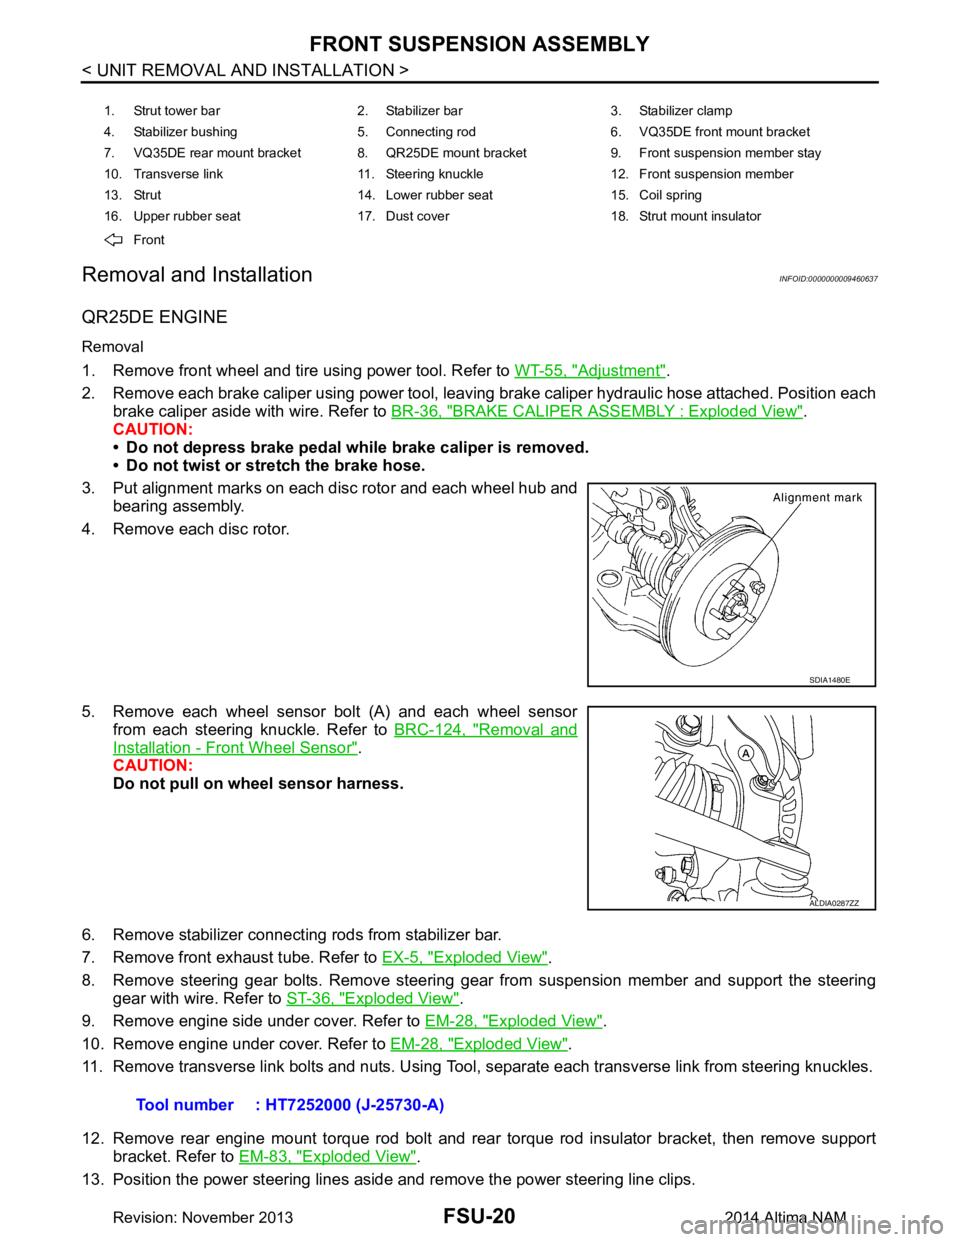
QR25DE ENGINE
Removal
1. Remove front wheel and tire using power tool. Refer to WT-55, "Adjustment".
2. Remove each brake caliper using power tool, leaving brake caliper hydraulic hose attached. Position each brake caliper aside with wire. Refer to BR-36, "BRAKE CALIPER ASSEMBLY : Exploded View"
.
CAUTION:
• Do not depress brake pedal while brake caliper is removed.
• Do not twist or stretch the brake hose.
3. Put alignment marks on each disc rotor and each wheel hub and bearing assembly.
4. Remove each disc rotor.
5. Remove each wheel sensor bolt (A) and each wheel sensor from each steering knuckle. Refer to BRC-124, "Removal and
Installation - Front Wheel Sensor".
CAUTION:
Do not pull on wheel sensor harness.
6. Remove stabilizer connecting rods from stabilizer bar.
7. Remove front exhaust tube. Refer to EX-5, "Exploded View"
.
8. Remove steering gear bolts. Remove steering gear from suspension member and support the steering gear with wire. Refer to ST-36, "Exploded View"
.
9. Remove engine side under cover. Refer to EM-28, "Exploded View"
.
10. Remove engine under cover. Refer to EM-28, "Exploded View"
.
11. Remove transverse link bolts and nuts. Using Tool, separate each transverse link from steering knuckles.
12. Remove rear engine mount torque rod bolt and rear torque rod insulator bracket, then remove support bracket. Refer to EM-83, "Exploded View"
.
13. Position the power steering lines aside and remove the power steering line clips.
1. Strut tower bar 2. Stabilizer bar 3. Stabilizer clamp
4. Stabilizer bushing 5. Connecting rod 6. VQ35DE front mount bracket
7. VQ35DE rear mount bracket 8. QR25DE mount bracket 9. Front suspension member stay
10. Transverse link 11. Steering knuckle 12. Front suspension member
13. Strut 14. Lower rubber seat 15. Coil spring
16. Upper rubber seat 17. Dust cover 18. Strut mount insulator
Front
SDIA1480E
ALDIA0287ZZ
Tool number : HT7252000 (J-25730-A)
Revision: November 20132014 Altima NAM
Page 2529 of 4801
GI-1
GENERAL INFORMATION
C
D E
F
G H
I
J
K L
M B
GI
SECTION GI
N
O P
CONTENTS
GENERAL INFORMATION
HOW TO USE THIS MANU AL ......................3
HOW TO USE THIS MANUAL ....................... .....3
Description .......................................................... ......3
Terms ........................................................................3
Units ..........................................................................3
Contents ....................................................................3
Relation between Illustrations and Descriptions .......4
Components ..............................................................4
HOW TO FOLLOW TROUBLE DIAGNOSES .....6
Description ................................................................6
How to Follow Test Groups in Trouble Diagnosis ......6
Key to Symbols Signifying Measurements or Pro-
cedures ............................................................... ......
7
HOW TO READ WIRING DIAGRAMS ................9
Connector symbols ............................................. ......9
Sample/wiring diagram -example- ...........................10
Description ..............................................................11
ABBREVIATIONS .......................................... ....13
Abbreviation List .................................................. ....13
TIGHTENING TORQUE OF STANDARD
BOLTS ............................................................ ....
18
Description .......................................................... ....18
Tightening Torque Table (New Standard Includ-
ed) ....................................................................... ....
18
RECOMMENDED CHEMICAL PRODUCTS
AND SEALANTS ............................................ ....
21
Recommended Chemical Products and Sealants ....21
VEHICLE INFORMATION ............................22
IDENTIFICATION INFORMATION ................. ....22
Model Variation ................................................... ....22
Identification Number ..............................................23
Identification Plate ...................................................24
Engine Serial Number .............................................24
CVT Number ...........................................................25
Dimensions .......................................................... ....25
Wheels & Tires ........................................................25
PRECAUTION ..............................................26
PRECAUTIONS .................................................26
Description ........................................................... ....26
Precaution for Supplemental Restraint System
(SRS) "AIR BAG" and "SEAT BELT PRE-TEN-
SIONER" ............................................................. ....
26
Precautions For Xenon Headlamp Service .............26
Procedures without Cowl Top Cover .......................27
Cautions in Removing Battery Terminal and AV
Control Unit .......................................................... ....
27
General Precautions ................................................27
Three Way Catalyst .................................................29
Fuel (Regular Unleaded Gasoline Recommend-
ed) QR25DE ........................................................ ....
29
Fuel (Regular Unleaded Gasoline Recommend-
ed) VQ35DE ........................................................ ....
29
Multiport Fuel Injection System or Engine Control
System ................................................................. ....
29
Hoses ......................................................................29
Engine Oils ..............................................................30
Air Conditioning .......................................................31
LIFTING POINT .................................................32
Special Service Tool ................................................32
Pantograph Jack ......................................................32
Garage Jack and Safety Stand ................................33
2-Pole Lift ................................................................34
Board-on Lift ............................................................35
TOW TRUCK TOWING .....................................36
Tow Truck Towing ...................................................36
Vehicle Recovery (Freeing a Stuck Vehicle) ...........36
WIRING DIAGRAM ......................................38
CONSULT CHECKING SYSTEM .....................38
Wiring Diagram .................................................... ....38
Revision: November 20132014 Altima NAMRevision: November 20132014 Altima NAM