Page 49 of 80

8. Make sure to select the USB mass storagedevice as the location to save, using the ex-
act folder name “/myPOIs” for User POIs or
“/myPOIs/myPOIwarnings”
for POI-warnings. For example, if the USB
mass storage device’s root folder is repre-
sented by f:/, save the file to the folder
“f:/myPOIs” for User POIs or to the folder
“f:/myPOIs/myPOIwarnings”
for POI-warnings.
9. Connect the USB mass storage device to the vehicle’s USB port. For more informa-
tion about the USB port, see your vehicle’s
Owner’s Manual.
Adding user-defined points of interest
(POIs)
Perform the following procedure to add your
User POIs to the system:
1. Press the NAV button.
2. Touch “Next Page”.
3. Touch “My Points of Interest”.
4. If a USB mass storage device with the new POI data is connected, the system will auto-
matically ask if you want to transfer the POI
data. Touch “Download” to begin the trans-
fer or “Cancel” to cancel the procedure.
NOTE:
New POI data will overwrite POI data al-
ready in the internal memory. 5. The POI data on the USB mass storage de-
vice is transferred to the vehicle.
NOTE:
A maximum of 8 MB of POI data can be
added to the system. 6. Once the download process is complete, the available POIs are displayed in a list on
the screen.
7. Touch the name of a POI on the list to set it as the destination.
8. Touch “Start” to calculate the route.
A user-defined POI in the My Points of Interest
database can also be set as the destination by
following the procedure below: 1. Press the NAV button.
2. Touch “Next Page”.
3. Touch “My Points of Interest”
4. Touch the name of the user-defined Point of Interest to set that entry as a destination.
LNV2410
Navigation4-15
Page 50 of 80

Perform the following procedure to delete the
user-defined POIs stored in the My Points of In-
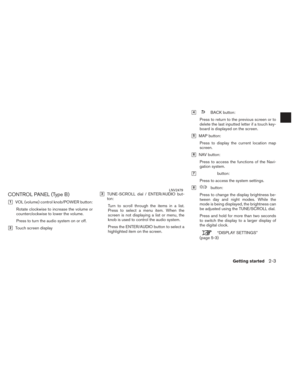
terest memory:1. Press the
or MENU button.
2. Touch “")
Deleting user-defined points of inter-
est (POIs)
Perform the following procedure to delete the
user-defined POIs stored in the My Points of In-
terest memory:1. Press the
or MENU button.
2. Touch “Settings”. 3. Touch “Navigation”.
4. Touch “My Points of Interest Settings”
5. Touch “Remove My Points of Interest From
System”.
6. A pop-up is displayed to confirm that you want to delete all User POIs (My Points of
Interest) from the system. Touch “Yes” to
delete the User POIs or “No” to cancel. Other options are available on the “My Points of
Interest Settings” screen:
●
My Points of Interest Alert
Select to adjust how alerts are provided when
approaching a destination set by My Points of
Interest. Choose “OFF” to disable the alert.
Choose “Show Only” to display the alert on
the screen. Choose “Show & Beep” to display
the alert on the screen and play an audible
sound.
● Points of Interest Alert Distance
Select to choose from the available list a dis-
tance away from the My Points of Interest
destination at which to activate the alert.
LNV2490LNV2460
4-16Navigation
Page 51 of 80

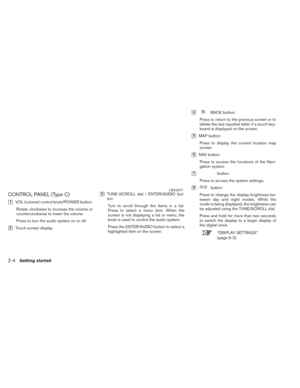
This option allows you to set and store the des-
tination in the address book and use the stored
destinations to calculate a route.
SETTING A NEW ENTRY TO THE
ADDRESS BOOK
1. Press the NAV button.
2. Touch “Next Page”.
3. Touch “Address Book”.
4. Touch “Add New Entry”.
There are four possibilities shown:
NOTE:
Up to 50 address book entries can be
stored. If the number of address book en-
tries exceeds 50, one must be deleted be-
fore the new one can be added.
“SETTING AN ENTRY AS A DESTI-
NATION” (page 4-18)
● “Street Address”
This option allows you to save a new entry
by selecting the address.
“SETTING A DESTINATION
FROM A STREET ADDRESS”
(page 4-5)
● “Previous Destination”
This option allows you to save a destination
in the address book from a location stored
in the previous destination memory.
Touch the destination you would like to save
into the address book.
The touch keyboard gives the option to change
the name of the selected destination.
Touch “OK”. The system confirms the entry and
adds it to the address book.
● “Current Destination”
This option allows you to store the currently
set destination in the address book when a
route is active. This option is only available
when a route is active.
Touch “Current Destination”.
LNV2410
SETTING A DESTINATION FROM THE
ADDRESS BOOK
Navigation4-17
Page 52 of 80

The touch keyboard gives the option to change
the name of the destination.
Touch “OK”. The system confirms the entry and
adds it to the address book.
●“Current Position”
This option allows you to set the current po-
sition as a destination in the address book.
Touch “Current Position”.
The touch keyboard gives the option to change
the name of the destination.
Touch “OK”. The system confirms the entry and
adds it to the address book.
SETTING AN ENTRY AS A DESTINA-
TION
Instead of touching “Add New Entry”, you can
touch any previously saved address.
The detailed description of the entry is shown. If
information for the destination is not available,
latitude and longitude coordinates will be shown.
You can rename or delete the entry. Touch “OK”
to set the entry as a destination.
The system will calculate the route to the ad-
dress chosen.
SETTING A DESTINATION FROM
THE ADDRESS BOOK USING
VOICE RECOGNITION (if so
equipped)
Entries in the address book can be set as desti-
nations using the NISSAN Voice Recognition
System: 1. Press the
orbutton on the
steering wheel. The system provides
prompts and waits for voice commands.
2. Say “Navigation”.
3. Say “Address Book”.
4. Say the number of the entry in the address book displayed on the screen.
If a route is active, say “Replace Destination” to re-
place the current destination with the address
book entry or say “Set as Waypoint” to set address
book entry as a waypoint on the current route.
If a route is not set, route guidance is calculated
to the address book entry.
Say “Show on Map” to display the location of the
address book entry on the map.
For more information about the NISSAN Voice
Recognition System, see the vehicle Owner’s
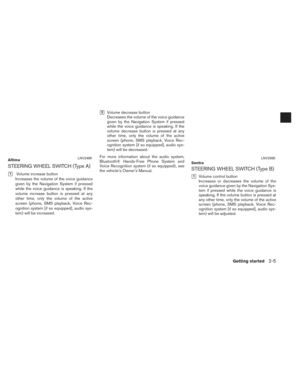
Manual. An intersection of two streets can be set as a
destination. To set an intersection as the desti-
nation:
1. Press the NAV button.
2. Touch “Next Page”.
3. Touch “Intersection”.
4. Touch “Change State/Province” if the state or province displayed is not correct.
5. If necessary, enter the name of the state or province.
The display shows the touch keyboard.
“HOW TO INPUT CHARACTERS”
(page 2-9)
6. Press “List” at any time and a list of remain- ing cities will be shown. Touch the desired
city.
LNV2410
SETTING AN INTERSECTION AS A
DESTINATION
4-18Navigation
Page 53 of 80

7. Touch “Street”.The display shows the touch keyboard.
8. Touch the name of the desired street.
9. A list of intersecting streets will be shown if six or less exist. Otherwise, the touch key-
board will be displayed again so that the
name of the second street in the intersec-
tion can be entered. Enter the second street
name.
10. Select the intersecting street.
11. Touch “Start”. The route to the intersection will be
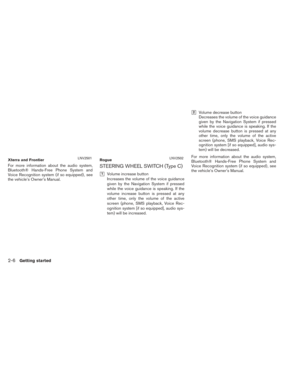
calculated. The center of a city can be set as a destination.
To set a city center as a destination:
1. Press the NAV button.
2. Touch “Next Page”.
3. Touch “City Center”.
4. If the state shown is not correct, touch “Change State or Province”. Otherwise,
proceed to step 7.
5. Enter the name of the state or province. The display shows the touch keyboard.
“HOW TO INPUT CHARAC-
TERS” (page 2-9)
The keyboard has an intelligent spelling
setting, so it excludes non-existing
combinations. On the top right of the
screen, the number of matches is shown. 6. Touch “City”
7. Enter the name of the first street. The dis-
play shows the touch keyboard.
8. Touch “Start” to calculate the route to the city center.
LNV2410
SETTING A CITY CENTER AS A DES-
TINATION
Navigation4-19
Page 54 of 80

The Navigation System receives traffic informa-
tion from SiriusXM Traffic to inform you of traffic
events and guide you to an alternate route. Traf-
fic events include accidents, road construction,
heavy traffic and other factors that affect the
route ahead.
DISPLAYING TRAFFIC EVENTS
ALONG ROUTE
When a route is active, press thebut-
ton and then touch “SiriusXM Traffic” to display
the traffic event nearest the current vehicle
location. The location and nature of the traffic
event is displayed on the screen. Three menu
options are available on the screen.
NOTE:
This feature can also be accessed using
the NISSAN Voice Recognition System (if
so equipped) by pressing the
orbutton on the steering wheel and
when prompted, saying “Information” then
“Traffic”. ●
“Avoid Road On Route.”
Touch the “Avoid Road On Route.” key to direct
the navigation system to avoid the area impacted
by the listed traffic event. The next screen lists
multiple options.
Touch the “Detour by Distance” key to avoid the
road listed on the traffic event. You can choose
the distance over which the system avoids the
affected road. Touch the “+” or “-” key to set the
distance and then touch “Recalculate Route” to
calculate the new route.
Touch the “Avoid Segment of Route List” key to
avoid a series of roads on the route list due to
the traffic event. The route list is displayed on the
screen. Touch the names of two streets on the
list to avoid that portion of the route and then
touch “Recalculate Route” to calculate the new
route.
● “List All Traffic Events”
Touch the “List All Traffic Events” key to display a
list of all traffic events in the area, including those
which are not directly along the current route.
Touch the line of a specific event on the screen
to see more details about that item.
LNV2490
TRAFFIC FEATURE
4-20Navigation
Page 55 of 80
TRAFFIC FLOW FEATURE
Using information received from SiriusXM Traffic,
the system informs you of traffic levels on certain
highways and roads in the area along the route.
Press the MAP button to display the map of the
current vehicle location. Any roads with traffic
flow information will appear colored as follows:
●Green: traffic is light and moving at normal
speeds. (>45 mph)
● Yellow: traffic is heavy and moving slowly.
(10-45 mph)
● Red: traffic is gridlocked and not moving.
(<10 mph)
TRAFFIC SETTINGS
To access the settings for the traffic feature:
1. Press the
or MENU button.
2. Touch the “Settings” key. 3. Touch the “Traffic Messages” key.
The following settings can be adjusted:
● Dynamic Guidance
● Show Traffic Incidents
● Show Traffic Flow
● Announce Traffic Alerts
LNV2490LNV2460
Navigation4-21
Page 56 of 80

NavWeatherXM information is a subscription
service offered by SiriusXM Satellite Radio.
This service provides real-time information re-
garding current weather and forecasts where
available. The weather information is broadcast
to the vehicle by the SiriusXM satellites.
mWARNING
NavWeatherXM information is not a
substitute for attentive driving.
Weather conditions change constantly
and emergency situations can arise
without warning. Relying only on
NavWeatherXM information could re-
sult in serious personal injury.
XM NavWeather information is available in limited
markets. To subscribe to or check if this service is
available in the area, call 1-866–635–2349 or
access www.siriusxm.com/navweather.
DISPLAYING WEATHER INFORMA-
TION ON THE SCREEN
1. Press theor MENU button.
2. Touch “SiriusXM Travel Link”.
3. Touch “Weather”. The weather conditions for the current location
are displayed on the screen.NOTE:
In some areas, the location name at the
top of the screen may not match the loca-
tion shown for “Weather Station” due to
differences in where weather information
is collected.
Touch “Forecast” to see the weather forecast for
the selected area for the next five days.
LNV2461LNV2441
WEATHER FEATURE
4-22Navigation