2014 NISSAN QUEST engine
[x] Cancel search: enginePage 118 of 482
damage to the heater.
. Any liquid spilled on the heated seat
should be removed immediately
with a dry cloth.
. When cleaning the seat, never use
gasoline, thinner, or any similar
materials.
. If any malfunctions are found or the
heated seat does not operate, turn
the switch off and have the system
checked by a NISSAN dealer.
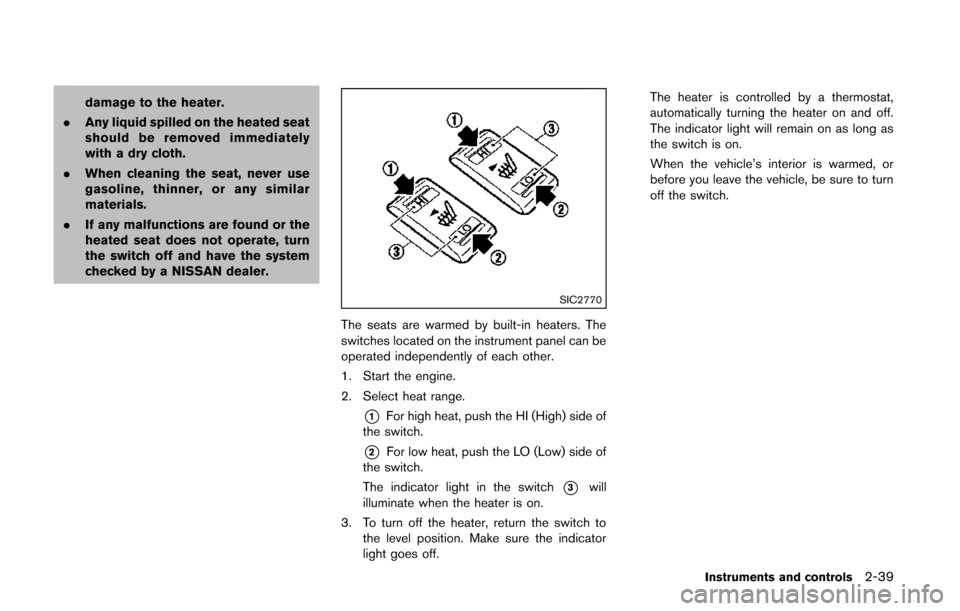
SIC2770
The seats are warmed by built-in heaters. The
switches located on the instrument panel can be
operated independently of each other.
1. Start the engine.
2. Select heat range.
*1For high heat, push the HI (High) side of
the switch.
*2For low heat, push the LO (Low) side of
the switch.
The indicator light in the switch
*3will
illuminate when the heater is on.
3. To turn off the heater, return the switch to the level position. Make sure the indicator
light goes off. The heater is controlled by a thermostat,
automatically turning the heater on and off.
The indicator light will remain on as long as
the switch is on.
When the vehicle’s interior is warmed, or
before you leave the vehicle, be sure to turn
off the switch.
Instruments and controls2-39
Page 119 of 482
2-40Instruments and controls
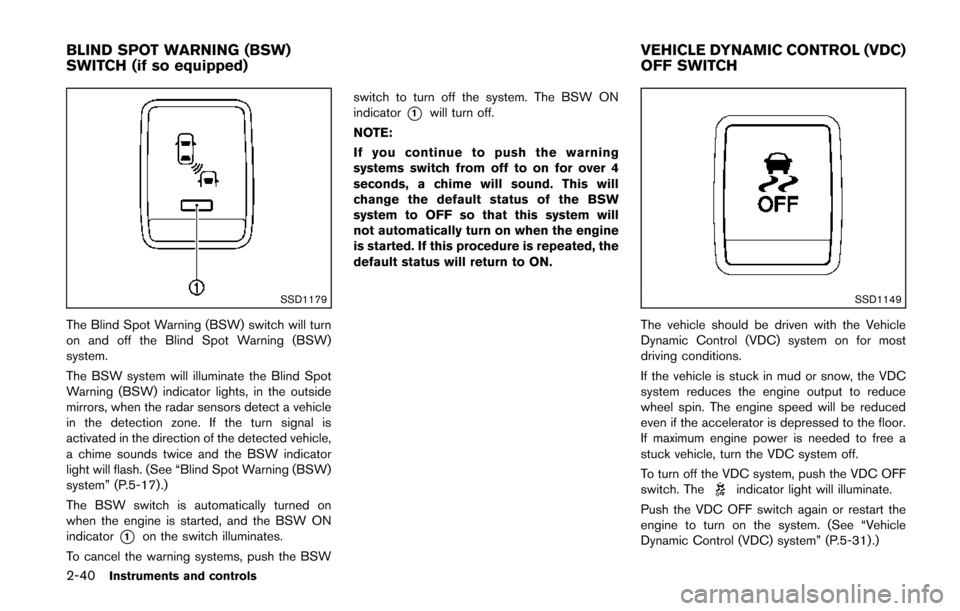
SSD1179
The Blind Spot Warning (BSW) switch will turn
on and off the Blind Spot Warning (BSW)
system.
The BSW system will illuminate the Blind Spot
Warning (BSW) indicator lights, in the outside
mirrors, when the radar sensors detect a vehicle
in the detection zone. If the turn signal is
activated in the direction of the detected vehicle,
a chime sounds twice and the BSW indicator
light will flash. (See “Blind Spot Warning (BSW)
system” (P.5-17) .)
The BSW switch is automatically turned on
when the engine is started, and the BSW ON
indicator
*1on the switch illuminates.
To cancel the warning systems, push the BSW switch to turn off the system. The BSW ON
indicator
*1will turn off.
NOTE:
If you continue to push the warning
systems switch from off to on for over 4
seconds, a chime will sound. This will
change the default status of the BSW
system to OFF so that this system will
not automatically turn on when the engine
is started. If this procedure is repeated, the
default status will return to ON.
SSD1149
The vehicle should be driven with the Vehicle
Dynamic Control (VDC) system on for most
driving conditions.
If the vehicle is stuck in mud or snow, the VDC
system reduces the engine output to reduce
wheel spin. The engine speed will be reduced
even if the accelerator is depressed to the floor.
If maximum engine power is needed to free a
stuck vehicle, turn the VDC system off.
To turn off the VDC system, push the VDC OFF
switch. The
indicator light will illuminate.
Push the VDC OFF switch again or restart the
engine to turn on the system. (See “Vehicle
Dynamic Control (VDC) system” (P.5-31) .)
BLIND SPOT WARNING (BSW)
SWITCH (if so equipped) VEHICLE DYNAMIC CONTROL (VDC)
OFF SWITCH
Page 120 of 482
CAUTION
.Use power outlet with the engine
running to avoid discharging the
vehicle battery.
. Avoid using power outlet when the
air conditioner, headlights or rear
window defroster is on.
. Before inserting or disconnecting a
plug, be sure the electrical acces-
sory being used is turned OFF.
. When not in use, be sure to close
the cap. Do not allow water or any
liquid to contact the outlet.
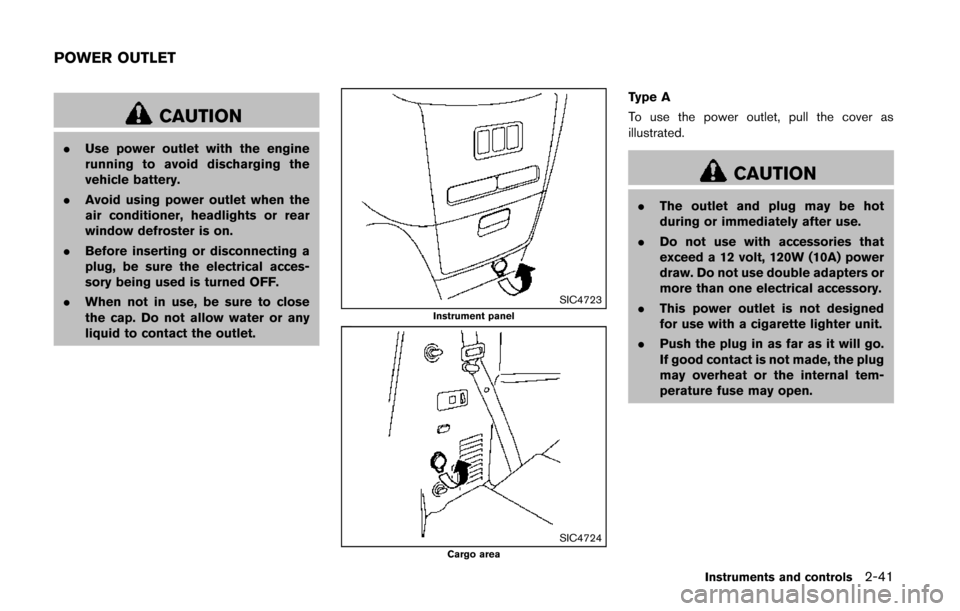
SIC4723Instrument panel
SIC4724Cargo area
Type A
To use the power outlet, pull the cover as
illustrated.
CAUTION
.The outlet and plug may be hot
during or immediately after use.
. Do not use with accessories that
exceed a 12 volt, 120W (10A) power
draw. Do not use double adapters or
more than one electrical accessory.
. This power outlet is not designed
for use with a cigarette lighter unit.
. Push the plug in as far as it will go.
If good contact is not made, the plug
may overheat or the internal tem-
perature fuse may open.
Instruments and controls2-41
POWER OUTLET
Page 121 of 482
2-42Instruments and controls
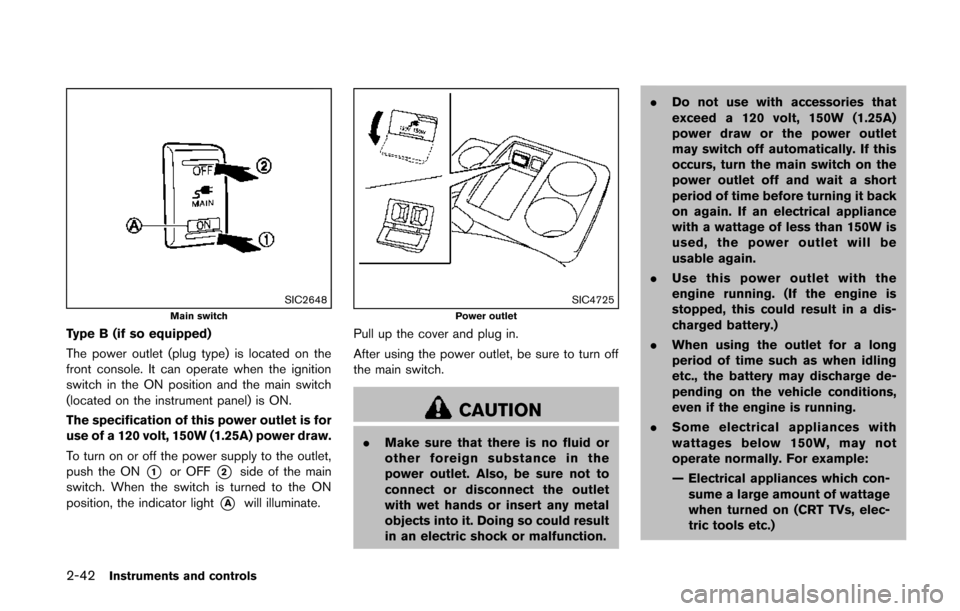
SIC2648Main switch
Type B (if so equipped)
The power outlet (plug type) is located on the
front console. It can operate when the ignition
switch in the ON position and the main switch
(located on the instrument panel) is ON.
The specification of this power outlet is for
use of a 120 volt, 150W (1.25A) power draw.
To turn on or off the power supply to the outlet,
push the ON
*1or OFF*2side of the main
switch. When the switch is turned to the ON
position, the indicator light
*Awill illuminate.
SIC4725Power outlet
Pull up the cover and plug in.
After using the power outlet, be sure to turn off
the main switch.
CAUTION
. Make sure that there is no fluid or
other foreign substance in the
power outlet. Also, be sure not to
connect or disconnect the outlet
with wet hands or insert any metal
objects into it. Doing so could result
in an electric shock or malfunction. .
Do not use with accessories that
exceed a 120 volt, 150W (1.25A)
power draw or the power outlet
may switch off automatically. If this
occurs, turn the main switch on the
power outlet off and wait a short
period of time before turning it back
on again. If an electrical appliance
with a wattage of less than 150W is
used, the power outlet will be
usable again.
. Use this power outlet with the
engine running. (If the engine is
stopped, this could result in a dis-
charged battery.)
. When using the outlet for a long
period of time such as when idling
etc., the battery may discharge de-
pending on the vehicle conditions,
even if the engine is running.
. Some electrical appliances with
wattages below 150W, may not
operate normally. For example:
— Electrical appliances which con-
sume a large amount of wattage
when turned on (CRT TVs, elec-
tric tools etc.)
Page 136 of 482
SIC4746
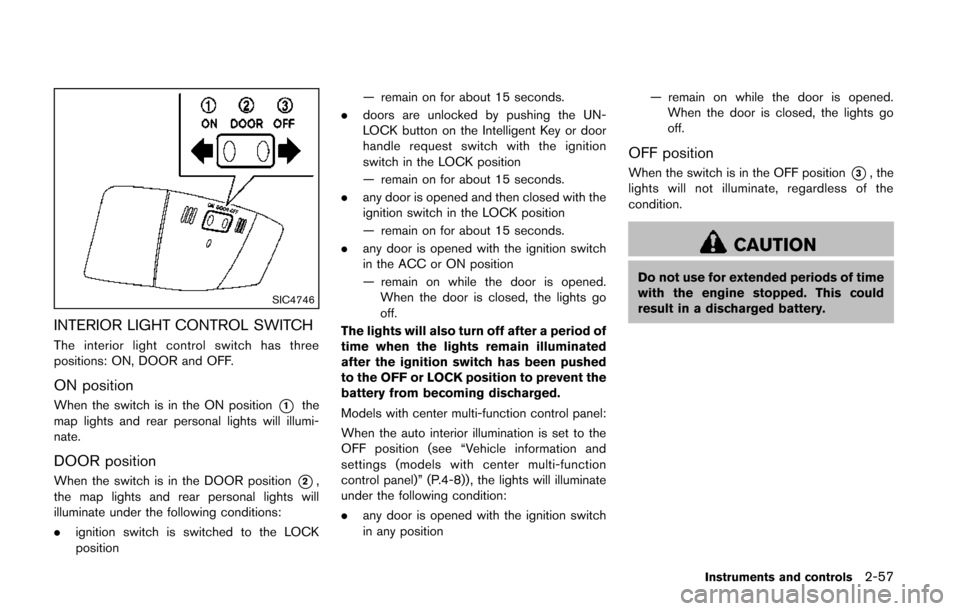
INTERIOR LIGHT CONTROL SWITCH
The interior light control switch has three
positions: ON, DOOR and OFF.
ON position
When the switch is in the ON position*1the
map lights and rear personal lights will illumi-
nate.
DOOR position
When the switch is in the DOOR position*2,
the map lights and rear personal lights will
illuminate under the following conditions:
. ignition switch is switched to the LOCK
position — remain on for about 15 seconds.
. doors are unlocked by pushing the UN-
LOCK button on the Intelligent Key or door
handle request switch with the ignition
switch in the LOCK position
— remain on for about 15 seconds.
. any door is opened and then closed with the
ignition switch in the LOCK position
— remain on for about 15 seconds.
. any door is opened with the ignition switch
in the ACC or ON position
— remain on while the door is opened.
When the door is closed, the lights go
off.
The lights will also turn off after a period of
time when the lights remain illuminated
after the ignition switch has been pushed
to the OFF or LOCK position to prevent the
battery from becoming discharged.
Models with center multi-function control panel:
When the auto interior illumination is set to the
OFF position (see “Vehicle information and
settings (models with center multi-function
control panel)” (P.4-8)) , the lights will illuminate
under the following condition:
. any door is opened with the ignition switch
in any position — remain on while the door is opened.
When the door is closed, the lights go
off.
OFF position
When the switch is in the OFF position*3, the
lights will not illuminate, regardless of the
condition.
CAUTION
Do not use for extended periods of time
with the engine stopped. This could
result in a discharged battery.
Instruments and controls2-57
Page 138 of 482
The HomeLink®Universal Transceiver provides a
convenient way to consolidate the functions of
up to three individual hand-held transmitters into
one built-in device.
HomeLink
®Universal Transceiver:
. Will operate most Radio Frequency (RF)
devices such as garage doors, gates, home
and office lighting, entry door locks and
security systems.
. Is powered by your vehicle’s battery. No
separate batteries are required. If the
vehicle’s battery is discharged or is dis-
connected, HomeLink
®will retain all pro-
gramming.
When the HomeLink
®Universal Transcei-
ver is programmed, retain the original
transmitter for future programming proce-
dures (Example: new vehicle purchases) .
Upon sale of the vehicle, the programmed
HomeLink
®Universal Transceiver buttons
should be erased for security purposes.
For additional information, refer to “Pro-
gramming HomeLink
®” (P.2-59) .
WARNING
. Do not use the HomeLink®Universal
Transceiver with any garage door
opener that lacks safety stop and reverse features as required by
federal safety standards. (These
standards became effective for
opener models manufactured after
April 1, 1982) . A garage door opener
which cannot detect an object in the
path of a closing garage door and
then automatically stop and reverse,
does not meet current federal safety
standards. Using a garage door
opener without these features in-
creases the risk of serious injury or
death.
. During the programming procedure
your garage door or security gate
will open and close (if the transmit-
ter is within range) . Make sure that
people or objects are clear of the
garage door, gate, etc. that you are
programming.
. Your vehicle’s engine should be
turned off while programming the
HomeLink
®Universal Transceiver.
Do not breathe exhaust gases; they
contain colorless and odorless car-
bon monoxide. Carbon monoxide is
dangerous. It can cause uncon-
sciousness or death.
PROGRAMMING HomeLink®
If you have any questions or are having difficulty
programming your HomeLink®buttons, refer to
the HomeLink®web site at: www.homelink.com
or call 1-800-355-3515.
NOTE:
It is also recommended that a new battery
be placed in the hand-held transmitter of
the device being programmed to
HomeLink
®for quicker programming and
accurate transmission of the radio-fre-
quency.
1. Position the end of your hand-held transmit- ter 1-3 in (26-76 mm) away from the
HomeLink
®surface, keeping the HomeLink®
indicator light*1in view.
Instruments and controls2-59
HomeLink®UNIVERSAL
TRANSCEIVER (if so equipped)
Page 153 of 482
3-10Pre-driving checks and adjustments
JVP0184X
WARNING
.There are some small distances
immediately before the closed posi-
tion which cannot be detected.
Make sure that all passengers have
their hands, feet etc., inside the
vehicle before closing the door.
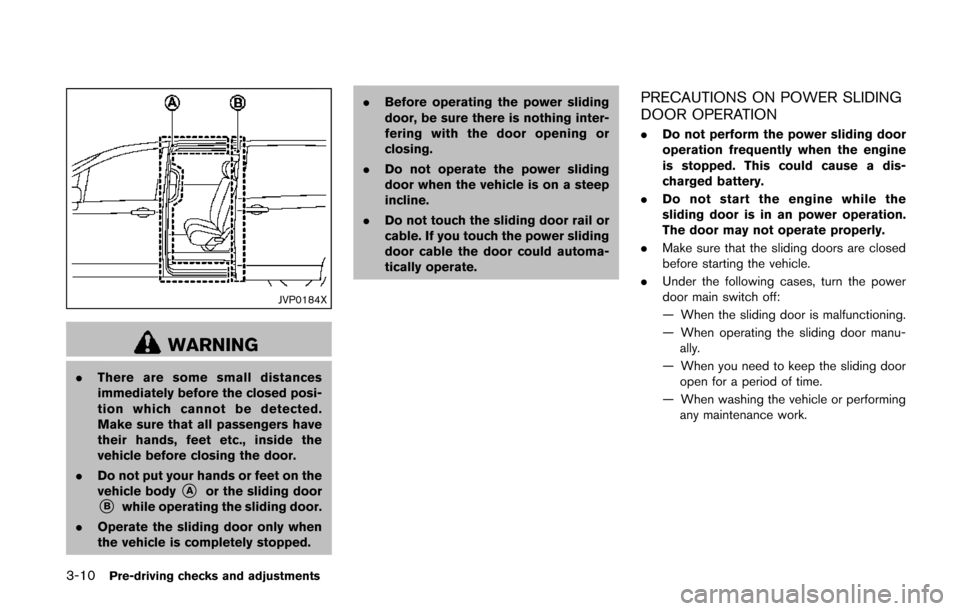
. Do not put your hands or feet on the
vehicle body
*Aor the sliding door*Bwhile operating the sliding door.
. Operate the sliding door only when
the vehicle is completely stopped. .
Before operating the power sliding
door, be sure there is nothing inter-
fering with the door opening or
closing.
. Do not operate the power sliding
door when the vehicle is on a steep
incline.
. Do not touch the sliding door rail or
cable. If you touch the power sliding
door cable the door could automa-
tically operate.
PRECAUTIONS ON POWER SLIDING
DOOR OPERATION
.Do not perform the power sliding door
operation frequently when the engine
is stopped. This could cause a dis-
charged battery.
. Do not start the engine while the
sliding door is in an power operation.
The door may not operate properly.
. Make sure that the sliding doors are closed
before starting the vehicle.
. Under the following cases, turn the power
door main switch off:
— When the sliding door is malfunctioning.
— When operating the sliding door manu-
ally.
— When you need to keep the sliding door open for a period of time.
— When washing the vehicle or performing any maintenance work.
Page 163 of 482
3-20Pre-driving checks and adjustments
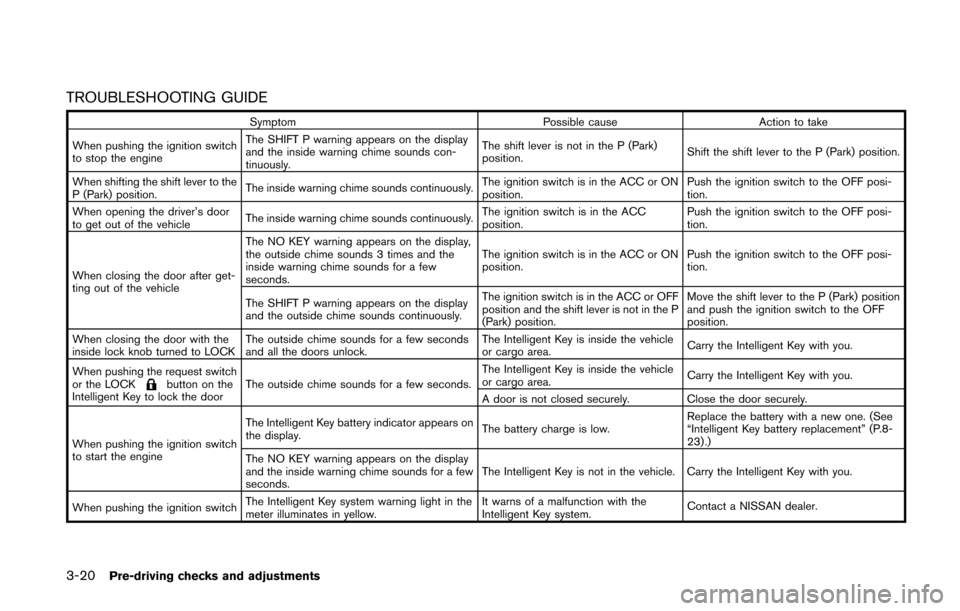
TROUBLESHOOTING GUIDE
SymptomPossible causeAction to take
When pushing the ignition switch
to stop the engine The SHIFT P warning appears on the display
and the inside warning chime sounds con-
tinuously.
The shift lever is not in the P (Park)
position.
Shift the shift lever to the P (Park) position.
When shifting the shift lever to the
P (Park) position. The inside warning chime sounds continuously.
The ignition switch is in the ACC or ON
position.Push the ignition switch to the OFF posi-
tion.
When opening the driver’s door
to get out of the vehicle The inside warning chime sounds continuously. The ignition switch is in the ACC
position.Push the ignition switch to the OFF posi-
tion.
When closing the door after get-
ting out of the vehicle The NO KEY warning appears on the display,
the outside chime sounds 3 times and the
inside warning chime sounds for a few
seconds.
The ignition switch is in the ACC or ON
position.
Push the ignition switch to the OFF posi-
tion.
The SHIFT P warning appears on the display
and the outside chime sounds continuously. The ignition switch is in the ACC or OFF
position and the shift lever is not in the P
(Park) position.Move the shift lever to the P (Park) position
and push the ignition switch to the OFF
position.
When closing the door with the
inside lock knob turned to LOCK The outside chime sounds for a few seconds
and all the doors unlock. The Intelligent Key is inside the vehicle
or cargo area.
Carry the Intelligent Key with you.
When pushing the request switch
or the LOCK
button on the
Intelligent Key to lock the door The outside chime sounds for a few seconds. The Intelligent Key is inside the vehicle
or cargo area.
Carry the Intelligent Key with you.
A door is not closed securely. Close the door securely.
When pushing the ignition switch
to start the engine The Intelligent Key battery indicator appears on
the display.
The battery charge is low.Replace the battery with a new one. (See
“Intelligent Key battery replacement” (P.8-
23).)
The NO KEY warning appears on the display
and the inside warning chime sounds for a few
seconds. The Intelligent Key is not in the vehicle. Carry the Intelligent Key with you.
When pushing the ignition switch The Intelligent Key system warning light in the
meter illuminates in yellow. It warns of a malfunction with the
Intelligent Key system.
Contact a NISSAN dealer.