2014 NISSAN QUEST engine
[x] Cancel search: enginePage 357 of 482
5-14Starting and driving
CAUTION
.Except in an emergency, do not shift
to the N (Neutral) position while
driving. Coasting with the transmis-
sion in the N (Neutral) position may
cause serious damage to the trans-
mission.
. When stopping the vehicle on an
uphill grade, do not hold the vehicle
by depressing the accelerator pedal.
The foot brake should be used for
this purpose.
. Do not downshift abruptly on slip-
pery roads. This may cause a loss of
control.
SSD1175
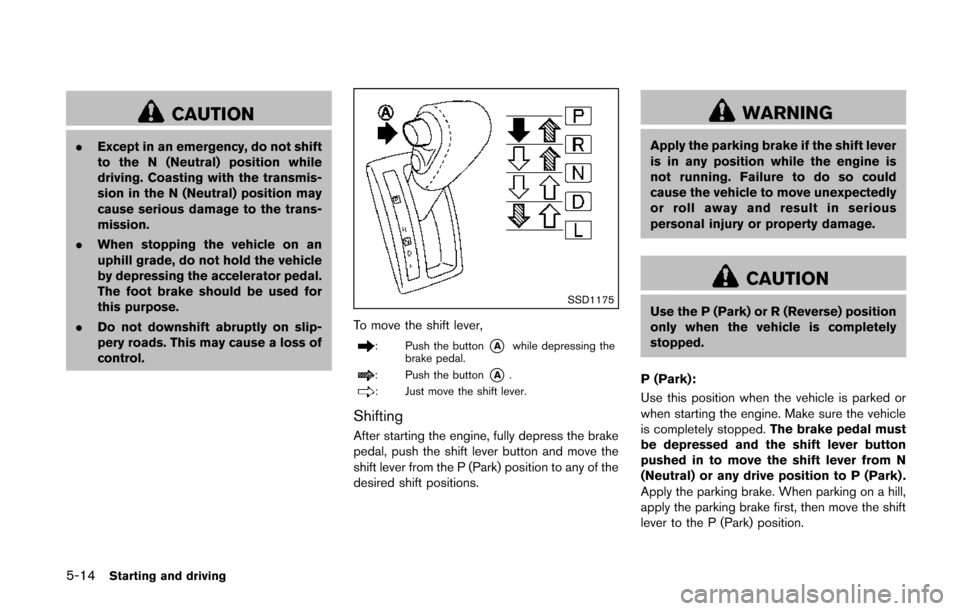
To move the shift lever,
: Push the button*Awhile depressing the
brake pedal.
: Push the button*A.
: Just move the shift lever.
Shifting
After starting the engine, fully depress the brake
pedal, push the shift lever button and move the
shift lever from the P (Park) position to any of the
desired shift positions.
WARNING
Apply the parking brake if the shift lever
is in any position while the engine is
not running. Failure to do so could
cause the vehicle to move unexpectedly
or roll away and result in serious
personal injury or property damage.
CAUTION
Use the P (Park) or R (Reverse) position
only when the vehicle is completely
stopped.
P (Park):
Use this position when the vehicle is parked or
when starting the engine. Make sure the vehicle
is completely stopped. The brake pedal must
be depressed and the shift lever button
pushed in to move the shift lever from N
(Neutral) or any drive position to P (Park) .
Apply the parking brake. When parking on a hill,
apply the parking brake first, then move the shift
lever to the P (Park) position.
Page 358 of 482
R (Reverse):
Use this position to back up. Make sure the
vehicle is completely stopped before selecting
the R (Reverse) position.The brake pedal
must be depressed and the shift lever
button pushed in to move the shift lever
from P (Park) , N (Neutral) or any driving
position to R (Reverse) .
N (Neutral):
Neither forward nor reverse gear is engaged.
The engine can be started in this position. You
may shift to N (Neutral) and restart a stalled
engine while the vehicle is moving.
D (Drive):
Use this position for all normal forward driving.
L (Low):
Use this position for maximum engine braking on
steep downhill gradients/climbing steep slopes
and whenever approaching sharp bends. Do not
use the L position in any other circumstances.
SSD1176
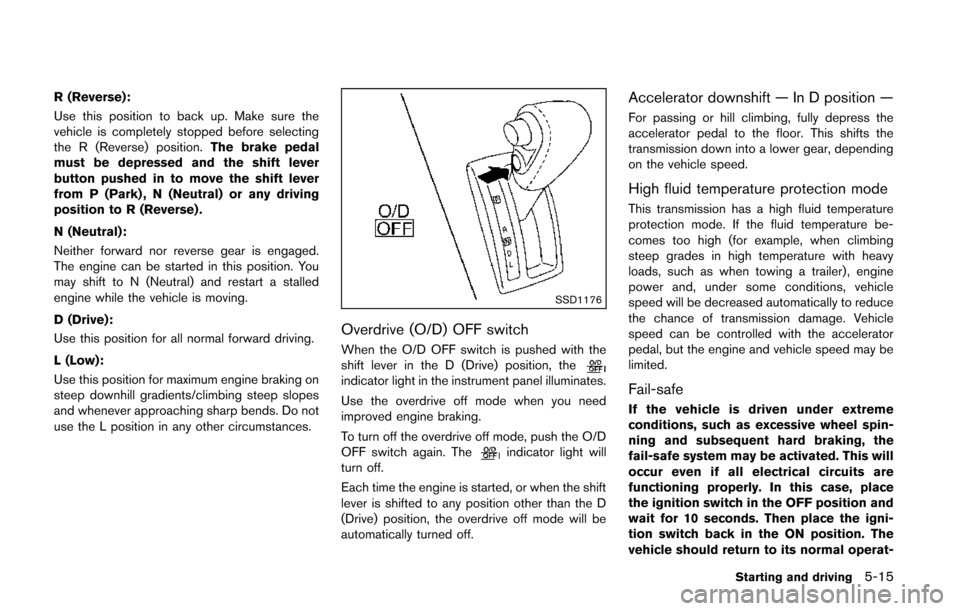
Overdrive (O/D) OFF switch
When the O/D OFF switch is pushed with the
shift lever in the D (Drive) position, the
indicator light in the instrument panel illuminates.
Use the overdrive off mode when you need
improved engine braking.
To turn off the overdrive off mode, push the O/D
OFF switch again. The
indicator light will
turn off.
Each time the engine is started, or when the shift
lever is shifted to any position other than the D
(Drive) position, the overdrive off mode will be
automatically turned off.
Accelerator downshift — In D position —
For passing or hill climbing, fully depress the
accelerator pedal to the floor. This shifts the
transmission down into a lower gear, depending
on the vehicle speed.
High fluid temperature protection mode
This transmission has a high fluid temperature
protection mode. If the fluid temperature be-
comes too high (for example, when climbing
steep grades in high temperature with heavy
loads, such as when towing a trailer), engine
power and, under some conditions, vehicle
speed will be decreased automatically to reduce
the chance of transmission damage. Vehicle
speed can be controlled with the accelerator
pedal, but the engine and vehicle speed may be
limited.
Fail-safe
If the vehicle is driven under extreme
conditions, such as excessive wheel spin-
ning and subsequent hard braking, the
fail-safe system may be activated. This will
occur even if all electrical circuits are
functioning properly. In this case, place
the ignition switch in the OFF position and
wait for 10 seconds. Then place the igni-
tion switch back in the ON position. The
vehicle should return to its normal operat-
Starting and driving5-15
Page 359 of 482
5-16Starting and driving
ing condition. If it does not return to its
normal operating condition, have a
NISSAN dealer check the transmission
and repair if necessary.
WARNING
When the high fluid temperature pro-
tection mode or fail-safe operation
occurs, vehicle speed may be gradually
reduced. The reduced speed may be
lower than other traffic, which could
increase the chance of a collision. Be
especially careful when driving. If ne-
cessary, pull to the side of the road at a
safe place and allow the transmission
to return to normal operation, or have it
repaired if necessary.
SSD1177
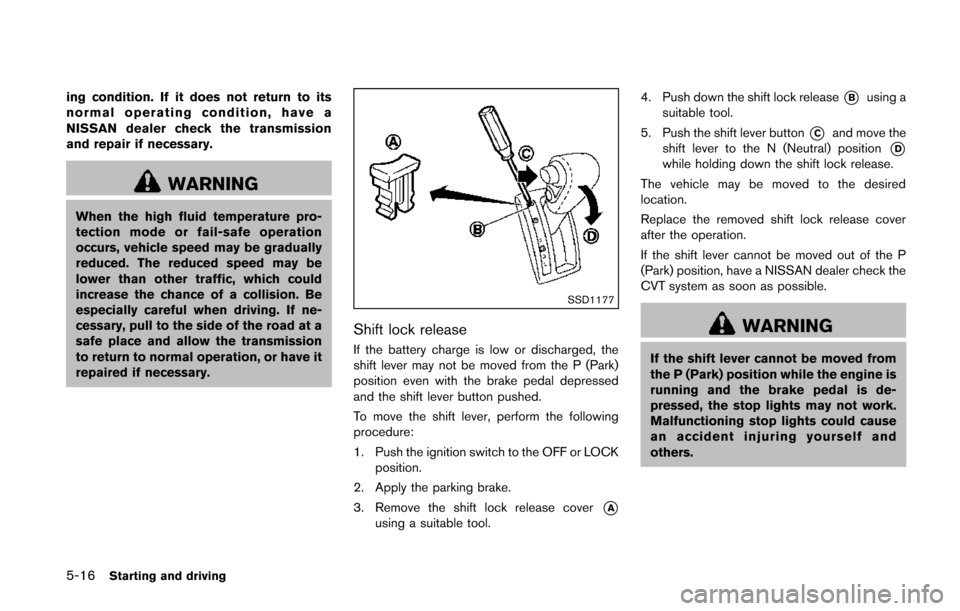
Shift lock release
If the battery charge is low or discharged, the
shift lever may not be moved from the P (Park)
position even with the brake pedal depressed
and the shift lever button pushed.
To move the shift lever, perform the following
procedure:
1. Push the ignition switch to the OFF or LOCKposition.
2. Apply the parking brake.
3. Remove the shift lock release cover
*Ausing a suitable tool. 4. Push down the shift lock release
*Busing a
suitable tool.
5. Push the shift lever button
*Cand move the
shift lever to the N (Neutral) position
*Dwhile holding down the shift lock release.
The vehicle may be moved to the desired
location.
Replace the removed shift lock release cover
after the operation.
If the shift lever cannot be moved out of the P
(Park) position, have a NISSAN dealer check the
CVT system as soon as possible.
WARNING
If the shift lever cannot be moved from
the P (Park) position while the engine is
running and the brake pedal is de-
pressed, the stop lights may not work.
Malfunctioning stop lights could cause
an accident injuring yourself and
others.
Page 362 of 482
SSD1184BSW indicator light
SSD1029BSW system warning light
SSD1179BSW switch
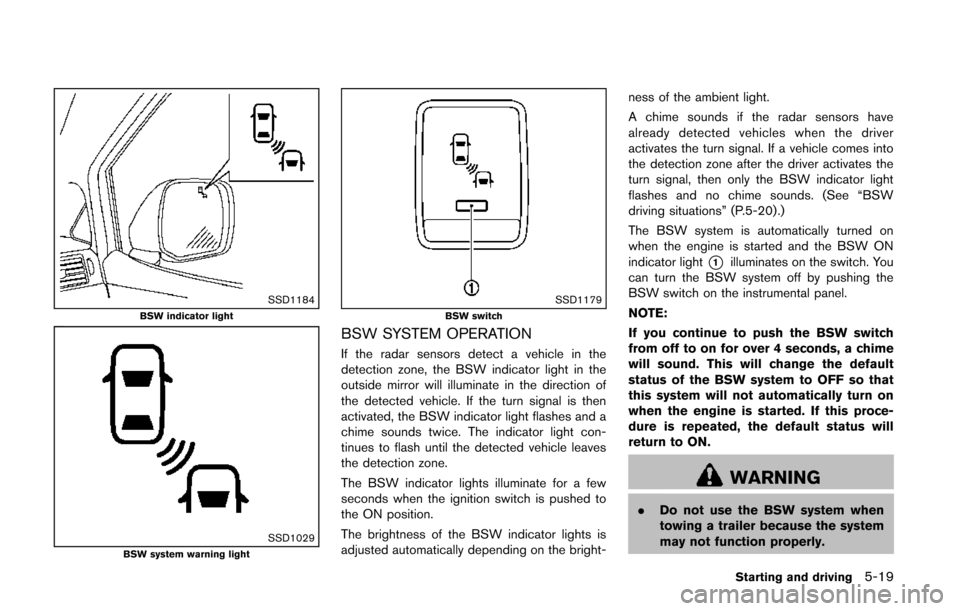
BSW SYSTEM OPERATION
If the radar sensors detect a vehicle in the
detection zone, the BSW indicator light in the
outside mirror will illuminate in the direction of
the detected vehicle. If the turn signal is then
activated, the BSW indicator light flashes and a
chime sounds twice. The indicator light con-
tinues to flash until the detected vehicle leaves
the detection zone.
The BSW indicator lights illuminate for a few
seconds when the ignition switch is pushed to
the ON position.
The brightness of the BSW indicator lights is
adjusted automatically depending on the bright-ness of the ambient light.
A chime sounds if the radar sensors have
already detected vehicles when the driver
activates the turn signal. If a vehicle comes into
the detection zone after the driver activates the
turn signal, then only the BSW indicator light
flashes and no chime sounds. (See “BSW
driving situations” (P.5-20).)
The BSW system is automatically turned on
when the engine is started and the BSW ON
indicator light
*1illuminates on the switch. You
can turn the BSW system off by pushing the
BSW switch on the instrumental panel.
NOTE:
If you continue to push the BSW switch
from off to on for over 4 seconds, a chime
will sound. This will change the default
status of the BSW system to OFF so that
this system will not automatically turn on
when the engine is started. If this proce-
dure is repeated, the default status will
return to ON.
WARNING
. Do not use the BSW system when
towing a trailer because the system
may not function properly.
Starting and driving5-19
Page 366 of 482
SSD1037
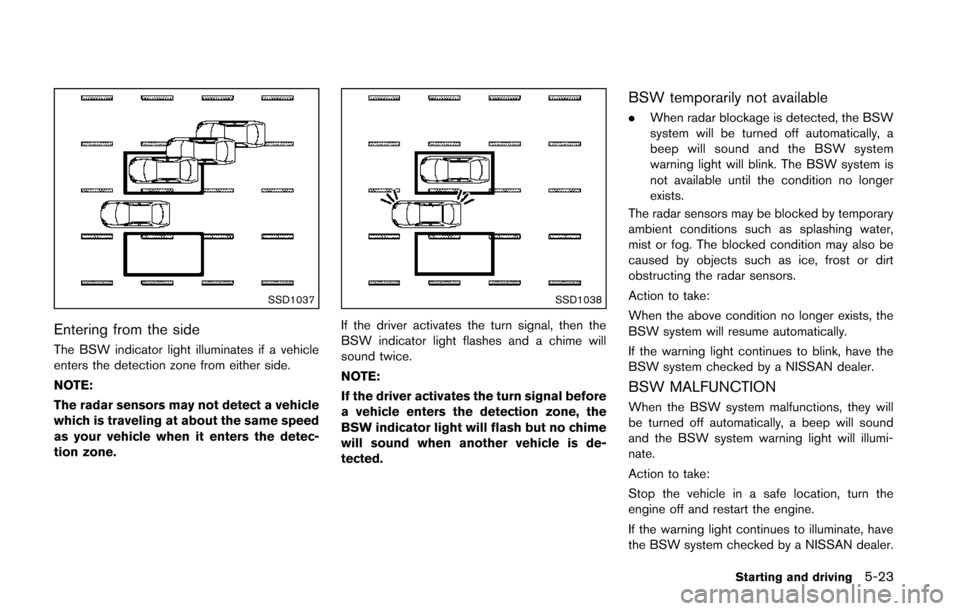
Entering from the side
The BSW indicator light illuminates if a vehicle
enters the detection zone from either side.
NOTE:
The radar sensors may not detect a vehicle
which is traveling at about the same speed
as your vehicle when it enters the detec-
tion zone.
SSD1038
If the driver activates the turn signal, then the
BSW indicator light flashes and a chime will
sound twice.
NOTE:
If the driver activates the turn signal before
a vehicle enters the detection zone, the
BSW indicator light will flash but no chime
will sound when another vehicle is de-
tected.
BSW temporarily not available
.When radar blockage is detected, the BSW
system will be turned off automatically, a
beep will sound and the BSW system
warning light will blink. The BSW system is
not available until the condition no longer
exists.
The radar sensors may be blocked by temporary
ambient conditions such as splashing water,
mist or fog. The blocked condition may also be
caused by objects such as ice, frost or dirt
obstructing the radar sensors.
Action to take:
When the above condition no longer exists, the
BSW system will resume automatically.
If the warning light continues to blink, have the
BSW system checked by a NISSAN dealer.
BSW MALFUNCTION
When the BSW system malfunctions, they will
be turned off automatically, a beep will sound
and the BSW system warning light will illumi-
nate.
Action to take:
Stop the vehicle in a safe location, turn the
engine off and restart the engine.
If the warning light continues to illuminate, have
the BSW system checked by a NISSAN dealer.
Starting and driving5-23
Page 367 of 482
5-24Starting and driving
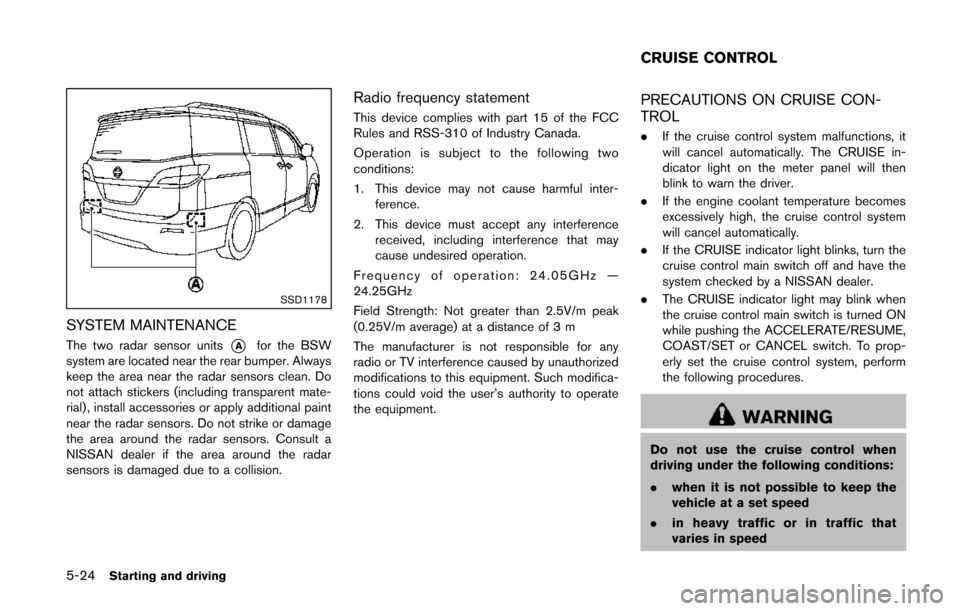
SSD1178
SYSTEM MAINTENANCE
The two radar sensor units*Afor the BSW
system are located near the rear bumper. Always
keep the area near the radar sensors clean. Do
not attach stickers (including transparent mate-
rial) , install accessories or apply additional paint
near the radar sensors. Do not strike or damage
the area around the radar sensors. Consult a
NISSAN dealer if the area around the radar
sensors is damaged due to a collision.
Radio frequency statement
This device complies with part 15 of the FCC
Rules and RSS-310 of Industry Canada.
Operation is subject to the following two
conditions:
1. This device may not cause harmful inter- ference.
2. This device must accept any interference received, including interference that may
cause undesired operation.
Frequency of operation: 24.05GHz —
24.25GHz
Field Strength: Not greater than 2.5V/m peak
(0.25V/m average) at a distance of 3 m
The manufacturer is not responsible for any
radio or TV interference caused by unauthorized
modifications to this equipment. Such modifica-
tions could void the user’s authority to operate
the equipment.
PRECAUTIONS ON CRUISE CON-
TROL
. If the cruise control system malfunctions, it
will cancel automatically. The CRUISE in-
dicator light on the meter panel will then
blink to warn the driver.
. If the engine coolant temperature becomes
excessively high, the cruise control system
will cancel automatically.
. If the CRUISE indicator light blinks, turn the
cruise control main switch off and have the
system checked by a NISSAN dealer.
. The CRUISE indicator light may blink when
the cruise control main switch is turned ON
while pushing the ACCELERATE/RESUME,
COAST/SET or CANCEL switch. To prop-
erly set the cruise control system, perform
the following procedures.
WARNING
Do not use the cruise control when
driving under the following conditions:
. when it is not possible to keep the
vehicle at a set speed
. in heavy traffic or in traffic that
varies in speed
CRUISE CONTROL
Page 369 of 482
5-26Starting and driving
To reset at a faster cruising speed,use one
of the following methods:
. Depress the accelerator pedal. When the
vehicle attains the desired speed, push and
release the COAST/SET switch.
. Push and hold the ACCELERATE/RESUME
switch. When the vehicle attains the desired
speed, release the switch.
. Push, then quickly release the ACCELER-
ATE/RESUME switch. Each time you do
this, the set speed will increase by about 1
MPH (1.6 km/h) .
To reset at a slower cruising speed, use one
of the following methods:
. Lightly tap the brake pedal. When the
vehicle attains the desired speed, push the
COAST/SET switch and release it.
. Push and hold the COAST/SET switch.
Release the switch when the vehicle slows
down to the desired speed.
. Push, then quickly release the COAST/SET
switch. Each time you do this, the set speed
will decrease by about 1 MPH (1.6 km/h).
To resume the preset speed, push and
release the ACCELERATE/RESUME switch.
The vehicle will resume the last set cruising
speed when the vehicle speed is over 25 MPH
(40 km/h).
CAUTION
During the first 1,200 miles (2,000 km) ,
follow these recommendations to ob-
tain maximum engine performance and
ensure the future reliability and econo-
my of your new vehicle. Failure to
follow these recommendations may
result in shortened engine life and
reduced engine performance.
. Avoid driving for long periods at constant
speed, either fast or slow. Do not run the
engine over 4,000 rpm.
. Do not accelerate at full throttle in any gear.
. Avoid quick starts.
. Avoid hard braking as much as possible.
. Do not tow a trailer for the first 500 miles
(800 km) . Your engine, axle or other parts
could be damaged. Follow these easy-to-use Fuel Efficient Driving
Tips to help you achieve the most fuel economy
from your vehicle.
1. Use smooth accelerator and brake pedal
application.
.Avoid rapid starts and stops..Use smooth, gentle accelerator andbrake application whenever possible.
.Maintain constant speed while commut-
ing and coast whenever possible.
2. Maintain constant speed.
.Look ahead to try and anticipate and minimize stops.
.Synchronizing your speed with traffic
lights allows you to reduce your number
of stops.
.Maintaining a steady speed can minimize red light stops and improve fuel effi-
ciency.
3. Use air conditioning (A/C) at higher vehicle speeds.
.Below 40 MPH (64 km/h), it is moreefficient to open windows to cool the
vehicle due to reduced engine load.
.Above 40 MPH (64 km/h) , it is moreefficient to use A/C to cool the vehicle
due to increased aerodynamic drag.
BREAK-IN SCHEDULE FUEL EFFICIENT DRIVING TIPS
Page 370 of 482
.Recirculating the cool air in the cabinwhen the A/C is on reduces cooling load.
4. Drive at economical speeds and distances.
.Observing the speed limit and not ex- ceeding 60 MPH (97 km/h) (where
legally allowed) can improve fuel effi-
ciency due to reduced aerodynamic
drag.
.Maintaining a safe following distancebehind other vehicles reduces unneces-
sary braking.
.Safely monitoring traffic to anticipatechanges in speed permits reduced brak-
ing and smooth acceleration changes.
.Select a gear range suitable to road conditions.
5. Use cruise control.
.Using cruise control during highway driving helps maintain a steady speed.
.Cruise control is particularly effective in providing fuel savings when driving on
flat terrains.
6. Plan for the shortest route.
.Utilize a map or navigation system to determine the best route to save time.
7. Avoid idling.
.Shutting off your engine when safe for stops exceeding 30-60 seconds saves fuel and reduces emissions.
8. Buy an automated pass for toll roads.
.Automated passes permit drivers to use special lanes to maintain cruising speed
through the toll and avoid stopping and
starting.
9. Winter warm up.
.Limit idling time to minimize impact to fuel economy.
.Vehicles typically need no more than 30seconds of idling at start-up to effectively
circulate the engine oil before driving.
.Your vehicle will reach its ideal operatingtemperature more quickly while driving
versus idling.
10. Keeping your vehicle cool.
.Park your vehicle in a covered parking area or in the shade whenever possible.
.When entering a hot vehicle, opening thewindows will help to reduce the inside
temperature faster, resulting in reduced
demand on your A/C system. .
Keep your engine tuned up.
. Follow the recommended scheduled main-
tenance.
. Keep the tires inflated to the correct
pressure. Low tire pressure increases tire
wear and lowers fuel economy.
. Keep the wheels in correct alignment.
Improper alignment increases tire wear and
lowers fuel economy.
. Use the recommended viscosity engine oil.
(See “Engine oil and oil filter recommenda-
tion” (P.9-5) .)
Starting and driving5-27
INCREASING FUEL ECONOMY