2014 NISSAN QUEST lock
[x] Cancel search: lockPage 255 of 482
4-72Monitor, heater, air conditioner, audio, phone and voice recognition systems
Audio main operation
Head unit:
The auto loudness circuit enhances the low and
high frequency ranges automatically in both
radio reception and CD playback.
PWR/Volume control:
Place the ignition switch in the ACC or ON
position, and then push the PWR button while
the system is off to turn on the last audio source,
which was playing immediately before the
system was turned off. While the system is on,
pushing the PWR button turns the system off.
Turn the VOL control knob to adjust the volume.
SETTING button:
The settings screen will appear when pushing
the SETTING button.
The following items are available in the settings
screen.
. Bass, Treble, Balance and Fade
Controls the sound of the audio system.
Balance adjusts the sound between the left
and right speakers. Fade adjusts the sound
between the front and rear speakers.
Select the "Bass", "Treble", "Balance" or
"Fade" using the TUNE·SCROLL control
knob and then push the ENTER button. Turn the TUNE·SCROLL control knob to
adjust the Bass, Treble, Balance and Fade of
the screen to the preferred level.
. Speed Sens Vol.
To change the Speed Sensitive Volume
(Speed Sens Vol.) level from off (0) to 5,
turn the TUNE·SCROLL control knob.
. AUX Vol.
Controls the volume level of incoming sound
when an auxiliary device is connected to the
system. To change the AUX Vol. level from 0
(off) to 3, turn the TUNE·SCROLL control
knob.
. Brightness and Contrast
Adjust the brightness and contrast of the
screen.
Select the "brightness" or "contrast" using
the TUNE·SCROLL control knob and then
push the ENTER button. Turn the TUNE·SC-
ROLL control knob to adjust the brightness
and contrast of the screen to the preferred
level.
. Clock Adjust
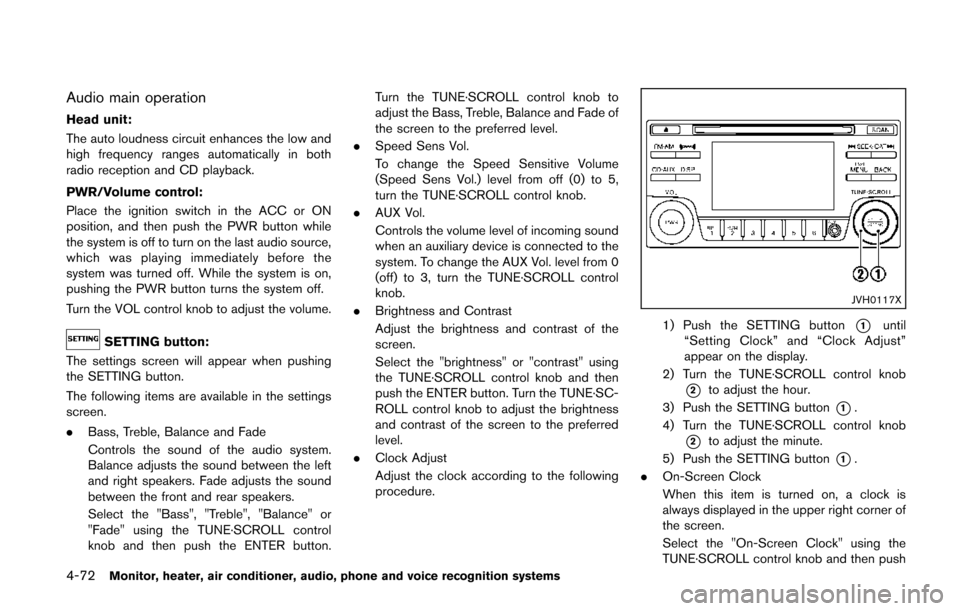
Adjust the clock according to the following
procedure.
JVH0117X
1) Push the SETTING button*1until
“Setting Clock” and “Clock Adjust”
appear on the display.
2) Turn the TUNE·SCROLL control knob
*2to adjust the hour.
3) Push the SETTING button
*1.
4) Turn the TUNE·SCROLL control knob
*2to adjust the minute.
5) Push the SETTING button
*1.
. On-Screen Clock
When this item is turned on, a clock is
always displayed in the upper right corner of
the screen.
Select the "On-Screen Clock" using the
TUNE·SCROLL control knob and then push
Page 262 of 482
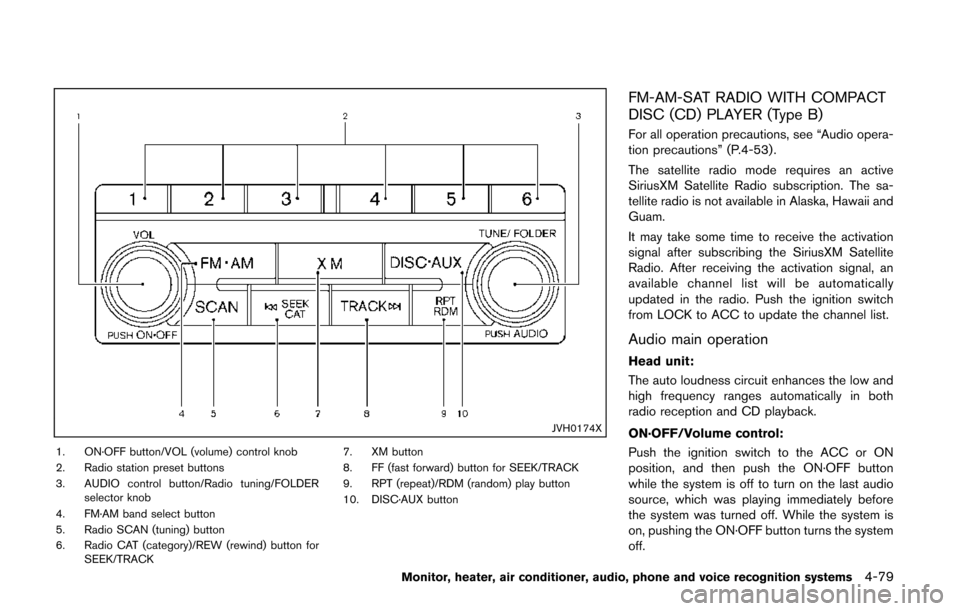
JVH0174X
1. ON·OFF button/VOL (volume) control knob
2. Radio station preset buttons
3. AUDIO control button/Radio tuning/FOLDERselector knob
4. FM·AM band select button
5. Radio SCAN (tuning) button
6. Radio CAT (category)/REW (rewind) button for SEEK/TRACK 7. XM button
8. FF (fast forward) button for SEEK/TRACK
9. RPT (repeat)/RDM (random) play button
10. DISC·AUX button
FM-AM-SAT RADIO WITH COMPACT
DISC (CD) PLAYER (Type B)
For all operation precautions, see “Audio opera-
tion precautions” (P.4-53) .
The satellite radio mode requires an active
SiriusXM Satellite Radio subscription. The sa-
tellite radio is not available in Alaska, Hawaii and
Guam.
It may take some time to receive the activation
signal after subscribing the SiriusXM Satellite
Radio. After receiving the activation signal, an
available channel list will be automatically
updated in the radio. Push the ignition switch
from LOCK to ACC to update the channel list.
Audio main operation
Head unit:
The auto loudness circuit enhances the low and
high frequency ranges automatically in both
radio reception and CD playback.
ON·OFF/Volume control:
Push the ignition switch to the ACC or ON
position, and then push the ON·OFF button
while the system is off to turn on the last audio
source, which was playing immediately before
the system was turned off. While the system is
on, pushing the ON·OFF button turns the system
off.
Monitor, heater, air conditioner, audio, phone and voice recognition systems4-79
Page 287 of 482
4-104Monitor, heater, air conditioner, audio, phone and voice recognition systems
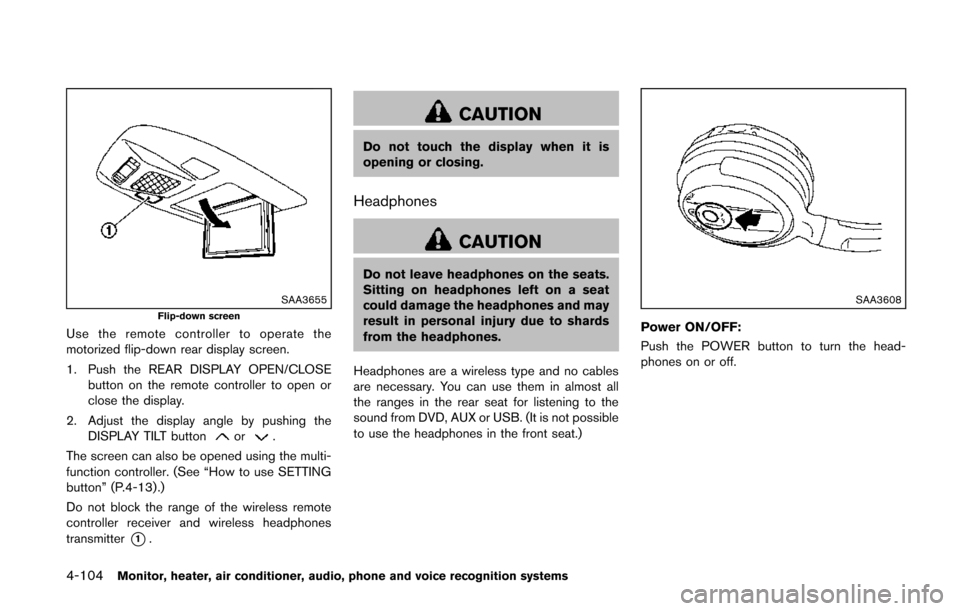
SAA3655Flip-down screen
Use the remote controller to operate the
motorized flip-down rear display screen.
1. Push the REAR DISPLAY OPEN/CLOSEbutton on the remote controller to open or
close the display.
2. Adjust the display angle by pushing the DISPLAY TILT button
or.
The screen can also be opened using the multi-
function controller. (See “How to use SETTING
button” (P.4-13).)
Do not block the range of the wireless remote
controller receiver and wireless headphones
transmitter
*1.
CAUTION
Do not touch the display when it is
opening or closing.
Headphones
CAUTION
Do not leave headphones on the seats.
Sitting on headphones left on a seat
could damage the headphones and may
result in personal injury due to shards
from the headphones.
Headphones are a wireless type and no cables
are necessary. You can use them in almost all
the ranges in the rear seat for listening to the
sound from DVD, AUX or USB. (It is not possible
to use the headphones in the front seat.)
SAA3608
Power ON/OFF:
Push the POWER button to turn the head-
phones on or off.
Page 298 of 482
.Set up the wireless connection between a
compatible cellular phone and the in-vehicle
phone module before using the Bluetooth
®
Hands-Free Phone System.
. Some Bluetooth®enabled cellular phones
may not be recognized by the in-vehicle
phone module. Please visit
www.nissanusa.com/bluetooth for a recom-
mended phone list.
. You will not be able to use a hands-free
phone under the following conditions:
— Your vehicle is outside of the telephone
service area.
— Your vehicle is in an area where it is difficult to receive radio waves; such as in
a tunnel, in an underground parking
garage, behind a tall building or in a
mountainous area.
— Your cellular phone is locked in order not to be dialed.
. When the radio wave reception is not good
or ambient sound is too loud, it may be
difficult to hear the other person’s voice
during a call.
. Immediately after the ignition switch is
pushed to the ON position, it may be
impossible to receive a call for a short
period of time. .
Do not place the cellular phone in an area
surrounded by metal or far away from the in-
vehicle phone module to prevent tone quality
degradation and wireless connection dis-
ruption.
. While a cellular phone is connected through
the Bluetooth
®wireless connection, the
battery power of the cellular phone may
discharge quicker than usual.
. If the Bluetooth
®Hands-Free Phone System
seems to be malfunctioning, please visit
www.nissanusa.com/bluetooth for trouble-
shooting help.
. Some cellular phones or other devices may
cause interference or a buzzing noise to
come from the audio system speakers.
Storing the device in a different location
may reduce or eliminate the noise.
. Refer to the cellular phone Owner’s Manual
regarding the telephone pairing procedure
specific to your phone, battery charging,
cellular phone antenna, etc.
. The antenna display on the monitor will not
coincide with the antenna display of some
cellular phones.
. Keep the interior of the vehicle as quiet as
possible to hear the caller’s voice clearly as
well as to minimize its echoes. .
If reception between callers is unclear,
adjusting the incoming or outgoing call
volume may improve the clarity.
REGULATORY INFORMATION
FCC Regulatory information
.CAUTION: To maintain compliance with
FCC’s RF exposure guidelines, use only
the supplied antenna. Unauthorized antenna,
modification, or attachments could damage
the transmitter and may violate FCC regula-
tions.
. Operation is subject to the following two
conditions:
1. this device may not cause interference and
2. this device must accept any interference, including interference that may cause un-
desired operation of the device
IC Regulatory information
.Operation is subject to the following two
conditions: (1) this device may not cause
interference, and (2) this device must accept
any interference, including interference that
may cause undesired operation of the
device.
. This Class B digital apparatus meets all
requirements of the Canadian Interference-
Causing Equipment Regulations.
Monitor, heater, air conditioner, audio, phone and voice recognition systems4-115
Page 308 of 482
— Your vehicle is outside of the telephoneservice area.
— Your vehicle is in an area where it is difficult to receive radio waves; such as in
a tunnel, in an underground parking
garage, near a tall building or in a
mountainous area.
— Your cellular phone is locked to prevent it from being dialed.
. When the radio wave condition is not ideal
or ambient sound is too loud, it may be
difficult to hear the other person’s voice
during a call.
. Immediately after the ignition switch is
pushed to the ON position, it may be
impossible to receive a call for a short
period of time.
. Do not place the cellular phone in an area
surrounded by metal or far away from the in-
vehicle phone module to prevent tone quality
degradation and wireless connection dis-
ruption.
. While a cellular phone is connected through
the Bluetooth
®wireless connection, the
battery power of the cellular phone may
discharge quicker than usual. The Blue-
tooth
®Hands-Free Phone System cannot
charge cellular phones. .
If the Bluetooth
®Hands-Free Phone System
seems to be malfunctioning, see “Trouble-
shooting guide” later in this section. You can
also visit www.nissanusa.com/bluetooth for
troubleshooting help.
. Some cellular phones or other devices may
cause interference or a buzzing noise to
come from the audio system speakers.
Storing the device in a different location
may reduce or eliminate the noise.
. Refer to the cellular phone Owner’s Manual
regarding battery charging, cellular phone
antenna, etc.
. This wireless hands free car kit is based on
Bluetooth
®technology,
— Frequency: 2402 MHz - 2480 MHz
— Output Power: 4.14 dBm E.I.R.P
— Modulation: FHSS GFSK 8DPSK, p/
4DQPSK
— Number of Channels: 79
— This wireless equipment can’t be used for any services related to safety because
there is the possibility of radio interfer-
ence.
REGULATORY INFORMATION
FCC Regulatory information
. CAUTION: To maintain compliance with
FCC’s RF exposure guidelines, use only
the supplied antenna. Unauthorized antenna,
modification, or attachments could damage
the transmitter and may violate FCC regula-
tions.
. Operation is subject to the following two
conditions:
1) this device may not cause interference
and
2) this device must accept any interference, including interference that may cause
undesired operation of the device
IC Regulatory information
.Operation is subject to the following two
conditions: (1) this device may not cause
interference, and (2) this device must accept
any interference, including interference that
may cause undesired operation of the
device.
. This Class B digital apparatus meets all
requirements of the Canadian Interference-
Causing Equipment Regulations.
Monitor, heater, air conditioner, audio, phone and voice recognition systems4-125
Page 317 of 482
4-134Monitor, heater, air conditioner, audio, phone and voice recognition systems
Training procedure
1. Position the vehicle in a reasonably quietoutdoor location.
2. Sit in the driver’s seat with the engine running, the parking brake on, and the
transmission in Park.
3. Press and hold the
button for more than
5 seconds.
4. The system announces: “Press the PHONE SEND (
) button for the hands-free
phone system to enter the speaker adapta-
tion mode or press the PHONE END (
)
button to select a different language.”
5. Press the
button.
For information on selecting a different
language, see “Choosing a language” (P.4-
128).
6. If the connected phone is already in use, the system will prompt you to overwrite. Follow
the instructions provided by the system.
7. When preparation is complete and you are ready to begin, press the
button.
8. The SA mode will be explained. Follow the instructions provided by the system.
9. When training is finished, the system will tell you an adequate number of phrases have
been recorded. 10. The system will announce that speaker
adaptation has been completed and the
system is ready.
The SA mode will stop if:
. The
button is pressed for more than 5
seconds in SA mode.
. The vehicle is driven during SA mode.
. The ignition switch is turned to the OFF or
LOCK position.
Training phrases
During the SA mode, the system instructs you to
say the following phrases.
(The system will prompt you for each phrase.)
.phonebook transfer entry
. dial 30429
. delete call back number
. Incoming
. Transfer entry
. 8 pause 9 3 2 pause 7
. delete all entries
. call 7 2409
. phonebook delete entry
. next entry
. dial star 2170
. yes .
no
. select
. Missed
. dial 85692
. Bluetooth on
. Outgoing
. call 3 1902
. 9 7 pause pause 3 0 8
. cancel
. call back number
. call star 2095
. delete phone
. dial 83051
. Record Name
. 4 3 pause 2 9 pause 0
. delete redial number
. phonebook list names
. call 8 0541
. correction
. connect phone
. dial 74018
. previous entry
. delete
. dial 97266
. call 7 6301
Page 344 of 482
5 Starting and driving
Precautions when starting and driving ................................ 5-2Exhaust gas (carbon monoxide) ...................................... 5-2
Three-way catalyst .............................................................. 5-3
Tire Pressure Monitoring System (TPMS) .................... 5-3
Avoiding collision and rollover ......................................... 5-6
Off-road recovery ................................................................ 5-7
Rapid air pressure loss ...................................................... 5-7
Drinking alcohol/drugs and driving ................................. 5-8
Push-button ignition switch .................................................... 5-8 Intelligent Key system ......................................................... 5-8
Push-button ignition switch operation ........................ 5-10
Push-button ignition switch positions ......................... 5-10
Emergency engine shut off ............................................ 5-11
Intelligent Key battery discharge .................................. 5-11
Before starting the engine ................................................... 5-12
Starting the engine ................................................................ 5-12
Driving the vehicle ................................................................. 5-13 Continuously Variable Transmission (CVT) ................ 5-13
Parking brake ........................................................................\
.. 5-17
Blind Spot Warning (BSW) system (if so equipped) ..... 5-17
BSW system operation .................................................. 5-19
BSW driving situations ................................................... 5-20
BSW malfunction ............................................................. 5-23
System maintenance ....................................................... 5-24 Cruise control ........................................................................\
. 5-24
Precautions on cruise control ..................................... 5-24
Cruise control operations ............................................ 5-25
Break-in schedule ................................................................. 5-26
Fuel efficient driving tips ..................................................... 5-26
Increasing fuel economy ...................................................... 5-27
Parking/parking on hills ........................................................ 5-28
Hydraulic pump electric power steering system ........... 5-29
Brake system ........................................................................\
.. 5-29 Braking precautions ...................................................... 5-29
Parking brake break-in .................................................. 5-30
Anti-lock Braking System (ABS) ............................... 5-30
Vehicle Dynamic Control (VDC) system ......................... 5-31
Cold weather driving ............................................................ 5-33 Freeing a frozen door lock ........................................... 5-33
Anti-freeze ........................................................................\
5-33
Battery ........................................................................\
....... 5-33
Draining of coolant water ............................................. 5-33
Tire equipment ................................................................ 5-33
Special winter equipment ............................................ 5-33
Driving on snow or ice ................................................. 5-34
Engine block heater (if so equipped) ....................... 5-34
Page 353 of 482
5-10Starting and driving
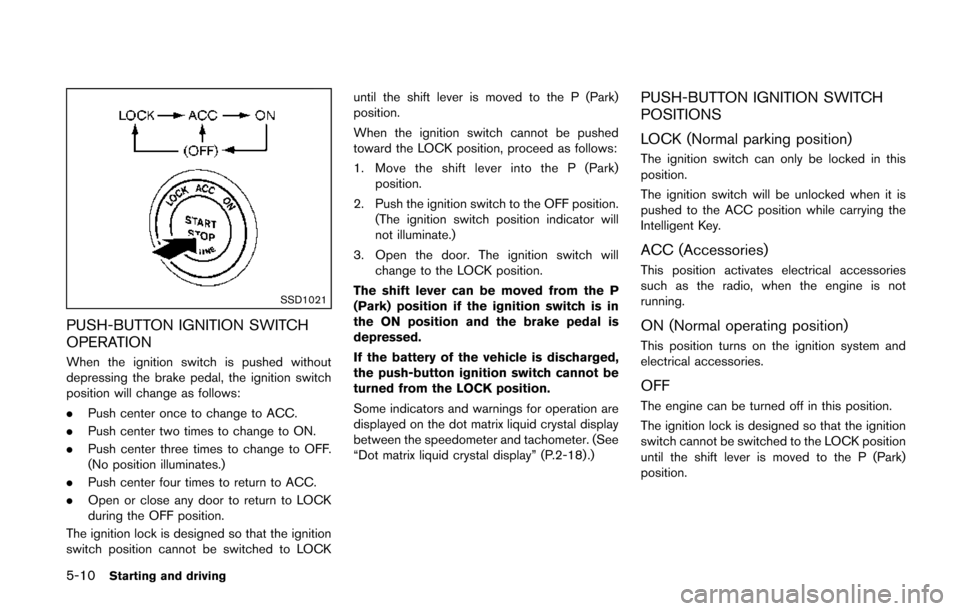
SSD1021
PUSH-BUTTON IGNITION SWITCH
OPERATION
When the ignition switch is pushed without
depressing the brake pedal, the ignition switch
position will change as follows:
.Push center once to change to ACC.
. Push center two times to change to ON.
. Push center three times to change to OFF.
(No position illuminates.)
. Push center four times to return to ACC.
. Open or close any door to return to LOCK
during the OFF position.
The ignition lock is designed so that the ignition
switch position cannot be switched to LOCK until the shift lever is moved to the P (Park)
position.
When the ignition switch cannot be pushed
toward the LOCK position, proceed as follows:
1. Move the shift lever into the P (Park)
position.
2. Push the ignition switch to the OFF position. (The ignition switch position indicator will
not illuminate.)
3. Open the door. The ignition switch will change to the LOCK position.
The shift lever can be moved from the P
(Park) position if the ignition switch is in
the ON position and the brake pedal is
depressed.
If the battery of the vehicle is discharged,
the push-button ignition switch cannot be
turned from the LOCK position.
Some indicators and warnings for operation are
displayed on the dot matrix liquid crystal display
between the speedometer and tachometer. (See
“Dot matrix liquid crystal display” (P.2-18) .)
PUSH-BUTTON IGNITION SWITCH
POSITIONS
LOCK (Normal parking position)
The ignition switch can only be locked in this
position.
The ignition switch will be unlocked when it is
pushed to the ACC position while carrying the
Intelligent Key.
ACC (Accessories)
This position activates electrical accessories
such as the radio, when the engine is not
running.
ON (Normal operating position)
This position turns on the ignition system and
electrical accessories.
OFF
The engine can be turned off in this position.
The ignition lock is designed so that the ignition
switch cannot be switched to the LOCK position
until the shift lever is moved to the P (Park)
position.