2014 NISSAN QUEST lock
[x] Cancel search: lockPage 175 of 482
3-32Pre-driving checks and adjustments
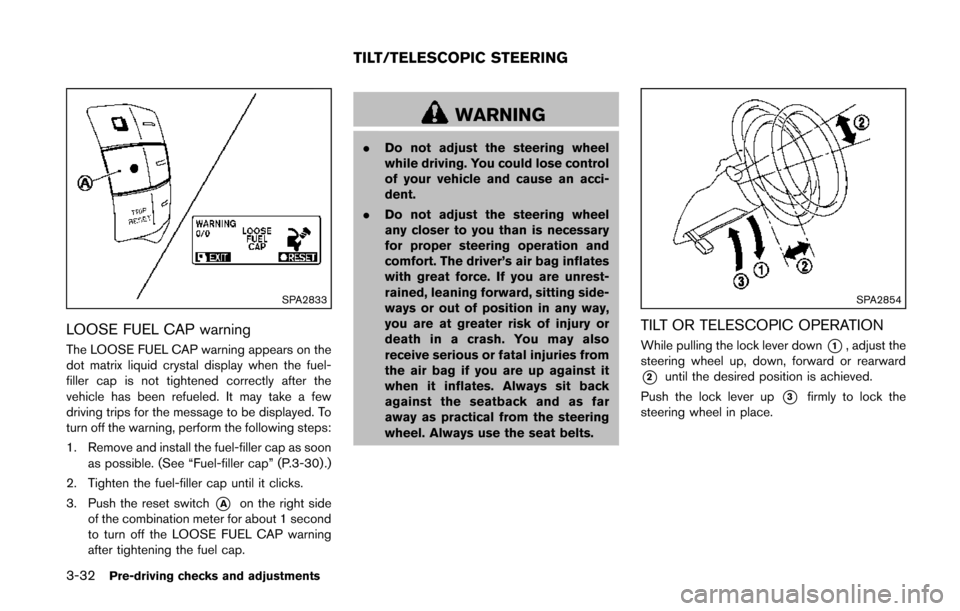
SPA2833
LOOSE FUEL CAP warning
The LOOSE FUEL CAP warning appears on the
dot matrix liquid crystal display when the fuel-
filler cap is not tightened correctly after the
vehicle has been refueled. It may take a few
driving trips for the message to be displayed. To
turn off the warning, perform the following steps:
1. Remove and install the fuel-filler cap as soonas possible. (See “Fuel-filler cap” (P.3-30) .)
2. Tighten the fuel-filler cap until it clicks.
3. Push the reset switch
*Aon the right side
of the combination meter for about 1 second
to turn off the LOOSE FUEL CAP warning
after tightening the fuel cap.
WARNING
. Do not adjust the steering wheel
while driving. You could lose control
of your vehicle and cause an acci-
dent.
. Do not adjust the steering wheel
any closer to you than is necessary
for proper steering operation and
comfort. The driver’s air bag inflates
with great force. If you are unrest-
rained, leaning forward, sitting side-
ways or out of position in any way,
you are at greater risk of injury or
death in a crash. You may also
receive serious or fatal injuries from
the air bag if you are up against it
when it inflates. Always sit back
against the seatback and as far
away as practical from the steering
wheel. Always use the seat belts.
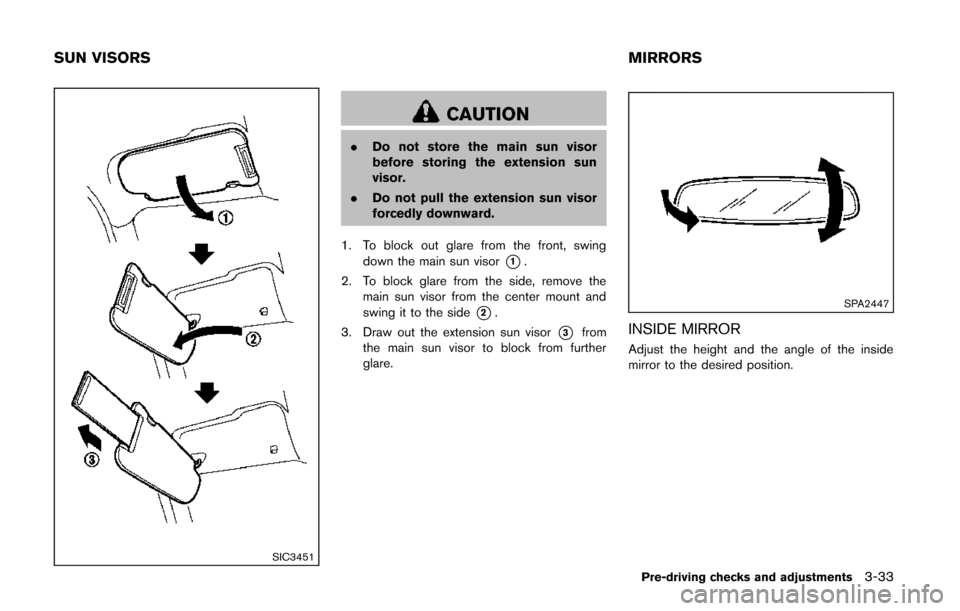
SPA2854
TILT OR TELESCOPIC OPERATION
While pulling the lock lever down*1, adjust the
steering wheel up, down, forward or rearward
*2until the desired position is achieved.
Push the lock lever up
*3firmly to lock the
steering wheel in place.
TILT/TELESCOPIC STEERING
Page 176 of 482
SIC3451
CAUTION
.Do not store the main sun visor
before storing the extension sun
visor.
. Do not pull the extension sun visor
forcedly downward.
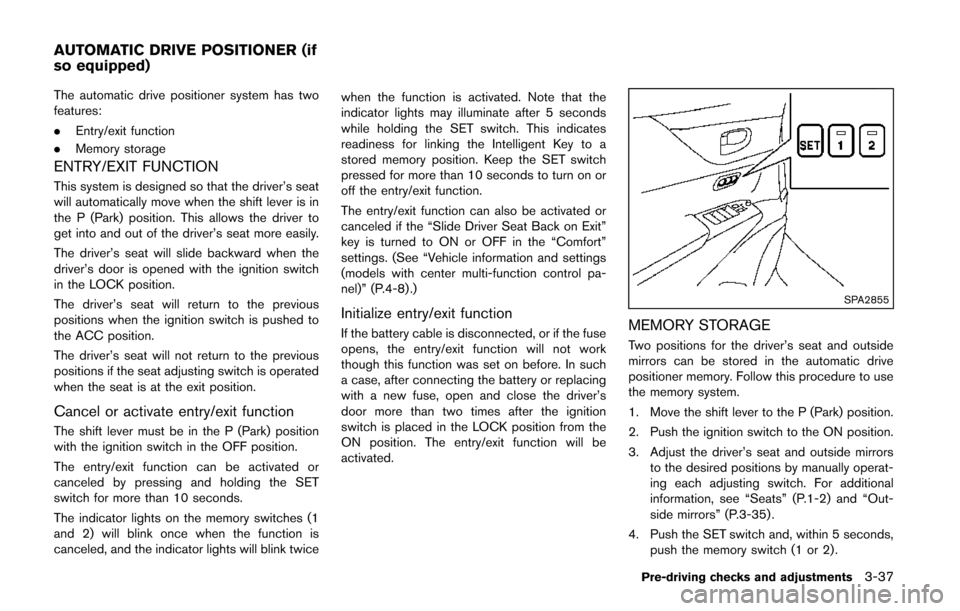
1. To block out glare from the front, swing down the main sun visor
*1.
2. To block glare from the side, remove the main sun visor from the center mount and
swing it to the side
*2.
3. Draw out the extension sun visor
*3from
the main sun visor to block from further
glare.
SPA2447
INSIDE MIRROR
Adjust the height and the angle of the inside
mirror to the desired position.
Pre-driving checks and adjustments3-33
SUN VISORS MIRRORS
Page 180 of 482
The automatic drive positioner system has two
features:
.Entry/exit function
. Memory storage
ENTRY/EXIT FUNCTION
This system is designed so that the driver’s seat
will automatically move when the shift lever is in
the P (Park) position. This allows the driver to
get into and out of the driver’s seat more easily.
The driver’s seat will slide backward when the
driver’s door is opened with the ignition switch
in the LOCK position.
The driver’s seat will return to the previous
positions when the ignition switch is pushed to
the ACC position.
The driver’s seat will not return to the previous
positions if the seat adjusting switch is operated
when the seat is at the exit position.
Cancel or activate entry/exit function
The shift lever must be in the P (Park) position
with the ignition switch in the OFF position.
The entry/exit function can be activated or
canceled by pressing and holding the SET
switch for more than 10 seconds.
The indicator lights on the memory switches (1
and 2) will blink once when the function is
canceled, and the indicator lights will blink twice when the function is activated. Note that the
indicator lights may illuminate after 5 seconds
while holding the SET switch. This indicates
readiness for linking the Intelligent Key to a
stored memory position. Keep the SET switch
pressed for more than 10 seconds to turn on or
off the entry/exit function.
The entry/exit function can also be activated or
canceled if the “Slide Driver Seat Back on Exit”
key is turned to ON or OFF in the “Comfort”
settings. (See “Vehicle information and settings
(models with center multi-function control pa-
nel)” (P.4-8) .)
Initialize entry/exit function
If the battery cable is disconnected, or if the fuse
opens, the entry/exit function will not work
though this function was set on before. In such
a case, after connecting the battery or replacing
with a new fuse, open and close the driver’s
door more than two times after the ignition
switch is placed in the LOCK position from the
ON position. The entry/exit function will be
activated.
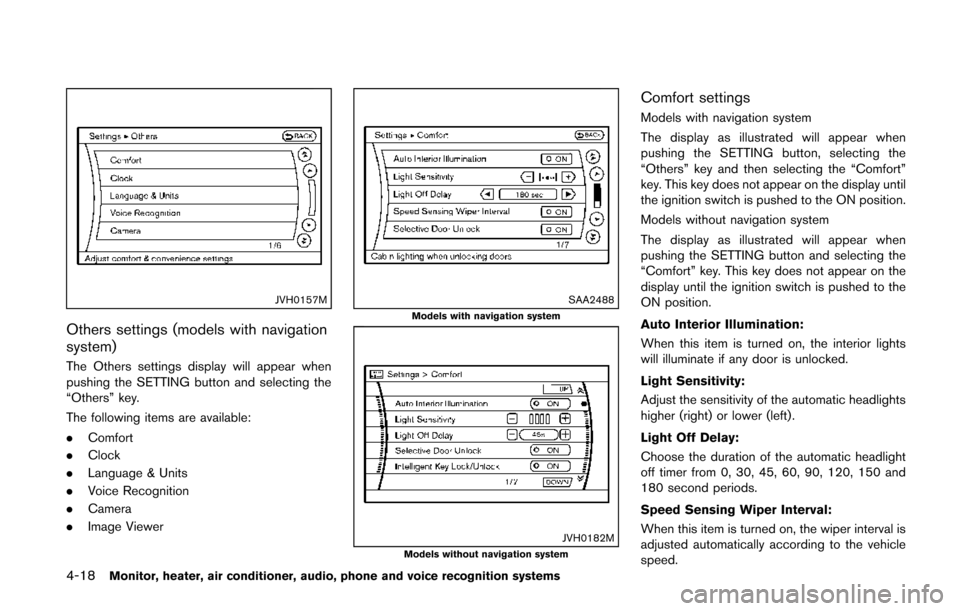
SPA2855
MEMORY STORAGE
Two positions for the driver’s seat and outside
mirrors can be stored in the automatic drive
positioner memory. Follow this procedure to use
the memory system.
1. Move the shift lever to the P (Park) position.
2. Push the ignition switch to the ON position.
3. Adjust the driver’s seat and outside mirrors
to the desired positions by manually operat-
ing each adjusting switch. For additional
information, see “Seats” (P.1-2) and “Out-
side mirrors” (P.3-35) .
4. Push the SET switch and, within 5 seconds, push the memory switch (1 or 2) .
Pre-driving checks and adjustments3-37
AUTOMATIC DRIVE POSITIONER (if
so equipped)
Page 201 of 482
4-18Monitor, heater, air conditioner, audio, phone and voice recognition systems
JVH0157M
Others settings (models with navigation
system)
The Others settings display will appear when
pushing the SETTING button and selecting the
“Others” key.
The following items are available:
.Comfort
. Clock
. Language & Units
. Voice Recognition
. Camera
. Image Viewer
SAA2488Models with navigation system
JVH0182MModels without navigation system
Comfort settings
Models with navigation system
The display as illustrated will appear when
pushing the SETTING button, selecting the
“Others” key and then selecting the “Comfort”
key. This key does not appear on the display until
the ignition switch is pushed to the ON position.
Models without navigation system
The display as illustrated will appear when
pushing the SETTING button and selecting the
“Comfort” key. This key does not appear on the
display until the ignition switch is pushed to the
ON position.
Auto Interior Illumination:
When this item is turned on, the interior lights
will illuminate if any door is unlocked.
Light Sensitivity:
Adjust the sensitivity of the automatic headlights
higher (right) or lower (left).
Light Off Delay:
Choose the duration of the automatic headlight
off timer from 0, 30, 45, 60, 90, 120, 150 and
180 second periods.
Speed Sensing Wiper Interval:
When this item is turned on, the wiper interval is
adjusted automatically according to the vehicle
speed.
Page 202 of 482
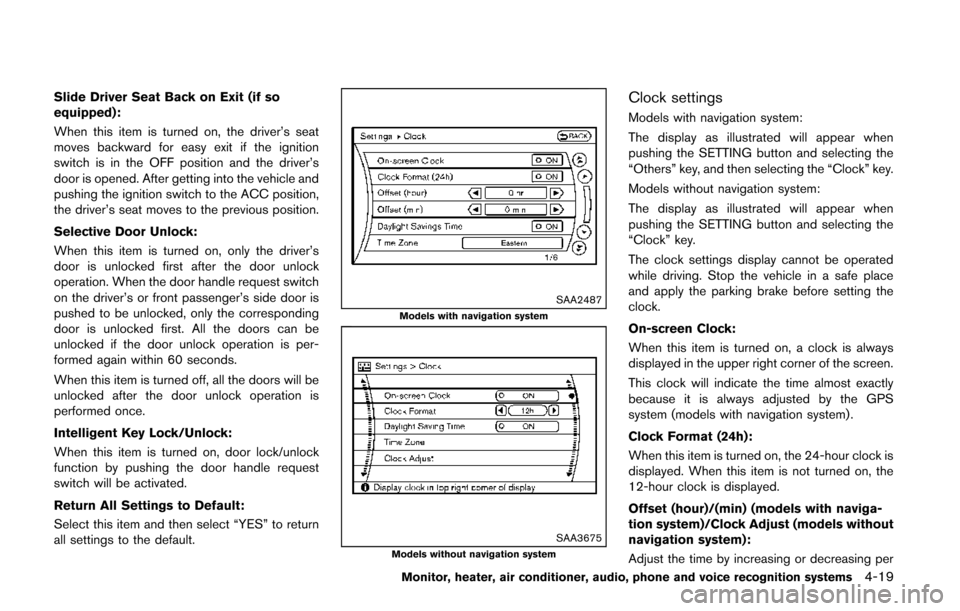
Slide Driver Seat Back on Exit (if so
equipped):
When this item is turned on, the driver’s seat
moves backward for easy exit if the ignition
switch is in the OFF position and the driver’s
door is opened. After getting into the vehicle and
pushing the ignition switch to the ACC position,
the driver’s seat moves to the previous position.
Selective Door Unlock:
When this item is turned on, only the driver’s
door is unlocked first after the door unlock
operation. When the door handle request switch
on the driver’s or front passenger’s side door is
pushed to be unlocked, only the corresponding
door is unlocked first. All the doors can be
unlocked if the door unlock operation is per-
formed again within 60 seconds.
When this item is turned off, all the doors will be
unlocked after the door unlock operation is
performed once.
Intelligent Key Lock/Unlock:
When this item is turned on, door lock/unlock
function by pushing the door handle request
switch will be activated.
Return All Settings to Default:
Select this item and then select “YES” to return
all settings to the default.
SAA2487Models with navigation system
SAA3675Models without navigation system
Clock settings
Models with navigation system:
The display as illustrated will appear when
pushing the SETTING button and selecting the
“Others” key, and then selecting the “Clock” key.
Models without navigation system:
The display as illustrated will appear when
pushing the SETTING button and selecting the
“Clock” key.
The clock settings display cannot be operated
while driving. Stop the vehicle in a safe place
and apply the parking brake before setting the
clock.
On-screen Clock:
When this item is turned on, a clock is always
displayed in the upper right corner of the screen.
This clock will indicate the time almost exactly
because it is always adjusted by the GPS
system (models with navigation system) .
Clock Format (24h):
When this item is turned on, the 24-hour clock is
displayed. When this item is not turned on, the
12-hour clock is displayed.
Offset (hour)/(min) (models with naviga-
tion system)/Clock Adjust (models without
navigation system):
Adjust the time by increasing or decreasing per
Monitor, heater, air conditioner, audio, phone and voice recognition systems4-19
Page 237 of 482
4-54Monitor, heater, air conditioner, audio, phone and voice recognition systems
SAA0306
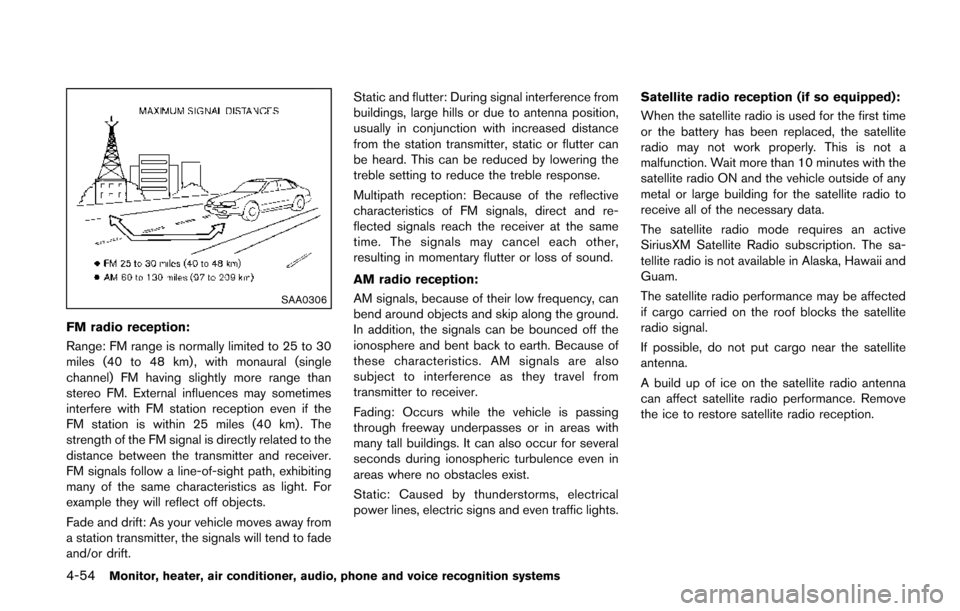
FM radio reception:
Range: FM range is normally limited to 25 to 30
miles (40 to 48 km) , with monaural (single
channel) FM having slightly more range than
stereo FM. External influences may sometimes
interfere with FM station reception even if the
FM station is within 25 miles (40 km). The
strength of the FM signal is directly related to the
distance between the transmitter and receiver.
FM signals follow a line-of-sight path, exhibiting
many of the same characteristics as light. For
example they will reflect off objects.
Fade and drift: As your vehicle moves away from
a station transmitter, the signals will tend to fade
and/or drift.Static and flutter: During signal interference from
buildings, large hills or due to antenna position,
usually in conjunction with increased distance
from the station transmitter, static or flutter can
be heard. This can be reduced by lowering the
treble setting to reduce the treble response.
Multipath reception: Because of the reflective
characteristics of FM signals, direct and re-
flected signals reach the receiver at the same
time. The signals may cancel each other,
resulting in momentary flutter or loss of sound.
AM radio reception:
AM signals, because of their low frequency, can
bend around objects and skip along the ground.
In addition, the signals can be bounced off the
ionosphere and bent back to earth. Because of
these characteristics. AM signals are also
subject to interference as they travel from
transmitter to receiver.
Fading: Occurs while the vehicle is passing
through freeway underpasses or in areas with
many tall buildings. It can also occur for several
seconds during ionospheric turbulence even in
areas where no obstacles exist.
Static: Caused by thunderstorms, electrical
power lines, electric signs and even traffic lights. Satellite radio reception (if so equipped):
When the satellite radio is used for the first time
or the battery has been replaced, the satellite
radio may not work properly. This is not a
malfunction. Wait more than 10 minutes with the
satellite radio ON and the vehicle outside of any
metal or large building for the satellite radio to
receive all of the necessary data.
The satellite radio mode requires an active
SiriusXM Satellite Radio subscription. The sa-
tellite radio is not available in Alaska, Hawaii and
Guam.
The satellite radio performance may be affected
if cargo carried on the roof blocks the satellite
radio signal.
If possible, do not put cargo near the satellite
antenna.
A build up of ice on the satellite radio antenna
can affect satellite radio performance. Remove
the ice to restore satellite radio reception.
Page 251 of 482
4-68Monitor, heater, air conditioner, audio, phone and voice recognition systems
Audio main operation
The audio system operates when the ignition
switch is in the “ACC” or “ON” position.
ON·OFF/Volume contorol:
To turn on the audio system, push the Power
button.
.The system will turn on in the mode (radio or
CD) which was used immediately before the
system was turned off.
. If no CD is loaded, the radio will be turned
on.
To turn on and off the audio system, push the
Power button.
To control the volume, turn the VOL control
knob.
Adjusting sound preference:
1. To adjust the sound settings, push the MENU button until the item (Bass, Treble,
Balance, Fade or AUX IN Volume) to be
adjusted is displayed.
2. Turn the TUNE knob to adjust the settings.
When no action is taken for 5 seconds, the
display will automatically return to the original
mode. Clock setting:
Turning the clock ON/OFF:
1. Push the MENU button until “Clock: ON” or “Clock: OFF” is displayed.
2. Turn the TUNE·FOLDER knob to toggle between “Clock: ON” and “Clock: OFF”.
Adjusting the clock:
1. Turn on the clock.
2. Push the MENU button until “Adjust Clock” is displayed, and then select the “Yes”.
3. Push the MENU button. Turn the TUNE knob to adjust the hour.
4. Push the MENU button. Turn the TUNE knob to adjust the minutes.
5. Push the MENU button to exit the clock mode.
When no action is taken for 5 seconds, the
display will automatically return to the original
mode.
AUX button:
The AUX IN jack is located on the audio unit.
The AUX IN audio input jack accepts any
standard analog audio input such as from a
portable cassette tape player, CD player, digital
audio player or laptop computer.
Push the AUX button to play a compatible device when it is plugged into the AUX IN jack.
NISSAN strongly recommends using a stereo
mini plug cable when connecting your music
device to the audio system. Music may not play
properly when a monaural cable is used.
FM-AM radio operation
/radio (FM/AM) band select:
When the FM/AM button is pushed while the
audio system is off, the audio system will turn on
and the radio will turn on.
When the FM/AM button is pushed while
another audio source is playing, the other audio
source will turn off and the radio will turn on.
To change the radio bands (FM1, FM2, or AM) ,
push the FM/AM buttons.
TUNE (Tuning):
When adjusting the broadcasting station fre-
quency manually, turn the TUNE·FOLDER knob
until the preferred frequency is achieved.
/SEEK tuning:
To adjust the broadcasting station frequency
automatically, push and release the SEEK or
TRACK button. When the system detects a
broadcasting station, it will stop at the station.
Detected stations are skipped while SEEK or
Page 254 of 482
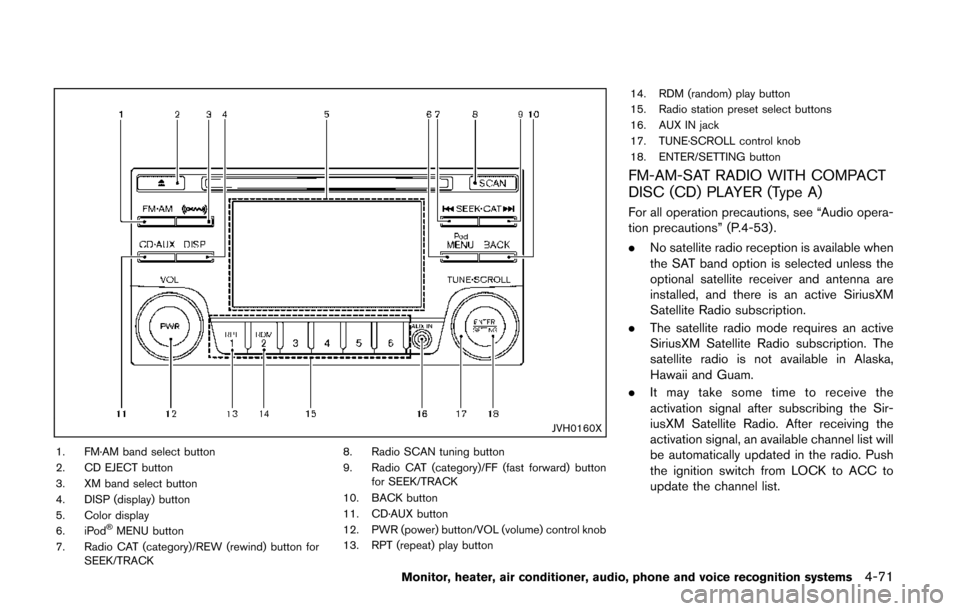
JVH0160X
1. FM·AM band select button
2. CD EJECT button
3. XM band select button
4. DISP (display) button
5. Color display
6. iPod
®MENU button
7. Radio CAT (category)/REW (rewind) button for SEEK/TRACK 8. Radio SCAN tuning button
9. Radio CAT (category)/FF (fast forward) button
for SEEK/TRACK
10. BACK button
11. CD·AUX button
12. PWR (power) button/VOL (volume) control knob
13. RPT (repeat) play button 14. RDM (random) play button
15. Radio station preset select buttons
16. AUX IN jack
17. TUNE·SCROLL control knob
18. ENTER/SETTING button
FM-AM-SAT RADIO WITH COMPACT
DISC (CD) PLAYER (Type A)
For all operation precautions, see “Audio opera-
tion precautions” (P.4-53) .
.
No satellite radio reception is available when
the SAT band option is selected unless the
optional satellite receiver and antenna are
installed, and there is an active SiriusXM
Satellite Radio subscription.
. The satellite radio mode requires an active
SiriusXM Satellite Radio subscription. The
satellite radio is not available in Alaska,
Hawaii and Guam.
. It may take some time to receive the
activation signal after subscribing the Sir-
iusXM Satellite Radio. After receiving the
activation signal, an available channel list will
be automatically updated in the radio. Push
the ignition switch from LOCK to ACC to
update the channel list.
Monitor, heater, air conditioner, audio, phone and voice recognition systems4-71