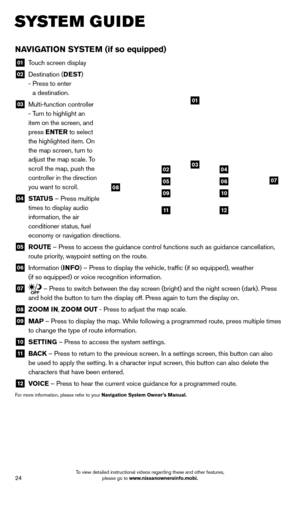
Page 17 of 32

15
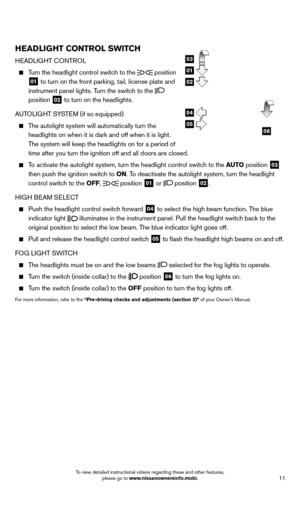
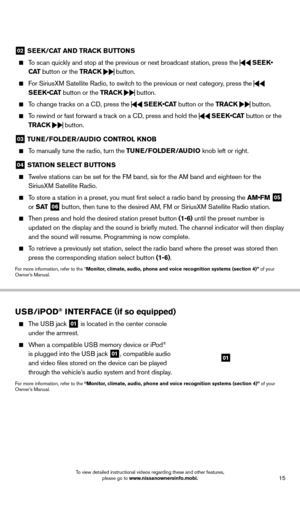
02 SEEK/CAT AND TRACK BUTTo NS
To scan quickly and stop at the previous or next broadcast station, press the
SEEK•
CAT button or the TRACK
button.
For SiriusXM Satellite Radio, to switch to the previous or next category, press the
SEEK•CAT button or the TRACK
button.
To change tracks on a
cD, press the
SEEK•CAT
button or the TRACK
button.
To rewind or fast forward a track on a
cD, press and hold the
SEEK•CAT
button or the
TRACK
button.
03
TUNE/Fol DER/AUDi o C o NTRol KNo B
To manually tune the radio, turn the TUNE/Fo lDER/ AUD io knob left or right.
04 STATioN SElECT BUTTo NS
Twelve stations can be set for the FM band, six for the AM band and eighteen for the
SiriusXM Satellite Radio.
To store a station in a preset, you must first select a radio band by pressing the \
AM•FM 05
or S AT 06 button, then tune to the desired AM, FM or SiriusXM Satellite Radio station.
Then press and hold the desired station preset button (1-6) until the preset number is
updated on the display and the sound is briefly muted. The channel indicator will then display
and the sound will resume. Programming is now complete.
To retrieve a previously set station, select the radio band where the preset was stored then press the corresponding station select button (1-6).
For more information, refer to the “Monitor, climate, audio, phone and voice recognition systems (section 4)” of your
Owner’s Manual.
USB/ iPo D® iNTERFACE (if so equipped)
The USB jack 01 is located in the center console
under the armrest.
When a compatible USB memory device or iPod®
is plugged into the USB jack
01, compatible audio
and video files stored on the device can be played
through the vehicle’s audio system and front display.
For more information, refer to the “Monitor, climate, audio, phone and voice recognition systems (section 4)” of your
Owner’s Manual.
01
1558965_14b_Pathfinder_QRG_100213.indd 1510/2/13 9:28 AM
To view detailed instructional videos regarding these and other features, please go to www.nissanownersinfo.mobi.
Page 18 of 32
.
The system will automatically ma")
16
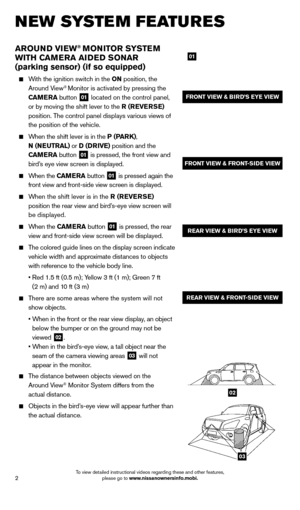
first drive features
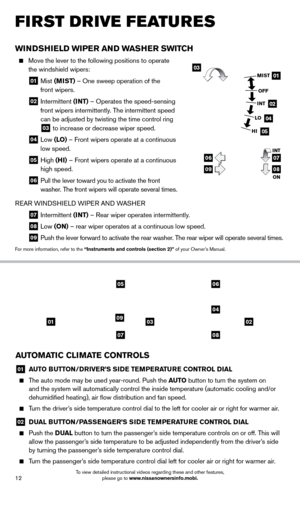
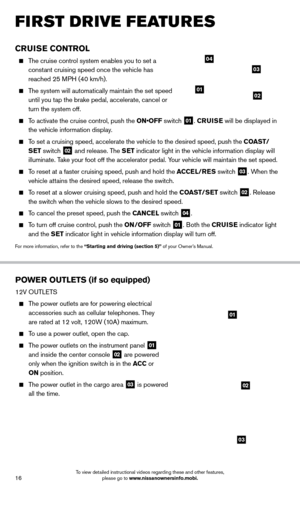
CRUiSE Co NTRol
The cruise control system enables you to set a
constant cruising speed once the vehicle has
reached 25 MPH (40 km/h).
The system will automatically maintain the set speed until you tap the brake pedal, accelerate, cancel or
turn the system off.
To activate the cruise control, push the ON•OFF switch 01. CRU i SE will be displayed in
the vehicle information display.
To set a cruising speed, accelerate the vehicle to the desired speed, pus\
h the C oAST/
S ET switch
02 and release. The SET indicator light in the vehicle information display will
illuminate. Take your foot off the accelerator pedal. Your vehicle will maintain the set speed.
To reset at a faster cruising speed, push and hold the ACCE l/RES switc h 03. When the
vehicle attains the desired speed, release the switch.
To reset at a slower cruising speed, push and hold the C oAST/ SET switch 02. Release
the switch when the vehicle slows to the desired speed.
To cancel the preset speed, push the CANCEl switch 04.
To turn off cruise control, push the o N/ o FF switch 01. Both the CRUiSE indicator light
and the SET indicator light in vehicle information display will turn off.
For more information, refer to the “Starting and driving (section 5)” of your Owner’s Manual.
PoWER o UT l ETS (if so equipped)
12V OUTLeTS
The power outlets are for powering electrical
accessories such as cellular telephones. They
are rated at 12 volt, 120W (10A) maximum.
To use a power outlet, open the cap.
The power outlets on the instrument panel 01
and inside the center console 02 are powered
only when the ignition switch is in the ACC or
o
N position.
The power outlet in the cargo area 03 is powered
all the time.
0102
03
04
01
02
03
1558965_14b_Pathfinder_QRG_100213.indd 1610/2/13 9:28 AM
To view detailed instructional videos regarding these and other features, please go to www.nissanownersinfo.mobi.
Page 19 of 32
17
04
05
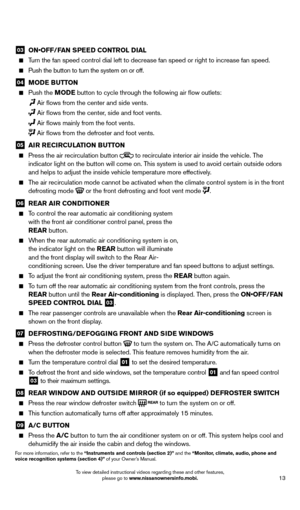
120V OUTLeT (if so equipped)
The 120V outlet 04 is located on the back of the
center console.
To use the outlets for devices that require 120V
power, place the ignition in the o N position and push
the power inverter switch
05.
The switch will illuminate when enabled.
For more information, refer to the “instruments and controls (section 2)”
of your Owner ’s Manual.
1558965_14b_Pathfinder_QRG_100213.indd 1710/2/13 9:28 AM
To view detailed instructional videos regarding these and other features, please go to www.nissanownersinfo.mobi.
Page 20 of 32

18
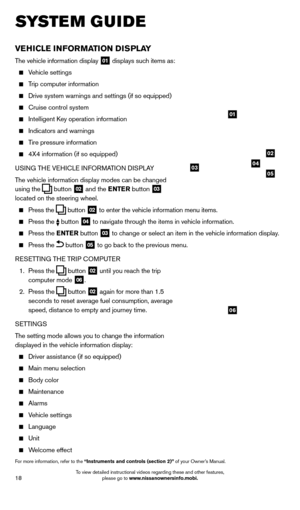
vEHiCl E iN Fo RMAT io N DiS P l AY
The vehicle information display 01 displays such items as:
Vehicle settings
Trip computer information
Drive system warnings and settings (if so equipped)
cruise control system
Intelligent key operation information
Indicators and warnings
Tire pressure information
4X4 information (if so equipped)
USI NG TH
e VeH
I c L
e I
NFORMATION DISPLAY
The vehicle information display modes can be changed
using the
button 02 and the ENTER button 03
located on the steering wheel.
Press the button 02 to enter the vehicle information menu items.
Press
the button 04 to navigate through the items in vehicle information.
Press the
E NTER button 03 to change or select an item in the vehicle information display.
Press the button 05 to go back to the previous menu.
R
eSe
TTING TH
e
TRIP
c
O
MPUT e
R
1.
Press the
button 02 until you reach the trip
computer mode 06.
2.
Press the
button 02 again for more than 1.5
seconds to reset average fuel consumption, average
speed, distance to empty and journey time.
S
e
TTINGS
The setting mode allows you to change the information
displayed in the vehicle information display:
Driver assist ance (if so equipped)
Main menu selection
Body color
Maintenance
Alarms
Vehicle settings
Language
Unit
Welcome effect
For more information, refer to the “instruments and controls (section 2)” of your Owner’s Manual.
system guide
01
02
040305
06
1558965_14b_Pathfinder_QRG_100213.indd 1810/2/13 9:28 AM
To view detailed instructional videos regarding these and other features, please go to www.nissanownersinfo.mobi.
Page 21 of 32

A cellular telephone should not be used while driving
so full attention may be given to vehicle operation.*
SYSTeM OPeRA TING TIPS
Pr")
19
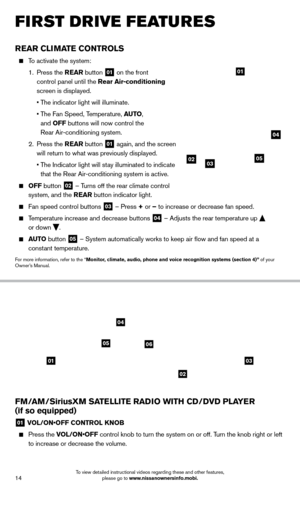
BlUETooTH® HANDS-FREE PHo NE SYSTEM (if so equipped)
A cellular telephone should not be used while driving
so full attention may be given to vehicle operation.*
SYSTeM OPeRA TING TIPS
Press the or button to interrupt the voice
prompts at any time and speak a command after
the tone.
The “Help” command can be used to hear a list of
available commands at any time.
Reduce bac kground noise as much as possible by
closing windows and pointing HVA
c
vents away from
the ceiling.
Speak naturally without long pauses and without
raising your voice.
When speaking Phonebook names, please be aware some phones require the last name to be spoken
before the first name. For example, “Michael Smith”
may be spoken as “Smith Michael”.
To cancel a voice recognition session, say “ e xit” or press and hold the or button.
Voice commands can be used to operate various Bluetooth System features u\
sing the
N ISSAN Voice Recognition system. See your Owner’s Manual for detailed information.
If the Voice Recognition system does not recognize your voice commands, train th\
e system using the Speaker Adaptation Mode.
For more detailed information and instructions, refer to your cellular phone Owner’s Manual and visit www.nissuanusa.com/bluetooth.
*Some jurisdictions prohibit the use of cellular telephones while drivin\
g.
Microphone
Bluetooth®
Controls
1558965_14b_Pathfinder_QRG_100213.indd 1910/2/13 9:28 AM
To view detailed instructional videos regarding these and other features, please go to www.nissanownersinfo.mobi.
Page 22 of 32

cONNecTING PRO ceDU Re
The vehicle must be stationary when connecting
the phone.
1.
Press the SETT
i
N
G button o")
20
BlUETooTH® SYSTE M
W
i
TH NA
viGA
T io N (if so equipped)
cONNecTING PRO ceDU Re
The vehicle must be stationary when connecting
the phone.
1.
Press the SETT
i
N
G button on the control panel
and select the “Bluetooth” key on the display.
2.
Select the ‘
c onnect Bluetooth” key.
3.
A popup bo
x will appear on the screen, prompting
you to confirm that the connection is for the phone
system. Select the “Yes” key.
4.
Initiate connecting from the phone.
•
T
he connecting procedure varies
according to each cellular phone model.
For detailed connecting instructions and
a list of compatible phones, please visit
www.nissanusa.com/bluetooth.
•
W
hen prompted for a PIN code, enter “1234”
from the handset. (The PIN code is assigned by
NISSAN and cannot be changed.)
5.
W
hen connecting is complete, the screen will return to the Bluetooth
® setting screen.
system guide
1558965_14b_Pathfinder_QRG_100213.indd 2010/2/13 9:28 AM
To view detailed instructional videos regarding these and other features, please go to www.nissanownersinfo.mobi.
Page 23 of 32

21
PHONeBOOk
Depending on your cell phone, the system may
automatically download your cell phone’s entire
phonebook to the vehicle’s Bluetooth
® system.
If the phonebook does not download automatically , the
vehicle phonebook may be set for
up to 40 entries.
To manually download entries:
1.
Press the
button on the steering wheel and
select the “Vehicle Phonebook” key.
2.
Select the “
Add New” key at the top of
the display. There are different methods to input a
phone number. Select one of the following options:
“ c opy from c all History” to save a number from the
Outgoing, Incoming or Missed c alls lists.
“c opy from the handset” to save a number that has
been downloaded from your handset to the vehicle.
“ e nter Number by keypad” to input the number and
name manually.
MA
k
I
NG A c
ALL
T
o make a call, follow this procedure:
1
.
Press the
button on the steering wheel.
The “Phone” menu will appear on the control
panel display.
2.
Select the “V
ehicle Phonebook”, “ c all History”,
“Handset Phonebook”, or “Dial Number” key.
3.
Select the desired entry from the list.
4.
Dialing begins when the entry is selected or when the
“O
k
” key is selected.
R
ece
IVING/
e
NDING A c
A
LL
To accept the call, press the button on the
steering wheel or touch the “Answer” key.
To reject the call, touch the “Reject c all”
key or press and hold the
button on the
steering wheel.
To hang up, press the button on the steering wheel
or touch the “Hang Up” key.
1558965_14b_Pathfinder_QRG_100213.indd 2110/2/13 9:28 AM
To view detailed instructional videos regarding these and other features, please go to www
Page 24 of 32

cONNecTING PRO ceDU Re
The vehicle must be stationary when connecting
the phone.
1.
Press the
button on the steering w")
22
BlUETooTH® SYSTEM WiTHo UT
NA
viGA
T
io
N (if so equipped)
cONNecTING PRO ceDU Re
The vehicle must be stationary when connecting
the phone.
1.
Press the
button on the steering wheel.
The system announces the available commands.
2.
S
ay: “
c
onnect phone”. The system acknowledges
the command and announces the next set of
available commands.
3.
S
ay: “Add phone”. The system acknowledges the
command and asks you to initiate connecting from
the phone handset.
4.
Initiate connecting from the phone:
•
T
he connecting procedure varies according to each cellular phone model.
For detailed connecting instructions and compatible phones, please
visit www.nissanusa.com/bluetooth.
•
W
hen prompted for a PIN code, enter “1234” from the handset.
(The PIN code is assigned by NISSAN and cannot be changed.)
5.
S
ay the name for the phone when the system asks you to provide one. You can give the
phone a name of your choice.
PHON
eB
OO
k
The phonebook stores up to 1,000 names for each phone paired with the system.
Depending on your cell phone, the system may automatically download your\
cell phone’ s
entire phonebook to the vehicle’s Bluetooth® system.
If the phonebook does not download automatically, 40 entries can be individually downloaded.
To manually download entries:
1.
Press the button on the steering wheel.
2.
After the tone, s
ay “Phonebook”.
3.
After the next tone s
ay “Transfer e ntry”. The system acknowledges the command
and asks you to initiate the transfer from the phone handset. The new contact phone
number will be transferred from the cellular phone to the vehicle.
•
T
he transfer procedure varies according to each cellular phone.
See your cellular phone’s Owner’s Manual for details. You can also
visit www.nissanusa.com/bluetooth for instruction on transferring
phone numbers from NISSAN recommended cellular phones.
4.
T
he system repeats the number and prompts you for the next command.
When you have finished entering numbers or transferring an entry, choose “Store”.
5.
T
he system confirms the name, location and number.
system guide
1558965_14b_Pathfinder_QRG_100213.indd 2210/2/13 9:28 AM
To view detailed instructional videos regarding these and other features, please go to www.nissanownersinfo.mobi.


The 120V outlet 04 is located on the back of the
center console.
To use the outlets for devices that require 120V
power, place the ignition in the o")