Page 25 of 88
Listen to Radio 25
AVRadio
Radio
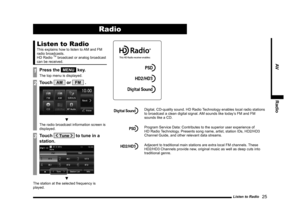
Listen to Radio
This explains how to listen to AM and FM
radio broadcasts.
HD Radio
TM broadcast or analog broadcast
can be received.
1Press the MENU key.
The top menu is displayed.
2Touch AM or FM .
▼
The radio broadcast information screen is
displayed.
3Touch to tune in a
station.
▼
The station at the selected frequency is
played.
Digital, CD-quality sound. HD Radio Technology enables local radio stations
to broadcast a clean digital signal. AM sounds like today’s FM and FM
sounds like a CD.
Program Service Data: Contributes to the superior user experience of
HD Radio Technology. Presents song name, artist, station IDs, HD2/HD3
Channel Guide, and other relevant data streams.
Adjacent to traditional main stations are extra local FM channels. These
HD2/HD3 Channels provide new, original music as well as deep cuts into
traditional genre.
13MY_AVC(NAS).indb 252013/02/14 10:57:31
Page 26 of 88

4) 1)
8)
6)
5)
2)
9)7)10) 16)
11),12)
13)
14)
17)
15)
1) Source plate
Displays the name of the currently
selected sour")
26 Listen to Radio
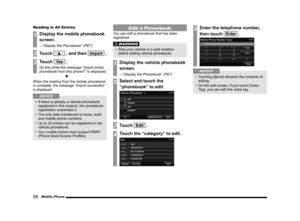
Display Contents
FM Radio Broadcast Information Screen
3)
4) 1)
8)
6)
5)
2)
9)7)10) 16)
11),12)
13)
14)
17)
15)
1) Source plate
Displays the name of the currently
selected source, preset channel number,
reception frequency, and station name.
2) HD Radio
TM indicator
Displayed during digital sound output.
3) Preset switch
Allows you to register your favorite
broadcast stations.
Touch and hold the switch for the desired
preset channel number until you hear
the “beep”. This registers the broadcast
station currently being received.
→“Register Your Favorite Broadcast
Stations” (P29)
4) ▲
Touching it displays the sub-menu. The
[Scan]
(P29), [RadioSetting] (P80), [Sound
Control]
(P73) settings can be made. 5)
Used to change the frequency. Touching
and holding until you hear the “beep”
starts automatic station selection (seek).
→“Starting the Seek” (P29)
6) SSN
Displays the SSN (Short Station Name)
that is currently being received.
If there is a sub-channel, “the received
channel number/total number of sub-
channels” is displayed.
7) PTY
Displays the PTY (Program Type) being
received.
8)
Info
Switches to information display.
9)
Station List
Displays a list of the stations that can
be received.
→ “Search for Broadcast
Stations from the Station List” (P30)
10) FM1 , FM2
Allows you to register your favorite 6
stations for each band.
11) Title
Displays the acquired title name.
12) Radio Text
During analog reception, “Title” changes
to “Radio Text”, and the acquired radio
text is displayed.
The “artist” and “album” are not displayed.
13) Artist
Displays the acquired artist name.
14) Album
Displays the acquired album name.
15) Indicator
: Live event broadcasts are
displayed as they are received.
: RBDS data is displayed as it is
received.
13MY_AVC(NAS).indb 262013/02/14 10:57:31
Page 27 of 88
Listen to Radio 27
AVRadio
16) Switch page
If the title, artist name, and album title
cannot fit in one page, the display can be
switched to Page 2 and beyond.
17)
Preset
Switches to preset display.
13MY_AVC(NAS).indb 272013/02/14 10:57:31
Page 28 of 88

4) 1)
8)
6)
5)
2)9)7)
14)
10)
11)
12)
15)
13)
1) Source plate
Displays the name of the currently
selected source, preset channel number")
28 Listen to Radio
AM Radio Broadcast Information Screen
3)
4) 1)
8)
6)
5)
2)9)7)
14)
10)
11)
12)
15)
13)
1) Source plate
Displays the name of the currently
selected source, preset channel number,
reception frequency, and station name.
2) HD Radio
TM indicator
Displayed during digital sound output.
3) Preset switch
Allows you to register your favorite
broadcast stations.
Touch and hold the switch for the desired
preset channel number until you hear
the “beep”. This registers the broadcast
station currently being received.
→“Register Your Favorite Broadcast
Stations” (P29)
4) ▲
Touching it displays the sub-menu. The
[Scan]
(P29), [RadioSetting] (P80), [Sound
Control]
(P73) settings can be made. 5)
Used to change the frequency. Touching
and holding until you hear the “beep”
starts automatic station selection (seek).
→“Starting the Seek” (P29)
6) SSN
Displays the SSN (Short Station Name)
that is currently being received.
7) PTY
Displays the PTY (Program Type) being
received.
8)
Info
Switches to information display.
This is not displayed during analog
reception.
9)
Station List
Displays a list of the stations that can
be received.
→ “Search for Broadcast
Stations from the Station List” (P30)
10) Title
Displays the acquired title name.
11) Artist
Displays the acquired artist name.
12) Album
Displays the acquired album name.
13) Indicator
: Live event broadcasts are
displayed as they are received.
14) Switch page
If the title, artist name, and album title
cannot fit in one page, the display can be
switched to Page 2 and beyond.
15)
Preset
Switches to preset display.
13MY_AVC(NAS).indb 282013/02/14 10:57:32
Page 29 of 88

Listen to Radio 29
AVRadio
Register Your Favorite
Broadcast Stations
You can register your favorite 6 stations for
each band, FM1, FM2, and AM.
1On the radio broadcast
information screen, touch
and search for the
“broadcast station” to register.
2To register your station, touch
and hold the “preset switch”
until you hear the “beep”.
▼
This registers the selected broadcast station
to the chosen preset channel number.
Search for Broadcast
Stations with Strong Signals
This is handy for searching for broadcast
stations you can receive when you drive to a
different area.
Starting the Seek
A receivable station can be searched one at a
time.
1On the radio broadcast
information screen, touch and
hold
until you hear
the “beep”.
▼
When a receivable station is found, it is
played.
Starting the Scan
This searches for stations that can be
received.
1On the radio broadcast
information screen, touch
▲ .
This displays the sub-menu.
2Touch Scan .
▼
When a broadcast station is received, this
is played for 10 seconds, then the product
searches for the next station.
ADVICE
• Touch ▼ to return to the radio
broadcast information screen without
stopping the scan.
• To cancel the scan, touch
Scan in Step
2 again.
13MY_AVC(NAS).indb 292013/02/14 10:57:33
Page 30 of 88

30 Listen to Radio
Search for Broadcast
Stations from the Station List
You can select a station from the list of
receivable broadcast stations.
1On the radio broadcast
information screen, touch
Station List .
The station list is displayed.
NOTE
• For FM, a station list that is maintained by the current tuner is displayed.
• For AM, the last searched station list is
displayed.
If the station list has not been acquired,
the list will not be displayed, so update
the list.
(P31)
2Select the broadcast stations
you want from the station list
and touch it.
▼
Reception of the selected broadcast
station starts.
3Touch Back .
▼
The display returns to the original radio
broadcast information screen.
Starting the Station List Scan
This searches for stations in the station list
that can be received.
1On the station list, touch ▲ .
This displays the sub-menu.
2Touch Scan List .
▼
When a broadcast station is received, this
is played for 10 seconds, then the product
searches for the next station.
ADVICE
• Touch ▼ to return to the station list
without stopping the scan.
• To cancel the scan, touch
Scan List in
Step 2 again.
13MY_AVC(NAS).indb 302013/02/14 10:57:34
Page 31 of 88
Listen to Radio 31
AVRadio
Narrowing Down the Station
List
You can narrow down the station list by genre.
1On the station list, touch
PTY Filter .
The genre list is displayed.
2Touch the “genre” you want.
▼
A station list for just the selected genre is
displayed.
ADVICE
• Touching the [Filter OFF] on the station
list cancels the filter by genre search.
Updating the Station List
You can manually update the station list.
1On the station list, touch
Update .
Updating starts.
▼
The updated station list is displayed.
13MY_AVC(NAS).indb 312013/02/14 10:57:34
Page 32 of 88
32 Listen to Satellite Radio
Equipment by type
Listen to Satellite
Radio
This section explains how to listen to
SIRIUS radio.
NOTE
• A subscription is required to listen to
SIRIUS radio.
For details, please consult an authorized
Mitsubishi Motors dealer.
1Press the MENU key.
The top menu is displayed.
2Touch SIRIUS .
▼
This displays SIRIUS broadcast
information screen.
3Touch to tune in
to a station.
▼
The selected station is played.
13MY_AVC(NAS).indb 322013/02/14 10:57:35


 Switch page
If the title, artist name, and album title
cannot fit in one page, the display can be
switched to Page 2 and beyond.
17)
Preset
Switches to preset")

