Page 9 of 88

2)3)
4) 7) 5)
6)
8)9)
10)
1)
Volume Header
Classified")
How to Read This Manual 9
IntroductionBefore Use
How to Read This Manual
The notation used in this manual and what it means are as follows.
1)
2)3)
4) 7) 5)
6)
8)9)
10)
1)
Volume Header
Classified by main functions.
2) Chapter Header
Classifies more finely the main functions
in the volume header. A chapter header
appears at the head of each chapter.
You can also check the index on the right
edge.
3) Major Header
Classifies the main operations and
functions in a chapter.
4) Intermediate Header
Classifies the operations and functions
under the major header. 5)
Minor Header
Classifies more finely the operations and
functions classified under the intermediate
header.
6) Operation procedure
These are numbers that shows the
operation procedure. Perform the
procedure in the order of these numbers.
7)
○○○ key or [○○○] key
Shows an operation key on the panel.
8)
○○○ or [○○○]
Shows a touch switch displayed on the
screen. 9)
(P000)
Shows the page to refer to. It contains
relevant explanations etc.
10)
Continued on the next page
Used when the explanation of operations
is continued.
13MY_AVC(NAS).indb 92013/02/14 10:57:20
Page 10 of 88

2)4) 3)
5)
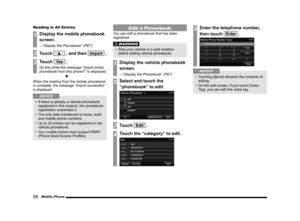
1) key
Used to eject a disc
(")
10 This Product
Basic Operation
This Product
Main Unit Panel
This gives the names of each section of the main unit panel and explains their functions.
1)
2)4) 3)
5)
1) key
Used to eject a disc
(P15).
2) Display Almost all operations can be performed by
touching the touch switches displayed on
this display.
→“How to Perform Touch Operations” (P11)
3) Disc slot
When a disc is inserted that can be played
by this product, starts playback.
→“Inserting the Disc” (P15)
4) MENU key
Displays the top menu.
Used to select an audio source.
→“Switch the Sources” (P13)
5) PWR/VOL key
Allows you to adjust the volume for the
audio function and telephone function.
It also allows you to switch the audio
function ON/OFF.
→“Adjust Volume” (P14)
Start
Start the system.
1Switch the vehicle's ignition
key to “ACC” or “ON”.
▼
The display switches to the last screen used
in its previous session.
ADVICE
• Immediately after the ignition key is
switched to “ACC” or “ON”, some
functions cannot be used immediately
because data is being read. Please wait
until the reading is completed.
13MY_AVC(NAS).indb 102013/02/14 10:57:21
Page 11 of 88
How to Perform Touch Operations 11
IntroductionBasic Operation
How to Perform
Touch Operations
This system uses a touch panel that is
operated by touching the display directly.
When Touching ___
This manual indicates the operation of
touching the screen to “Enter” with “Touch
___”.
Also, the menu of operations executed by
touch is indicated as “Touch Switch”.
CAUTION
• The surface of the display scratches
easily. Do not push on it too hard or rub it
with a stiff cloth.
• If the screen is dirty, wipe it gently with an eyeglass wipe or other soft cloth.
Searching Items from a List
You can move the display one page by
touching or .
▼
When the item you are searching for is
displayed, touch it directly.
13MY_AVC(NAS).indb 112013/02/14 10:57:22
Page 12 of 88
![MITSUBISHI LANCER EVOLUTION 2014 10.G Display Audio Manual 12 Top Menu
Top Menu
By pressing the [MENU] key to display the top menu, then selecting a sou\
rce from that menu,
you can use various functions.
Display Contents
TOP
5)6)7)9)8)
1)2) 3)4)
2nd TOP
1](/manual-img/19/7473/w960_7473-11.png "MITSUBISHI LANCER EVOLUTION 2014 10.G Display Audio Manual 12 Top Menu
Top Menu
By pressing the [MENU] key to display the top menu, then selecting a sou\
rce from that menu,
you can use various functions.
Display Contents
TOP
5)6)7)9)8)
1)2) 3)4)
2nd TOP
1")
12 Top Menu
Top Menu
By pressing the [MENU] key to display the top menu, then selecting a sou\
rce from that menu,
you can use various functions.
Display Contents
TOP
5)6)7)9)8)
1)2) 3)4)
2nd TOP
10)11)12)13)
1) FM (P25)
Allows you to use the FM radio function.
2)
AM (P25)
Allows you to use the AM radio function.
3)
SIRIUS *7 (P32)
Allows you to use the satellite radio
function.
4) Clock
Displays the current time using 24-hour
time or 12-hour time.
5)
CD
Plays media inserted into this product.
Audio CD
(P41)
Audio files (MP3/WMA/AAC)
(P44)
6) USB/iPod *1
When an iPod is connected to this
product,
iPod is displayed and when you
touch this, the iPod screen is displayed.
(P52)
When a USB device is connected to this
product,
USB is displayed and when you
touch this, the USB screen is displayed.
(P57)
When nothing is connected to this product,
USB/iPod is displayed.
7)
BT Audio *2(P62)
When a Bluetooth-capable audio device
is connected to this product, the Bluetooth
audio function can be used. 8)
Next
Displays the top menu (2nd top).
9)
Voice *3(P17)
Allows you to use the voice control
function.
10)
AUX *1, *4, *5(P65)
When an external input device is connected to this product, the audio from
the external input device is played.
11)
Phone *6(P66)
Allows you to make and receive telephone
calls.
12)
Setting (P73)
Displays the settings screen, on which you
can make various settings for this product.
13)
Back
Displays the top menu (top).
*1) An iPod and external input cable (both available separately) are required.
*2) Requires a separately-purchased Bluetooth-
capable audio device in
Equipment by type (vehicles
with a Bluetooth® 2.0 interface).
*3) Can be used with Equipment by type (vehicles with a
Bluetooth® 2.0 interface).
*4) Equipment by type Even when no external input
cable or AUX device (both available separately)
is connected to this product, [AUX] is displayed,
but touching it does not output any audio.
*5)
Equipment by type Not displayed for vehicles that do
not support AUX devices.
*6) Requires a separately-purchased Bluetooth-
capable mobile phone in
Equipment by type (vehicles
with a Bluetooth® 2.0 interface).
*7) Equipment by type Requires a satellite tuner
connection.
13MY_AVC(NAS).indb 122013/02/14 10:57:23
Page 13 of 88

Top Menu 13
IntroductionBasic Operation
Switch the Top Menu
The top menu comprises of 2 pages. The
following explains how to view the other page.
1Touch Next .
TOP
▼
2nd TOP
The top menu (2nd top) is displayed.
2Touch Back .
▼
This returns the display to the top menu (top).
ADVICE
• In some cases, because of Equipment by type
and the connection status of devices, the
top menu has only one page.
Switch the Sources
A source can be selected on the top menu
display.
NOTE
• This manual uses the term “source” as the general name for all audio functions,
including radio, CD, etc.
1Press the MENU key.
▼
The top menu is displayed.
2Touch any “source”.
▼
The screen for the selected source is
displayed.
ADVICE
• When no audio CD and no disc with audio files (MP3/WMA/AAC) is inserted
into this product, [CD] is displayed greyed
out and cannot be selected.
• Equipment that is not connected cannot be selected.
• The contents of the menu depend on the model and on what optional equipment is
connected.
13MY_AVC(NAS).indb 132013/02/14 10:57:24
Page 14 of 88
14 Basic Operation
AV
The following explains audio function operations.
Audio Functions
Basic Operation
NOTE
• The album names, titles, etc. in the title information in pictures used with the
audio functions and related functions
of this manual were prepared for these
explanations. They have no relationship
whatsoever with actual title information.
Switch Audio ON/OFF
You can switch the audio function ON/OFF.
ADVICE
• Hold down the steering [MODE] key to also turn the audio function ON/OFF.
1Press the PWR/VOL key.
▼
This switches the audio function OFF.
2Press the PWR/VOL key.
▼
The audio function is switched ON and the
audio source screen last used is displayed.
Adjust Volume
Adjust the audio function volume.
1During audio play, turn the
PWR/VOL key counter-
clockwise.
▼
The volume is lowered.
2Turn the PWR/VOL key
clockwise.
▼
The volume is raised.
13MY_AVC(NAS).indb 142013/02/14 10:57:25
Page 15 of 88
Basic Operation 15
AVAudio Functions
Insert/Eject Discs
The following explains how to insert a disc into
this product.
CAUTION
• When replacing discs, first ensure that the vehicle is stopped in an area in which
stopping is permitted.
• Do not insert your hand, fingers, or foreign objects into the disc slot. This
may lead to injury, smoking, or fire.
Inserting the Disc
1Insert the disc into the disc slot
with the label surface up.
Disc
Label side
Push the disc in a certain amount, and the
product will pull the disc in.
▼
Playback starts.
Ejecting the Disc
1Press the key.
▼
This will eject the disc from the product, so
remove the disc.
13MY_AVC(NAS).indb 152013/02/14 10:57:26
Page 16 of 88
3)
2) 5)
4)
6)1) 2) 3)
5)
4)
6)
3)
1) 2)
5)
4)
6)
A typeC typeB type
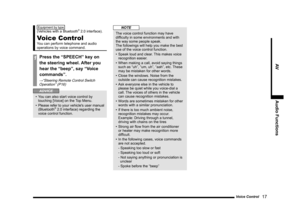
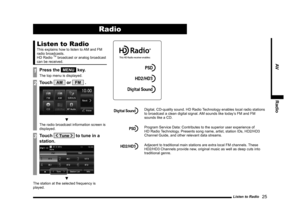
1) “SPEECH” key*1
Starts voice control.
2) “OFF HOOK” key")
16 Basic Operation
Steering Remote Control Switch Operation
1)3)
2) 5)
4)
6)1) 2) 3)
5)
4)
6)
3)
1) 2)
5)
4)
6)
A typeC typeB type
1) “SPEECH” key*1
Starts voice control.
2) “OFF HOOK” key
*1
Used to receive a telephone call.
3) “ON HOOK” key
*1
Used to end a telephone call. 4) Vol
key, key
Adjust audio functions and the telephone
function volume.
5) CH
key, key
Select CD and other audio source tracks
and radio stations.
Hold down for fast forward and rewind.
Hold down to switch the satellite radio
band during satellite radio reception. 6)
MODE key
Hold down to turn the audio function
ON/OFF. Additionally, each time this is
pressed, this switches the audio source.
The order of switching is shown below.
If devices are not connected, then
these sources are skipped, and the next
available source is selected.
CD
iPod*2 or USB device
Bluetooth Audio*3
FM
AM
AUX*4
SIRIUS*5
*1) Can be used with Equipment by type (vehicles with a
Bluetooth® 2.0 interface).
*2) An iPod cable (available separately) is required.
*3) Requires a separately-purchased Bluetooth-
capable audio device in
Equipment by type (vehicles
with a Bluetooth® 2.0 interface).
*4) Equipment by type Only for vehicles that support AUX
devices
*5)
Equipment by type Requires a satellite tuner
connection.
13MY_AVC(NAS).indb 162013/02/14 10:57:27