2014 MERCEDES-BENZ S-Class trunk
[x] Cancel search: trunkPage 381 of 434

Fuses
Important safety notes
G
WARNING
If you manipulate or bridge a faulty fuse or if
you replace it with a fuse with a higher
amperage, the electric cables could be
overloaded. This could result in a fire. There
is a risk of an accident and injury.
Always replace faulty fuses with the specified
new fuses having the correct amperage.
Blown fuses must be replaced with fuses of
the same rating, which you can recognize by
the color and value. The fuse ratings are listed
in the fuse allocation chart.
The fuse allocation chart is on the fuse box in
the trunk (Y page 380).
If a newly inserted fuse also blows, have the
cause traced and rectified at a qualified
specialist workshop, e.g. an authorized
Mercedes-Benz Center.
! Only use fuses that have been approved
for Mercedes-Benz vehicles and which
have the correct fuse rating for the system
concerned. Otherwise, components or
systems could be damaged.
The fuses in your vehicle serve to close down
faulty circuits. If a fuse blows, all the
components on the circuit and their functions
stop operating. Before changing a fuse
X Secure the vehicle against rolling away
(Y page 190).
X Switch off all electrical consumers.
X Make sure that the ignition is switched off
(Y page 171).
or
X When using the SmartKey, turn the
SmartKey to position 0in the ignition lock
and remove it (Y page 171). All indicator lamps in the instrument cluster
must be off.
The fuses are located in various fuse boxes:
R
Fuse box on the driver's side of the
dashboard
R Fuse box in the front-passenger footwell
R Fuse box in the engine compartment on the
left-hand side of the vehicle, when viewed
in the direction of travel
R Fuse box in the trunk on the right-hand side
of the vehicle, when viewed in the direction
of travel Dashboard fuse box
! Do not use a pointed object such as a
screwdriver to open the cover in the
dashboard. You could damage the
dashboard or the cover.
! Make sure that no moisture can enter the
fuse box when the cover is open.
! When closing the cover, make sure that it
is lying correctly on the fuse box. Moisture
seeping in or dirt could otherwise impair
the operation of the fuses.
X Open the driver's door. X
To open: pull cover 0043outwards in the
direction of the arrow and remove it.
X To close: clip in cover 0043on the front of
the dashboard.
X Fold cover 0043inwards until it engages. Fuses
379Breakdown assistance Z
Page 382 of 434

Fuse box in the front-passenger
footwell
! Make sure that no moisture can enter the
fuse box when the cover is open.
! When closing the cover, make sure that it
is lying correctly on the fuse box. Moisture
seeping in or dirt could otherwise impair
the operation of the fuses.
X Open the front-passenger door. X
Fold cover 0043down and remove it. Fuse box in the engine compartment
G
WARNING
When the hood is open and the windshield
wipers are set in motion, you can be injured
by the wiper linkage. There is a risk of injury.
Always switch off the windshield wipers and
the ignition before opening the hood.
! Make sure that no moisture can enter the
fuse box when the cover is open.
! When closing the cover, make sure that it
is lying correctly on the fuse box. Moisture
seeping in or dirt could otherwise impair
the operation of the fuses.
X Open the hood. X
To open: release retaining clamps 0043and
remove cover 0044. X
Use a dry cloth to remove any moisture
from the fuse box.
X Undo screws 0087on the fuse box.
X Remove fuse box cover 0085forwards.
X To close: check whether the seal is lying
correctly in cover 0085.
X Insert cover 0085at the rear of the fuse box
into the retainer.
X Fold down cover 0085of the fuse box and
tighten screws 0087.
X Insert cover 0044and secure with retaining
clamps 0043.
X Close the hood. Fuse box in the trunk
! Make sure that no moisture can enter the
fuse box when the cover is open.
! When closing the cover, make sure that it
is lying correctly on the fuse box. Moisture 380
FusesBreakdown assistance
Page 383 of 434

seeping in or dirt could otherwise impair
the operation of the fuses.
X Open the trunk lid. X
To open: release cover 0043at the top right
and left-hand sides with a flat object.
X Open cover 0043downwards in the direction
of the arrow.
i The fuse allocation chart is located in a
recess at the side of the fuse box. You can
find the corresponding fuse rating and fuse
type on the fuse allocation chart. Engine emergency off
If the engine cannot be switched off as
described, observe the following procedure:
X Take the fuse allocation chart from the fuse
box in the trunk (Y page 380).
X Search for “Emergency engine shutdown”
in the fuse allocation chart.
X Remove the fuses listed under "Emergency
engine shutdown". Fuses
381Breakdown assistance Z
Page 411 of 434

Raising the vehicle
G
WARNING
If you do not position the jack correctly at the
appropriate jacking point of the vehicle, the
jack could tip over with the vehicle raised.
There is a risk of injury.
Only position the jack at the appropriate
jacking point of the vehicle. The base of the
jack must be positioned vertically, directly
under the jacking point of the vehicle.
! The jack is designed exclusively for
jacking up the vehicle at the jacking points.
Otherwise, your vehicle could be damaged.
Observe the following when raising the
vehicle:
R to raise the vehicle, only use the vehicle-
specific jack that has been tested and
approved by Mercedes-Benz. If used
incorrectly, the jack could tip over with the
vehicle raised.
R the jack is designed only to raise and hold
the vehicle for a short time while a wheel
is being changed. It is not suited for
performing maintenance work under the
vehicle.
R avoid changing the wheel on uphill and
downhill slopes.
R before raising the vehicle, secure it from
rolling away by applying the parking brake
and positioning wheel chocks. Do not
disengage the parking brake while the
vehicle is raised.
R the jack must be placed on a firm, flat and
non-slip surface. On a loose surface, a
large, flat load-bearing underlay must be
used. On a slippery surface, a non-slip
underlay must be used, e.g. rubber mats.
R do not use wooden blocks or similar
objects as a jack underlay. Otherwise, the
jack will not be able to achieve its load-
bearing capacity due to the restricted
height. R
make sure that the distance between the
underside of the tires and the ground does
not exceed 1.2 in (3 cm).
R never place your hands and feet under the
raised vehicle.
R do not lie under the vehicle.
R do not start the engine when the vehicle is
raised.
R do not open or close a door or the trunk lid
when the vehicle is raised.
R make sure that no persons are present in
the vehicle when the vehicle is raised.
Vehicles with hub caps: the hub cap covers
the wheel bolts. Before you can unscrew the
wheel bolts, you must remove the hub caps.
Two different variants can be installed. Vehicles with plastic hub caps:
X
To remove: turn the center cover of hub
cap 0043counter-clockwise and remove.
X To install: before installing, ensure that
hub cap 0043is in the open position. To do
so, turn the center cover counter-
clockwise.
X Place hub cap 0043in position and turn the
center cover clockwise until you feel and
hear hub cap 0043engage.
X Make sure that hub cap 0043is installed
securely. Changing a wheel
409Wheels and tires Z
Page 414 of 434

Always pay attention to the instructions and
safety notes in the "Changing a wheel"
section ( Ypage 407).
Only use wheel bolts that have been designed
for the wheel and the vehicle. For safety
reasons, Mercedes-Benz recommends that
you only use wheel bolts which have been
approved for Mercedes-Benz vehicles and the
respective wheel.
! AMG vehicles: during removal and
repositioning of the wheel, the wheel rim
can strike the ceramic-brake disc and
damage it. Therefore, take precautions and
get a second person to assist you.
Alternatively, you can use a second
alignment bolt.
! To prevent damage to the paintwork, hold
the wheel securely against the wheel hub
while screwing in the first wheel bolt. X
Clean the wheel and wheel hub contact
surfaces.
X Slide the wheel to be mounted onto the
alignment bolt and push it on.
X Tighten the wheel bolts until they are
finger-tight.
X Unscrew the alignment bolt.
X Tighten the last wheel bolt until it is finger-
tight. Lowering the vehicle G
WARNING
The wheels could work loose if the wheel nuts
and bolts are not tightened to the specified
tightening torque. There is a risk of accident.
Have the tightening torque immediately
checked at a qualified specialist workshop
after a wheel is changed. X
Place the ratchet wrench onto the hexagon
nut of the jack so that the letters ABare
visible.
X Turn the ratchet wrench until the vehicle is
once again standing firmly on the ground.
X Place the jack to one side.
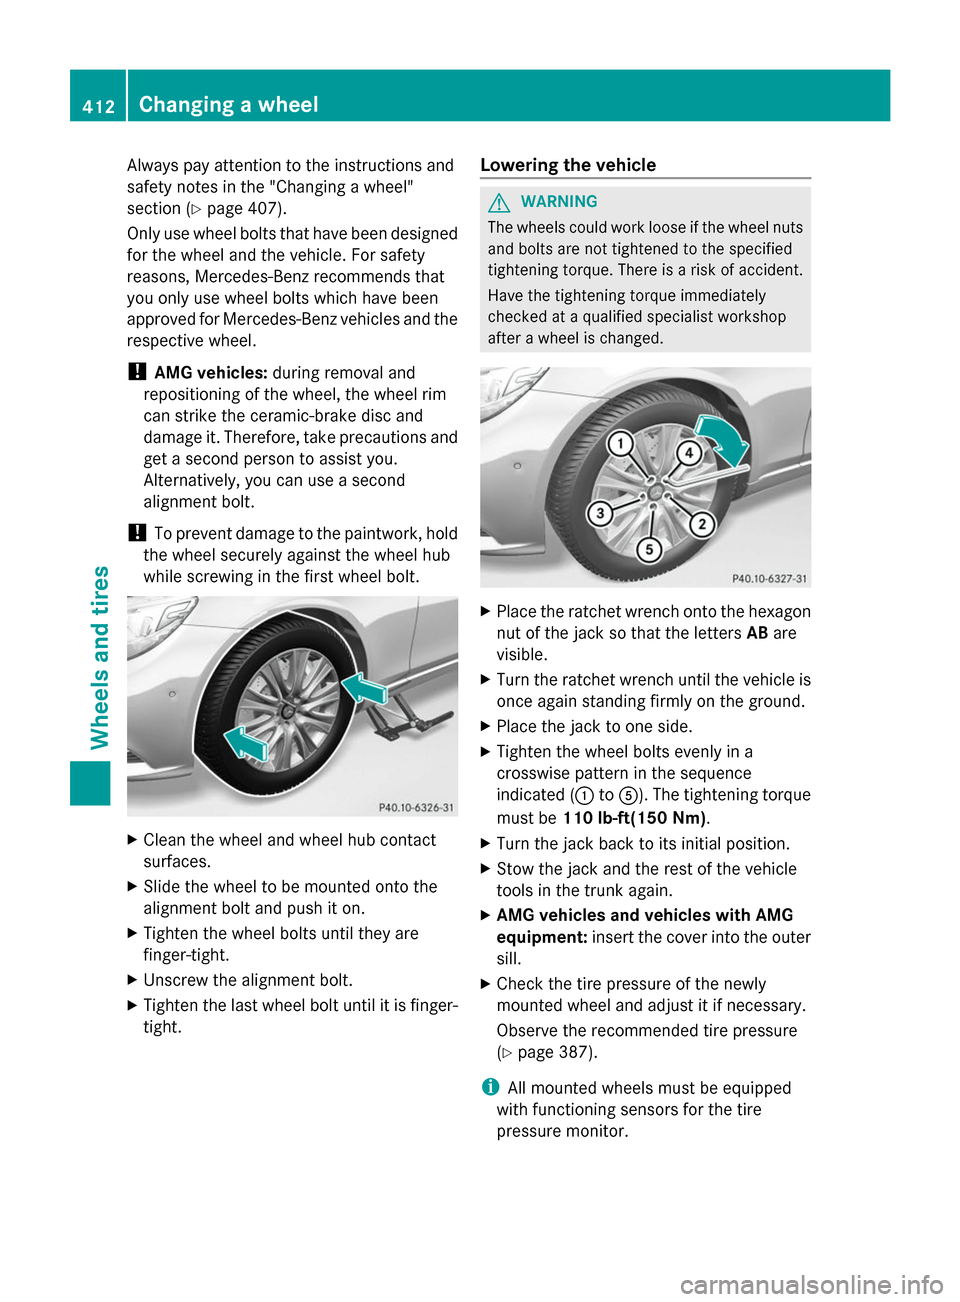
X Tighten the wheel bolts evenly in a
crosswise pattern in the sequence
indicated ( 0043to0083). The tightening torque
must be 110 lb-ft(150 Nm).
X Turn the jack back to its initial position.
X Stow the jack and the rest of the vehicle
tools in the trunk again.
X AMG vehicles and vehicles with AMG
equipment: insert the cover into the outer
sill.
X Check the tire pressure of the newly
mounted wheel and adjust it if necessary.
Observe the recommended tire pressure
(Y page 387).
i All mounted wheels must be equipped
with functioning sensors for the tire
pressure monitor. 412
Changing a wheelWheels and tires
Page 431 of 434

Vehicles with rear-
compartment air
conditioning system Capacity
Refrigerant
27.1 ± 0.4 oz
(770 ± 10 g) PAG oil
4.2 oz
(120 g) Vehicle data
General notes
Please note that for the specified vehicle
data:
R the heights specified may vary as a result
of:
-tires
- load
- condition of the suspension
- optional equipment
R optional equipment reduces the maximum
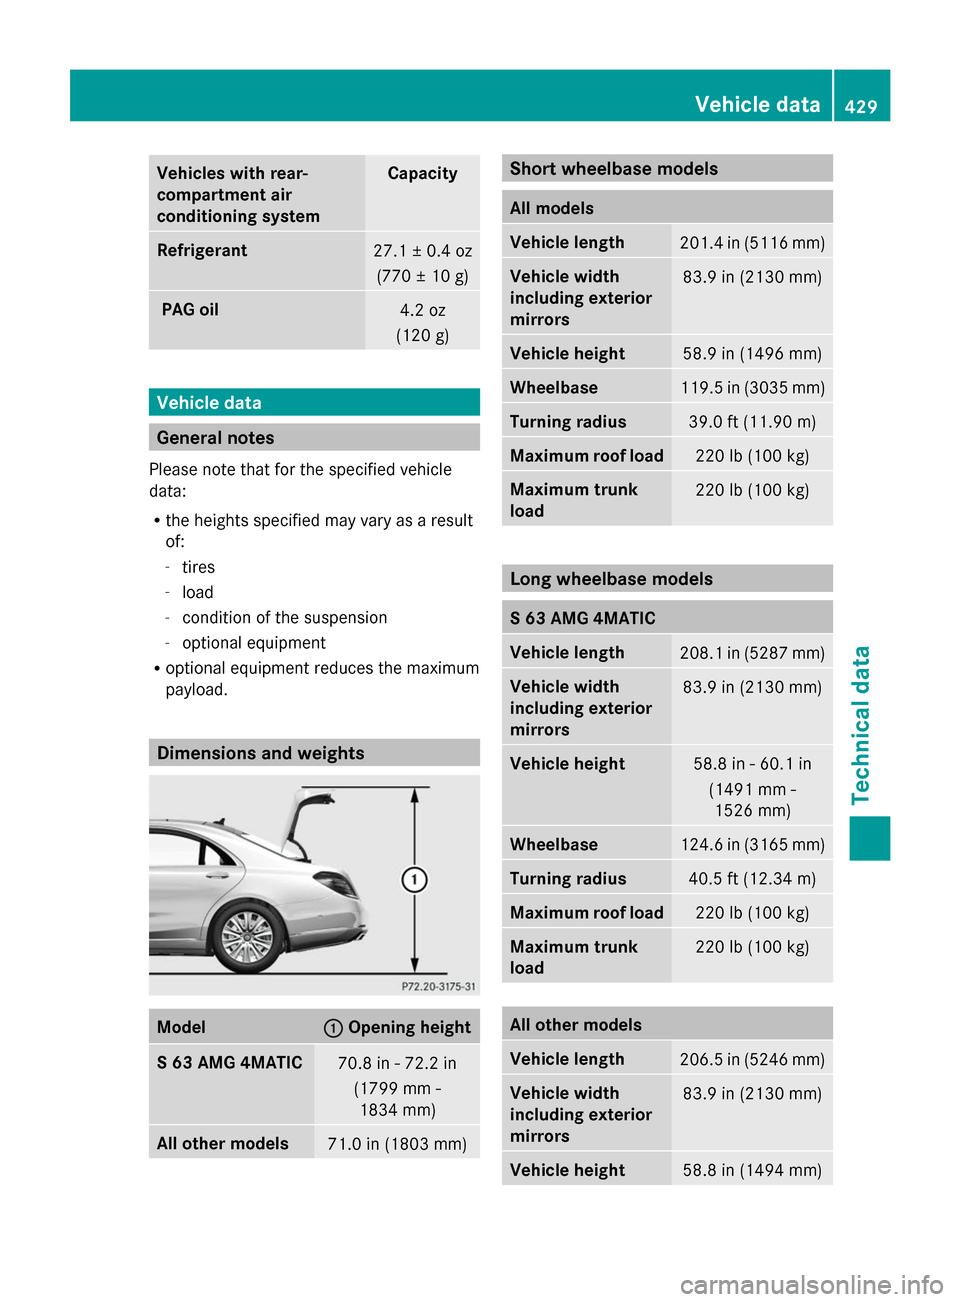
payload. Dimensions and weights
Model 0043 0043
Opening height S 63 AMG 4MATIC
70.8 in - 72.2 in
(1799 mm -1834 mm) All other models
71.0 in (1803 mm) Short wheelbase models
All models
Vehicle length
201.4 in (5116 mm)
Vehicle width
including exterior
mirrors
83.9 in (2130 mm)
Vehicle height
58.9 in (1496 mm)
Wheelbase
119.5 in (3035 mm)
Turning radius
39.0 ft (11.90
m) Maxi
mum roof load 220 lb (100 kg)
Maximum trunk
load
220 lb (100 kg)
Long wheelbase models
S 63 AMG 4MATIC
Vehicle length
208.1 in (5287 mm)
Vehicle width
including exterior
mirrors
83.9 in (2130 mm)
Vehicle height
58.8 in - 60.1 in
(1491 mm -1526 mm) Wheelbase
124.6 in (3165 mm)
Turning radius
40.5 ft (12.34
m) Maxi
mum roof load 220 lb (100 kg)
Maximum trunk
load
220 lb (100 kg)
All other models
Vehicle length
206.5 in (5246 mm)
Vehicle width
including exterior
mirrors
83.9 in (2130 mm)
Vehicle height
58.8 in (1494 mm) Vehicle data
429Technical data Z
Page 432 of 434

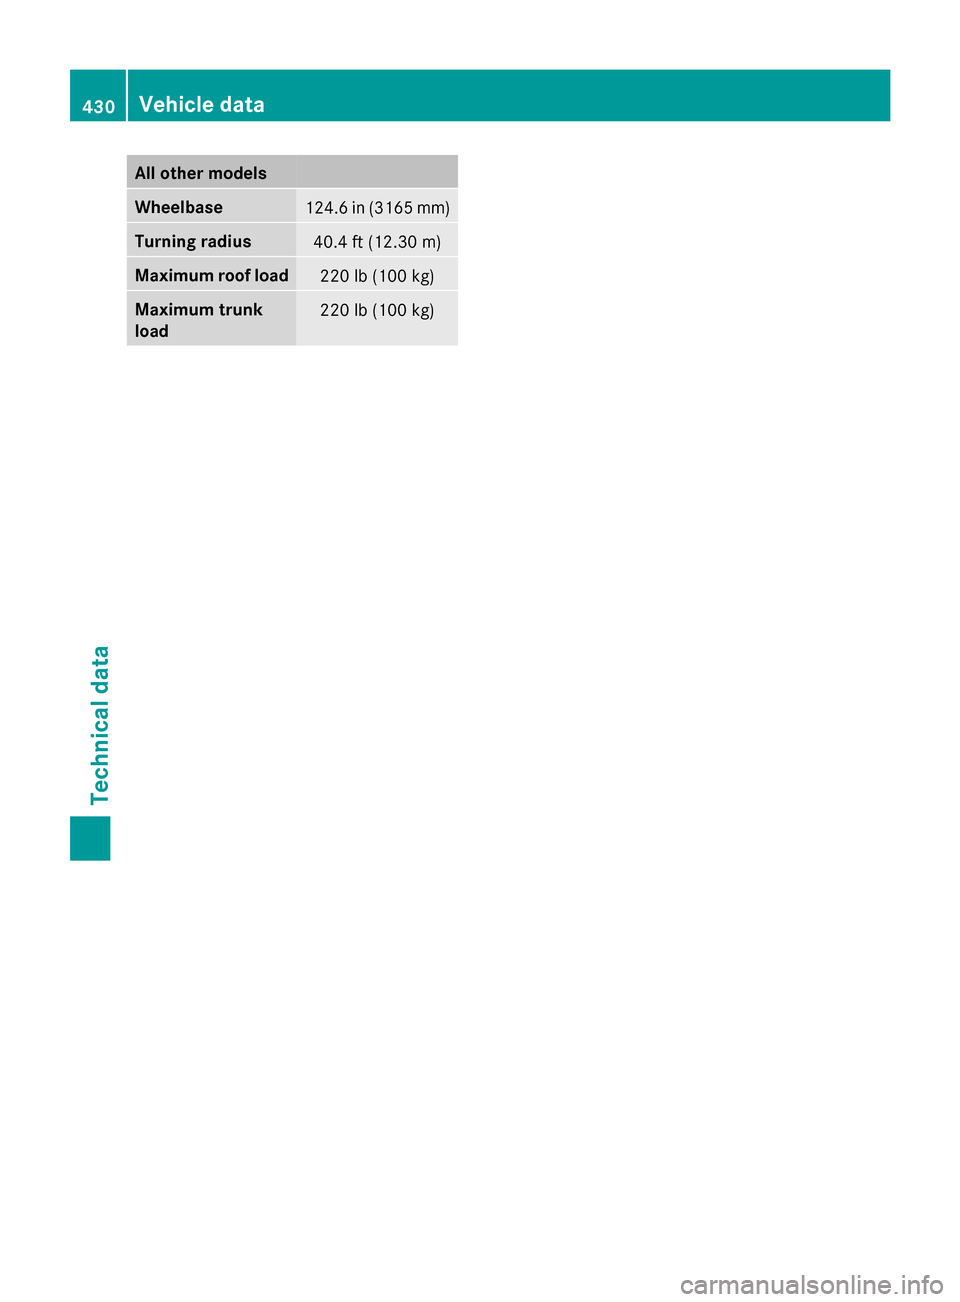
All other models
Wheelbase
124.6 in (3165 mm)
Turning radius
40.4 ft (12.30 m)
Maximum roof load
220 lb (100 kg)
Maximum trunk
load
220 lb (100 kg)430
Vehicle dataTechnical data