2014 MERCEDES-BENZ S-Class four wheel drive
[x] Cancel search: four wheel drivePage 6 of 434

1, 2, 3 ...
115 V socket ...................................... 329
12 V socket see Sockets
360° camera
Cleaning .........................................3 58
Function/notes ............................. 230
4ETS
see ETS/4ETS (Electronic
Traction System)
4MATIC (permanent four-wheel
drive) .................................................. 218A
ABS (Anti-lock Braking System) Display message ............................ 266
Function/notes ................................ 71
Important safety notes ....................71
Warning lamp ................................. 304
Accident
Automatic measures after an
accident ........................................... 57
Activating/deactivating cooling
with air dehumidification .................156
Activating/deactivating Night
View Assist Plus
With spotlight function ................... 238
Active Blind Spot Assist
Activating/deactivating (on-
board computer) ............................ 261
Display message ............................ 290
Function/informatio n.................... 240
Active Body Control (ABC)
Display message ............................ 288
Function/notes ............................. 214
Active Lane Keeping Assist
Activating/deactivating (on-
board computer) ............................ 262
Display message ............................ 289
Function/informatio n.................... 243
Active multicontour seat ..................125
Active Parking Assist Detecting parking spaces ..............222
Display message ............................ 290
Exiting a parking space ..................224
Function/notes ............................. 221Important safety notes
..................221
Parking .......................................... 223
ADAPTIVE BRAKE ................................. 78
Adaptive Brake Assist Function/notes ................................ 75
Adaptive Damping System (ADS) ..... 217
Adaptive Highbeam Assist Display message ............................ 283
Function/notes ............................. 141
Switching on/off ........................... 142
Adaptive Highbeam Assist PLUS
Display messages ..........................283
Function/notes ............................. 143
Switching on/off ........................... 144
Additional speedometer ...................263
Additives (engine oil) ........................426
Air bags Belt bags .......................................... 63
Cushion air bag s.............................. 51
Display message ............................ 279
Front air bag (driver, front
passenger) ....................................... 48
Important safety notes ....................46
Knee bag .......................................... 49
PASSENGER AIR BAG OFF
indicator lamp .................................. 51
Safety guidelines ............................. 45
Side impact air bag ..........................49
Window curtain air bag ....................50
Air-conditioning system
see Climate control
AIRMATIC
Display message ............................ 287
Function/notes ............................. 216
Air vents
Glove box ...................................... .167
Important safety notes ..................166
Rear ............................................... 167
Setting ........................................... 166
Setting the center air vents ...........166
Setting the side air vents ...............167
Alarm
ATA (Anti-Theft Alarm system) .........81
Switching off (ATA) ..........................81
Switching the function on/off
(ATA) ................................................ 81
Alarm system
see ATA (Anti-Theft Alarm system) 4
Index
Page 220 of 434

Comfort tuning
In comfort mode, the driving characteristics
of your vehicle are more comfortable.
Therefore, select this mode if you favor a
more comfortable driving style. Select
comfort mode also when driving fast on
straight roads, e.g. on straight stretches of
freeway.
X If indicator lamp 0044
0044 is not lit: press
button 0043.
Indicator lamp 0044lights up. Comfort tuning
is selected.
All vehicles except AMG vehicles: the
AIRMATIC COMFORT AIRMATIC COMFORT message appears in
the multifunction display.
AMG vehicles: theAMG Suspension
AMG Suspension
System COMFORT
System COMFORT message appears in the
multifunction display.
If the driving speed is higher than 75 mph
(120 km/h), the vehicle is automatically
lowered by another 0.4 in (10 mm) compared
to the normal level in comfort mode.
Load compensation The vehicle can compensate differences in
the vehicle level by raising or lowering the
axles. This is the case, for example, if people
get out or if luggage is being loaded.
Load compensation takes place if:
R a door or the trunk lid is opened
R the parked vehicle is unlocked
For larger level changes, the engine must be
running. 4MATIC (permanent four-wheel drive)
4MATIC ensures that all four wheels are
permanently driven. Together with ESP ®
, it
improves the traction of your vehicle
whenever a drive wheel spins due to
insufficient grip.
If you fail to adapt your driving style, 4MATIC
can neither reduce the risk of accident nor
override the laws of physics. 4MATIC cannot
take account of road, weather and traffic
conditions. 4MATIC is only an aid. You are
responsible for the distance to the vehicle in
front, for vehicle speed, for braking in good
time and for staying in your lane.
If a drive wheel spins due to insufficient grip:
R Only depress the accelerator pedal as far
as necessary when pulling away.
R Accelerate less when driving.
! Never tow the vehicle with one axle
raised. This may damage the transfer case.
Damage of this sort is not covered by the
Mercedes-Benz Limited Warranty. All
wheels must remain either on the ground
or be fully raised. Observe the instructions
for towing the vehicle with all wheels in full
contact with the ground.
i In wintry driving conditions, the maximum
effect of 4MATIC can only be achieved if
you use winter tires (M+S tires), with snow
chains if necessary. PARKTRONIC
Important safety notes PARKTRONIC is an electronic parking aid with
ultrasonic sensors. It monitors the area
around your vehicle using six sensors in the
front bumper and six sensors in the rear
bumper. PARKTRONIC indicates visually and
audibly the distance between your vehicle
and an object.
PARKTRONIC is only an aid. It is not a
replacement for your attention to your
immediate surroundings. You are always 218
Driving systemsDriving and parking
Page 393 of 434

X
Read the tire pressure and compare it with
the recommended value on the Tire and
Loading Information placard ( Ypage 387).
X If the tire pressure is too low, increase it to
the recommended value.
X If the tire pressure is too high, release air
by pressing down the metal pin in the valve.
Use the tip of a pen, for example. Then,
check the tire pressure again using the tire
pressure gauge.
X Screw the valve cap onto the valve.
X Repeat these steps for the other tires. Tire pressure monitor
General notes If a tire pressure monitor is installed, the
vehicle's wheels have sensors that monitor
the tire pressures in all four tires. The tire
pressure monitor warns you if the pressure
drops in one or more of the tires. The tire
pressure monitor only functions if the correct
sensors are installed on all wheels.
Information on tire pressures is displayed in
the multifunction display. After a few minutes
of driving, the current tire pressure of each
tire is shown in the Service
Service menu of the
multifunction display; see illustration
(example). For information on the message display, refer
to the "Checking the tire pressure
electronically" section ( Ypage 392).
Important safety notes G
WARNING
Each tire, including the spare (if provided),
should be checked at least once every two weeks when cold and inflated to the pressure
recommended by the vehicle manufacturer
on the Tire and Loading Information placard
on the driver's door B-pillar or the tire
pressure label on the inside of the fuel filler
flap. If your vehicle has tires of a different size
than the size indicated on the Tire and Loading
Information placard or, if available, the tire
pressure label, you should determine the
proper tire pressure for those tires.
As an added safety feature, your vehicle has
been equipped with a tire pressure monitoring
system (TPMS) that illuminates a low tire
pressure telltale when one or more of your
tires are significantly underinflated.
Accordingly, when the low tire pressure
telltale lights up, you should stop and check
your tires as soon as possible, and inflate
them to the proper pressure. Driving on a
significantly underinflated tire causes the tire
to overheat and can lead to tire failure.
Underinflation also reduces fuel efficiency
and tire tread life, and may affect the vehicle's
handling and stopping ability. Please note that
the TPMS is not a substitute for proper tire
maintenance, and it is the driver's
responsibility to maintain correct tire
pressure, even if underinflation has not
reached the level to trigger illumination of the
TPMS low tire pressure telltale.
Your vehicle has also been equipped with a
TPMS malfunction indicator to indicate when
the system is not operating properly. The
TPMS malfunction indicator is combined with
the low tire pressure telltale. When the
system detects a malfunction, the warning
lamp will flash for approximately a minute and
then remain continuously illuminated. This
sequence will be repeated every time the
vehicle is started as long as the malfunction
exists. When the malfunction indicator is
illuminated, the system may not be able to
detect or signal low tire pressure as intended.
TPMS malfunctions may occur for a variety of
reasons, including the installation of
incompatible replacement or alternate tires
or wheels on the vehicle that prevent the Ti
re pressure
391Wheels and tires
Z
Page 395 of 434

If the vehicle has been parked for over
20 minutes, the Tire pressure will be
Tire pressure will be
displayed after driving a few
displayed after driving a few
minutes minutes message appears.
After a teach-in process, the tire pressure
monitor automatically detects new wheels or
new sensors. As long as a clear allocation of
the tire pressure value to the individual
wheels is not possible, the Tire Pressure
Tire Pressure
Monitor Active Monitor Active display message is shown
instead of the tire pressure display. The tire
pressures are already being monitored.
Tire pressure monitor warning
messages If the tire pressure monitor detects a pressure
loss in one or more tires, a warning message
is shown in the multifunction display and the
yellow tire pressure monitor warning lamp
comes on.
R If the Correct Tire Pressure
Correct Tire Pressure message
appears in the multifunction display, the
tire pressure in at least one tire is too low
and must be corrected at the next
opportunity.
R If the Check
Check Tires Tiresmessage appears in the
multifunction display, the tire pressure in
one or more tires has dropped significantly
and the tires must be checked.
R If the Tire Malfunction
Tire Malfunction appears in the
multifunction display, the tire pressure in
one or more tires has dropped suddenly
and the tires must be checked.
Observe the instructions and safety notes in
the display messages in the "Tires" section
(Y page 295).
i If the wheel positions on the vehicle are
rotated, the tire pressures may be
displayed for the wrong positions for a
short time. This is rectified after a few
minutes of driving, and the tire pressures
are displayed for the correct positions. Restarting the tire pressure monitor When you restart the tire pressure monitor,
all existing warning messages are deleted and
the warning lamps go out. The monitor uses
the currently set tire pressures as the
reference values for monitoring. In most
cases, the tire pressure monitor will
automatically detect the new reference
values after you have changed the tire
pressure. However, you can also define
reference values manually as described here.
The tire pressure monitor then monitors the
new tire pressure values.
X
Set the tire pressure to the value
recommended for the corresponding
driving situation on the Tire and Loading
Information placard on the driver's side
B-pillar (Y page 387).
Additional tire pressure values for different
loads can also be found on the tire pressure
table on the inside of the fuel filler flap
(Y page 387).
X Make sure that the tire pressure is correct
on all four wheels.
X Make sure that the SmartKey is in position
2in the ignition lock.
X Use 00E2 on the steering wheel to call up
the list of menus.
X Press the 0063or0064 button on the
steering wheel to select the Service
Service
menu.
X Press the 0076button.
X Press the 0063or0064 button to select
Tire Pressure Tire Pressure.
X Press the 0076button.
The multifunction display shows the
current tire pressure for the individual tires
or the Tire pressure will be Tire pressure will be
displayed after driving a few
displayed after driving a few
minutes minutes message.
X Press the 0064button.
The Use current pressures as new
Use current pressures as new
reference values
reference values message appears in
the multifunction display. Tire pressure
393Wheels and tires Z
Page 396 of 434
If you wish to confirm the restart:
X Press the 0076button.
The Tire Press. Monitor Restarted
Tire Press. Monitor Restarted
message appears in the multifunction
display.
After driving for a few minutes, the system
checks whether the current tire pressures
are within the specified range. The new tire
pressures are then accepted as reference
values and monitored.
If you wish to cancel the restart:
X Press the 0038button.
The tire pressure values stored at the last
restart will continue to be monitored. Tire pressure loss warning system
(Canada only)
General notes While the vehicle is in motion, the tire
pressure loss warning system monitors the
set tire pressure using the rotational speed of
the wheels. This enables the system to detect
significant pressure loss in a tire. If the speed
of rotation of a wheel changes as a result of
a loss of pressure, a corresponding warning
message will appear in the multifunction
display.
You can recognize the tire pressure loss
warning by the Run Flat Indicator
Run Flat Indicator
Active Press 'OK' to Restart
Active Press 'OK' to Restart message
which appears in the Service
Service menu of the
multifunction display. Information on the
message display can be found in the
"Restarting the tire pressure loss warning
system" section (Y page 394).
Important safety notes The tire pressure warning system does not
warn you of an incorrectly set tire pressure.
Observe the notes on the recommended tire
pressure ( Ypage 387).
The tire pressure loss warning does not
replace the need to regularly check the tire pressure. An even loss of pressure on several
tires at the same time cannot be detected by
the tire pressure loss warning system.
The tire pressure monitor is not able to warn
you of a sudden loss of pressure, e.g. if the
tire is penetrated by a foreign object. In the
event of a sudden loss of pressure, bring the
vehicle to a halt by braking carefully. Avoid
abrupt steering maneuvers.
The function of the tire pressure loss warning
system is limited or delayed if:
R snow chains are mounted on your vehicle's
tires.
R road conditions are wintry.
R you are driving on sand or gravel.
R you adopt a very sporty driving style
(cornering at high speeds or driving with
high rates of acceleration).
R you are driving with a heavy load (in the
vehicle or on the roof).
Restarting the tire pressure loss
warning system Restart the tire pressure loss warning system
if you have:
R changed the tire pressure
R changed the wheels or tires
R mounted new wheels or tires
X Before restarting, make sure that the tire
pressures are set properly on all four tires
for the respective operating conditions.
The recommended tire pressure can be
found on the Tire and Loading Information
placard on the B-pillar on the driver's side.
Additionally, a tire pressure table is
attached to the fuel filler flap. The tire
pressure loss warning system can only give
reliable warnings if you have set the correct
tire pressure. If an incorrect tire pressure
is set, these incorrect values will be
monitored.
X Also observe the notes in the section on tire
pressures ( Ypage 387). 394
Tire pressureWheels and ti
res
Page 397 of 434
X
Make sure that the SmartKey is in position
2 in the ignition lock (Y page 171).
X Use 00E2 on the steering wheel to call up
the list of menus.
X Press the 0063or0064 button on the
steering wheel to select the Service
Service
menu.
X Press the 0076button.
X Press the 0063or0064 button to select
Tire Pressure
Tire Pressure.
X Press the 0076button.
The Run Flat Indicator Active
Run Flat Indicator Active
Press 'OK' to Restart
Press 'OK' to Restart message
appears in the multifunction display.
If you wish to confirm the restart:
X Press the 0076button.
The Tire Pressure Now OK?
Tire Pressure Now OK? message
appears in the multifunction display.
X Press the 0063or0064 button to select
Yes
Yes.
X Press the 0076button.
The Run Flat Indicator Restarted Run Flat Indicator Restarted
message appears in the multifunction
display.
After a teach-in period, the tire pressure
loss warning system will monitor the set
tire pressures of all four tires.
If you wish to cancel the restart:
X Press the 0038button.
or
X If the Tire Pressure Now OK?
Tire Pressure Now OK? message
appears, use the 0063or0064 button to
select Cancel Cancel.
X Press the 0076button.
The tire pressure values stored at the last
restart will continue to be monitored. Loading the vehicle
Instruction labels for tires and loads
G
WARNING
Overloaded tires can overheat, causing a
blowout. Overloaded tires can also impair the
steering and driving characteristics and lead
to brake failure. There is a risk of accident.
Observe the load rating of the tires. The load
rating must be at least half of the GAWR of
your vehicle. Never overload the tires by
exceeding the maximum load.
Two instruction labels on your vehicle show
the maximum possible load.
(1) The Tire and Loading Information placard is on the B-pillar on the driver's side. The
Tire and Loading Information placard
shows the maximum permissible number
of occupants and the maximum
permissible vehicle load. It also contains
details of the tire sizes and
corresponding pressures for tires
mounted at the factory.
(2) The vehicle identification plate is on the B-pillar on the driver's side. The vehicle
identification plate informs you of the
gross vehicle weight rating. It is made up
of the vehicle weight, all vehicle
occupants, the fuel and the cargo. You
can also find information about the
maximum gross axle weight rating on the
front and rear axle.
The maximum gross axle weight rating is
the maximum weight that can be carried
by one axle (front or rear axle). Never
exceed the maximum load or the
maximum gross axle weight rating for the
front or rear axle. Loading the vehicle
395Wheels and tires Z
Page 402 of 434
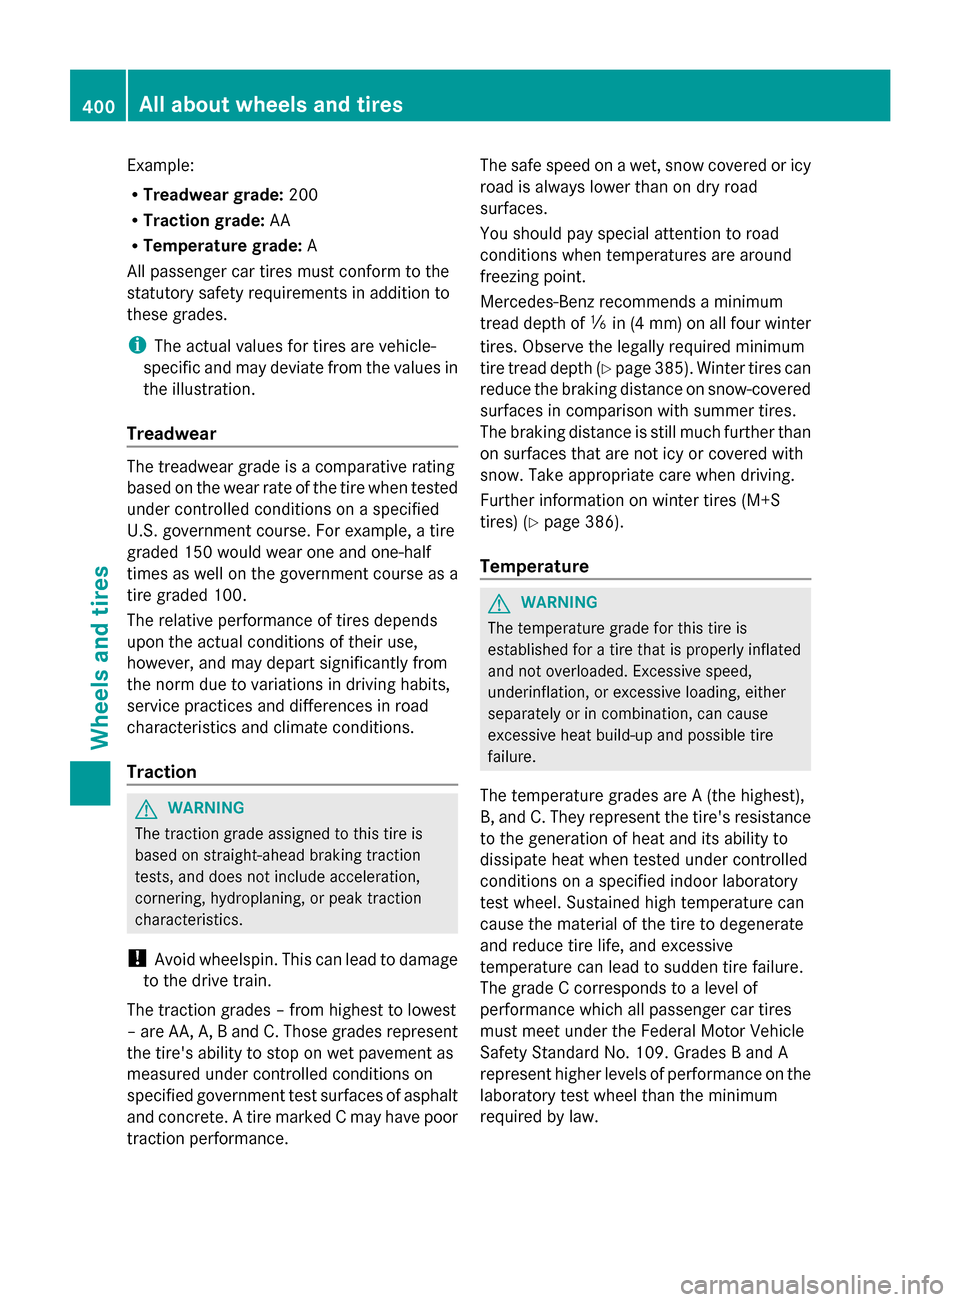
Example:
R
Treadwear grade: 200
R Traction grade: AA
R Temperature grade: A
All passenger car tires must conform to the
statutory safety requirements in addition to
these grades.
i The actual values for tires are vehicle-
specific and may deviate from the values in
the illustration.
Treadwear The treadwear grade is a comparative rating
based on the wear rate of the tire when tested
under controlled conditions on a specified
U.S. government course. For example, a tire
graded 150 would wear one and one-half
times as well on the government course as a
tire graded 100.
The relative performance of tires depends
upon the actual conditions of their use,
however, and may depart significantly from
the norm due to variations in driving habits,
service practices and differences in road
characteristics and climate conditions.
Traction G
WARNING
The traction grade assigned to this tire is
based on straight-ahead braking traction
tests, and does not include acceleration,
cornering, hydroplaning, or peak traction
characteristics.
! Avoid wheelspin. This can lead to damage
to the drive train.
The traction grades – from highest to lowest
– are AA, A, B and C. Those grades represent
the tire's ability to stop on wet pavement as
measured under controlled conditions on
specified government test surfaces of asphalt
and concrete. A tire marked C may have poor
traction performance. The safe speed on a wet, snow covered or icy
road is always lower than on dry road
surfaces.
You should pay special attention to road
conditions when temperatures are around
freezing point.
Mercedes-Benz recommends a minimum
tread depth of
00CFin(4 mm) on all four winter
tires. Observe the legally required minimum
tire tread depth (Y page 385). Winter tires can
reduce the braking distance on snow-covered
surfaces in comparison with summer tires.
The braking distance is still much further than
on surfaces that are not icy or covered with
snow. Take appropriate care when driving.
Further information on winter tires (M+S
tires) (Y page 386).
Temperature G
WARNING
The temperature grade for this tire is
established for a tire that is properly inflated
and not overloaded. Excessive speed,
underinflation, or excessive loading, either
separately or in combination, can cause
excessive heat build-up and possible tire
failure.
The temperature grades are A (the highest),
B, and C. They represent the tire's resistance
to the generation of heat and its ability to
dissipate heat when tested under controlled
conditions on a specified indoor laboratory
test wheel. Sustained high temperature can
cause the material of the tire to degenerate
and reduce tire life, and excessive
temperature can lead to sudden tire failure.
The grade C corresponds to a level of
performance which all passenger car tires
must meet under the Federal Motor Vehicle
Safety Standard No. 109. Grades B and A
represent higher levels of performance on the
laboratory test wheel than the minimum
required by law. 400
All about wheels and tiresWheels and tires
Page 406 of 434
Do not overload the tires by exceeding the
specified load limit. The maximum
permissible load can be found on the
vehicle's Tire and Loading Information
placard on the B-pillar on the driver's side
(Y page 395).
i The actual values for tires are vehicle-
specific and may deviate from the values in
the illustration.
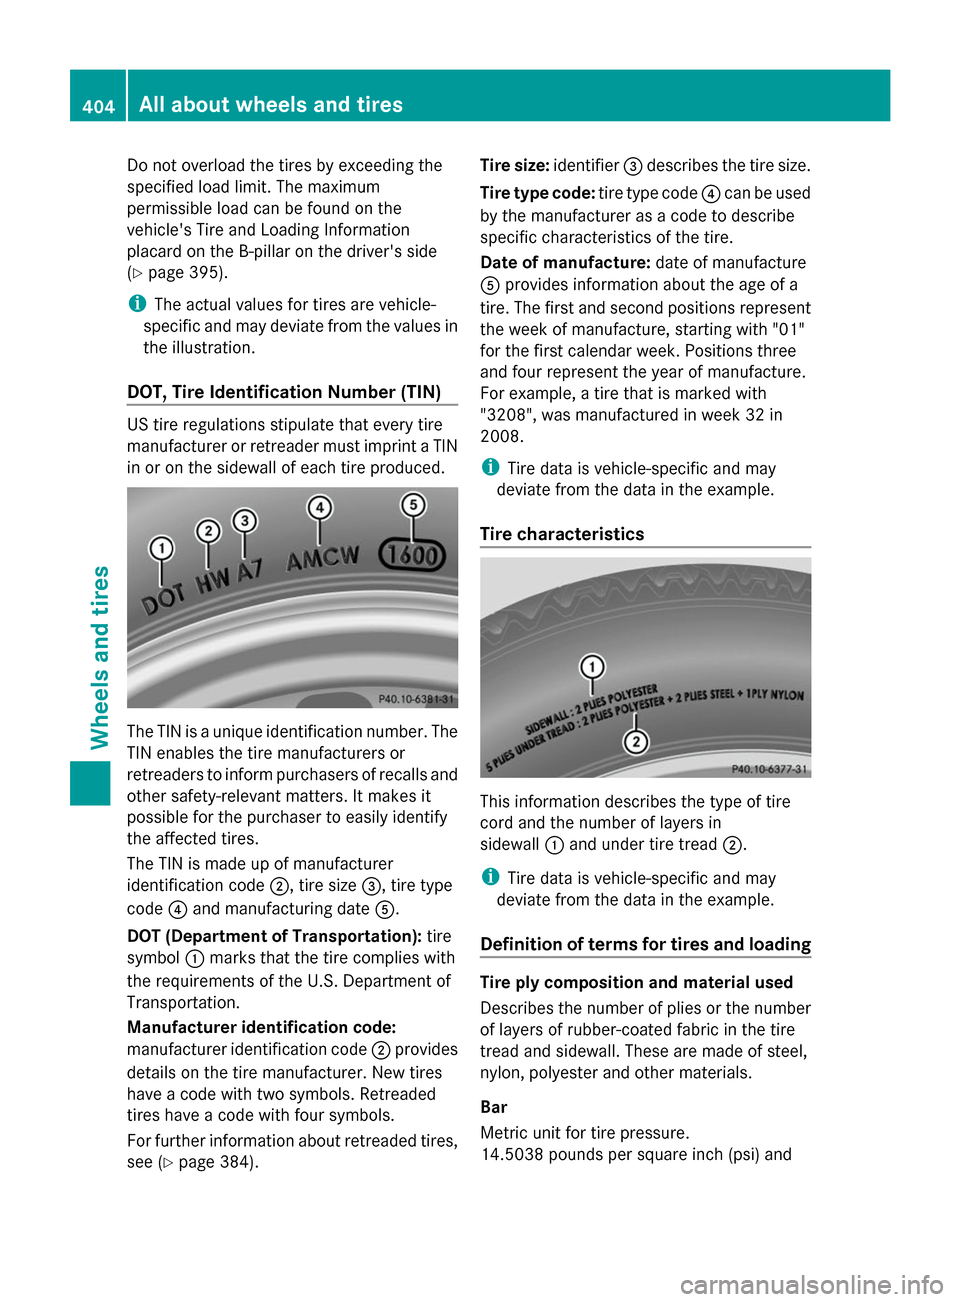
DOT, Tire Identification Number (TIN) US tire regulations stipulate that every tire
manufacturer or retreader must imprint a TIN
in or on the sidewall of each tire produced. The TIN is a unique identification number. The
TIN enables the tire manufacturers or
retreaders to inform purchasers of recalls and
other safety-relevant matters. It makes it
possible for the purchaser to easily identify
the affected tires.
The TIN is made up of manufacturer
identification code 0044, tire size0087, tire type
code 0085and manufacturing date 0083.
DOT (Department of Transportation): tire
symbol 0043marks that the tire complies with
the requirements of the U.S. Department of
Transportation.
Manufacturer identification code:
manufacturer identification code 0044provides
details on the tire manufacturer. New tires
have a code with two symbols. Retreaded
tires have a code with four symbols.
For further information about retreaded tires,
see (Y page 384). Tire size:
identifier0087describes the tire size.
Tire type code: tire type code0085can be used
by the manufacturer as a code to describe
specific characteristics of the tire.
Date of manufacture: date of manufacture
0083 provides information about the age of a
tire. The first and second positions represent
the week of manufacture, starting with "01"
for the first calendar week. Positions three
and four represent the year of manufacture.
For example, a tire that is marked with
"3208", was manufactured in week 32 in
2008.
i Tire data is vehicle-specific and may
deviate from the data in the example.
Tire characteristics This information describes the type of tire
cord and the number of layers in
sidewall 0043and under tire tread 0044.
i Tire data is vehicle-specific and may
deviate from the data in the example.
Definition of terms for tires and loading Tire ply composition and material used
Describes the number of plies or the number
of layers of rubber-coated fabric in the tire
tread and sidewall. These are made of steel,
nylon, polyester and other materials.
Bar
Metric unit for tire pressure.
14.5038 pound s per square inch (psi) and 404
All about wheels and tiresWheels and tires