2014 MERCEDES-BENZ S-Class wiper blades
[x] Cancel search: wiper bladesPage 8 of 434

Brake fluid
Display message ............................ 272
Notes ............................................. 426
Brake force distribution,
electronic
see EBD (electronic brake force
distribution)
Brake lamps
Display message ............................ 281
Brakes
ABS .................................................. 71
Adaptive Brake Assist ......................75
BAS .................................................. 71
BAS PLUS with Cross-Traffic Assist .72
Brake fluid (notes) .........................426
Display message ............................ 266
EBD .................................................. 78
High-performance brake system ....197
Hill start assist ............................... 175
HOLD function ............................... 212
Important safety notes ..................196
Maintenance .................................. 196
Parking brake ................................ 192
Riding tips ...................................... 196
Warning lamp ................................. 303
Breakdown
see Flat tire
see Towing away
Buttons on the steering wheel .........249 C
California Important notice for retail
customers and lessees ....................24
Calling up a malfunction
see Display messages
Camera
see 360° camera
Car
see Vehicle
Care
360° camera ................................. 358
Carpets .......................................... 361
Car wash ........................................ 354
Display ........................................... 359
Exhaust pipe .................................. 359
Exterior lights ................................ 357Gear or selector lever
....................360
Interior ........................................... 359
Matte finish ................................... 356
Night View Assist Plus ...................359
Notes ............................................. 353
Paint .............................................. 356
Plastic trim .................................... 360
Power washer ................................ 355
Rear view camera .......................... 358
Roof lining ...................................... 361
Seat belt ........................................ 361
Seat cover ..................................... 361
Sensors ......................................... 358
Steering wheel ............................... 360
Trim pieces .................................... 360
Washing by hand ........................... 355
Wheels ........................................... 356
Windows ........................................ 357
Wiper blades .................................. 357
Wooden trim .................................. 360
Car key
see SmartKey
Car wash (care) ................................. 354
CD player/CD changer (on-board
computer) .......................................... 256
Center console Overview .......................................... 37
Stowage space .............................. 317
Center console in the rear
compartment
Stowage compartment ..................319
Central locking
Locking/unlocking (SmartKey) ........85
Chauffeur mode
Display message ............................ 299
Fully reclined position ....................121
General notes ................................ 117
Installing the head restraint ...........119
Moving front-passenger seat into
the chauffeur position .................... 118
Moving the front-passenger seat
into the normal position ................. 120
Removing the head restraint .......... 119
Child-proof locks
Important safety notes ....................69
Rear doors ....................................... 696
Index
Page 23 of 434
Wheel bolt tightening torque
...........412
Wheel chock ...................................... 408
Wheels Changing a wheel .......................... 407
Checking ........................................ 385
Cleaning ......................................... 356
Cleaning (warning) .........................407
Important safety notes ..................384
Interchanging/changing ................407
Mounting a new wheel ...................411
Mounting a wheel .......................... 408
Removing a wheel ..........................411
Storing ........................................... 407
Tightening torque ........................... 412
Wheel size/tire size .......................413
Window curtain air bag
Operation ........................................ .50
Windows
see Side windows
Windshield
Defrosting ...................................... 161
Infrared reflective .......................... 345
Windshield washer fluid
see Windshield washer system
Windshield washer system
Adding washer fluid .......................351
Notes ............................................. 427
Windshield wipers
Problem (malfunction) ...................149
Replacing the wiper blades ............147
Switching on/off ........................... 146
Winter driving
Important safety notes ..................386
Slippery road surfaces ...................198
Snow chains .................................. 387
Winter operation
Summer tires ................................. 386
Winter tires
M+S tires ....................................... 386
Wiper blades
Cleaning ......................................... 357
Important safety notes ..................147
Replacing ....................................... 147
Wooden trim (cleaning instructions) 360
Workshop see Qualified specialist workshop Index
21
Page 148 of 434

Replacing bulbs
The front and rear light clusters of your
vehicle are equipped with LED light bulbs. Do
not replace the bulbs yourself. Contact a
qualified specialist workshop which has the
necessary specialist knowledge and tools to
carry out the work required.
Lamps are an important aspect of vehicle
safety. You must therefore make sure that
these function correctly at all times. Have the
headlamp setting checked regularly. Windshield wipers
Switching the windshield wipers on/
off
! Do not operate the windshield wipers
when the windshield is dry, as this could
damage the wiper blades. Moreover, dust
that has collected on the windshield can
scratch the glass if wiping takes place when
the windshield is dry.
If it is necessary to switch on the windshield
wipers in dry weather conditions, always
use washer fluid when operating the
windshield wipers.
! If the windshield wipers leave smears on
the windshield after the vehicle has been
washed in an automatic car wash, wax or
other residues may be the reason for this.
Clean the windshield using washer fluid
after washing the vehicle in an automatic
car wash.
! Vehicles with a rain sensor: if the
windshield becomes dirty in dry weather
conditions, the windshield wipers may be
activated inadvertently. This could then
damage the windshield wiper blades or
scratch the windshield.
For this reason, you should always switch
off the windshield wipers in dry weather. 0047
003F Windshield wiper off
0048 0062 Intermittent wipe, low (rain sensor
set to low sensitivity)
0049 0063 Intermittent wipe, high (rain sensor
set to high sensitivity)
004A 00AA Continuous wipe, slow
004B 00A9 Continuous wipe, fast
0084 00D3 Single wipe/00D4 To wipe the
windshield using washer fluid
X Switch on the power supply with the Start/
Stop button or the SmartKey
(Y page 171).
X Turn the combination switch to the
corresponding position.
In the 0062or0063 position, the appropriate
wiping frequency is set automatically
according to the intensity of the rain. In
the 0063 position, the rain sensor is more
sensitive than in the 0062position, causing
the windshield wipers to wipe more
frequently.
i Vehicles with MAGIC VISION CONTROL:
the washer fluid is fed through the wiper
blades and when wiping with washer fluid
00D4 the washer fluid is emitted directly
from the blades.
If the wiper blades are worn, the windshield
will no longer be wiped properly. This could
prevent you from observing the traffic
conditions. 146
Windshield wipersLights and windshield wipers
Page 149 of 434
Replacing the wiper blades
Important safety notes G
WARNING
If the windshield wipers begin to move while
you are changing the wiper blades, you could
be trapped by the wiper arm. There is a risk
of injury.
Always switch off the windshield wipers and
ignition before changing the wiper blades.
! To avoid damaging the wiper blades,
make sure that you touch only the wiper
arm of the wiper.
! Never open the hood if a windshield wiper
arm has been folded away from the
windshield.
Never fold a windshield wiper arm without
a wiper blade back onto the windshield.
Hold the windshield wiper arm firmly when
you change the wiper blade. If you release
the windshield wiper arm without a wiper
blade and it falls onto the windshield, the
windshield may be damaged by the force of
the impact.
Mercedes-Benz recommends that you have
the wiper blades changed at a qualified
specialist workshop.
! Always position the windshield wiper
arms vertically before folding them away
from the windshield. By doing so, you will
avoid damage to the hood.
Replacing the wiper blades (standard
windshield wipers) Moving the wiper blades to a vertical
position
X
Turn the SmartKey to position 0in the
ignition lock (Y page 171).
X Set the windshield wiper to the 00AA
position.
X Turn the SmartKey to position 1in the
ignition lock (Y page 171). X
As soon as the wiper arms are vertical to
the hood, turn the SmartKey to position 0
in the ignition lock (Y page 171).
X Remove the SmartKey.
X Fold the wiper arms away from the
windshield until you feel them snap into
place.
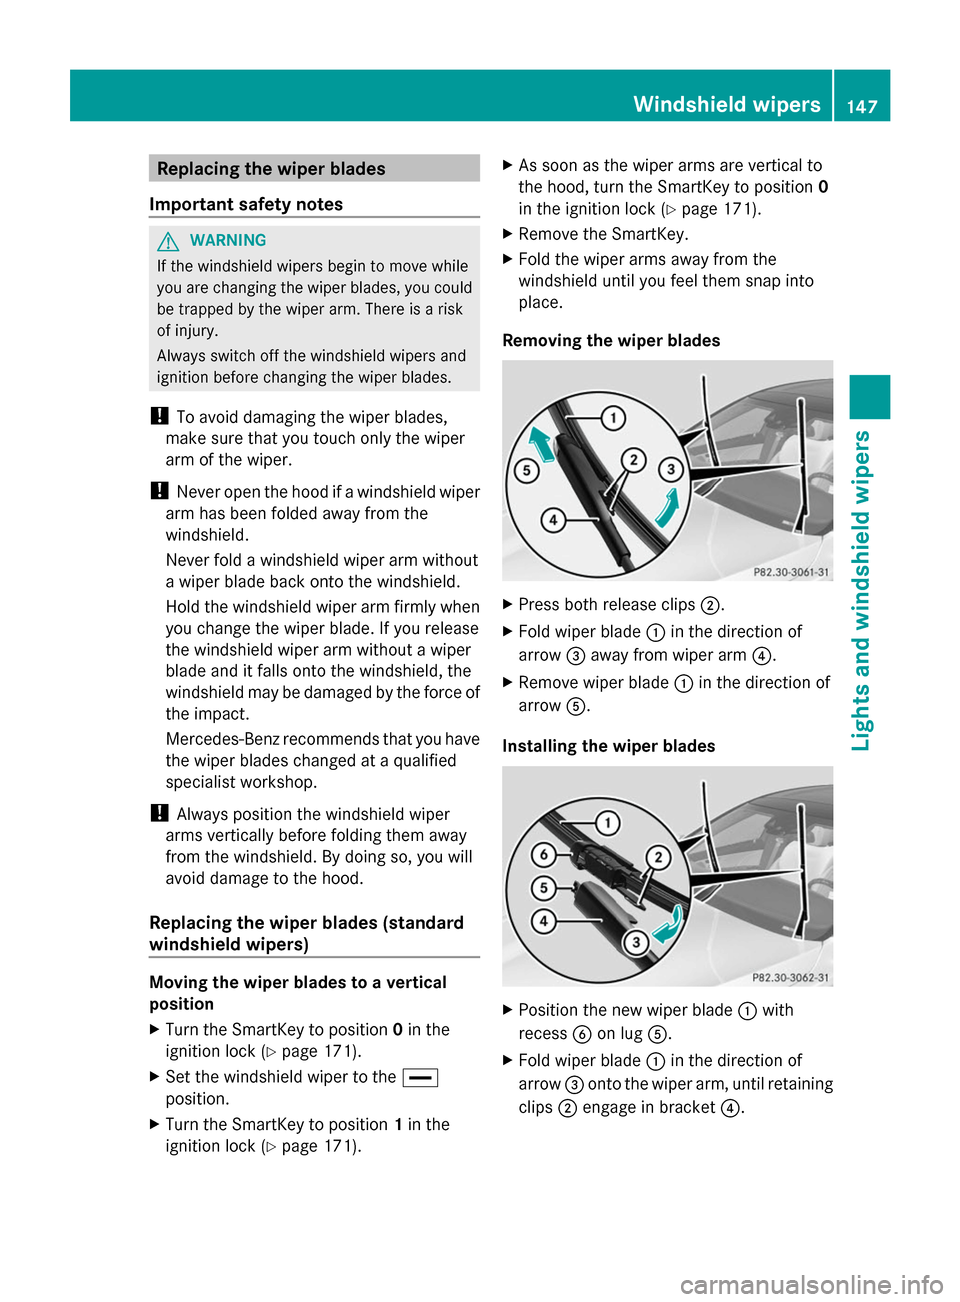
Removing the wiper blades X
Press both release clips 0044.
X Fold wiper blade 0043in the direction of
arrow 0087away from wiper arm 0085.
X Remove wiper blade 0043in the direction of
arrow 0083.
Installing the wiper blades X
Position the new wiper blade 0043with
recess 0084on lug 0083.
X Fold wiper blade 0043in the direction of
arrow 0087onto the wiper arm, until retaining
clips 0044engage in bracket 0085. Windshield wipers
147Lights and windshield wipers Z
Page 150 of 434
X
Make sure that wiper blade 0043is seated
correctly.
X Fold the wiper arm back onto the
windshield.
Replacing the wiper blades (MAGIC
VISION CONTROL) Moving the wiper blades to a vertical
position
X
Turn the SmartKey to position 0in the
ignition lock (Y page 171).
X Set the windshield wiper to the 00AA
position.
X Turn the SmartKey to position 1in the
ignition lock (Y page 171).
X As soon as the wiper arms are vertical to
the hood, turn the SmartKey to position 0
in the ignition lock (Y page 171).
X Remove the SmartKey.
X Fold the wiper arms away from the
windshield until you feel them snap into
place.
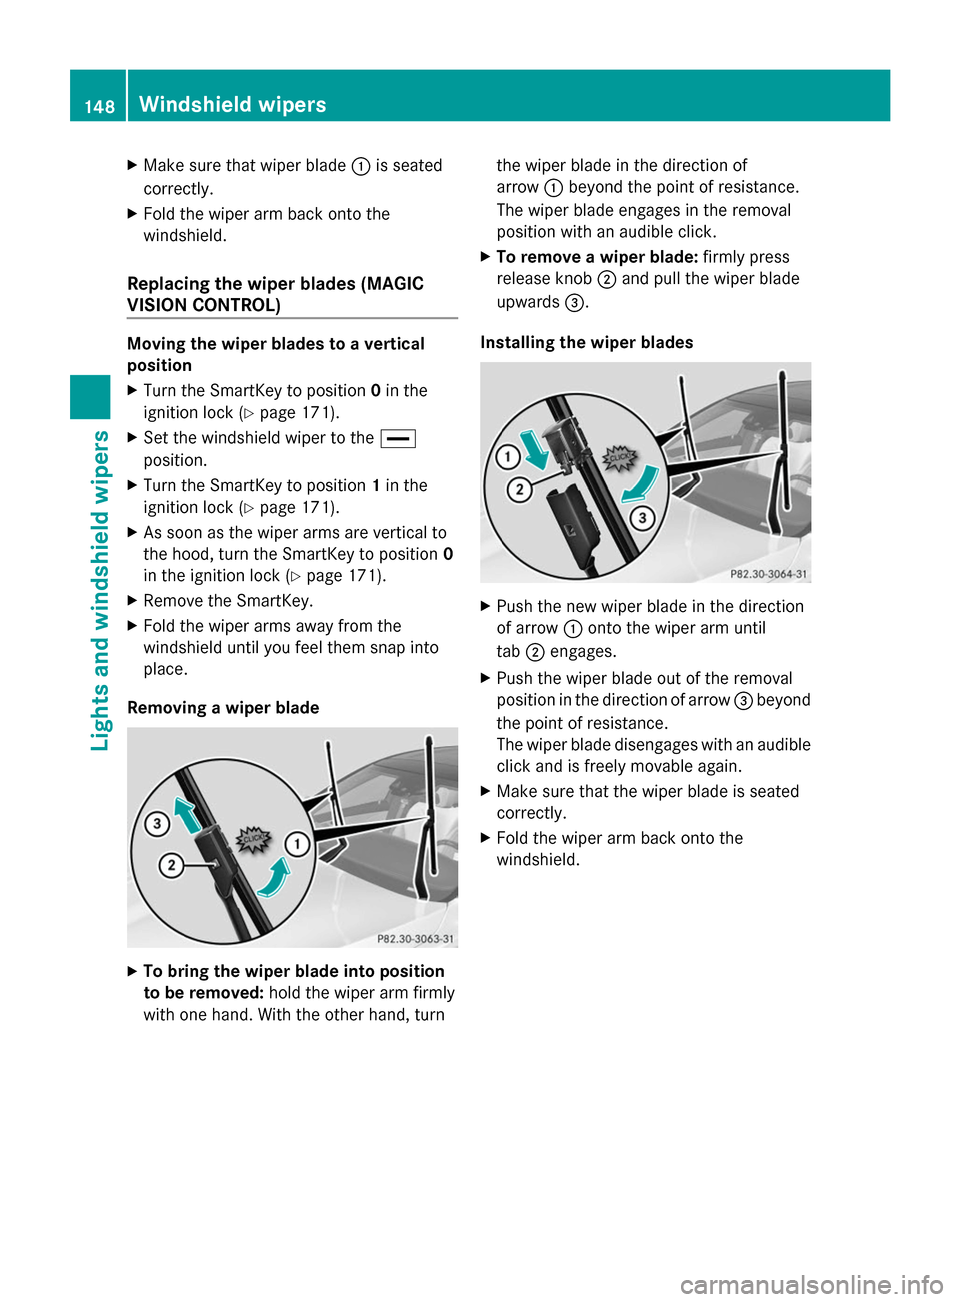
Removing a wiper blade X
To bring the wiper blade into position
to be removed: hold the wiper arm firmly
with one hand. With the other hand, turn the wiper blade in the direction of
arrow
0043beyond the point of resistance.
The wiper blade engages in the removal
position with an audible click.
X To remove a wiper blade: firmly press
release knob 0044and pull the wiper blade
upwards 0087.
Installing the wiper blades X
Push the new wiper blade in the direction
of arrow 0043onto the wiper arm until
tab 0044engages.
X Push the wiper blade out of the removal
position in the direction of arrow 0087beyond
the point of resistance.
The wiper blade disengages with an audible
click and is freely movable again.
X Make sure that the wiper blade is seated
correctly.
X Fold the wiper arm back onto the
windshield. 148
Windshield wipersLights and windshield wipers
Page 242 of 434

Problems with Night View Assist
Problem Possible causes/consequences and
0050
0050Solutions The picture quality of
Night View Assist Plus
has deteriorated. The windshield is fogged up on the inside.
X Fold down camera cover (Y page 359).
X Defrost the windshield (Y page 162). The windshield is iced up.
X
De-ice the windshield (Y page 161). The windshield wipers are smearing the windshield.
X
Replace the wiper blades (Y page 147). The windshield is smeared after the vehicle has been cleaned in a
car wash.
X
Clean the windshield (Y page 357). There is windshield chip damage in the camera's field of vision.
X Replace the windshield. The pedestrian and
animal recognition is
not available. The infrared camera in the radiator grill is dirty.
X
Use a soft cloth and water to clean the infrared camera. Driving Assistance PLUS package
General notes The Active Driving Assistance PLUS package
consists of DISTRONIC PLUS (Y page 201),
Active Blind Spot Assist (Y page 240) and
Active Lane Keeping Assist (Y page 243).
Active Blind Spot Assist General notes
Active Blind Spot Assist uses a radar sensor
system, pointed toward the rear of the
vehicle, to monitor the area to the sides of the
vehicle which the driver is unable to see. A
warning display in the exterior mirrors draws
your attention to vehicles detected in the
monitored area. If you then switch on the
corresponding turn signal to change lane, you
will also receive an optical and audible
warning. If a risk of lateral collision is detected, corrective braking may help you
avoid a collision. Active Blind Spot Assist
evaluates the free space in the direction of
travel and to the side before making a course-
correcting brake application. For this, Active
Blind Spot Assist uses radar sensors which
are pointed in the direction of travel.
Active Blind Spot Assist supports you from a
speed of approximately 20 mph (30 km/h).
Important safety notes
Active Blind Spot Assist is only an aid and is
not a substitute for attentive driving.
G
WARNING
Active Blind Spot Assist does not react to:
R vehicles overtaken too closely on the side,
placing them in the blind spot area
R vehicles which approach with a large speed
differential and overtake your vehicle 240
Driving systemsDriving and parking
Page 357 of 434
X
Remove Start/Stop button from ignition
lock (Y page 171).
X Insert the SmartKey into the ignition lock.
X Switch on the ignition.
X Depress and hold the brake pedal.
X Shift to neutral N.
X Release the brake pedal.
X Release the electric parking brake, if
necessary.
X Switch off the ignition and leave the
SmartKey in the ignition lock.
You can wash the vehicle in an automatic car
wash from the very start.
If the vehicle is very dirty, pre-wash it before
cleaning it in an automatic car wash.
After using an automatic car wash, wipe off
wax from the windshield and the wiper
blades. This will prevent smears and reduce
wiping noises caused by residue on the
windshield.
Washing by hand In some countries, washing by hand is only
allowed at specially equipped washing bays.
Observe the legal requirements in each
country.
X Do not use hot water and do not wash the
vehicle in direct sunlight.
X Use a soft sponge to clean.
X Use a mild cleaning agent, such as a car
shampoo approved by Mercedes-Benz.
X Thoroughly hose down the vehicle with a
gentle jet of water.
X Do not point the water jet directly towards
the air inlet.
X Use plenty of water and rinse out the
sponge frequently.
X Rinse the vehicle with clean water and dry
thoroughly with a chamois.
X Do not let the cleaning agent dry on the
paintwork.
Carefully remove all deposits of road salt as
soon as possible when driving in winter. Power washers G
WARNING
The water jet from a circular jet nozzle (dirt
blasters) can cause invisible exterior damage
to the tires or chassis components.
Components damaged in this way may fail
unexpectedly. There is a risk of an accident.
Do not use power washers with circular jet
nozzles to clean the vehicle. Have damaged
tires or chassis components replaced
immediately.
! Always maintain a distance of at least
11.8 in (30 cm) between the vehicle and the
power washer nozzle. Information about
the correct distance is available from the
equipment manufacturer.
Move the power washer nozzle around
when cleaning your vehicle.
Do not aim directly at any of the following:
R tires
R door gaps, roof gaps, joints, etc.
R electrical components
R battery
R connectors
R lights
R seals
R trim
R ventilation slots
Damaged seals or electrical components
can lead to leaks or failures.
! If the key is within the rear detection
range of KEYLESS-GO, the following
situations, for example, could lead to the
unintentional opening of the trunk:
R using a car wash
R using a power washer
Make sure that the key is at least 6.5 ft
(2 m) away from the vehicle. Care
355Maintenance and care Z
Page 359 of 434
after having cleaned the wheels with wheel
cleaner. Wheel cleaners could cause
increased corrosion of the brake discs and
brake pads/linings. For this reason, you
should drive for a few minutes after
cleaning. Braking heats the brake discs and
the brake pads/linings, thus drying them.
The vehicle can then be parked.
Cleaning the windows G
WARNING
You could become trapped by the windshield
wipers if they start moving while cleaning the
windshield or wiper blades. There is a risk of
injury.
Always switch off the windshield wipers and
the ignition before cleaning the windshield or
wiper blades.
! Do not use dry cloths, abrasive products,
solvents or cleaning agents containing
solvents to clean the inside of the windows.
Do not touch the insides of the windows
with hard objects, e.g. an ice scraper or
ring. There is otherwise a risk of damaging
the windows.
! Clean the water drainage channels of the
windshield and the rear window at regular
intervals. Deposits such as leaves, petals
and pollen may under certain
circumstances prevent water from draining
away. This can lead to corrosion damage
and damage to electronic components.
X Clean the inside and outside of the
windows with a damp cloth and a cleaning
product that is recommended and
approved by Mercedes-Benz.
Cleaning wiper blades G
WARNING
You could become trapped by the windshield
wipers if they start moving while cleaning the
windshield or wiper blades. There is a risk of
injury. Always switch off the windshield wipers and
the ignition before cleaning the windshield or
wiper blades.
! Do not pull the wiper blade. Otherwise,
the wiper blade could be damaged.
! Do not clean wiper blades too often and
do not rub them too hard. Otherwise, the
graphite coating could be damaged. This
could cause wiper noise.
! Hold the wiper arm securely when folding
back. The windshield could be damaged if
the wiper arm smacks against it suddenly.
X Fold the windshield wiper arms away from
the windshield.
X Carefully clean the wiper blades with a
damp cloth.
X Fold the windshield wiper arms back again
before switching on the ignition.
Cleaning the exterior lighting !
Only use cleaning agents or cleaning
cloths which are suitable for plastic light
lenses. Unsuitable cleaning agents or
cleaning cloths could scratch or damage
the plastic light lenses.
X Clean the plastic lenses of the exterior
lights with a wet sponge and a mild cleaning
agent, e.g. Mercedes-Benz car shampoo or
cleaning cloths.
Mirror turn signals !
Only use cleaning agents or cleaning
cloths that are suitable for plastic lenses.
Unsuitable cleaning agents or cleaning
cloths could scratch or damage the plastic
lenses of the mirror turn signals.
X Clean the plastic lenses of the mirror turn
signals in the exterior mirror housing using
a wet sponge and mild cleaning agent, e.g.
Mercedes-Benz car shampoo or cleaning
cloths. Care
357Maintenance and care Z