2014 MERCEDES-BENZ S-Class trunk
[x] Cancel search: trunkPage 331 of 434
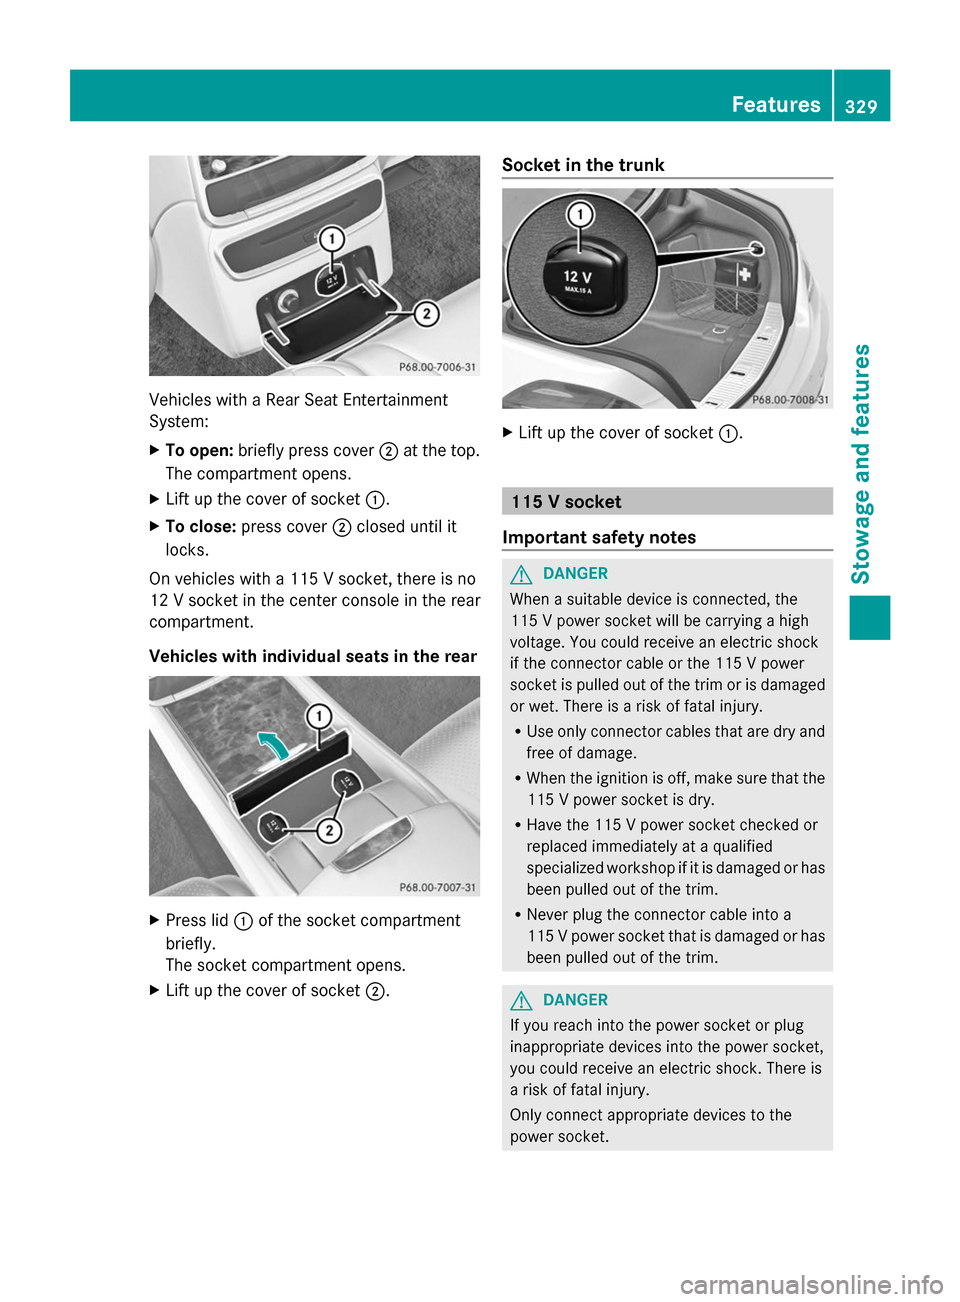
Vehicles with a Rear Seat Entertainment
System:
X
To open: briefly press cover 0044at the top.
The compartment opens.
X Lift up the cover of socket 0043.
X To close: press cover 0044closed until it
locks.
On vehicles with a 115 V socket, there is no
12 V socket in the center console in the rear
compartment.
Vehicles with individual seats in the rear X
Press lid 0043of the socket compartment
briefly.
The socket compartment opens.
X Lift up the cover of socket 0044.Socket in the trunk X
Lift up the cover of socket 0043. 115 V socket
Important safety notes G
DANGER
When a suitable device is connected, the
115 V power socket will be carrying a high
voltage. You could receive an electric shock
if the connector cable or the 115 V power
socket is pulled out of the trim or is damaged
or wet. There is a risk of fatal injury.
R Use only connector cables that are dry and
free of damage.
R When the ignition is off, make sure that the
115 V power socket is dry.
R Have the 115 V power socket checked or
replaced immediately at a qualified
specialized workshop if it is damaged or has
been pulled out of the trim.
R Never plug the connector cable into a
115 V power socket that is damaged or has
been pulled out of the trim. G
DANGER
If you reach into the power socket or plug
inappropriate devices into the power socket,
you could receive an electric shock. There is
a risk of fatal injury.
Only connect appropriate devices to the
power socket. Features
329Stowage and features Z
Page 332 of 434
!
Note that work and repairs on the 115 V
power socket should only be carried out by
qualified specialist personnel.
General notes The 115 V power socket provides an
alternating voltage of 115 V so that small
electronic devices can be connected. These
devices, such as games consoles, chargers
and laptops, must not consume more than a
maximum of 150 watts altogether.
Requirements for operation of these devices:
R the electronic device that you connect has
a suitable connector and conforms to
standards specific to the country you are
in.
R the plug of the electronic device is plugged
correctly into 115 V power socket.
R the maximum wattage of the device to be
connected must not exceed 150 watts.
R the on-board power supply is within a
permissible voltage range.
R the 12 V sockets in the center console in
the front compartment (Y page 328) and in
the trunk are functional (Y page 329).
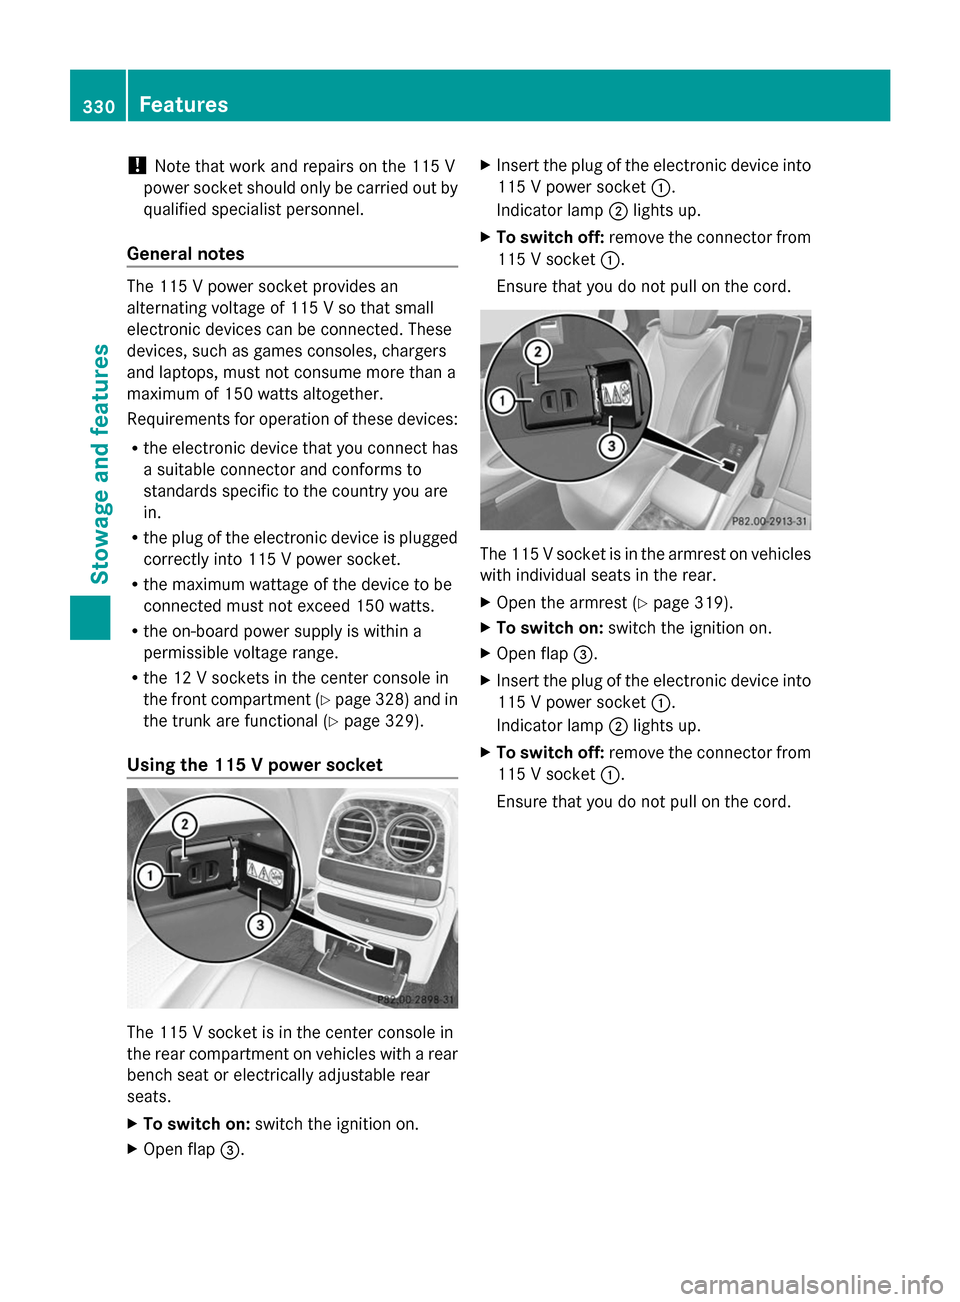
Using the 115 V power socket The 115 V socket is in the center console in
the rear compartment on vehicles with a rear
bench seat or electrically adjustable rear
seats.
X To switch on: switch the ignition on.
X Open flap 0087. X
Insert the plug of the electronic device into
115 V power socket 0043.
Indicator lamp 0044lights up.
X To switch off: remove the connector from
115 V socket 0043.
Ensure that you do not pull on the cord. The 115 V socket is in the armrest on vehicles
with individual seats in the rear.
X Open the armrest (Y page 319).
X To switch on: switch the ignition on.
X Open flap 0087.
X Insert the plug of the electronic device into
115 V power socket 0043.
Indicator lamp 0044lights up.
X To switch off: remove the connector from
115 V socket 0043.
Ensure that you do not pull on the cord. 330
FeaturesStowage and features
Page 333 of 434
Problems with the 115 V power socket
Problem Possible causes/consequences and
0050
0050Solutions The warning lamp on
the 115 V power socket
is not lit. The on-board voltage is too low because the battery is too weak.
X
Start the engine.
or
X Charge the battery (Y page 371).
If the indicator lamp still does not light up:
X Visit a qualified specialist workshop. The temperature of the DC/AC converter is temporarily too high.
X
Remove the electronic device connector from the 115 V socket.
X Let the DC/AC converter cool down.
If the indicator lamp still does not light up after cooling down the
converter:
X Visit a qualified specialist workshop. You have connected an electronic device that has a constant
nominal power of less than 150 watts, but has a very high switch-
on current. This device will not work. If you connect such a device,
the 115 V power socket will not supply it with power.
X Connect a suitable electronic device. Coolbox in the rear compartment
Important safety notes G
WARNING
If you cover the ventilation grille for the
coolbox, it may overheat. There is a risk of fire.
Always make sure that the ventilation grille is
not covered.
The ventilation grille for the coolbox is in the
trunk.
The coolbox can bear a maximum load of
7.7 lb (3.5 kg).
If you want to store a bottle in the upper
compartment of the coolbox, the capacity of
the bottle must not exceed 17 fl. oz. (0.5 l).
Store only plastic bottles in the upper
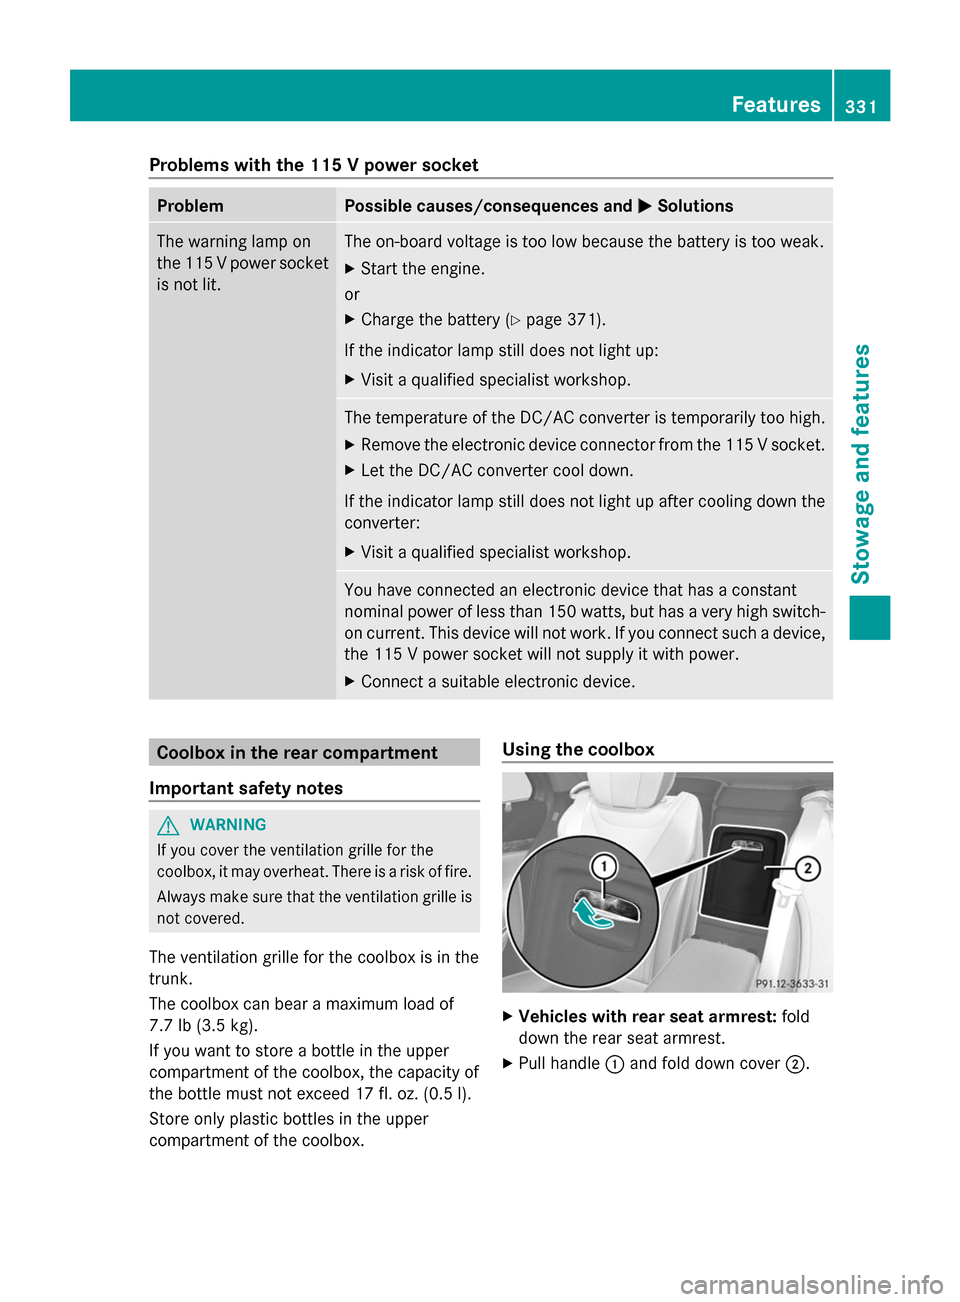
compartment of the coolbox. Using the coolbox
X
Vehicles with rear seat armrest: fold
down the rear seat armrest.
X Pull handle 0043and fold down cover 0044. Features
331Stowage and features Z
Page 356 of 434
Regular care of your vehicle is a condition for
retaining the quality in the long term.
Use care products and cleaning agents
recommended and approved by Mercedes-
Benz. Washing the vehicle and cleaning the
paintwork
Automatic car wash G
WARNING
Braking efficiency is reduced after washing
the vehicle. There is a risk of an accident.
After the vehicle has been washed, brake
carefully while paying attention to the traffic
conditions until full braking power is restored.
! If DISTRONIC PLUS or the HOLD function
is activated, the vehicle brakes
automatically in certain situations. To
prevent damage to the vehicle, deactivate
DISTRONIC PLUS and the HOLD function in
the following or other similar situations:
R when towing the vehicle
R in the car wash
! Never clean your vehicle in a Touchless
Automatic Car Wash as these use special
cleaning agents. These cleaning agents can
damage the paintwork or plastic parts.
! Make sure that:
R the side windows and the sliding sunroof
are fully closed.
R the ventilation/heating is switched off
(the OFF button has been pressed).
R the windshield wiper switch is in position
0.
Otherwise, the vehicle might be damaged.
! If the key is within the rear detection
range of KEYLESS-GO, the following
situations, for example, could lead to the
unintentional opening of the trunk:
R using a car wash
R using a power washer Make sure that the key is at least 6.5 ft
(2 m) away from the vehicle.
! Make sure that the automatic
transmission is in neutral position Nwhen
washing your vehicle in a tow-through car
wash. The vehicle may otherwise be
damaged.
R Operating with the SmartKey:
Do not remove the SmartKey from the
ignition lock. Do not open the driver's
door when the engine is switched off or
at very low speeds. Otherwise, when in
transmission position Dor Rthe
automatic transmission will
automatically switch to park position P
and block the wheels.
R Operating with the Start/Stop button:
Do not open the driver's door when the
engine is switched off or at very low
speeds. Otherwise, when in transmission
position Dor Rthe automatic
transmission will automatically switch to
park position Pand block the wheels.
Observe the following to make sure that the
automatic transmission stays in position N
neutral:
Operating with the SmartKey:
X Make sure that the ignition is switched on.
X Make sure that the vehicle is stationary.
X Depress and hold the brake pedal.
X Shift to neutral N.
X Release the brake pedal.
X Release the electric parking brake, if
necessary.
X Switch off the ignition and leave the
SmartKey in the ignition lock.
Operating with the Start/Stop button:
X Make sure that the ignition is switched on.
X Make sure that the vehicle is stationary.
X Depress and hold the brake pedal.
X Engage park position P.
X Release the brake pedal. 354
CareMaintenance and care
Page 357 of 434
X
Remove Start/Stop button from ignition
lock (Y page 171).
X Insert the SmartKey into the ignition lock.
X Switch on the ignition.
X Depress and hold the brake pedal.
X Shift to neutral N.
X Release the brake pedal.
X Release the electric parking brake, if
necessary.
X Switch off the ignition and leave the
SmartKey in the ignition lock.
You can wash the vehicle in an automatic car
wash from the very start.
If the vehicle is very dirty, pre-wash it before
cleaning it in an automatic car wash.
After using an automatic car wash, wipe off
wax from the windshield and the wiper
blades. This will prevent smears and reduce
wiping noises caused by residue on the
windshield.
Washing by hand In some countries, washing by hand is only
allowed at specially equipped washing bays.
Observe the legal requirements in each
country.
X Do not use hot water and do not wash the
vehicle in direct sunlight.
X Use a soft sponge to clean.
X Use a mild cleaning agent, such as a car
shampoo approved by Mercedes-Benz.
X Thoroughly hose down the vehicle with a
gentle jet of water.
X Do not point the water jet directly towards
the air inlet.
X Use plenty of water and rinse out the
sponge frequently.
X Rinse the vehicle with clean water and dry
thoroughly with a chamois.
X Do not let the cleaning agent dry on the
paintwork.
Carefully remove all deposits of road salt as
soon as possible when driving in winter. Power washers G
WARNING
The water jet from a circular jet nozzle (dirt
blasters) can cause invisible exterior damage
to the tires or chassis components.
Components damaged in this way may fail
unexpectedly. There is a risk of an accident.
Do not use power washers with circular jet
nozzles to clean the vehicle. Have damaged
tires or chassis components replaced
immediately.
! Always maintain a distance of at least
11.8 in (30 cm) between the vehicle and the
power washer nozzle. Information about
the correct distance is available from the
equipment manufacturer.
Move the power washer nozzle around
when cleaning your vehicle.
Do not aim directly at any of the following:
R tires
R door gaps, roof gaps, joints, etc.
R electrical components
R battery
R connectors
R lights
R seals
R trim
R ventilation slots
Damaged seals or electrical components
can lead to leaks or failures.
! If the key is within the rear detection
range of KEYLESS-GO, the following
situations, for example, could lead to the
unintentional opening of the trunk:
R using a car wash
R using a power washer
Make sure that the key is at least 6.5 ft
(2 m) away from the vehicle. Care
355Maintenance and care Z
Page 366 of 434

Useful information
i This Operator's Manual describes all
models and all standard and optional
equipment of your vehicle available at the
time of publication of the Operator's
Manual. Country-specific differences are
possible. Please note that your vehicle may
not be equipped with all features
described. This also applies to safety-
related systems and functions.
i Read the information on qualified
specialist workshops: (Y page 27).Where will I find...?
Vehicle tool kit
General notes The towing eye is located in the stowage well
under the trunk floor.
i Apart from certain country-specific
variations, the vehicles are not equipped
with a tire-change tool kit. Some tools for
changing a wheel are specific to the
vehicle. For more information on which
tools are required and approved to perform
a wheel change on your vehicle, consult a
qualified specialist workshop.
Tools required for changing a wheel may
include, for example:
R Jack
R Wheel chock
R Lug wrench
R Ratchet wrench
R Alignment bolt Vehicles with a TIREFIT kit Example
0043 Tire sealant filler bottle
0044 Tire inflation compressor
0087 Towing eye
X Open the trunk lid.
X Lift the trunk floor upwards (Y page 320).
X Use the TIREFIT kit (Y page 366).
AMG vehicles Example
0043 Tire sealant filler bottle
0044 Jack
0087 Ratchet
0085 Alignment bolt
0083 Jacking support
0084 Socket
006B Lug wrench
006C Towing eye
006D Folding wheel chock
006E Tire inflation compressor 364
Where will I find...?Breakdown assistance
Page 367 of 434
The tire-change tool kit is kept in a tray in the
stowage well under the trunk floor.
X Open the trunk lid.
X Lift the trunk floor upwards (Y page 320).Flat tire
Preparing the vehicle
Your vehicle may be equipped with:
R MOExtended tires (tires with run-flat
properties) (Y page 365)
Vehicle preparation is not necessary on
vehicles with MOExtended tires.
R a TIREFIT kit (Y page 364)
Information on changing/mounting a wheel
(Y page 407).
X Stop the vehicle on solid, non-slippery and
level ground, as far away as possible from
traffic.
X Switch on the hazard warning lamps.
X Secure the vehicle against rolling away
(Y page 190).
X If possible, bring the front wheels into the
straight-ahead position.
X Switch off the engine.
X Open the driver's door.
The on-board electronics now have status
0. This is the same as the SmartKey having
been removed.
X Remove Start/Stop button from ignition
lock (Y page 171).
or, if the SmartKey is inserted in the ignition
lock:
X Remove the SmartKey from the ignition
lock.
X All occupants must get out of the vehicle.
Make sure that they are not endangered as
they do so.
X Make sure that no one is near the danger
area while a wheel is being changed.
Anyone who is not directly assisting in the
wheel change should, for example, stand
behind the barrier. X
Get out of the vehicle. Pay attention to
traffic conditions when doing so.
X Close the driver's door. MOExtended tires (tires with run-flat
properties)
General notes With MOExtended tires (tires with run flat
characteristics), you can continue to drive
your vehicle even if there is a total loss of
pressure in one or more tires. The affected
tire must not show any clearly visible damage.
You can recognize MOExtended tires by the
MOExtended marking which appears on the
sidewall of the tire. You will find this marking
next to the tire size designation, the load-
bearing capacity and the speed index
(Y
page 401).
MOExtended tires may only be used in
conjunction with an active tire pressure loss
warning system or with an active tire pressure
monitor.
If the pressure loss warning message
appears in the multifunction display:
R Observe the instructions in the display
messages (Y page 295).
R Check the tire for damage.
R If driving on, observe the following notes.
The maximum driving distance is
approximately 50 miles (80 km) when the
vehicle is partially laden and approximately
18 miles (30 km) when the vehicle is fully
laden.
In addition to the vehicle load, the driving
distance possible depends upon:
R Speed
R Road condition
R Outside temperature
The driving distance possible in run-flat mode
may be reduced by extreme driving
conditions/maneuvers, or it can be increased
through a moderate style of driving. Flat tire
365Breakdown assistance
Page 369 of 434
plenty of water. Do not induce vomiting,
and seek medical attention immediately.
R Immediately change out of clothing which
has come into contact with tire sealant.
R If an allergic reaction occurs, seek medical
attention immediately.
! Do not operate the tire inflation
compressor for longer than eight minutes
at a time without a break. It may otherwise
overheat.
The tire inflation compressor can be
operated again once it has cooled down.
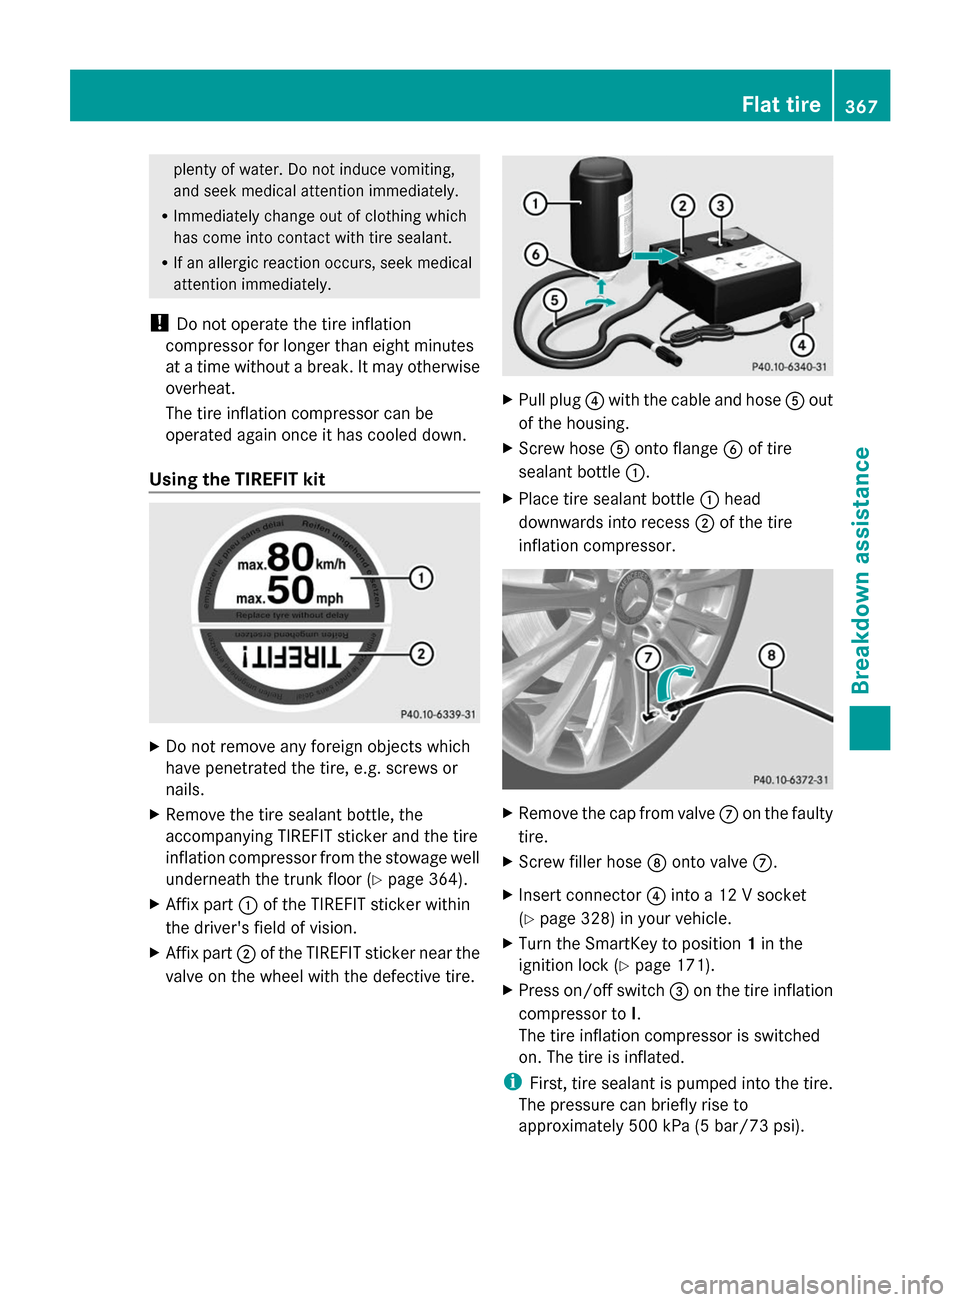
Using the TIREFIT kit X
Do not remove any foreign objects which
have penetrated the tire, e.g. screws or
nails.
X Remove the tire sealant bottle, the
accompanying TIREFIT sticker and the tire
inflation compressor from the stowage well
underneath the trunk floor (Y page 364).
X Affix part 0043of the TIREFIT sticker within
the driver's field of vision.
X Affix part 0044of the TIREFIT sticker near the
valve on the wheel with the defective tire. X
Pull plug 0085with the cable and hose 0083out
of the housing.
X Screw hose 0083onto flange 0084of tire
sealant bottle 0043.
X Place tire sealant bottle 0043head
downwards into recess 0044of the tire
inflation compressor. X
Remove the cap from valve 006Bon the faulty
tire.
X Screw filler hose 006Conto valve 006B.
X Insert connector 0085into a 12 V socket
(Y page 328) in your vehicle.
X Turn the SmartKey to position 1in the
ignition lock (Y page 171).
X Press on/off switch 0087on the tire inflation
compressor to I.
The tire inflation compressor is switched
on. The tire is inflated.
i First, tire sealant is pumped into the tire.
The pressure can briefly rise to
approximately 500 kPa (5 bar/73 psi). Flat tire
367Breakdown assistance Z