2014 MERCEDES-BENZ E-SEDAN roof
[x] Cancel search: roofPage 57 of 430
R
if, on vehicles with DISTRONIC PLUS, the
radar sensor system detects an imminent
danger of collision in certain situations.
R in critical driving situations, e.g. when
physical limits are exceeded and the
vehicle understeers or oversteers severely.
PRE-SAFE ®
takes the following measures
depending on the hazardous situation
detected:
R the front seat belts are pre-tensioned.
R the front-passenger seat is adjusted if it is
in an unfavorable position.
R the air pressure in the side bolsters of the
seat cushion and seat backrest of the front
active multicontour seats is increased.
R if the vehicle skids, the sliding sunroof and
the side windows are closed so that only a
small gap remains. On vehicles with a
panorama roof with power tilt/sliding
panel, they are closed completely.
If the hazardous situation passes without
resulting in an accident, PRE-SAFE ®
slackens
the belt pre-tensioning. The air pressure in
the side bolsters of the active multicontour
seat is reduced again. All settings made by
PRE-SAFE ®
can then be reversed.
If the seat belts are not released:
X When the vehicle is stationary, move the
backrest or seat back slightly.
The seat belt pre-tensioning is reduced and
the locking mechanism is released.
Information about seat belt adjustment, a
convenience function integrated into PRE-
SAFE ®
, can be found in the "Seat belt
adjustment" section (Y page 57).Seat belts
Important safety notes G
WARNING
The seat belt does not offer the intended level
of protection if the backrest is not in the
upright position. When braking or in the event of an accident, you could slide underneath the
seat belt and sustain abdomen or neck
injuries, for example. This poses an increased
risk of injury or even fatal injury.
Adjust the seat properly before beginning
your journey. Always make sure that the seat
is in the upright position.
G
WARNING
Seat belts cannot protect as intended, if:
R they are damaged, extremely dirty,
bleached or dyed
R the seat belt buckle is damaged or
extremely dirty
R the Emergency Tensioning Devices or the
belt anchorage has been modified.
Damage caused to seat belts in an accident
may not be visible, e.g. by splinters of glass.
Modified or damaged seat belts can tear or
fail, for example in the event of an accident.
Modified Emergency Tensioning Devices may
be deployed unintentionally or fail to be
deployed when required. There is an
increased risk of injury, possibly even fatal.
Never modify seat belts, Emergency
Tensioning Devices, seat belt anchorages and
inertia reels. Ensure that seat belts are not
damaged or worn and are clean.
Only use seat belts that have been approved
for your vehicle by Mercedes-Benz.
The use of seat belts and infant and child
restraint systems is required by law in:
R all 50 states
R the U.S. territories
R the District of Columbia
R all Canadian provinces
Even where this is not required by law, all
vehicle occupants should correctly fasten
their seat belts before starting the journey.
i See "Children in the vehicle"
(Y page 60) for further information on
infants and children traveling in the vehicle
as well as on child restraint systems. Occupant safety
55Safety Z
ProCarManuals.com
Page 67 of 430
X
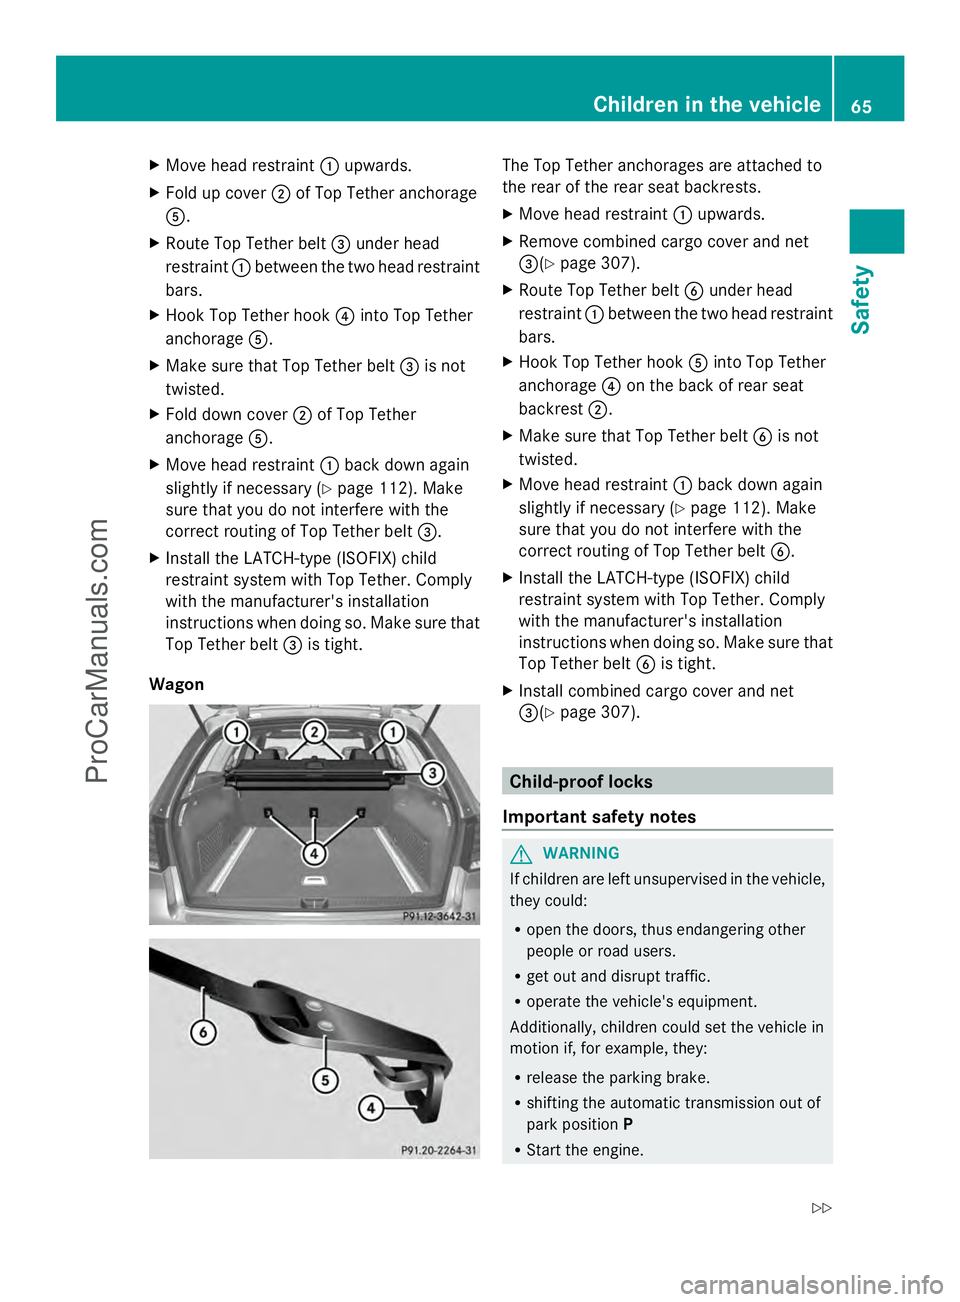
Move head restraint :upwards.
X Fold up cover ;of Top Tether anchorage
A.
X Route Top Tether belt =under head
restraint :between the two head restraint
bars.
X Hook Top Tether hook ?into Top Tether
anchorage A.
X Make sure that Top Tether belt =is not
twisted.
X Fold down cover ;of Top Tether
anchorage A.
X Move head restraint :back down again
slightly if necessary (Y page 112). Make
sure that you do not interfere with the
correct routing of Top Tether belt =.
X Install the LATCH-type (ISOFIX) child
restraint system with Top Tether. Comply
with the manufacturer's installation
instructions when doing so. Make sure that
Top Tether belt =is tight.
Wagon The Top Tether anchorages are attached to
the rear of the rear seat backrests.
X
Move head restraint :upwards.
X Remove combined cargo cover and net
=(Y page 307).
X Route Top Tether belt Bunder head
restraint :between the two head restraint
bars.
X Hook Top Tether hook Ainto Top Tether
anchorage ?on the back of rear seat
backrest ;.
X Make sure that Top Tether belt Bis not
twisted.
X Move head restraint :back down again
slightly if necessary (Y page 112). Make
sure that you do not interfere with the
correct routing of Top Tether belt B.
X Install the LATCH-type (ISOFIX) child
restraint system with Top Tether. Comply
with the manufacturer's installation
instructions when doing so. Make sure that
Top Tether belt Bis tight.
X Install combined cargo cover and net
=(Y page 307). Child-proof locks
Important safety notes G
WARNING
If children are left unsupervised in the vehicle,
they could:
R open the doors, thus endangering other
people or road users.
R get out and disrupt traffic.
R operate the vehicle's equipment.
Additionally, children could set the vehicle in
motion if, for example, they:
R release the parking brake.
R shifting the automatic transmission out of
park position P
R Start the engine. Children in the vehicle
65Safety
Z
ProCarManuals.com
Page 68 of 430
There is a risk of an accident and injury.
When leaving the vehicle, always take the
SmartKey with you and lock the vehicle. Never
leave children or animals unattended in the
vehicle. Always keep the SmartKey out of
reach of children. G
WARNING
If persons, particularly children are subjected
to prolonged exposure to extreme heat or
cold, there is a risk of injury, possibly even
fatal. Never leave children unattended in the
vehicle. G
WARNING
If children are traveling in the vehicle, they
could:
R open doors, thus endangering other people
or road users
R exit the vehicle and be caught by oncoming
traffic
R operate vehicle equipment and become
trapped
There is a risk of an accident and injury.
Always activate the child-proof locks and
override feature if children are traveling in the
vehicle. When leaving the vehicle, always take
the key with you and lock the vehicle. Never
leave children unattended in the vehicle.
You can activate the following child-proof
locks:
R rear doors (Y page 66)
R rear side windows (Y page 66)
Child-proof locks for the rear doors G
WARNING
Children could open a rear door from inside
the vehicle. This could result in serious
injuries or an accident. Therefore, when
children ride in the rear always secure the rear
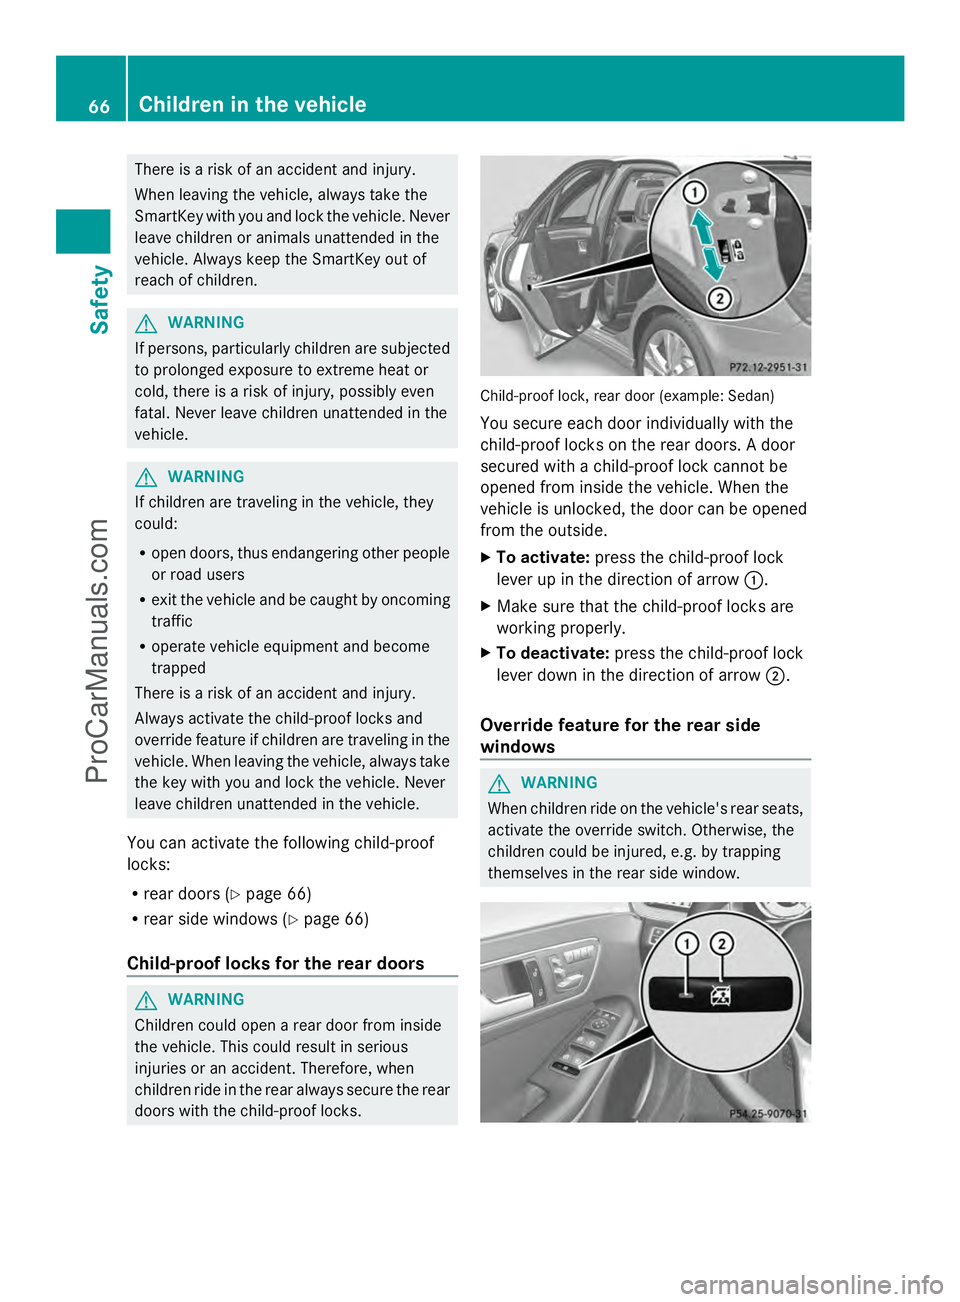
doors with the child-proof locks. Child-proof lock, rear door (example: Sedan)
You secure each door individually with the
child-proof locks on the rear doors. A door
secured with a child-proof lock cannot be
opened from inside the vehicle. When the
vehicle is unlocked, the door can be opened
from the outside.
X
To activate: press the child-proof lock
lever up in the direction of arrow :.
X Make sure that the child-proof locks are
working properly.
X To deactivate: press the child-proof lock
lever down in the direction of arrow ;.
Override feature for the rear side
windows G
WARNING
When children ride on the vehicle's rear seats,
activate the override switch. Otherwise, the
children could be injured, e.g. by trapping
themselves in the rear side window. 66
Children in the vehicleSafety
ProCarManuals.com
Page 83 of 430
Useful information
..............................82
SmartKey ............................................. 82
Doors .................................................... 88
Trunk/cargo compartment ................90
Side windows ...................................... 98
Sliding sunroof .................................. 102 81Opening and closing
ProCarManuals.com
Page 91 of 430
will trigger the anti-theft alarm system.
Switch off the alarm (Y page 78).
You can only open the rear doors from inside
the vehicle if they are not secured by the
child-proof locks (Y page 66).X
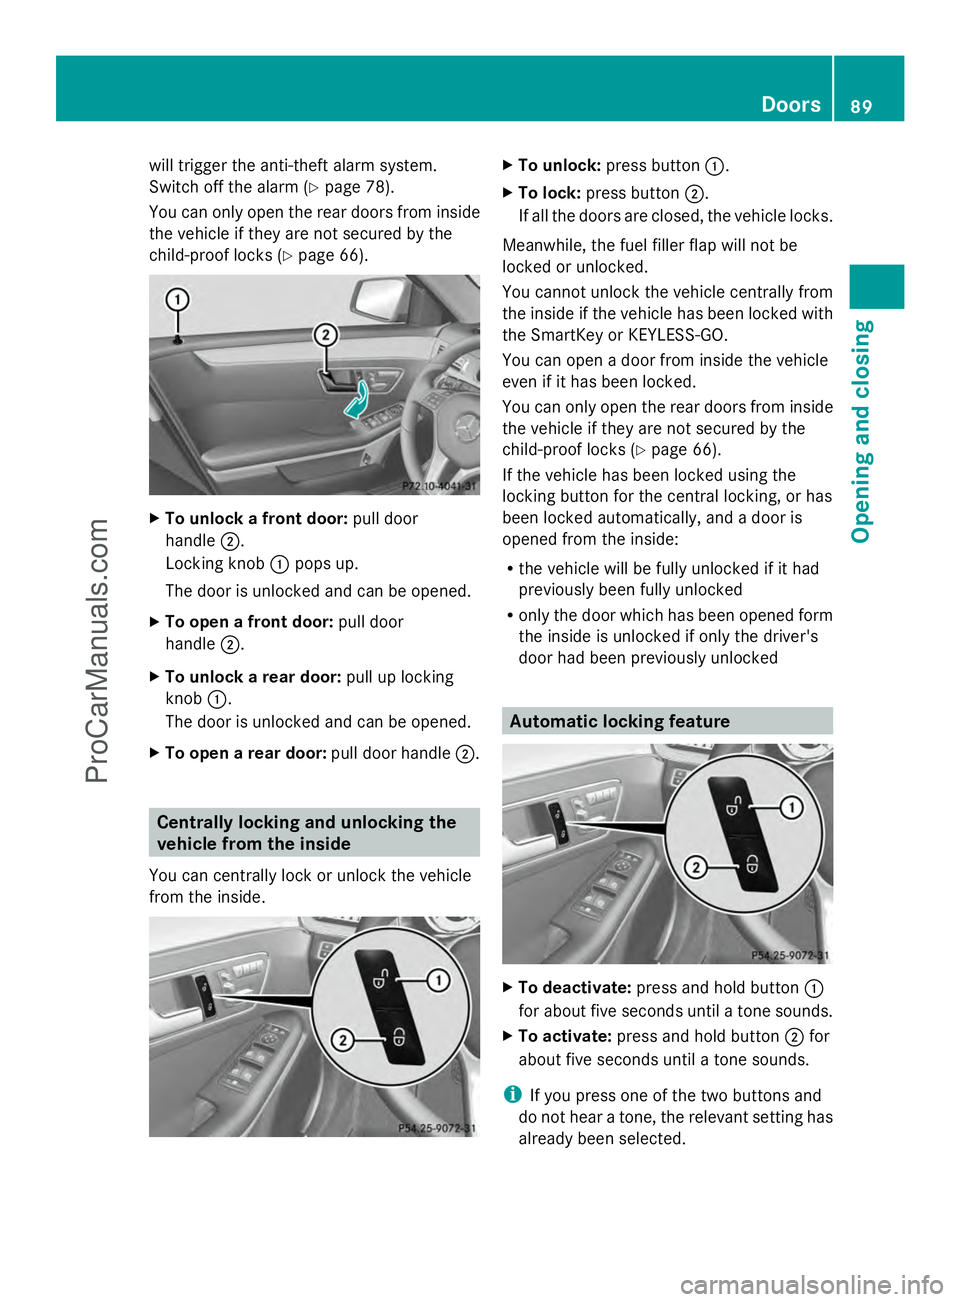
To unlock a front door: pull door
handle ;.
Locking knob :pops up.
The door is unlocked and can be opened.
X To open a front door: pull door
handle ;.
X To unlock a rear door: pull up locking
knob :.
The door is unlocked and can be opened.
X To open a rear door: pull door handle;. Centrally locking and unlocking the
vehicle from the inside
You can centrally lock or unlock the vehicle
from the inside. X
To unlock: press button :.
X To lock: press button ;.
If all the doors are closed, the vehicle locks.
Meanwhile, the fuel filler flap will not be
locked or unlocked.
You cannot unlock the vehicle centrally from
the inside if the vehicle has been locked with
the SmartKey or KEYLESS-GO.
You can open a door from inside the vehicle
even if it has been locked.
You can only open the rear doors from inside
the vehicle if they are not secured by the
child-proof locks (Y page 66).
If the vehicle has been locked using the
locking button for the central locking, or has
been locked automatically, and a door is
opened from the inside:
R the vehicle will be fully unlocked if it had
previously been fully unlocked
R only the door which has been opened form
the inside is unlocked if only the driver's
door had been previously unlocked Automatic locking feature
X
To deactivate: press and hold button :
for about five seconds until a tone sounds.
X To activate: press and hold button ;for
about five seconds until a tone sounds.
i If you press one of the two buttons and
do not hear a tone, the relevant setting has
already been selected. Doors
89Opening and closing Z
ProCarManuals.com
Page 101 of 430
Make sure that no body parts are in close
proximity during the closing procedure. If
someone becomes trapped, press the switch
to open the side window again. Opening and closing the side
windows
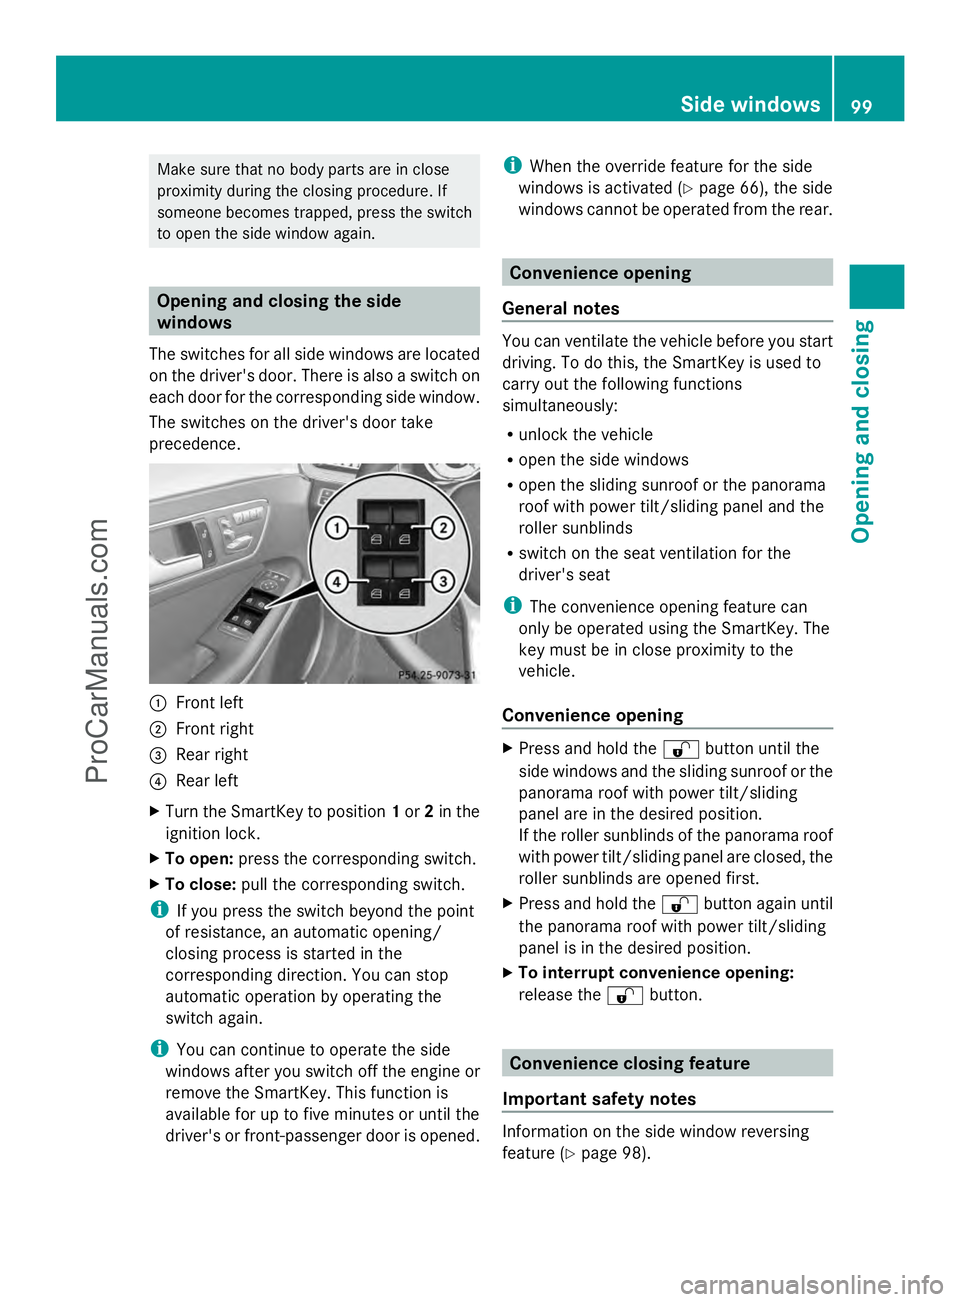
The switches for all side windows are located
on the driver's door. There is also a switch on
each door for the corresponding side window.
The switches on the driver's door take
precedence. :
Front left
; Front right
= Rear right
? Rear left
X Turn the SmartKey to position 1or 2in the
ignition lock.
X To open: press the corresponding switch.
X To close: pull the corresponding switch.
i If you press the switch beyond the point
of resistance, an automatic opening/
closing process is started in the
corresponding direction. You can stop
automatic operation by operating the
switch again.
i You can continue to operate the side
windows after you switch off the engine or
remove the SmartKey. This function is
available for up to five minutes or until the
driver's or front-passenger door is opened. i
When the override feature for the side
windows is activated (Y page 66), the side
windows cannot be operated from the rear. Convenience opening
General notes You can ventilate the vehicle before you start
driving. To do this, the SmartKey is used to
carry out the following functions
simultaneously:
R
unlock the vehicle
R open the side windows
R open the sliding sunroof or the panorama
roof with power tilt/sliding panel and the
roller sunblinds
R switch on the seat ventilation for the
driver's seat
i The convenience opening feature can
only be operated using the SmartKey. The
key must be in close proximity to the
vehicle.
Convenience opening X
Press and hold the %button until the
side windows and the sliding sunroof or the
panorama roof with power tilt/sliding
panel are in the desired position.
If the roller sunblinds of the panorama roof
with power tilt/sliding panel are closed, the
roller sunblinds are opened first.
X Press and hold the %button again until
the panorama roof with power tilt/sliding
panel is in the desired position.
X To interrupt convenience opening:
release the %button. Convenience closing feature
Important safety notes Information on the side window reversing
feature (Y
page 98). Side windows
99Opening and closing Z
ProCarManuals.com
Page 102 of 430
G
WARNING
When the convenience closing feature is
operating, parts of the body could become
trapped in the closing area of the side window
and the sliding sunroof. There is a risk of
injury.
Observe the complete closing procedure
when the convenience closing feature is
operating. Make sure that no body parts are
in close proximity during the closing
procedure.
Proceed as follows if someone is trapped:
With the SmartKey:
X Release the &button.
X Press and hold the %button until the
side windows and the sliding sunroof or the
panorama roof with power tilt/sliding
panel open again.
Using KEYLESS-GO:
X Release the sensor surface on the door
handle.
X Pull the door handle immediately and hold
it.
The side windows and the sliding sunroof
or the panorama roof with power tilt/
sliding panel open.
General notes When you lock the vehicle, you can
simultaneously:
R close the side windows
R close the sliding sunroof or the panorama
roof with power tilt/sliding panel
On vehicles with a panorama roof with power
tilt/sliding panel, you can then close the
roller sunblinds. Using the SmartKey X
Vehicles without KEYLESS-GO: point the
tip of the SmartKey at the door handle on
the driver's door.
X Vehicles with KEYLESS-GO: the key must
be in close proximity to the vehicle.
X Press and hold the &button until the
side windows and the sliding sunroof or the
panorama roof with power tilt/sliding
panel are fully closed.
X Make sure that all the side windows and the
sliding sunroof or panorama roof with
power tilt/sliding panel are closed.
On vehicles with a panorama roof with power
tilt/sliding panel:
X Press and hold the &button again until
the roller sunblinds of the panorama roof
with power tilt/sliding panel close.
X To interrupt convenience closing:
release the &button.
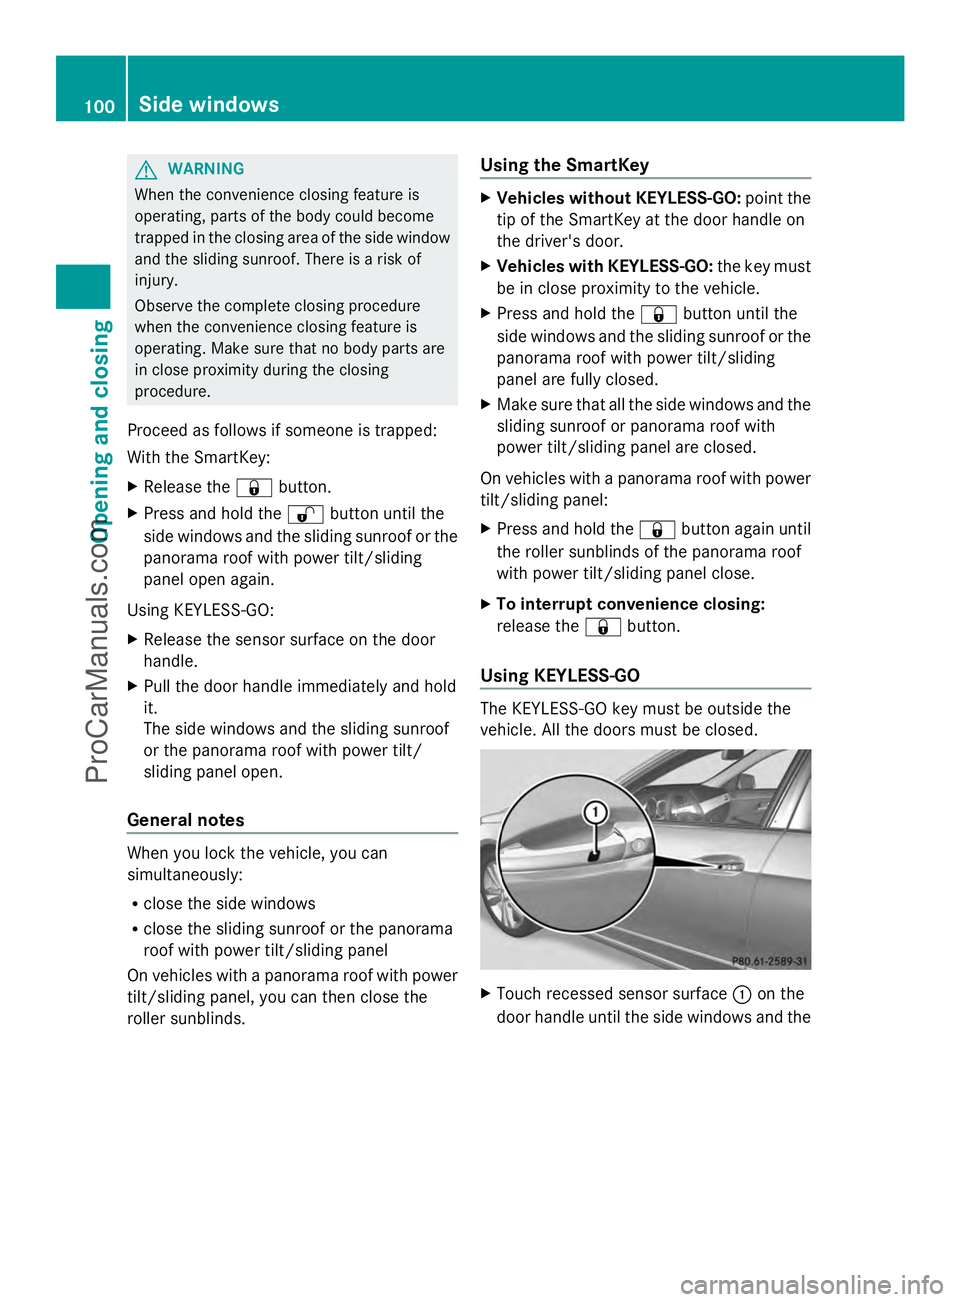
Using KEYLESS-GO The KEYLESS-GO key must be outside the
vehicle. All the doors must be closed.
X
Touch recessed sensor surface :on the
door handle until the side windows and the 100
Side windowsOpening and closing
ProCarManuals.com
Page 103 of 430
sliding sunroof or the panorama roof with
power tilt/sliding panel are fully closed.
i Make sure you only touch recessed
sensor surface :.
X Make sure that all the side windows and the
sliding sunroof or panorama roof with
power tilt/sliding panel are closed.
On vehicles with a panorama roof with power
tilt/sliding panel:
X Touch recessed sensor surface :on the
door handle again until the roller sunblinds
of the panorama roof with power tilt/
sliding panel close.
X To interrupt convenience closing:
release recessed sensor surface :on the
door handle. Resetting the side windows
If a side window can no longer be closed fully,
you must reset it.
X Close all the doors.
X Turn the SmartKey to position 1or 2in the
ignition lock.
X Pull the corresponding switch on the door
control panel until the side window is
completely closed (Y page 99).
X Hold the switch for an additional second.
If the side window opens again slightly:
X Immediately pull the corresponding switch
on the door control panel until the side
window is completely closed (Y page 99).
X Hold the switch for an additional second.
X If the corresponding side window remains
closed after the button has been released,
the side window has been reset correctly.
If this is not the case, repeat the steps
above again. Side windows
101Opening and closing Z
ProCarManuals.com