2014 MERCEDES-BENZ E-SEDAN roof
[x] Cancel search: roofPage 190 of 430
The wear of individual components of the
brake system, such as the brake pads/linings
or brake discs, depends on the individual
driving style and operating conditions.
For this reason, it is impossible to state a
mileage that will be valid under all
circumstances. An aggressive driving style
will lead to high wear. You can obtain further
information about this from your authorized
Mercedes-Benz Center.
New and replaced brake pads and discs only
reach their optimum braking effect after
several hundred kilometers of driving.
Compensate for this by applying greater force
to the brake pedal. Keep this in mind, and
adapt your driving and braking accordingly
during this break-in period.
Excessive heavy braking results in
correspondingly high brake wear. Observe
the # brake wear warning lamp in the
instrument cluster and note any brake status
messages in the multifunction display.
Especially for high performance driving, it is
important to maintain and have the brake
system checked regularly. Driving on wet roads
Hydroplaning If water has accumulated to a certain depth
on the road surface, there is a danger of
hydroplaning occurring, even if:
R you drive at low speeds.
R the tires have adequate tread depth.
For this reason, in the event of heavy rain or
in conditions in which hydroplaning may
occur, you must drive in the following
manner:
R lower your speed.
R avoid ruts.
R brake carefully. Driving on flooded roads !
Do not drive through flooded areas.
Check the depth of any water before driving
through it. Drive slowly through standing
water. Otherwise, water may enter the
vehicle interior or the engine compartment.
This can damage the electronic
components in the engine or the automatic
transmission. Water can also be drawn in
by the engine's air suction nozzles and this
can cause engine damage. Winter driving
Important safety notes G
WARNING
If you shift down on a slippery road surface in
an attempt to increase the engine's braking
effect, the drive wheels could lose their grip.
There is an increased danger of skidding and
accidents.
Do not shift down for additional engine
braking on a slippery road surface. G
DANGER
If the exhaust pipe is blocked or adequate
ventilation is not possible, poisonous gases
such as carbon monoxide (CO) may enter the
vehicle. This is the case, e.g. if the vehicle
becomes trapped in snow. There is a risk of
fatal injury.
If you leave the engine or the auxiliary heating
running, make sure the exhaust pipe and area
around the vehicle are clear of snow. To
ensure an adequate supply of fresh air, open
a window on the side of the vehicle that is not
facing into the wind.
Have your vehicle winterproofed at a qualified
specialist workshop at the onset of winter.
i Vehicles with a diesel engine: do not
cover the radiator, e.g. with a protective
cover. The measuring function of the
onboard diagnosis system may otherwise
provide inaccurate values. Some of these 188
Driving tipsDriving and parking
ProCarManuals.com
Page 316 of 430

Installing and removing the folding
cargo compartment floor
120° position
X
Remove the combined cargo cover and net
(Y page 308).
X To remove: move EASY-PACK folding
luggage-compartment floor :into the
120° position and lift it upwards.
X To install: push EASY-PACK folding
luggage-compartment floor :to the stop,
move it into the 120° position and make
sure it engages audibly.
X Pull EASY-PACK folding luggage-
compartment floor :forwards. EASY-PACK rear sill protector
(Wagon)
! Before closing the tailgate, refasten the
EASY-PACK rear sill protector on the
underside of the EASY-PACK folding
luggage-compartment floor.
The EASY-PACK rear sill protector could
otherwise be damaged. The EASY-PACK rear sill protector is attached
to the underside of the EASY-PACK folding
cargo compartment floor by means of
magnets. It is designed to prevent clothing
becoming stained and the paintwork being
scratched when loading.
X Open the EASY-PACK folding luggage-
compartment floor (Y page 313).
X Use tab ;to detach EASY-PACK rear sill
protector :from the magnets and place
it over the loading sill.
X Close the EASY-PACK folding cargo
compartment floor. Roof carrier
Important safety notes G
WARNING
When you load the roof, the center of gravity
of the vehicle rises and the driving
characteristics change. If you exceed the
maximum roof load, the driving
characteristics, as well as steering and
braking, will be greatly impaired. There is a
risk of an accident.
Never exceed the maximum roof load and
adjust your driving style.
! Mercedes-Benz recommends that you
only use roof carriers that have been tested
and approved for Mercedes-Benz vehicles.
This helps to prevent damage to the
vehicle. 314
Stowage areasStowage and featu
res
ProCarManuals.com
Page 317 of 430
Position the load on the roof carrier in such
a way that the vehicle will not sustain
damage even when it is in motion.
Ensure that when the roof carrier is
installed:
R you can raise the sliding sunroof or the
panorama roof with power tilt/sliding
panel fully (depending on the vehicle's
equipment)
R you can open the tailgate or trunk lid fully
R the roof carrier does not come into
contact with the antenna
! To avoid damaging or scratching the
covers, do not use metallic or hard objects
to open them.
The maximum roof load is 220 lbs(100 kg).
An incorrectly secured roof carrier or roof
load may become detached from the vehicle.
You must therefore ensure that you observe
the roof carrier manufacturer's installation
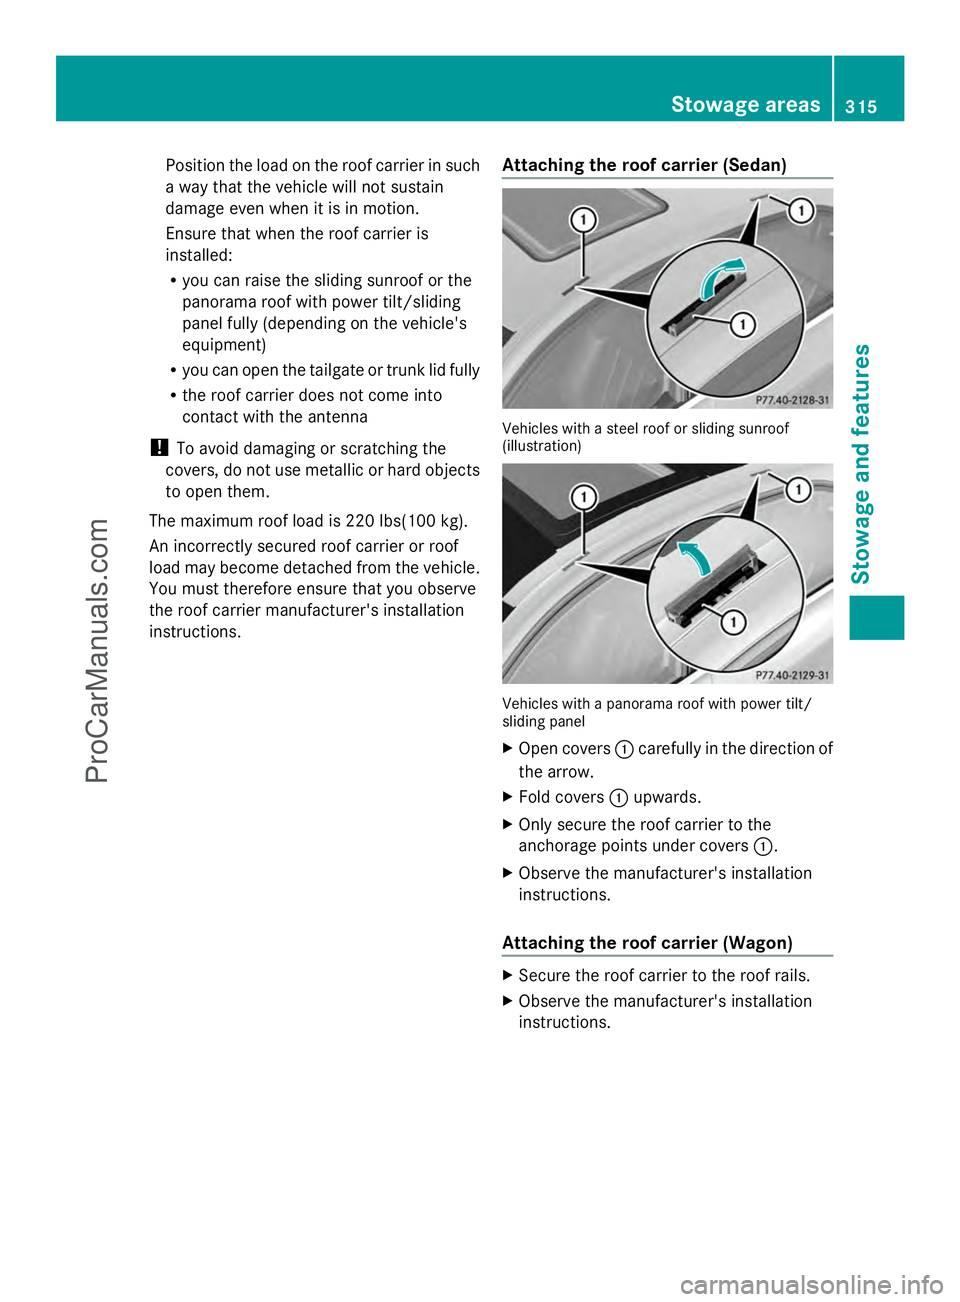
instructions. Attaching the roof carrier (Sedan) Vehicles with a steel roof or sliding sunroof
(illustration)
Vehicles with a panorama roof with power tilt/
sliding panel
X
Open covers :carefully in the direction of
the arrow.
X Fold covers :upwards.
X Only secure the roof carrier to the
anchorage points under covers :.
X Observe the manufacturer's installation
instructions.
Attaching the roof carrier (Wagon) X
Secure the roof carrier to the roof rails.
X Observe the manufacturer's installation
instructions. Stowage areas
315Stowage and features Z
ProCarManuals.com
Page 344 of 430
Do not scrub.
Do not touch the surfaces or protective
films with hard objects, e.g. a ring or ice
scraper. You could otherwise scratch or
damage the surfaces and protective film.
! Do not park the vehicle for an extended
period straight after cleaning it, particularly
after having cleaned the wheels with wheel
cleaner. Wheel cleaners could cause
increased corrosion of the brake discs and
brake pads/linings. For this reason, you
should drive for a few minutes after
cleaning. Braking heats the brake discs and
the brake pads/linings, thus drying them.
The vehicle can then be parked.
Regular care of your vehicle is a condition for
retaining the quality in the long term.
Use care products and cleaning agents
recommended and approved by Mercedes-
Benz. Washing the vehicle and cleaning the
paintwork
Automatic car wash G
WARNING
Braking efficiency is reduced after washing
the vehicle. There is a risk of an accident.
After the vehicle has been washed, brake
carefully while paying attention to the traffic
conditions until full braking power is restored.
! If DISTRONIC PLUS or the HOLD function
is activated, the vehicle brakes
automatically in certain situations. To
prevent damage to the vehicle, deactivate
DISTRONIC PLUS and the HOLD function in
the following or other similar situations:
R when towing the vehicle
R in the car wash
! Never clean your vehicle in a Touchless
Automatic Car Wash as these use special
cleaning agents. These cleaning agents can
damage the paintwork or plastic parts. !
Make sure that:
R the side windows and the sliding sunroof
are fully closed.
R the ventilation/heating is switched off
(the OFF button has been pressed).
R the windshield wiper switch is in position
0.
Otherwise, the vehicle might be damaged.
! In car washes with a towing mechanism,
make sure that the automatic transmission
is in transmission position N, otherwise the
vehicle could be damaged.
R Vehicles with a SmartKey:
Do not remove the SmartKey from the
ignition lock. Do not open the driver's
door or front-passenger door when the
engine is switched off. Otherwise, the
automatic transmission selects park
position Pautomatically and locks the
wheels. You can prevent this by shifting
the automatic transmission to N
beforehand.
R Vehicles with KEYLESS-GO:
Do not open the driver's door or front-
passenger door when the engine is
switched off. Otherwise, the automatic
transmission selects park position P
automatically and locks the wheels.
! If the SmartKey is within the rear
detection range of KEYLESS-GO, the
following situations, for example, could
lead to the unintentional opening of the
trunk lid/tailgate:
R using a car wash
R using a power washer
Make sure that the SmartKey is at least
6.5 ft (2 m) away from the vehicle.
Observe the following to make sure that the
automatic transmission stays in position N:342
CareMaintenance and care
ProCarManuals.com
Page 345 of 430
X
Make sure the vehicle is stationary and the
ignition is switched off.
X Turn the SmartKey to position 2in the
ignition lock (Y page 159).
Use the SmartKey instead of the Start/
Stop button on vehicles with KEYLESS-GO.
X Depress and hold the brake pedal.
X Shift the automatic transmission to
position N.
X Release the brake pedal.
X Release the parking brake.
X Switch off the ignition and leave the
SmartKey in the ignition lock.
You can wash the vehicle in an automatic car
wash from the very start.
If the vehicle is very dirty, pre-wash it before
cleaning it in an automatic car wash.
After using an automatic car wash, wipe off
wax from the windshield and the wiper
blades. This will prevent smears and reduce
wiping noises caused by residue on the
windshield.
Washing by hand In some countries, washing by hand is only
allowed at specially equipped washing bays.
Observe the legal requirements in all
countries concerned.
X Do not use hot water and do not wash the
vehicle in direct sunlight.
X Use a soft sponge to clean.
X Use a mild cleaning agent, such as a car
shampoo approved by Mercedes-Benz.
X Thoroughly hose down the vehicle with a
gentle jet of water.
X Do not point the water jet directly towards
the air inlet.
X Use plenty of water and rinse out the
sponge frequently.
X Rinse the vehicle with clean water and dry
thoroughly with a chamois.
X Do not let the cleaning agent dry on the
paintwork. When using the vehicle in winter, remove all
traces of road salt deposits carefully and as
soon as possible.
Power washers G
WARNING
The water jet from a circular jet nozzle (dirt
blasters) can cause invisible exterior damage
to the tires or chassis components.
Components damaged in this way may fail
unexpectedly. There is a risk of an accident.
Do not use power washers with circular jet
nozzles to clean the vehicle. Have damaged
tires or chassis components replaced
immediately.
! Always maintain a distance of at least
11.8 in (30 cm) between the vehicle and the
power washer nozzle. Information about
the correct distance is available from the
equipment manufacturer.
Move the power washer nozzle around
when cleaning your vehicle.
Do not aim directly at any of the following:
R tires
R door gaps, roof gaps, joints, etc.
R electrical components
R battery
R connectors
R lights
R seals
R trim
R ventilation slots
Damaged seals or electrical components
can lead to leaks or failures.
! If the SmartKey is within the rear
detection range of KEYLESS-GO, the
following situations, for example, could
lead to the unintentional opening of the
trunk lid/tailgate:
R using a car wash
R using a power washer Care
343Maintenance and care Z
ProCarManuals.com
Page 376 of 430
Bar indicator
:for tread wear is integrated
into the tire tread.
Treadwear indicators (TWI) are required by
law. Six indicators are positioned on the tire
tread. They are visible once a tread depth of
approximately áin (1.6 mm) has been
reached. If this is the case, the tire is so worn
that it must be replaced. Selecting, mounting and replacing
tires
R Only mount tires and wheels of the same
type and make.
Exception: it is permissible to install a
different type or make in the event of a flat
tire. Observe the "MOExtended tires (tires
with run-flat characteristics" section
(Y page 354).
R Only mount tires of the correct size onto
the wheels.
R Break in new tires at moderate speeds for
the first 60 miles (100 km). They only reach
their full performance after this distance.
R Do not drive with tires which have too little
tread depth, as this significantly reduces
the traction on wet roads (hydroplaning).
R Replace the tires after six years at the
latest, regardless of wear.
Observe the notes on the emergency spare
wheel (Y page 410). MOExtended tires (tires with run-flat
properties)
With MOExtended tires (tires with run flat
characteristics), you can continue to drive
your vehicle even if there is a total loss of
pressure in one or more tires.
MOExtended tires may only be used in
conjunction with an active tire pressure loss
warning system or with an active tire pressure
monitor and on wheels specifically tested by
Mercedes-Benz. Notes on driving with MOExtended tires with
a flat tire (Y
page 354).
i Vehicles equipped with MOExtended tires
are not equipped with a TIREFIT kit at the
factory. It is therefore recommended that
you additionally equip your vehicle with a
TIREFIT kit if you mount tires that do not
feature run-flat properties, e.g. winter tires.
A TIREFIT kit can be obtained from a
qualified specialist workshop. Winter operation
General notes
Have your vehicle winterproofed at a qualified
specialist workshop at the onset of winter.
Observe the notes in the "Changing a wheel"
section (Y page 395). Driving with summer tires
At temperatures below 45 ‡(+7 †), summer
tires lose elasticity significantly, and
therefore traction and braking power as well.
Change the tires on your vehicle to
M+S tires. Using summer tires at very cold
temperatures could cause cracks to form,
thereby damaging the tires permanently.
Mercedes-Benz cannot accept responsibility
for this type of damage. M+S tires
G
WARNING
M+S tires with a tire tread depth of less than
ã in (4 mm) are not suitable for use in winter
and do not provide sufficient traction. There
is a risk of an accident.
M+S tires with a tread depth of less than ã
in (4 mm) must be replaced immediately.
At temperatures below 45 ‡ (+7 †), use
winter tires or all-weather tires. Both types of
tire are identified by the M+S marking. 374
Winter operationWheels and tires
ProCarManuals.com
Page 382 of 430
R
you adopt a very sporty driving style
(cornering at high speeds or driving with
high rates of acceleration).
R you are driving with a heavy load (in the
vehicle or on the roof).
Restarting the tire pressure loss
warning system Restart the tire pressure loss warning system
if you have:
R changed the tire pressure
R changed the wheels or tires
R mounted new wheels or tires
X Before restarting, make sure that the tire
pressures are set properly on all four tires
for the respective operating conditions.
The recommended tire pressure can be
found on the Tire and Loading Information
placard on the B-pillar on the driver's side.
Additionally, a tire pressure table is
attached to the fuel filler flap. The tire
pressure loss warning system can only give
reliable warnings if you have set the correct
tire pressure. If an incorrect tire pressure
is set, these incorrect values will be
monitored.
X Also observe the notes in the section on tire
pressures ( Ypage 376).
X Make sure that the SmartKey is in position
2 in the ignition lock (Y page 159).
X Press the =or; button on the
steering wheel to select the Service
Service
menu.
X Press the 9or: button on the
steering wheel to select the Tire
Tire
Pressure Pressure menu.
X Press the abutton.
The Run Flat Indicator Active
Run Flat Indicator Active
Press 'OK' to Restart
Press 'OK' to Restart message
appears in the multifunction display. If you wish to confirm the restart:
X
Press the abutton.
The Tire Pressure Now OK? Tire Pressure Now OK? message
appears in the multifunction display.
X Press the 9or: button to select
Yes
Yes .
X Press the abutton.
The Run Flat Indicator Restarted
Run Flat Indicator Restarted
message appears in the multifunction
display.
After a teach-in period, the tire pressure
loss warning system will monitor the set
tire pressures of all four tires.
If you wish to cancel the restart:
X Press the %button.
or
X When the Tire Pressure Now OK? Tire Pressure Now OK?
message appears, press the 9
or : button to select Cancel
Cancel.
X Press the abutton.
The tire pressure values stored at the last
restart will continue to be monitored. Tire pressure monitor
General notes If a tire pressure monitor is installed, the
vehicle's wheels have sensors that monitor
the tire pressures in all four tires. The tire
pressure monitor warns you if the pressure
drops in one or more of the tires. The tire
pressure monitor only functions if the correct
sensors are installed on all wheels.
Information on tire pressures is displayed in
the multifunction display. After a few minutes
of driving, the current tire pressure of each
tire is shown in the Service Servicemenu of the
multifunction display. 380
Ti
re pressureWhe els and tires
ProCarManuals.com
Page 396 of 430
Curb weight
The weight of a vehicle with standard
equipment including the maximum capacity
of fuel, oil and coolant. It also includes the air-
conditioning system and optional equipment
if these are installed in the vehicle, but does
not include passengers or luggage.
Maximum load rating
The maximum tire load is the maximum
permissible weight in kilograms or lbs for
which a tire is approved.
Maximum permissible tire pressure
Maximum permissible tire pressure for one
tire.
Maximum load on one tire
Maximum load on one tire. This is calculated
by dividing the maximum axle load of one axle
by two.
PSI (pounds per square inch)
A standard unit of measure for tire pressure.
Aspect ratio
Relationship between tire height and tire
width in percent.
Tire pressure
This is pressure inside the tire applying an
outward force to each square inch of the tire's
surface. The tire pressure is specified in
pounds per square inch (psi), in kilopascal
(kPa) or in bar. The tire pressure should only
be corrected when the tires are cold.
Cold tire pressure
The tires are cold:
R if the vehicle has been parked without
direct sunlight on the tires for at least three
hours and
R if the vehicle has been driven for less than
1 mile (1.6 km). Tread
The part of the tire that comes into contact
with the road.
Bead
The tire bead ensures that the tire sits
securely on the wheel. There are several steel
wires in the bead to prevent the tire from
coming loose from the wheel rim.
Sidewall
The part of the tire between the tread and the
bead.
Weight of optional extras
The combined weight of those optional extras
that weigh more than the replaced standard
parts and more than 2.3 kilograms (5 lbs).
These optional extras, such as high-
performance brakes, level control, a roof rack
or a high-performance battery, are not
included in the curb weight and the weight of
the accessories.
TIN (Tire Identification Number)
This is a unique identifier which can be used
by a tire manufacturer to identify tires, for
example for a product recall, and thus identify
the purchasers. The TIN is made up of the
manufacturer's identity code, tire size, tire
type code and the manufacturing date.
Load bearing index
The load bearing index (also load index) is a
code that contains the maximum load bearing
capacity of a tire.
Traction
Traction is the result of friction between the
tires and the road surface.
Treadwear indicators
Narrow bars (tread wear bars) that are
distributed over the tire tread. If the tire tread
is level with the bars, the wear limit of áin
(1.6 mm) has been reached. 394
All about wheels and tiresWheels and tires
ProCarManuals.com