2014 MERCEDES-BENZ E-SEDAN emergency towing
[x] Cancel search: emergency towingPage 12 of 430
ECO display
Function/notes ............................. 185
On-board computer .......................242
ECO start/stop function
Automatic engine start ..................164
Automatic engine switch-off ..........163
Deactivating/activating .................164
General information .......................163
Important safety notes ..................163
Introduction ................................... 163
Electronic Stability Program
see ESP ®
(Electronic Stability Program)
Emergency release
Driver's door .................................... 90
Fuel filler fla p................................. 177
Trunk ............................................... 97
Vehicle ............................................. 90
Emergency spare wheel
Important safety notes ..................410
Points to remember .......................410
Removing ....................................... 411
Storage location ............................ 411
Stowing .......................................... 412
Technical data ............................... 414
Emergency Tensioning Devices
Function .......................................... .59
Safety guideline s............................. 41
Emergency unlocking
Tailgate ............................................ 97
Emissions control
Service and warranty information ....23
Engine
Check Engine warning lamp ........... 292
Display message ............................ 269
ECO start/stop function ................163
Engine number ............................... 417
Irregular running ............................ 166
Jump-starting ................................. 362
Starting problems ..........................166
Starting the engine with the
SmartKey ....................................... 161
Starting with KEYLESS-GO .............161
Switching off .................................. 182
Tow-starting (vehicle) ..................... 367
Engine electronics
Problem (malfunction) ...................166Engine oil
Adding ........................................... 338
Additives ........................................ 422
Checking the oil level ..................... 337
Checking the oil level using the
dipstick .......................................... 338
Display message ............................ 271
Filling capacity ............................... 422
Notes about oil grades ................... 422
Notes on oil level/consumption ....337
Temperature (on-board computer) .253
Viscosity ........................................ 423
ESP ®
(Electronic Stability
Program) AMG menu (on-board computer) ...254
Deactivating/activating (AMG
vehicles) .......................................... 74
Deactivating/activating (except
AMG vehicles) ................................ 247
Deactivating/activating (notes;
except AMG vehicles) ......................73
Display message ............................ 258
ETS/4ETS ........................................ 72
Function/notes ................................ 72
General notes .................................. 72
Important safety information ...........72
Warning lamp ................................. 289
ETS/4ETS (Electronic Traction
System) ................................................ 72
Exhaust check ................................... 184
Exhaust pipe (cleaning instructions) 347
Exterior lighting Setting options .............................. 128
see Lights
Exterior mirrors
Adjusting ....................................... 122
Dipping (automatic) .......................124
Folding in/out (automatically). ......123
Folding in/out (electrically). ..........123
Folding in when locking (on-board
computer) ...................................... 252
Out of position (troubleshooting) ...124
Setting ........................................... 123
Storing settings (memory function) 125
Storing the parking position ..........124
Eyeglasses compartment .................29910
IndexProCarManuals.com
Page 22 of 430
Uniform Tire Quality Grading
Standards
...................................... 387
Uniform Tire Quality Grading
Standards (definition) ....................393
Unladen weight (definition) ............394
Wear indicator (definition) .............394
Wheel rim (definition) ....................393
see Flat tire
Top Tether ............................................ 64
Towing Important safety guidelines ...........364
Installing the towing eye ................365
Removing the towing eye ...............366
With the rear axle raised ................366
Towing away
With both axles on the ground .......366
Tow-starting
Emergency engine starting ............367
Important safety notes ..................364
Transfer case ..................................... 175
Transmission see Automatic transmission
Transmission position display .........168
Transmission position display
(DIRECT SELECT lever) ......................168
Transporting the vehicle ..................366
Trim pieces (cleaning instructions) .348
Trip computer (on-board computer) 241
Trip odometer Calling up ....................................... 241
Resetting (on-board computer) ......242
Trunk
Emergency release ..........................97
Locking separately ...........................96
Opening/closing (from outside,
HANDS-FREE ACCESS) ....................93
Trunk lid
Display message ............................ 282
Opening dimensions ......................426
Trunk load (maximum) ......................426
Turn signals Changing bulbs (front) ...................138
Display message ............................ 266
Switching on/off ........................... 131
Type identification plate
see Vehicle identification plate U
Unlocking Emergency unlocking .......................90
From inside the vehicle (central
unlocking button) ............................. 89 V
Vanity mirror (in the sun visor) ........317
Vehicle Correct use ...................................... 27
Data acquisition ............................... 28
Display message ............................ 282
Equipment ....................................... 23
Individual settings ..........................249
Limited Warranty ............................. 27
Loading .......................................... 383
Locking (in an emergency) ...............90
Locking (SmartKey) .......................... 82
Lowering ........................................ 400
Maintenance .................................... 24
Parking for a long period ................ 183
Pulling away ................................... 162
Raising ........................................... 397
Reporting problems .........................27
Securing from rolling away ............396
Towing away .................................. 364
Transporting .................................. 366
Unlocking (in an emergency) ...........90
Unlocking (SmartKey) ......................82
Vehicle data ................................... 426
Vehicle data ....................................... 426
Vehicle dimensions ...........................426
Vehicle emergency locking ................90
Vehicle identification number see VIN
Vehicle identification plate ..............416
Vehicle level AIRMATIC ...................................... 204
Vehicle level (display message) .......273
Vehicle tool kit .................................. 352
Video Operating the DVD ......................... 245
VIN ...................................................... 41620
IndexProCarManuals.com
Page 355 of 430
stowage well under the trunk floor/cargo
compartment floor.
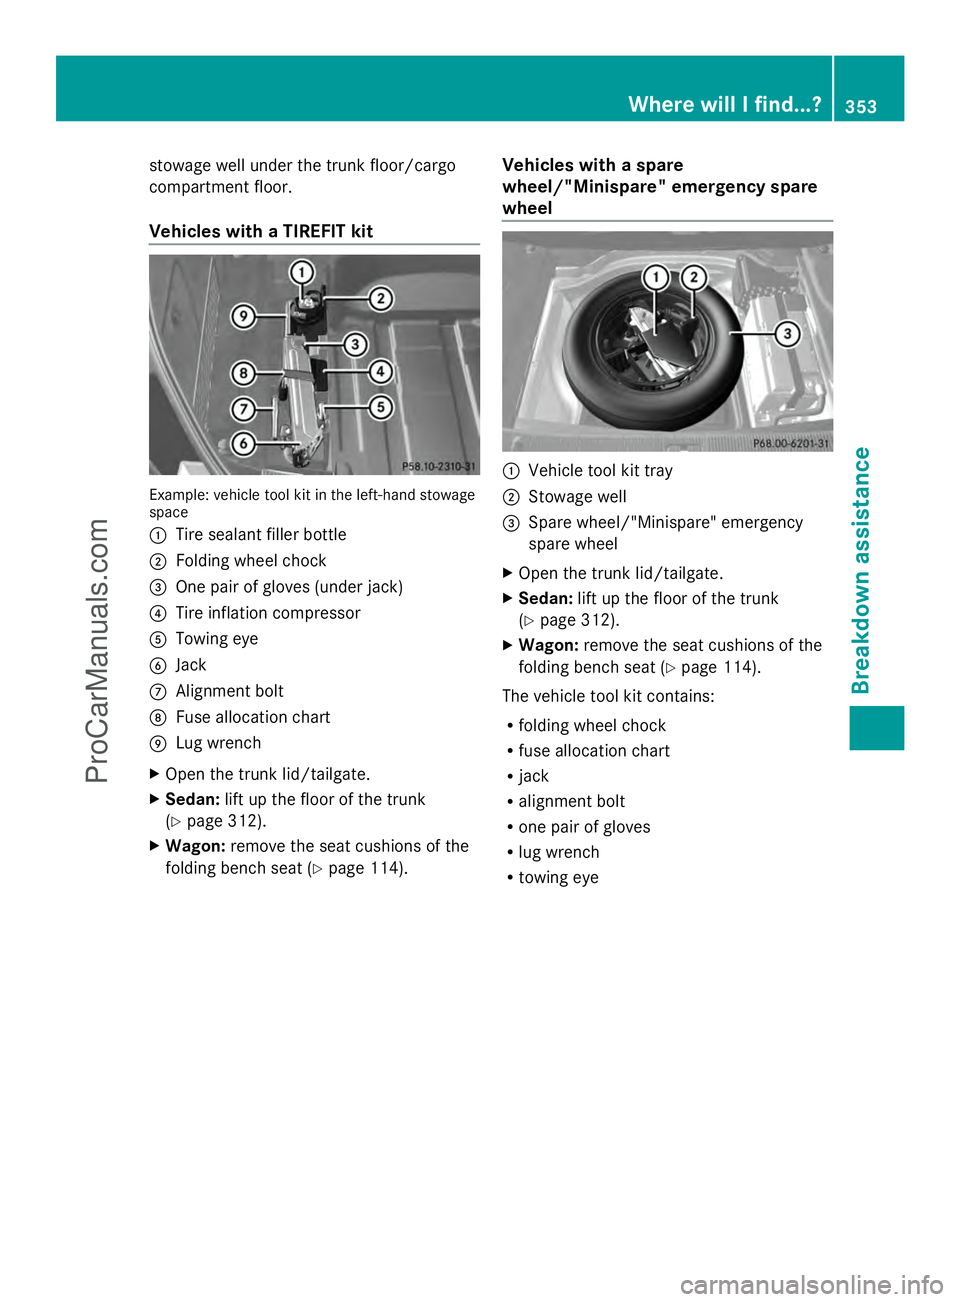
Vehicles with a TIREFIT kit
Example: vehicle tool kit in the left-hand stowage
space
: Tire sealant filler bottle
; Folding wheel chock
= One pair of gloves (under jack)
? Tire inflation compressor
A Towing eye
B Jack
C Alignment bolt
D Fuse allocation chart
E Lug wrench
X Open the trunk lid/tailgate.
X Sedan: lift up the floor of the trunk
(Y page 312).
X Wagon: remove the seat cushions of the
folding bench seat (Y page 114). Vehicles with a spare
wheel/"Minispare" emergency spare
wheel :
Vehicle tool kit tray
; Stowage well
= Spare wheel/"Minispare" emergency
spare wheel
X Open the trunk lid/tailgate.
X Sedan: lift up the floor of the trunk
(Y page 312).
X Wagon: remove the seat cushions of the
folding bench seat (Y page 114).
The vehicle tool kit contains:
R folding wheel chock
R fuse allocation chart
R jack
R alignment bolt
R one pair of gloves
R lug wrench
R towing eye Where will I find...?
353Breakdown assistance
ProCarManuals.com
Page 356 of 430
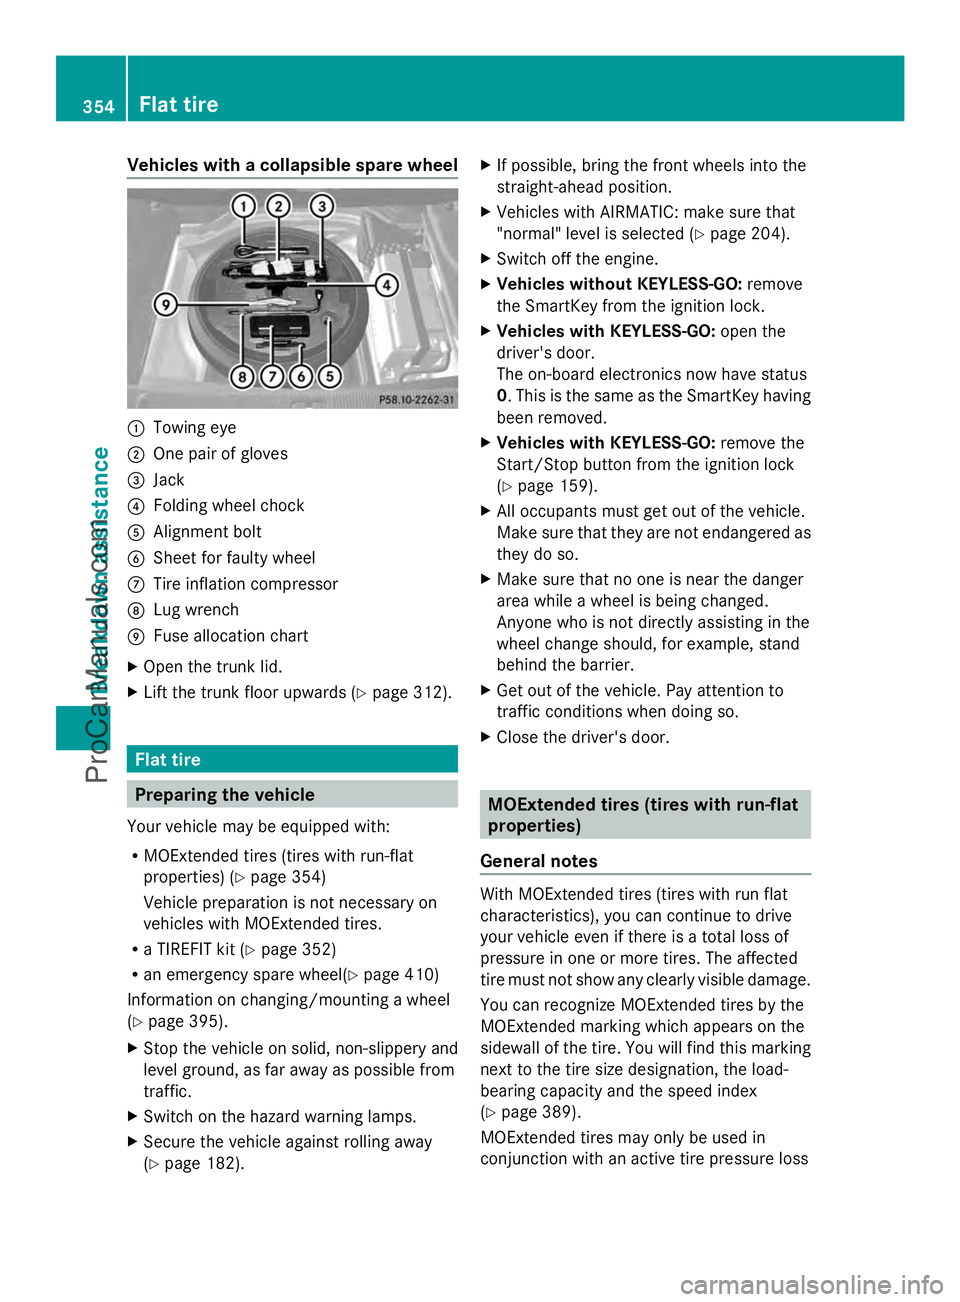
Vehicles with a collapsible spare wheel
:
Towing eye
; One pair of gloves
= Jack
? Folding wheel chock
A Alignment bolt
B Sheet for faulty wheel
C Tire inflation compressor
D Lug wrench
E Fuse allocation chart
X Open the trunk lid.
X Lift the trunk floor upwards (Y page 312).Flat tire
Preparing the vehicle
Your vehicle may be equipped with:
R MOExtended tires (tires with run-flat
properties) (Y page 354)
Vehicle preparation is not necessary on
vehicles with MOExtended tires.
R a TIREFIT kit (Y page 352)
R an emergency spare wheel(Y page 410)
Information on changing/mounting a wheel
(Y page 395).
X Stop the vehicle on solid, non-slippery and
level ground, as far away as possible from
traffic.
X Switch on the hazard warning lamps.
X Secure the vehicle against rolling away
(Y page 182). X
If possible, bring the front wheels into the
straight-ahead position.
X Vehicles with AIRMATIC: make sure that
"normal" level is selected (Y page 204).
X Switch off the engine.
X Vehicles without KEYLESS-GO: remove
the SmartKey from the ignition lock.
X Vehicles with KEYLESS-GO: open the
driver's door.
The on-board electronics now have status
0. This is the same as the SmartKey having
been removed.
X Vehicles with KEYLESS-GO: remove the
Start/Stop button from the ignition lock
(Y page 159).
X All occupants must get out of the vehicle.
Make sure that they are not endangered as
they do so.
X Make sure that no one is near the danger
area while a wheel is being changed.
Anyone who is not directly assisting in the
wheel change should, for example, stand
behind the barrier.
X Get out of the vehicle. Pay attention to
traffic conditions when doing so.
X Close the driver's door. MOExtended tires (tires with run-flat
properties)
General notes With MOExtended tires (tires with run flat
characteristics), you can continue to drive
your vehicle even if there is a total loss of
pressure in one or more tires. The affected
tire must not show any clearly visible damage.
You can recognize MOExtended tires by the
MOExtended marking which appears on the
sidewall of the tire. You will find this marking
next to the tire size designation, the load-
bearing capacity and the speed index
(Y page 389).
MOExtended tires may only be used in
conjunction with an active tire pressure loss 354
Flat tireBreakdo
wn assis tance
ProCarManuals.com
Page 414 of 430
Stowing a used collapsible spare
wheel
! Only place the collapsible spare wheel in
the vehicle when it is dry. Otherwise,
moisture may get into the vehicle.
Take the following steps to stow a used
collapsible spare wheel. It will not otherwise
install into the spare wheel well. Mercedes-
Benz recommends that you have this work
performed at a qualified specialist workshop,
e.g. at an authorized Mercedes-Benz Center.
X Unscrew the valve cap from the valve.
X Use the back of the valve cap to unscrew
the valve insert from the valve and release
the air.
i Fully deflating the tires can take a few
minutes.
X Screw the valve insert back into the valve.
X Screw the valve cap back on.
X Remove the protective sheet from the
vehicle tool kit and pull it over the
collapsible spare wheel.
X Stow the collapsible spare wheel in the
emergency spare wheel well under the
trunk. Inflating the collapsible spare wheel
! Inflate the collapsible spare wheel using
the tire inflation compressor before
lowering the vehicle. The wheel rim could
otherwise be damaged.
! Do not operate the tire inflation
compressor for longer than eight minutes
at a time without a break. It may otherwise
overheat.
The tire inflation compressor can be
operated again once it has cooled down. X
Mount the collapsible spare wheel as
described (Y page 395).
The collapsible spare wheel must be
mounted before it is inflated.
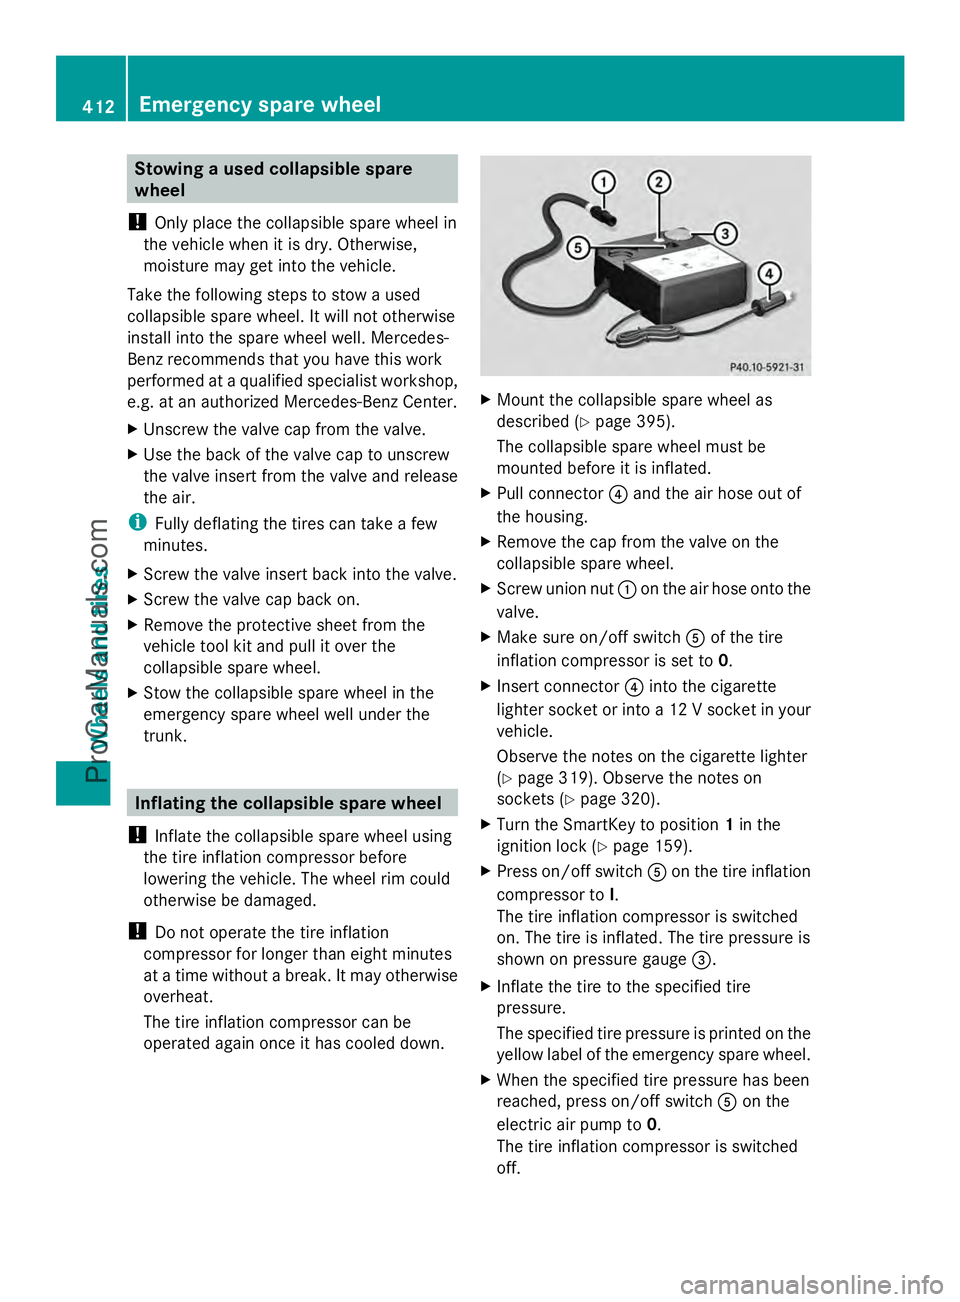
X Pull connector ?and the air hose out of
the housing.
X Remove the cap from the valve on the
collapsible spare wheel.
X Screw union nut :on the air hose onto the
valve.
X Make sure on/off switch Aof the tire
inflation compressor is set to 0.
X Insert connector ?into the cigarette
lighter socket or into a 12 V socket in your
vehicle.
Observe the notes on the cigarette lighter
(Y page 319). Observe the notes on
sockets (Y page 320).
X Turn the SmartKey to position 1in the
ignition lock (Y page 159).
X Press on/off switch Aon the tire inflation
compressor to I.
The tire inflation compressor is switched
on. The tire is inflated. The tire pressure is
shown on pressure gauge =.
X Inflate the tire to the specified tire
pressure.
The specified tire pressure is printed on the
yellow label of the emergency spare wheel.
X When the specified tire pressure has been
reached, press on/off switch Aon the
electric air pump to 0.
The tire inflation compressor is switched
off. 412
Emergency spare wheelWheels and tires
ProCarManuals.com