2014 MERCEDES-BENZ CLS COUPE tailgate
[x] Cancel search: tailgatePage 182 of 417
recesses in the fuel filler flap hinge arm
from above.
X Completely insert the filler neck of the fuel
pump nozzle into the tank, hook in place
and refuel.
X Only fill the tank until the pump nozzle
switches off.
i Vehicles with a diesel engine: the filler
neck is designed for refuelling at diesel fill-
ing pumps.
i Do not add any more fuel after the pump
stops filling for the first time. Otherwise,
fuel may leak out.
Closing the fuel filler flap X
Replace the cap on the filler neck and turn
clockwise until it engages audibly.
X Close the fuel filler flap.
i Close the fuel filler flap before locking the
vehicle. Otherwise, the locking pin of the
central locking prevents the fuel filler flap
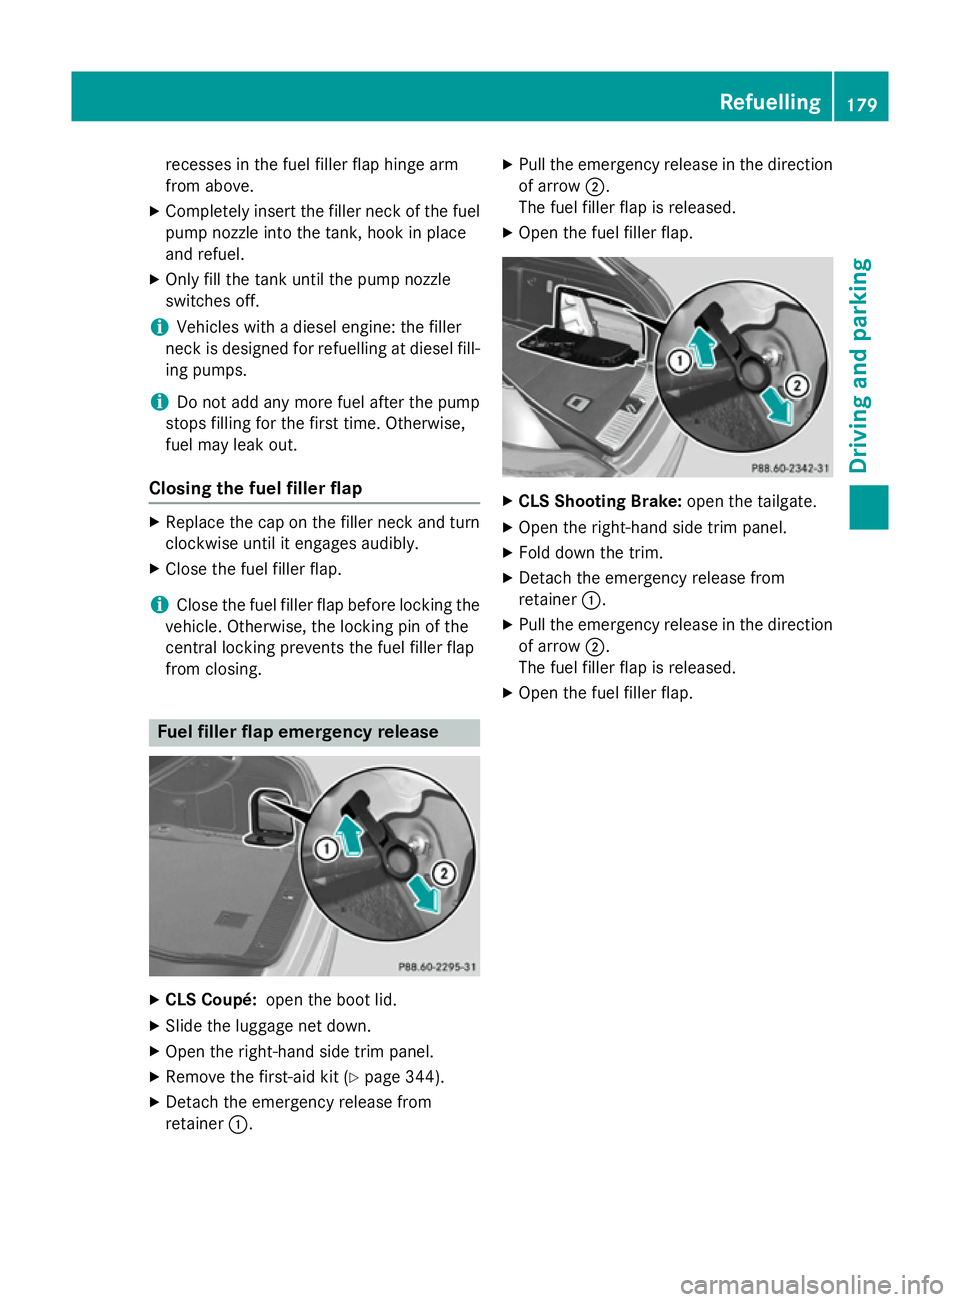
from closing. Fuel filler flap emergency release
X
CLS Coupé: open the boot lid.
X Slide the luggage net down.
X Open the right-hand side trim panel.
X Remove the first-aid kit (Y page 344).
X Detach the emergency release from
retainer :. X
Pull the emergency release in the direction
of arrow ;.
The fuel filler flap is released.
X Open the fuel filler flap. X
CLS Shooting Brake: open the tailgate.
X Open the right-hand side trim panel.
X Fold down the trim.
X Detach the emergency release from
retainer :.
X Pull the emergency release in the direction
of arrow ;.
The fuel filler flap is released.
X Open the fuel filler flap. Refuelling
179Driving and parking Z
Page 209 of 417
Vehicle level
Important safety notes
G
WARNING
People's limbs may become trapped if they
are located underneath the vehicle or
between the vehicle body and the tyres when the vehicle is lowering. There is a danger of
injury.
When lowering the vehicle, make sure no one
is underneath the vehicle or in the immediate vicinity of the wheel arches.
The vehicle may be lowered if you press the
suspension tuning selector button or the
AMG button. The vehicle is lowered even if the
vehicle is at a standstill.
! If Sport or Sport + suspension tuning has
been selected, the vehicle's ground clear-
ance decreases. Make sure that no objects
become trapped or that the vehicle has not
been damaged, for example, on the kerb.
i The vehicle level at the rear axle may
change visibly if you park the vehicle and
the outside temperature changes. If the
temperature drops, the vehicle level low-
ers; with an increase in temperature, the
vehicle level rises.
Changing the rear axle level
This function is only available for the CLS 63
AMG 4MATIC and CLS 63 AMG Shooting
Brake.
The vehicle level at the rear axle depends on
the selected suspension mode and the vehi-
cle speed.
The vehicle level at the rear axle changes
while driving depending on which suspension mode is selected:
R Comfort: +10 mm
R Sport + and Sport: -15 mm
When changing from Comfort to Sport or
Sport +, the axle is lowered approximately
25 mm. When changing from Sport or Sport +
to Comfort, the axle is raised approximately 25 mm. The level change also occurs when
stationary.
If you drive faster than 170 km/h, the rear
axle level is set to a middle level. This increa- ses road safety and reduces air resistance. If
you then drive slower than 150 km/h, the
level of the rear axle is again adjusted to cor- respond to the selected suspension mode.
Load compensation
The vehicle can compensate differences in
the vehicle level by raising or lowering the
rear axle. This is the case, for example, when
people get out of the vehicle or when luggage is removed.
A load compensation occurs if:
R a door or the boot lid/tailgate is opened
R the parked vehicle is unlocked
The engine needs to be running for larger level
changes. 4MATIC (permanent all-wheel drive)
If you fail to adapt your driving style, 4MATIC
can neither reduce the risk of accident nor
override the laws of physics. 4MATIC cannot
take account of road, weather and traffic con- ditions. 4MATIC is only an aid. You are
responsible for the distance to the vehicle in
front, for vehicle speed, for braking in good
time, and for staying in the lane.
If a drive wheel spins due to insufficient grip:
R when pulling away, only depress the accel-
erator pedal as far as is necessary
R accelerate less when driving
! Never tow the vehicle with one axle
raised. This may damage the transfer case.
Damage of this sort is not covered by the
Mercedes-Benz implied warranty. All
wheels must remain either on the ground or be fully raised. Observe the instructions for
towing the vehicle with all wheels in full
contact with the ground.
i In wintry driving conditions, the maximum
effect of 4MATIC can only be achieved if 206
Driving systemsDriving an
d parking
Page 217 of 417
Reversing camera
General notes Example: Coupé
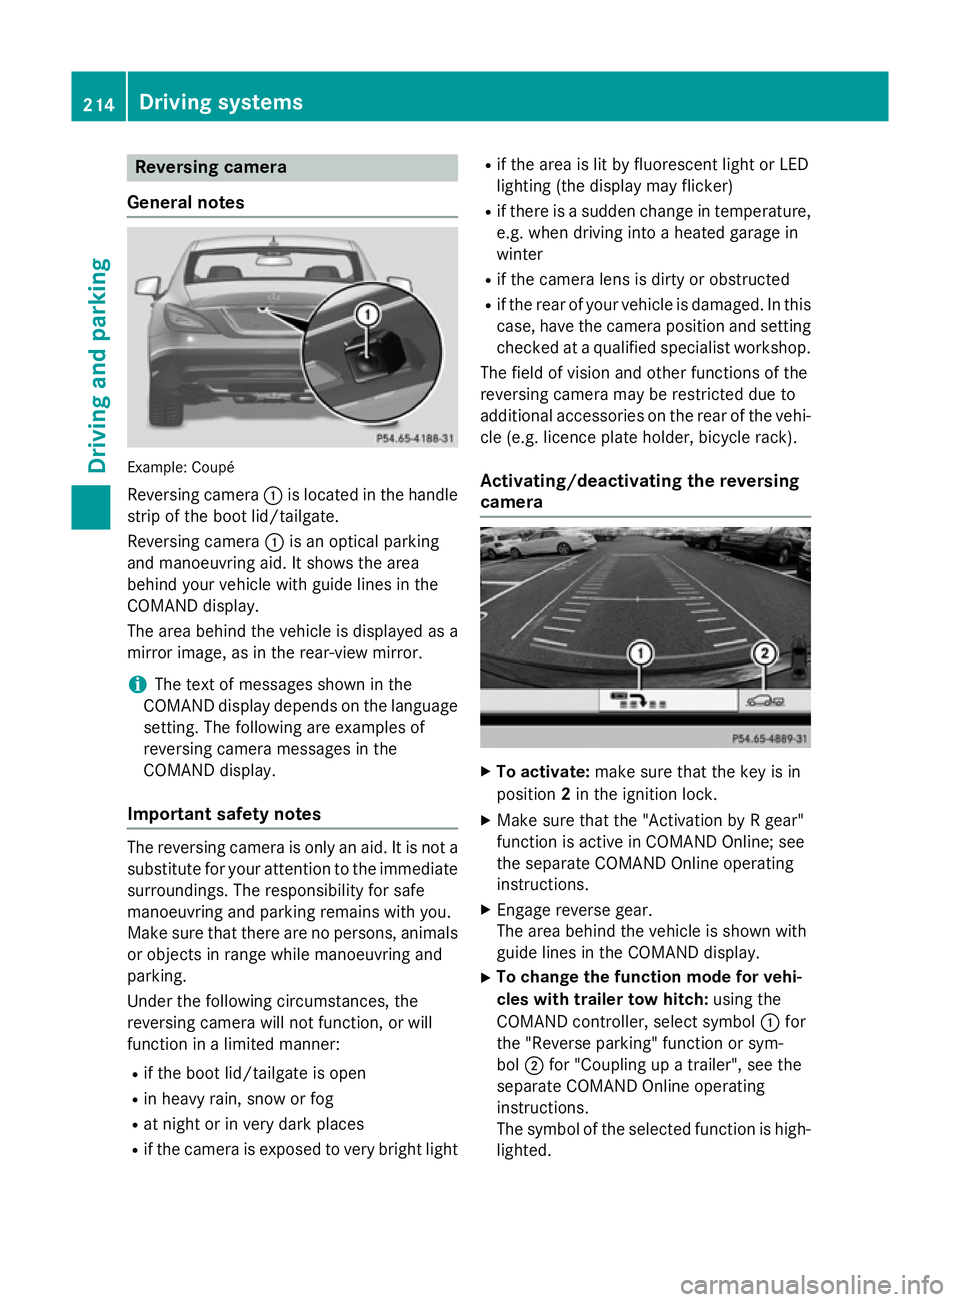
Reversing camera :is located in the handle
strip of the boot lid/tailgate.
Reversing camera :is an optical parking
and manoeuvring aid. It shows the area
behind your vehicle with guide lines in the
COMAND display.
The area behind the vehicle is displayed as a
mirror image, as in the rear-view mirror.
i The text of messages shown in the
COMAND display depends on the language setting. The following are examples of
reversing camera messages in the
COMAND display.
Important safety notes The reversing camera is only an aid. It is not a
substitute for your attention to the immediate
surroundings. The responsibility for safe
manoeuvring and parking remains with you.
Make sure that there are no persons, animals
or objects in range while manoeuvring and
parking.
Under the following circumstances, the
reversing camera will not function, or will
function in a limited manner:
R if the boot lid/tailgate is open
R in heavy rain, snow or fog
R at night or in very dark places
R if the camera is exposed to very bright light R
if the area is lit by fluorescent light or LED
lighting (the display may flicker)
R if there is a sudden change in temperature,
e.g. when driving into a heated garage in
winter
R if the camera lens is dirty or obstructed
R if the rear of your vehicle is damaged. In this
case, have the camera position and setting checked at a qualified specialist workshop.
The field of vision and other functions of the
reversing camera may be restricted due to
additional accessories on the rear of the vehi-
cle (e.g. licence plate holder, bicycle rack).
Activating/deactivating the reversing
camera X
To activate: make sure that the key is in
position 2in the ignition lock.
X Make sure that the "Activation by R gear"
function is active in COMAND Online; see
the separate COMAND Online operating
instructions.
X Engage reverse gear.
The area behind the vehicle is shown with
guide lines in the COMAND display.
X To change the function mode for vehi-
cles with trailer tow hitch: using the
COMAND controller, select symbol :for
the "Reverse parking" function or sym-
bol ;for "Coupling up a trailer", see the
separate COMAND Online operating
instructions.
The symbol of the selected function is high- lighted. 214
Driving systemsDriving and parking
Page 218 of 417
To deactivate:
the reversing camera deacti-
vates if you shift the transmission to Por after
driving forwards a short distance.
Displays in the COMAND display The reversing camera may show a distorted
view of obstacles or show them incorrectly or
not at all. Obstacles are not shown by the
reversing camera in the following locations:
R very close to the rear bumper
R under the rear bumper
R in the area immediately above the tailgate/
boot
i The following reversing camera messages
in the COMAND display correspond to the
display in the CLS Coupé. The details of the
display of the guide lines differ slightly for
the CLS Shooting Brake.
! Objects not at ground level may appear to
be further away than they actually are, e.g.:
R the bumper of a parked vehicle
R the drawbar of a trailer
R the ball coupling of a trailer tow hitch
R the rear section of an HGV
R a slanted post
Use the guidelines only for orientation.
Approach objects no further than the bot-
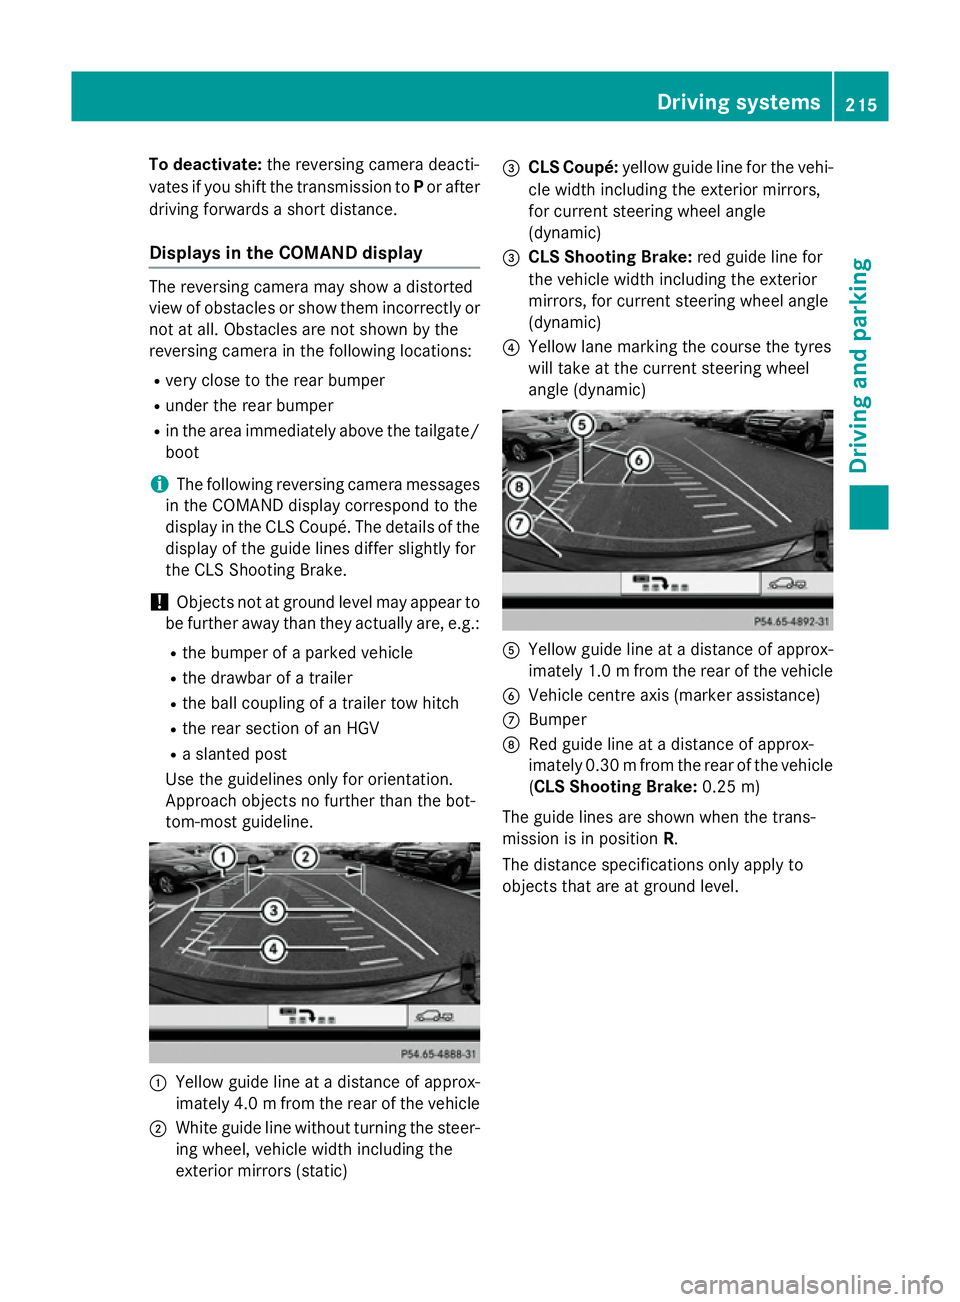
tom-most guideline. :
Yellow guide line at a distance of approx-
imately 4.0 mfrom the rear of the vehicle
; White guide line without turning the steer-
ing wheel, vehicle width including the
exterior mirrors (static) =
CLS Coupé: yellow guide line for the vehi-
cle width including the exterior mirrors,
for current steering wheel angle
(dynamic)
= CLS Shooting Brake: red guide line for
the vehicle width including the exterior
mirrors, for current steering wheel angle
(dynamic)
? Yellow lane marking the course the tyres
will take at the current steering wheel
angle (dynamic) A
Yellow guide line at a distance of approx-
imately 1.0 mfrom the rear of the vehicle
B Vehicle centre axis (marker assistance)
C Bumper
D Red guide line at a distance of approx-
imately 0.30 mfrom the rear of the vehicle
(CLS Shooting Brake: 0.25 m)
The guide lines are shown when the trans-
mission is in position R.
The distance specifications only apply to
objects that are at ground level. Driving systems
215Driving and parking Z
Page 257 of 417
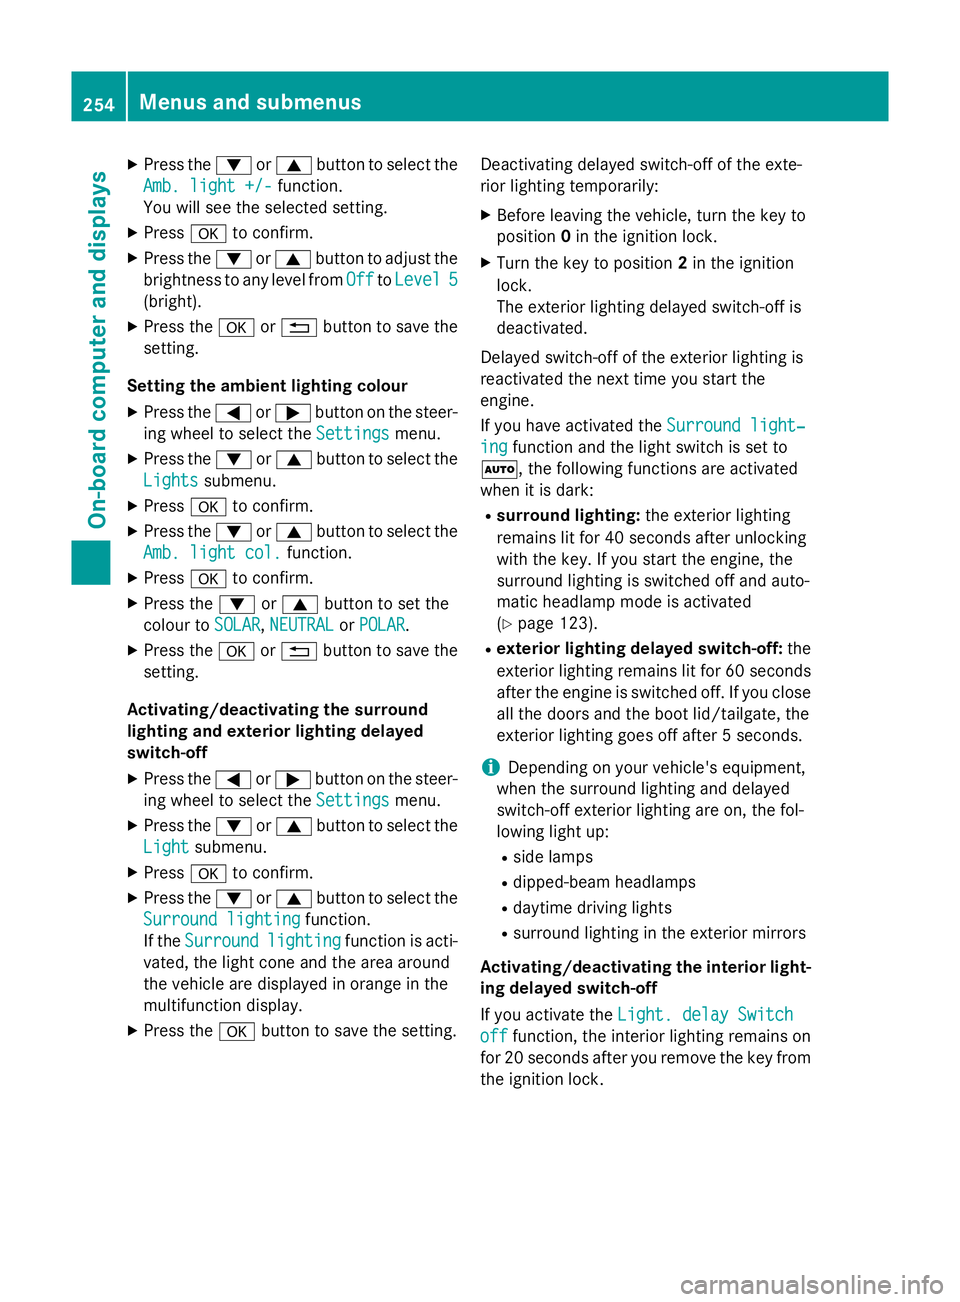
X
Press the :or9 button to select the
Amb. light +/-
Amb. light +/- function.
You will see the selected setting.
X Press ato confirm.
X Press the :or9 button to adjust the
brightness to any level from Off
OfftoLevel 5
Level 5
(bright).
X Press the aor% button to save the
setting.
Setting the ambient lighting colour X Press the =or; button on the steer-
ing wheel to select the Settings
Settings menu.
X Press the :or9 button to select the
Lights
Lights submenu.
X Press ato confirm.
X Press the :or9 button to select the
Amb. light col.
Amb. light col. function.
X Press ato confirm.
X Press the :or9 button to set the
colour to SOLAR
SOLAR, NEUTRAL
NEUTRAL orPOLAR
POLAR.
X Press the aor% button to save the
setting.
Activating/deactivating the surround
lighting and exterior lighting delayed
switch-off
X Press the =or; button on the steer-
ing wheel to select the Settings Settingsmenu.
X Press the :or9 button to select the
Light
Light submenu.
X Press ato confirm.
X Press the :or9 button to select the
Surround lighting
Surround lighting function.
If the Surround
Surround lighting
lightingfunction is acti-
vated, the light cone and the area around
the vehicle are displayed in orange in the
multifunction display.
X Press the abutton to save the setting. Deactivating delayed switch-off of the exte-
rior lighting temporarily:
X Before leaving the vehicle, turn the key to
position 0in the ignition lock.
X Turn the key to position 2in the ignition
lock.
The exterior lighting delayed switch-off is
deactivated.
Delayed switch-off of the exterior lighting is
reactivated the next time you start the
engine.
If you have activated the Surround light‐
Surround light‐
ing ing function and the light switch is set to
Ã, the following functions are activated
when it is dark:
R surround lighting: the exterior lighting
remains lit for 40 seconds after unlocking
with the key. If you start the engine, the
surround lighting is switched off and auto-
matic headlamp mode is activated
(Y page 123).
R exterior lighting delayed switch-off: the
exterior lighting remains lit for 60 seconds
after the engine is switched off. If you close all the doors and the boot lid/tailgate, the
exterior lighting goes off after 5 seconds.
i Depending on your vehicle's equipment,
when the surround lighting and delayed
switch-off exterior lighting are on, the fol-
lowing light up:
R side lamps
R dipped-beam headlamps
R daytime driving lights
R surround lighting in the exterior mirrors
Activating/deactivating the interior light-
ing delayed switch-off
If you activate the Light. delay Switch Light. delay Switch
off
off function, the interior lighting remains on
for 20 seconds after you remove the key from the ignition lock. 254
Menus and submenusOn-board computer and displays
Page 286 of 417
Display messages
Possible causes/consequences and
M
MSolutions Without changing
Without changing
gear, gear,
consult workshop consult workshop You cannot change the transmission position due to a malfunction.
A warning tone also sounds.
If transmission position Dis selected:
X Drive to a qualified specialist workshop without shifting the
transmission from position D.
If transmission position R,Nor Pis selected:
X Consult a qualified specialist workshop. Only select Park Only select Park
(P) (P)
when vehicle is when vehicle is
stationary stationary The vehicle is moving.
X
Pull over and stop the vehicle safely as soon as possible, paying
attention to road and traffic conditions.
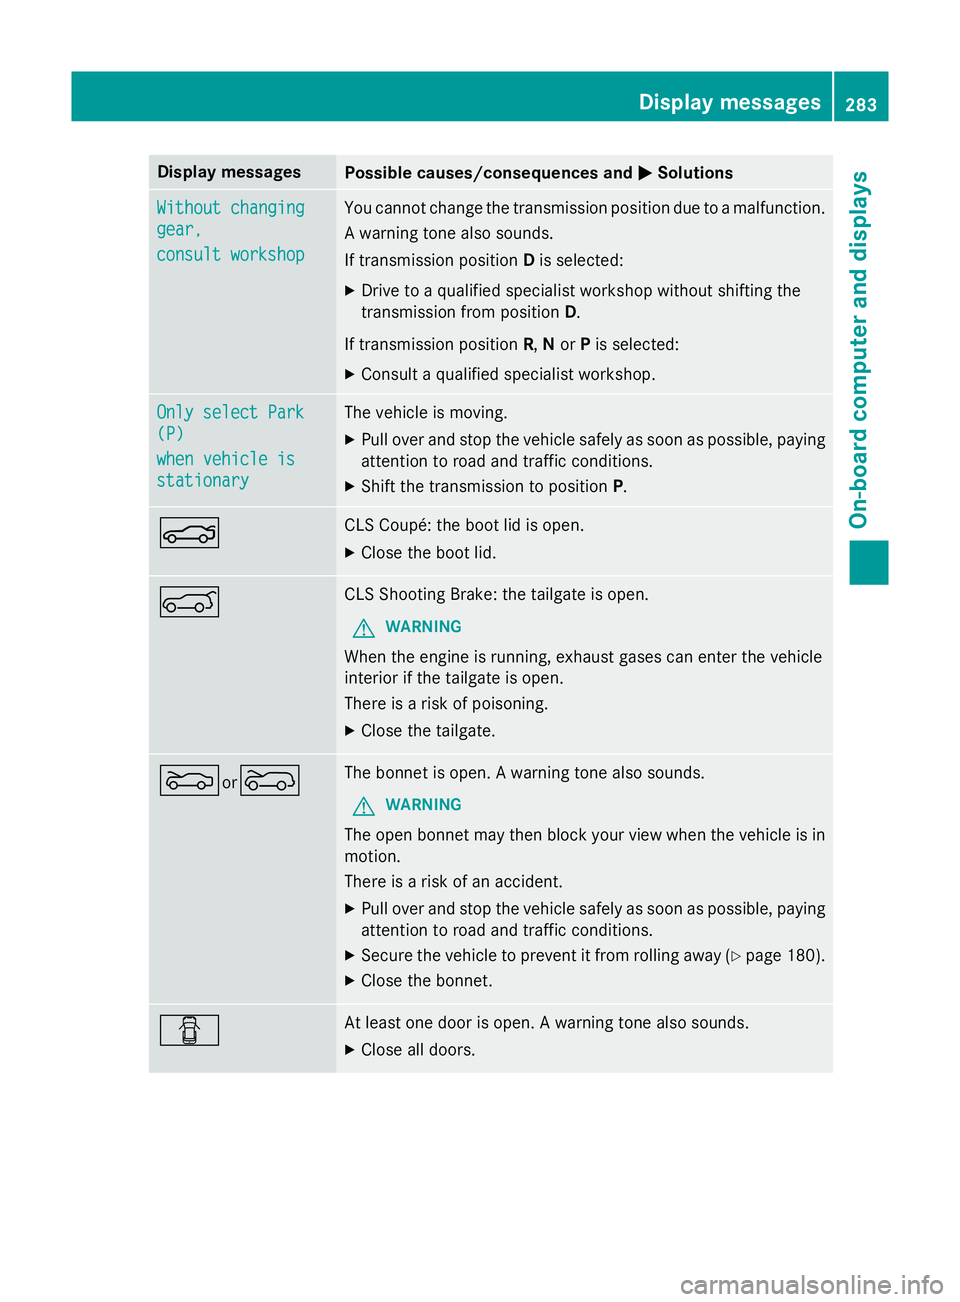
X Shift the transmission to position P.N CLS Coupé: the boot lid is open.
X Close the boot lid. A CLS Shooting Brake: the tailgate is open.
G WARNING
When the engine is running, exhaust gases can enter the vehicle
interior if the tailgate is open.
There is a risk of poisoning.
X Close the tailgate. Mor
? The bonnet is open. A warning tone also sounds.
G WARNING
The open bonnet may then block your view when the vehicle is in
motion.
There is a risk of an accident.
X Pull over and stop the vehicle safely as soon as possible, paying
attention to road and traffic conditions.
X Secure the vehicle to prevent it from rolling away (Y page 180).
X Close the bonnet. C At least one door is open. A warning tone also sounds.
X Close all doors. Display
messages
283On-board computer and displays Z
Page 303 of 417
Useful information
i This Owner's Manual describes all mod-
els, series and optional equipment for your
vehicle that were available at the time of
going to press. National variations are pos- sible. Note that your vehicle may not be
equipped with all of the functions descri-
bed. This is also the case for systems and
functions relevant to safety.
i Read the information on qualified special-
ist workshops: (Y page 26). Stowage areas
Loading guidelines
G
WARNING
If objects, luggage or loads are not secured or not secured sufficiently, they could slip, tip
over or be flung around and thereby hit vehicle
occupants. There is a risk of injury, especially when braking or abruptly changing directions.
Always store objects so that they cannot be
flung around. Secure objects, luggage or
loads against slipping or tipping before the
journey. G
WARNING
Combustion engines emit poisonous exhaust
gases such as carbon monoxide. Exhaust
gases can enter the vehicle interior if the boot
lid/tailgate is open when the engine is run-
ning, especially if the vehicle is in motion.
There is a risk of poisoning.
Always switch off the engine before opening
the boot lid/tailgate. Never drive with the
boot lid/tailgate open. The handling characteristics of a laden vehi-
cle are dependent on the distribution of the
load within the vehicle. For this reason, you
should observe the following notes when
transporting a load:
R never exceed the maximum permissible
gross vehicle weight or the permissible axle
loads for the vehicle (including occupants).
R the boot/luggage compartment is the pre-
ferred place to store objects.
R position heavy loads as far forwards as pos-
sible and as low down in the boot/luggagecompartment as possible.
R the load must not protrude above the upper
edge of the seat backrests.
R always place the load against the rear or
front seat backrests. Make sure that the
seat backrests are securely locked into
place.
R always place the load behind unoccupied
seats if possible.
R use the lashing eyelets and the luggage
nets to transport loads and luggage.
R only use lashing eyelets and fastening com-
ponents that are suitable for the weight and
size of the load.
R when transporting objects in the luggage
compartment, the combined luggage cover
and net must always be installed (luggage
compartment cover and safety net).
R secure the load with sufficiently strong and
wear-resistant lashing material. Pad sharp
edges for protection.
i Load restraints are available at any quali-
fied specialist workshop, e.g. a Mercedes-
Benz Service Centre. Stowage spaces
Important safety notes G
WARNING
If objects in the passenger compartment are
stowed incorrectly, they can slide or be 300
Stowage areasStowing and features
Page 310 of 417
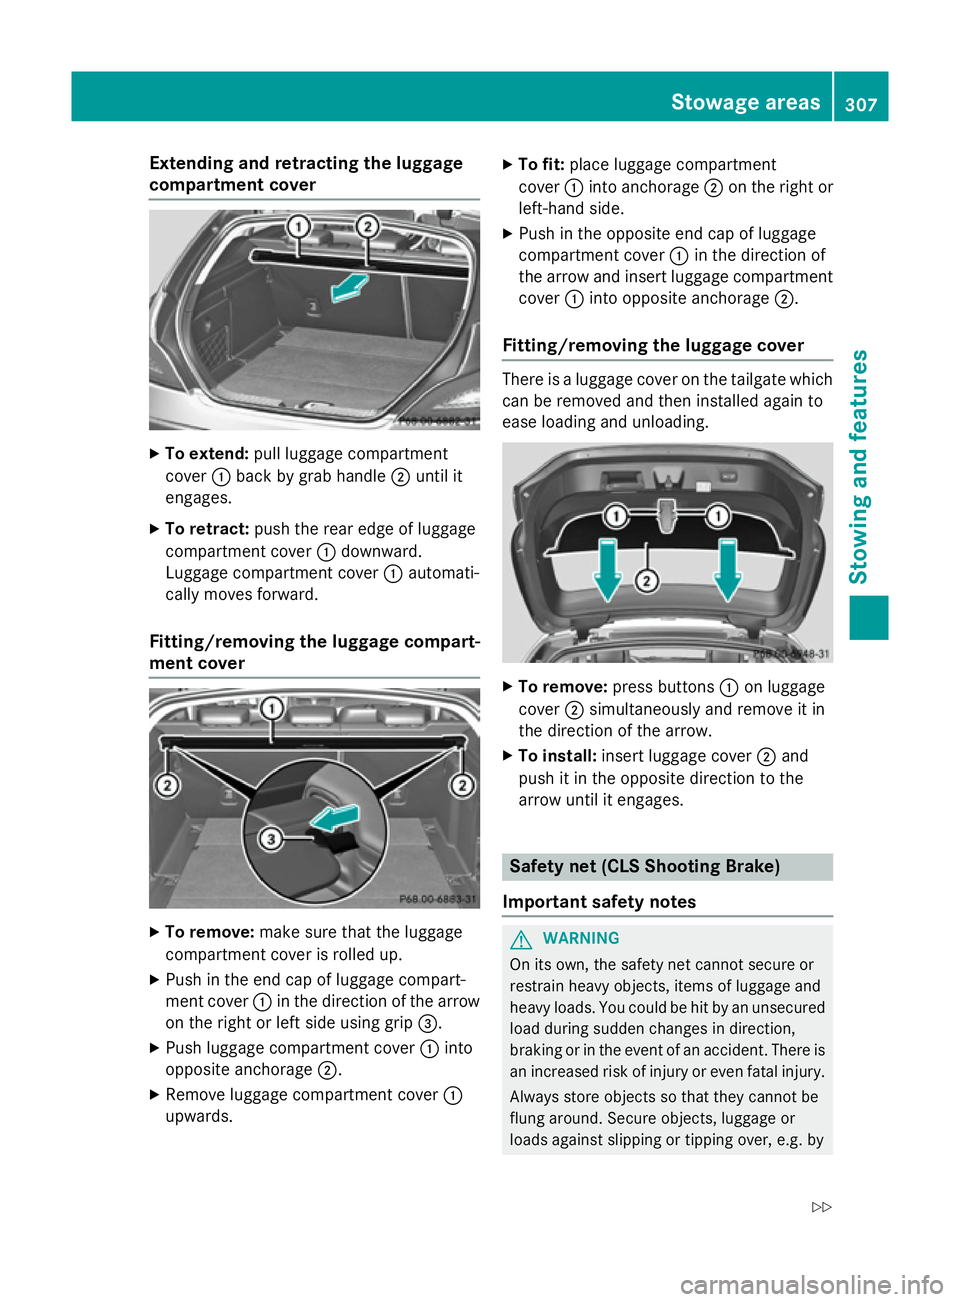
Extending and retracting the luggage
compartment cover X
To extend: pull luggage compartment
cover :back by grab handle ;until it
engages.
X To retract: push the rear edge of luggage
compartment cover :downward.
Luggage compartment cover :automati-
cally moves forward.
Fitting/removing the luggage compart-
ment cover X
To remove: make sure that the luggage
compartment cover is rolled up.
X Push in the end cap of luggage compart-
ment cover :in the direction of the arrow
on the right or left side using grip =.
X Push luggage compartment cover :into
opposite anchorage ;.
X Remove luggage compartment cover :
upwards. X
To fit: place luggage compartment
cover :into anchorage ;on the right or
left-hand side.
X Push in the opposite end cap of luggage
compartment cover :in the direction of
the arrow and insert luggage compartment cover :into opposite anchorage ;.
Fitting/removing the luggage cover There is a luggage cover on the tailgate which
can be removed and then installed again to
ease loading and unloading. X
To remove: press buttons :on luggage
cover ;simultaneously and remove it in
the direction of the arrow.
X To install: insert luggage cover ;and
push it in the opposite direction to the
arrow until it engages. Safety net (CLS Shooting Brake)
Important safety notes G
WARNING
On its own, the safety net cannot secure or
restrain heavy objects, items of luggage and
heavy loads. You could be hit by an unsecured load during sudden changes in direction,
braking or in the event of an accident. There isan increased risk of injury or even fatal injury.
Always store objects so that they cannot be
flung around. Secure objects, luggage or
loads against slipping or tipping over, e.g. by Stowage areas
307Stowing and features
Z