2014 MERCEDES-BENZ CLS COUPE fuel cap release
[x] Cancel search: fuel cap releasePage 15 of 417

Refuellin
g....................................... 177
Tank content/reserve fue l............. 400
Fuel filler flap
Emergency release ........................ 179
Opening ......................................... 178
Fuel filter (white display message) .. 273
Fuel level
Calling up the range (on-board
computer) ...................................... 244
Gaug e.............................................. 32
Fuel reserve
see Fuel
Fuel tank
Capacity ........................................ 400
Problem (malfunction) ................... 180
Fuse allocation chart (vehicle tool
kit) ...................................................... 345
Fuses
Allocation chart ............................. 360
Before changing ............................. 360
Fuse box in the boot ...................... 361
Fuse box in the engine compart-
ment .............................................. 361
Fuse box in the luggage compart-
ment .............................................. 362
Important safety notes .................. 360 G
Garage door opener Clearing the memory ..................... 322
Frequencies ................................... 323
General notes ................................ 320
Important safety notes .................. 320
Opening/closing the garage doo r..3 22
Programming (button in the rear-
view mirror) ................................... 320
Gear indicator (on-board com-
puter) ................................................. .258
Gearshift program
SETUP (on-board computer) .......... 258
Genuine Mercedes-Benz parts ........... 23
Glove compartment .......................... 301H
Handbrake see Parking brake Hazard warning lamps
......................126
Head restraints
Adjusting ....................................... 107
Adjusting (electrically) ................... 108
Adjusting (manually) ..................... .107
Adjusting (rear) .............................. 108
Fitting/removing (rear) .................. 109
Luxury ............................................ 108
see NECK-PRO head restraints
see NECK-PRO luxury head restraints
Headbag
Display message ............................ 267
Headlamp
Cleaning system (function) ............ 127
Cleaning system (notes) ................ 406
Headlamps
Misting up ...................................... 129
Topping up the cleaning system .... 332
see Automatic headlamp mode
Heating
see Climate control
High-pressure cleaners .................... 335
Hill start assist .................................. 162
HOLD function
Activating ....................................... 201
Deactivating ................................... 201
Display message ............................ 275
Function/notes ............................ .200 I
Ignition lock see Key positions
Immobiliser .......................................... 78
In-car hotspot
see Separate operating instructions
Indicator and warning lamp
Restraint system ............................ 294
Indicator and warning lamps
Coolant .......................................... 295
DISTRONIC PLUS ........................... 297
Engine diagnostics ......................... 295
SPORT handling mode ................... 292
Indicator lamps
Display message ............................ 268
see Warning and indicator lamps
Indicators
see Turn signals 12
Index
Page 182 of 417

recesses in the fuel filler flap hinge arm
from above.
X Completely insert the filler neck of the fuel
pump nozzle into the tank, hook in place
and refuel.
X Only fill the tank until the pump nozzle
switches off.
i Vehicles with a diesel engine: the filler
neck is designed for refuelling at diesel fill-
ing pumps.
i Do not add any more fuel after the pump
stops filling for the first time. Otherwise,
fuel may leak out.
Closing the fuel filler flap X
Replace the cap on the filler neck and turn
clockwise until it engages audibly.
X Close the fuel filler flap.
i Close the fuel filler flap before locking the
vehicle. Otherwise, the locking pin of the
central locking prevents the fuel filler flap
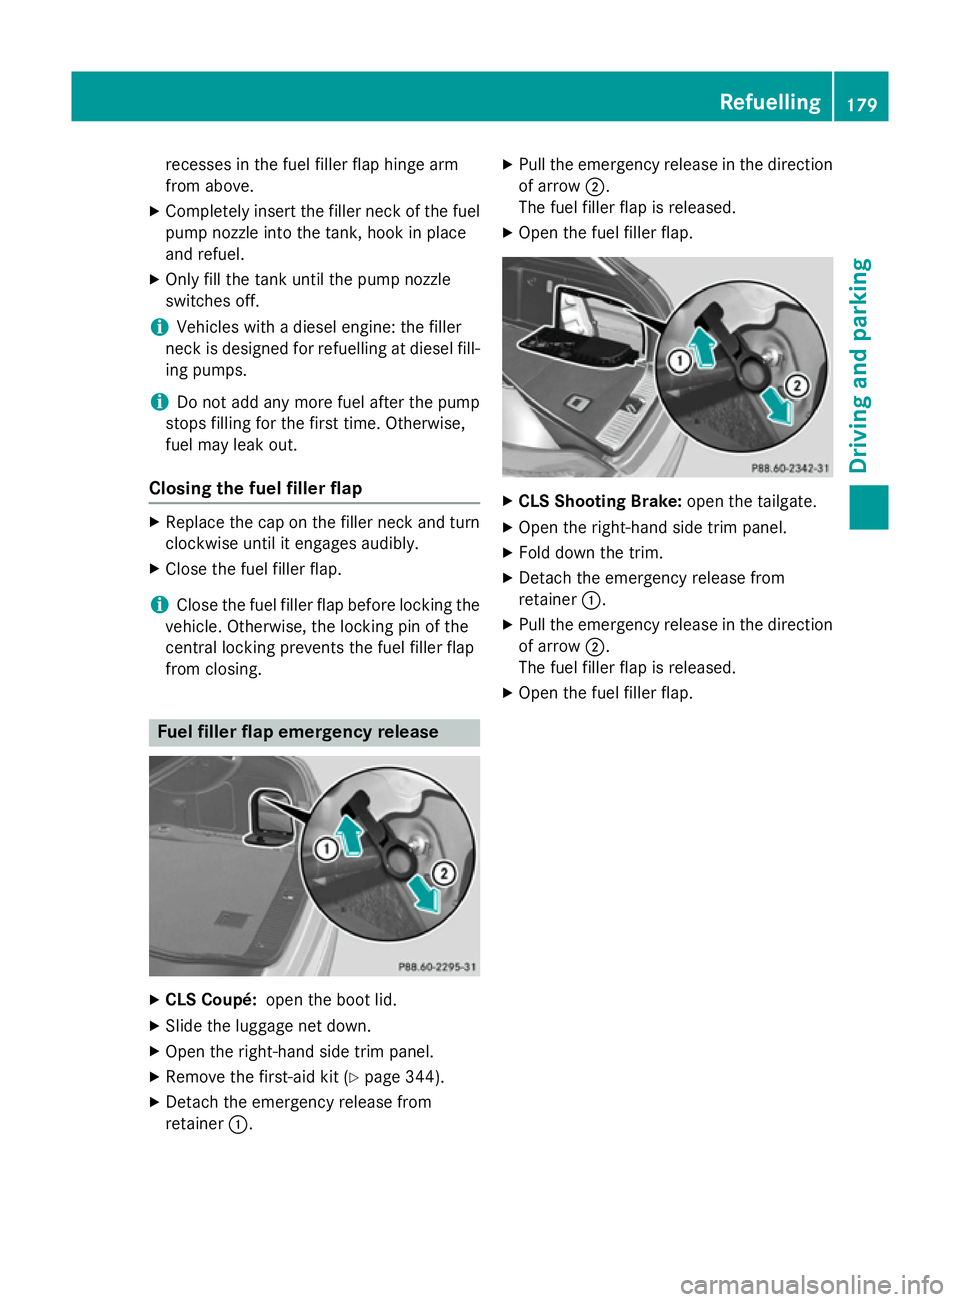
from closing. Fuel filler flap emergency release
X
CLS Coupé: open the boot lid.
X Slide the luggage net down.
X Open the right-hand side trim panel.
X Remove the first-aid kit (Y page 344).
X Detach the emergency release from
retainer :. X
Pull the emergency release in the direction
of arrow ;.
The fuel filler flap is released.
X Open the fuel filler flap. X
CLS Shooting Brake: open the tailgate.
X Open the right-hand side trim panel.
X Fold down the trim.
X Detach the emergency release from
retainer :.
X Pull the emergency release in the direction
of arrow ;.
The fuel filler flap is released.
X Open the fuel filler flap. Refuelling
179Driving and parking Z
Page 237 of 417

prescribed maximum speed in the relevant
country.
For certain Mercedes-Benz vehicles, the max-
imum permissible rear axle load is increased
when towing a trailer. See "Technical data" to
find out whether this applies to your vehicle
(Y page 410). If you utilise any of the added
maximum rear axle load when towing a trailer, the vehicle/trailer combination may not
exceed a maximum speed of 100 km/ hfor
reasons concerning the operating permit.
This also applies in countries in which the
permissible maximum speed for vehicle/
trailer combinations is above 100 km/h.
When towing a trailer, your vehicle's handling
characteristics will be different in comparison
to when driving without a trailer and it will
consume more fuel.
Change into a lower gear in good time on long and steep downhill gradients.
i This also applies if you have activated
cruise control, SPEEDTRONIC or DIS-
TRONIC PLUS.
This will use the braking effect of the engine,
so less braking will be required to maintain
vehicle speed. This relieves the load on the
brake system and prevents the brakes from
overheating and wearing too quickly. If you
need additional braking, depress the brake
pedal repeatedly rather than continuously.
Driving tips If the trailer swings from side to side:
X Do not accelerate.
X Do not countersteer.
X Brake if necessary.
R Maintain a greater distance from the vehi-
cle in front than when driving without a
trailer.
R Avoid braking abruptly. If possible, brake
gently at first to allow the trailer to run on. Then, increase the braking force rapidly.
R The values given for gradient-climbing
capabilities from a standstill refer to sea level. When driving in mountainous areas,
note that the power output of the engine,
and consequently the vehicle's gradient-
climbing capability, decrease with increas-
ing altitude. Folding out the ball coupling
G
WARNING
If the ball coupling is not correctly engaged,
the trailer can detach. There is a risk of an
accident.
Always engage the ball coupling as described. G
WARNING
If you release the ball coupling or it does not
engage correctly when folding in, it will swing out. Within pivoting range of the ball coupling,
there is an increased risk of an accident and
injury.
Only release the ball coupling if the pivoting
range is unobstructed. Always make sure that the ball coupling engages when folding in. CLS Shooting Brake
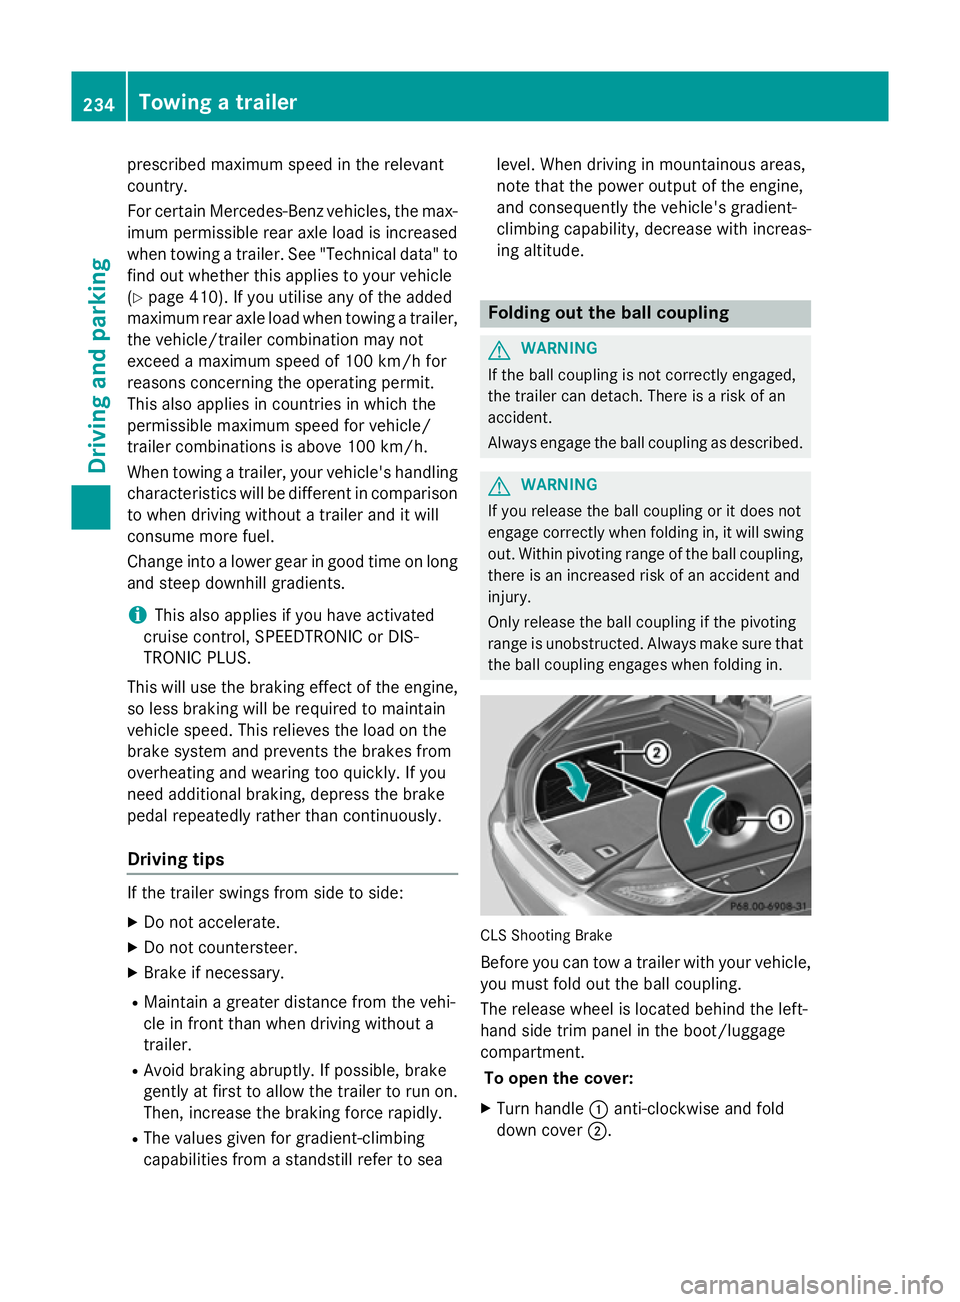
Before you can tow a trailer with your vehicle, you must fold out the ball coupling.
The release wheel is located behind the left-
hand side trim panel in the boot/luggage
compartment.
To open the cover:
X Turn handle :anti-clockwise and fold
down cover ;.234
Towing a trailerDriving and parking
Page 354 of 417

icantly impair the vehicle's braking and driv-
ing characteristics. There is a risk of accident.
Do not continue driving. Contact a qualified
specialist workshop.
i In your vehicle, you will find a sticker with
the Mercedes-Benz Service24h telephone
number, e.g. on the B-pillar on the driver's
side.
X Correct the tyre pressure if it is still at least
130 kPa (1.3 bar/19 psi). See the fuel filler
flap for values.
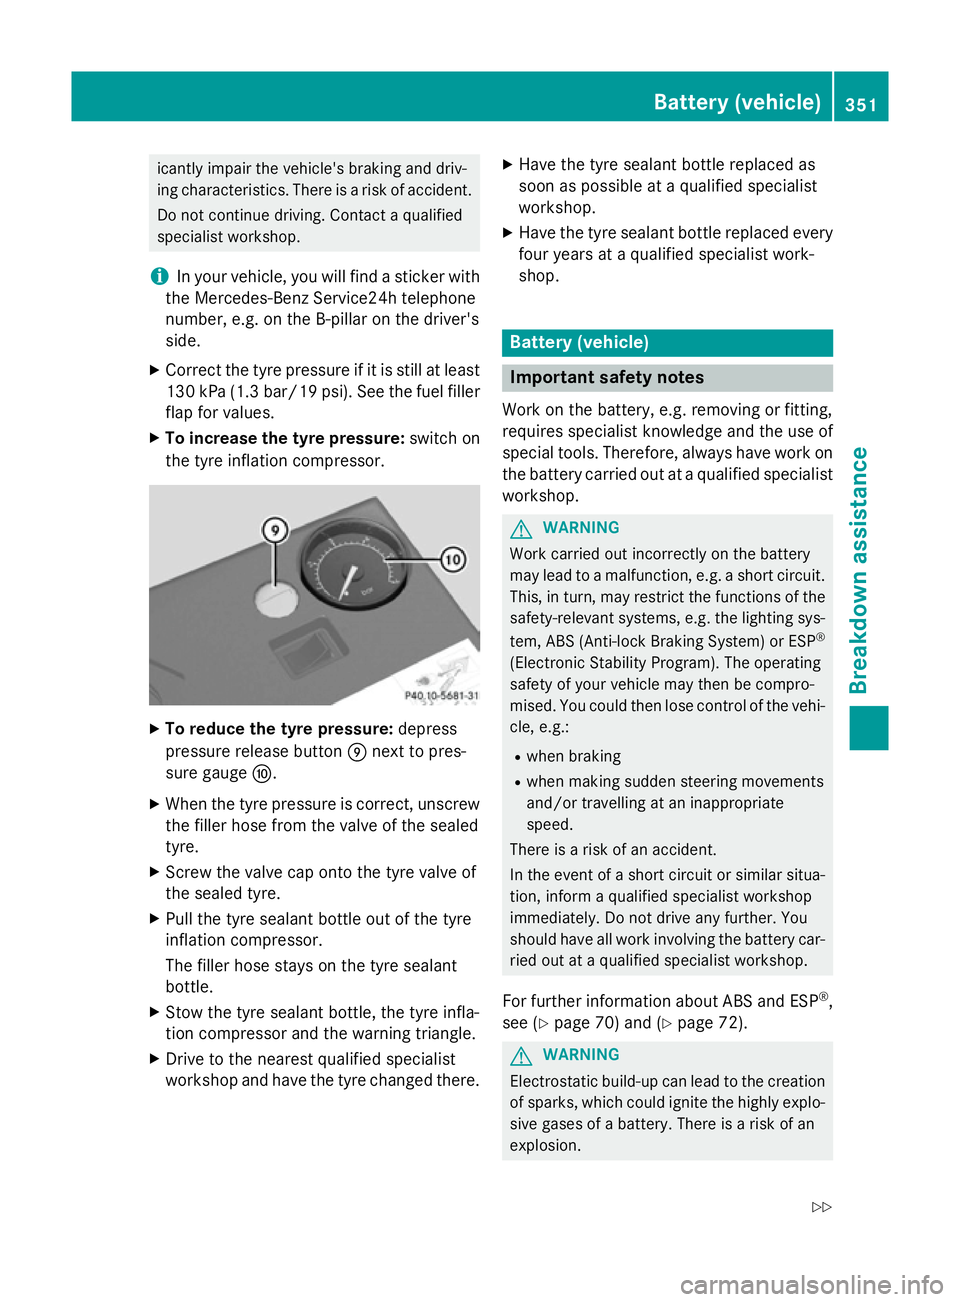
X To increase the tyre pressure: switch on
the tyre inflation compressor. X
To reduce the tyre pressure: depress
pressure release button Enext to pres-
sure gauge F.
X When the tyre pressure is correct, unscrew
the filler hose from the valve of the sealed
tyre.
X Screw the valve cap onto the tyre valve of
the sealed tyre.
X Pull the tyre sealant bottle out of the tyre
inflation compressor.
The filler hose stays on the tyre sealant
bottle.
X Stow the tyre sealant bottle, the tyre infla-
tion compressor and the warning triangle.
X Drive to the nearest qualified specialist
workshop and have the tyre changed there. X
Have the tyre sealant bottle replaced as
soon as possible at a qualified specialist
workshop.
X Have the tyre sealant bottle replaced every
four years at a qualified specialist work-
shop. Battery (vehicle)
Important safety notes
Work on the battery, e.g. removing or fitting,
requires specialist knowledge and the use of
special tools. Therefore, always have work on the battery carried out at a qualified specialist
workshop. G
WARNING
Work carried out incorrectly on the battery
may lead to a malfunction, e.g. a short circuit. This, in turn, may restrict the functions of the
safety-relevant systems, e.g. the lighting sys-
tem, ABS (Anti-lock Braking System) or ESP ®
(Electronic Stability Program). The operating
safety of your vehicle may then be compro-
mised. You could then lose control of the vehi-
cle, e.g.:
R when braking
R when making sudden steering movements
and/or travelling at an inappropriate
speed.
There is a risk of an accident.
In the event of a short circuit or similar situa-
tion, inform a qualified specialist workshop
immediately. Do not drive any further. You
should have all work involving the battery car- ried out at a qualified specialist workshop.
For further information about ABS and ESP ®
,
see (Y page 70) and (Y page 72). G
WARNING
Electrostatic build-up can lead to the creation of sparks, which could ignite the highly explo-
sive gases of a battery. There is a risk of an
explosion. Battery (vehicle)
351Breakdown assistance
Z
Page 406 of 417

global warming (the greenhouse effect). Your
vehicle's CO 2emissions are directly related to
fuel consumption and therefore depend on:
R efficient use of the fuel by the engine
R driving style
R other non-technical factors, such as envi-
ronmental influences, road conditions or
traffic flow
You can minimise your vehicle's CO 2emis-
sions by driving carefully and having it serv-
iced regularly.
The vehicle will use more fuel than usual in the following situations:
R at very low outside temperatures
R in urban traffic
R on short journeys
R in mountainous terrain
R when towing a trailer
i Only for certain countries: you can find
the current consumption and emission val-
ues of your vehicle in the COC documents
(EU CERTIFICATE OF CONFORMITY). These documents are delivered with your vehicle.
The consumption figures were, in each
case, based on the currently applicable ver-sion:
R for vehicles that comply with standards
up to and including the EURO 4 standard,
in accordance with EU Directive
80/1268/EEC
R for vehicles that comply with or exceed
the EURO 5 standard, in accordance with
Regulation (EC) No. 715/2007
Deviations from these values may occur
under normal operating conditions. AdBlue
®
Important safety notes Comply with the important safety notes for
service products when handling AdBlue
®
(Y page 399). AdBlue
®
is a water-soluble fluid for the
exhaust gas aftertreatment of diesel engines. It is:
R non-toxic
R colourless and odourless
R non-flammable
If you open the AdBlue ®
tank, small amounts
of ammonia vapour may be released.
Ammonia vapours have a pungent odour and
are particularly irritating to the skin, to
mucous membranes and to the eyes. You may experience a burning sensation in your eyes,
nose and throat. You may also experience
coughing and watery eyes.
Do not inhale any ammonia vapours that may
be released. Only fill the AdBlue ®
tank in well-
ventilated areas.
Low outside temperatures AdBlue
®
freezes at a temperature of approx-
imately -11 †. The vehicle is delivered from
the factory equipped with an AdBlue ®
pre-
heating system. Winter operation can thus be guaranteed even at temperatures below
-11 †.
Additives !
Only use AdBlue ®
in accordance with ISO
22241. Do not use additives with AdBlue ®
and do not dilute AdBlue ®
with water. This
may destroy the BlueTEC exhaust gas after-
treatment system.
Purity !
Impurities in AdBlue ®
(e.g. due to other
service products, cleaning agents or dust)
lead to:
R increased emission values
R damage to the catalytic converter
R engine damage
R malfunctions in the BlueTEC ®
exhaust
gas aftertreatment system Service products and capacities
403Technical data Z