Page 315 of 417

EASY-PACK load-securing kit, TIREFIT, the
vehicle tool kit, etc. are located underneath
the luggage compartment floor.
X To open: open the tailgate.
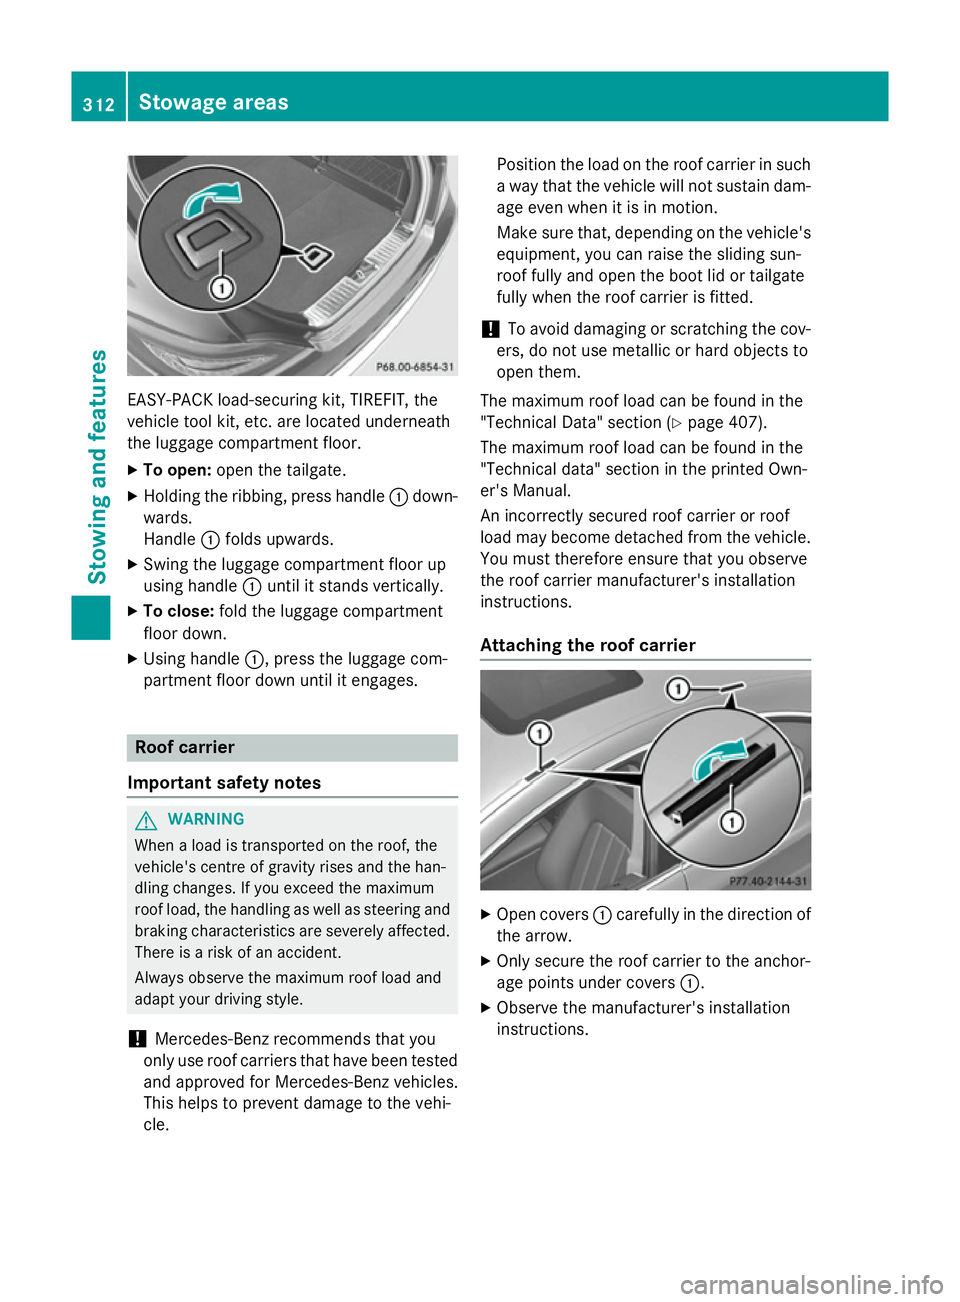
X Holding the ribbing, press handle :down-
wards.
Handle :folds upwards.
X Swing the luggage compartment floor up
using handle :until it stands vertically.
X To close: fold the luggage compartment
floor down.
X Using handle :, press the luggage com-
partment floor down until it engages. Roof carrier
Important safety notes G
WARNING
When a load is transported on the roof, the
vehicle's centre of gravity rises and the han-
dling changes. If you exceed the maximum
roof load, the handling as well as steering and braking characteristics are severely affected.
There is a risk of an accident.
Always observe the maximum roof load and
adapt your driving style.
! Mercedes-Benz recommends that you
only use roof carriers that have been tested and approved for Mercedes-Benz vehicles.
This helps to prevent damage to the vehi-
cle. Position the load on the roof carrier in such
a way that the vehicle will not sustain dam-
age even when it is in motion.
Make sure that, depending on the vehicle's equipment, you can raise the sliding sun-
roof fully and open the boot lid or tailgate
fully when the roof carrier is fitted.
! To avoid damaging or scratching the cov-
ers, do not use metallic or hard objects to
open them.
The maximum roof load can be found in the
"Technical Data" section (Y page 407).
The maximum roof load can be found in the
"Technical data" section in the printed Own-
er's Manual.
An incorrectly secured roof carrier or roof
load may become detached from the vehicle.
You must therefore ensure that you observe
the roof carrier manufacturer's installation
instructions.
Attaching the roof carrier X
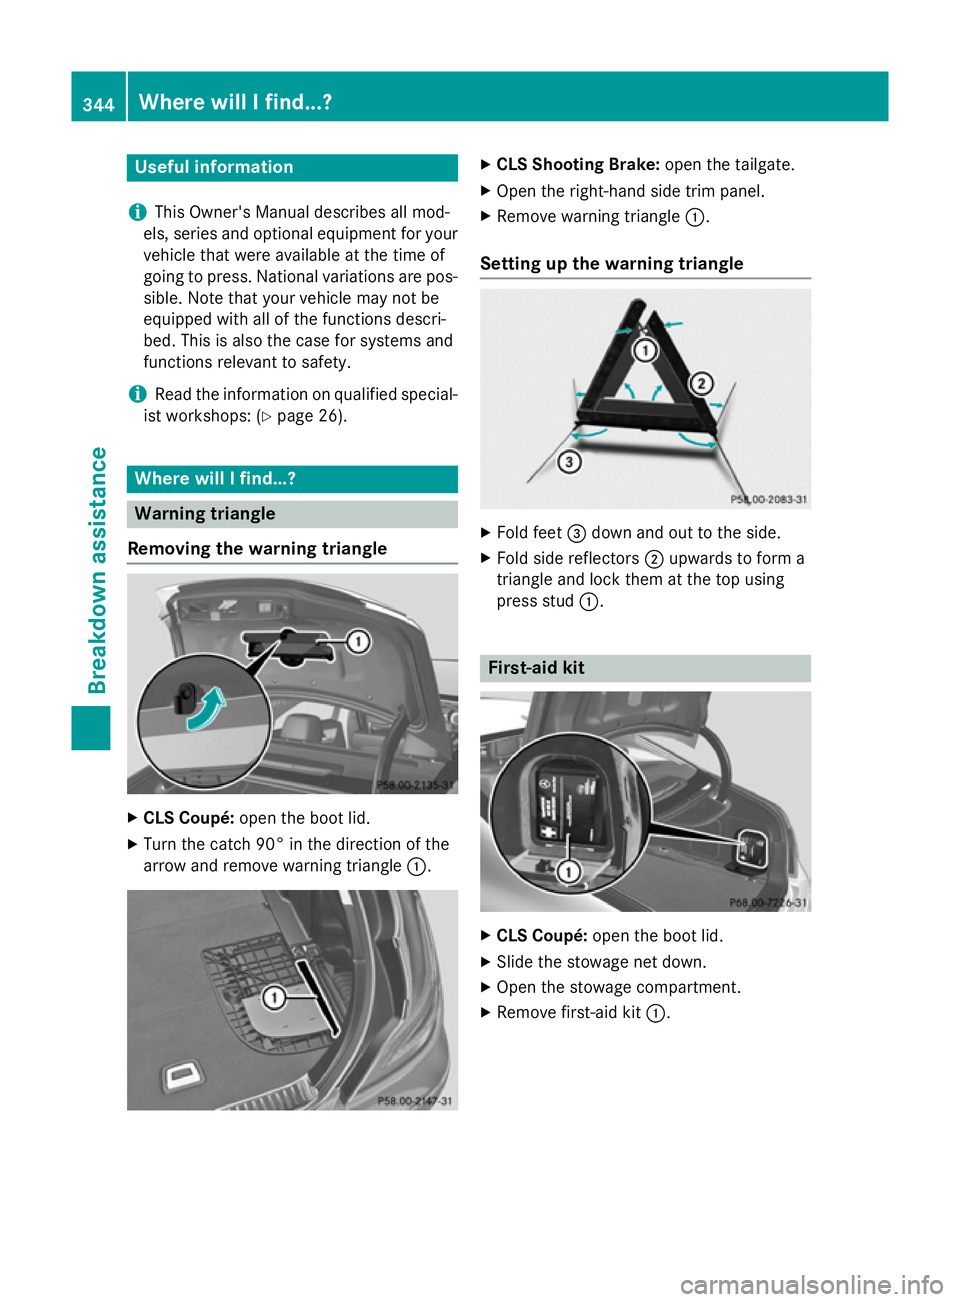
Open covers :carefully in the direction of
the arrow.
X Only secure the roof carrier to the anchor-
age points under covers :.
X Observe the manufacturer's installation
instructions. 312
Sto
wage areasStowing an d features
Page 347 of 417

Useful information
i This Owner's Manual describes all mod-
els, series and optional equipment for your
vehicle that were available at the time of
going to press. National variations are pos- sible. Note that your vehicle may not be
equipped with all of the functions descri-
bed. This is also the case for systems and
functions relevant to safety.
i Read the information on qualified special-
ist workshops: (Y page 26). Where will I find...?
Warning triangle
Removing the warning triangle X
CLS Coupé: open the boot lid.
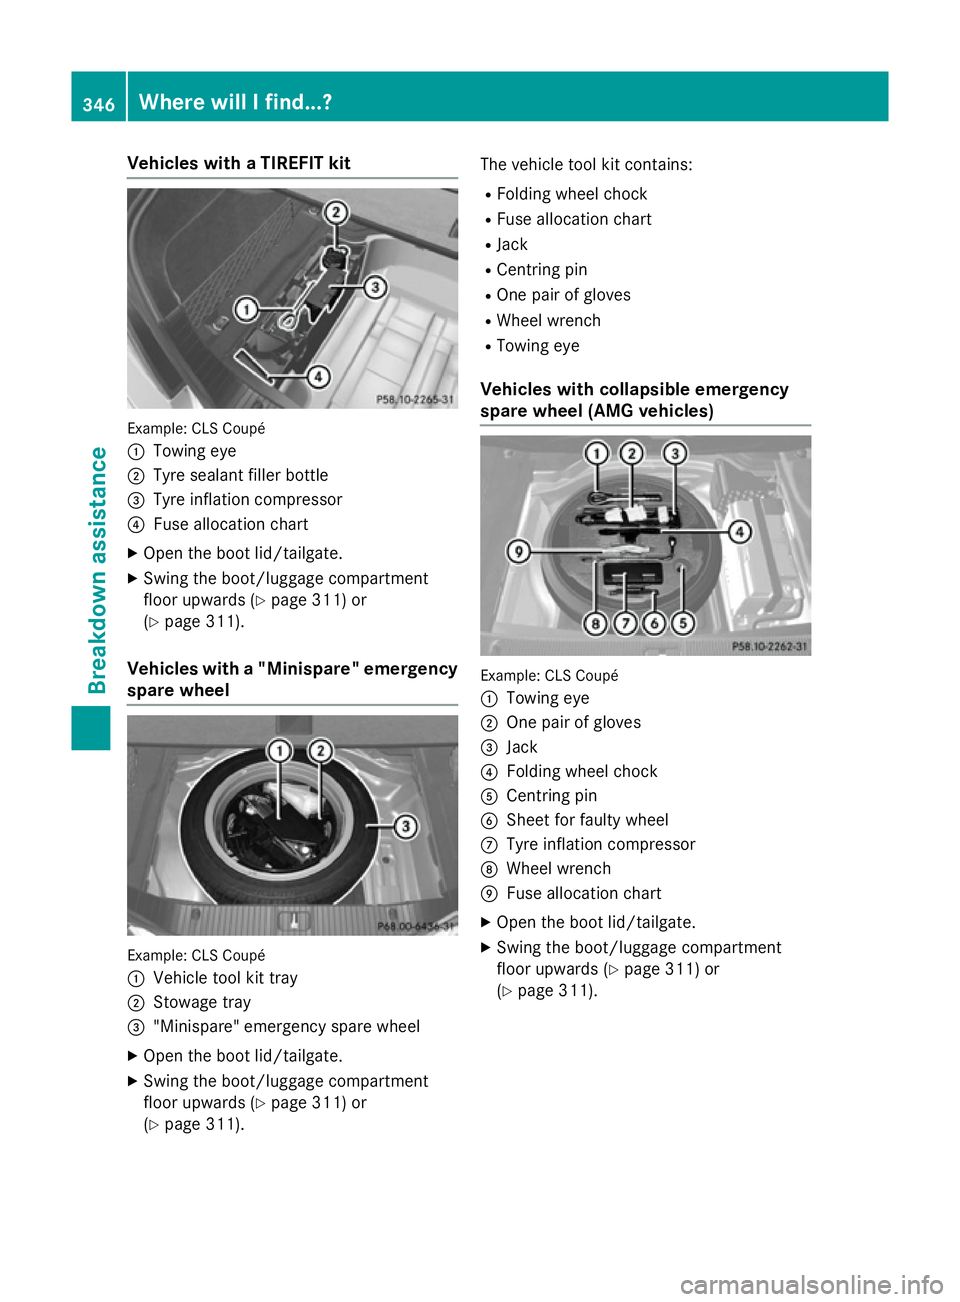
X Turn the catch 90° in the direction of the
arrow and remove warning triangle :. X
CLS Shooting Brake: open the tailgate.
X Open the right-hand side trim panel.
X Remove warning triangle :.
Setting up the warning triangle X
Fold feet =down and out to the side.
X Fold side reflectors ;upwards to form a
triangle and lock them at the top using
press stud :. First-aid kit
X
CLS Coupé: open the boot lid.
X Slide the stowage net down.
X Open the stowage compartment.
X Remove first-aid kit :.344
Where will I find...?Breakdown assistance
Page 349 of 417

Vehicles with a TIREFIT kit
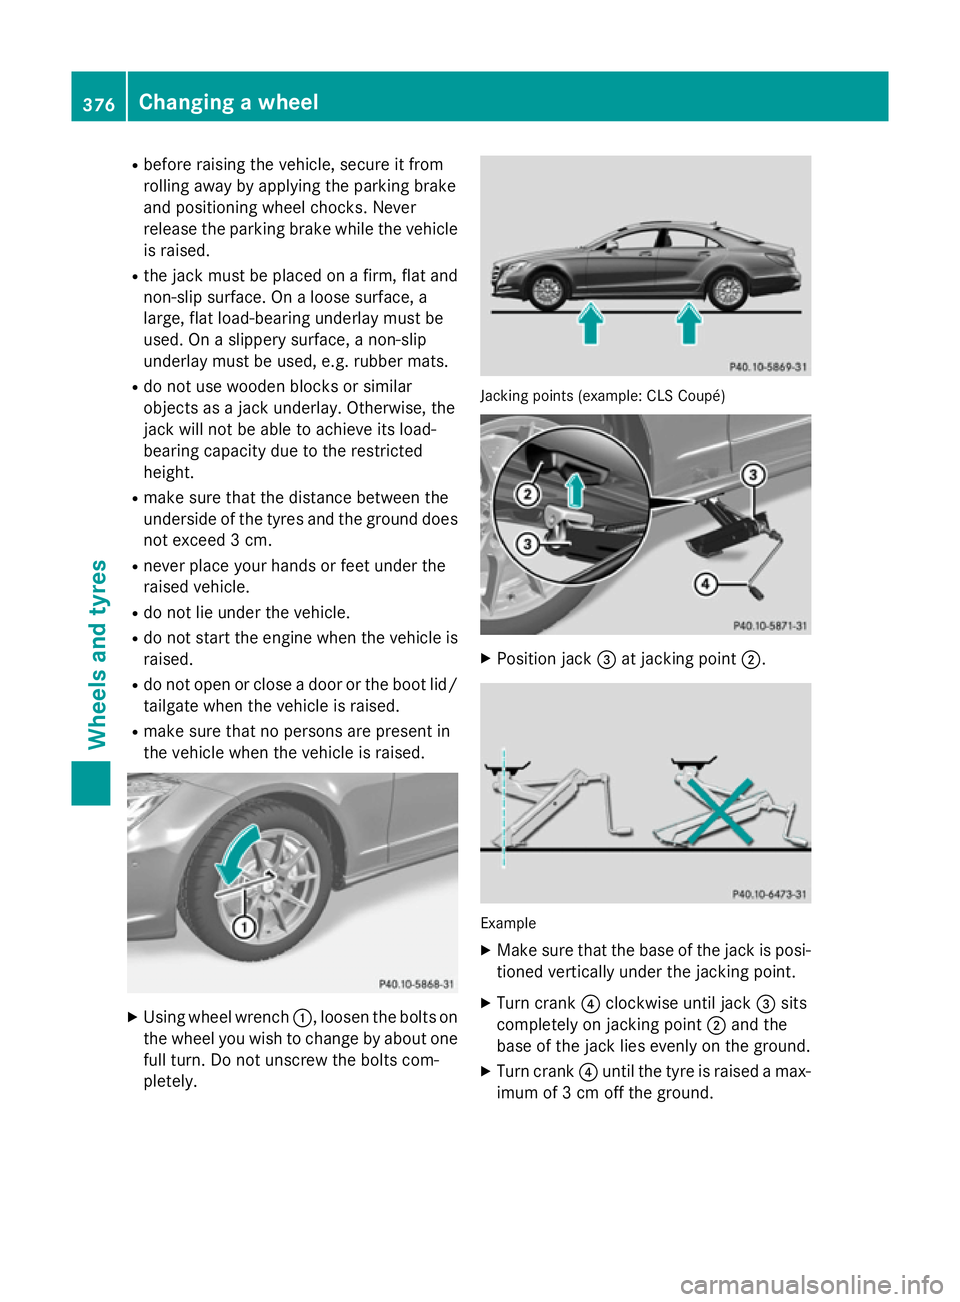
Example: CLS Coupé
:
Towing eye
; Tyre sealant filler bottle
= Tyre inflation compressor
? Fuse allocation chart
X Open the boot lid/tailgate.
X Swing the boot/luggage compartment
floor upwards (Y page 311) or
(Y page 311).
Vehicles with a "Minispare" emergency
spare wheel Example: CLS Coupé
:
Vehicle tool kit tray
; Stowage tray
= "Minispare" emergency spare wheel
X Open the boot lid/tailgate.
X Swing the boot/luggage compartment
floor upwards (Y page 311) or
(Y page 311). The vehicle tool kit contains:
R Folding wheel chock
R Fuse allocation chart
R Jack
R Centring pin
R One pair of gloves
R Wheel wrench
R Towing eye
Vehicles with collapsible emergency
spare wheel (AMG vehicles) Example: CLS Coupé
:
Towing eye
; One pair of gloves
= Jack
? Folding wheel chock
A Centring pin
B Sheet for faulty wheel
C Tyre inflation compressor
D Wheel wrench
E Fuse allocation chart
X Open the boot lid/tailgate.
X Swing the boot/luggage compartment
floor upwards (Y page 311) or
(Y page 311). 346
Where will I find...?Breakdo
wn assis tance
Page 365 of 417
X
Open the boot lid. X
To open: release cover :at the top right
and left-hand sides with a flat object.
X Open cover :downwards in the direction
of the arrow. Fuse box in the luggage compartment
(CLS Shooting Brake)
Observe the important safety notes
(Y page 360)
! Make sure that no moisture can enter the
fuse box when the cover is open.
! When closing the cover, make sure that it
is lying correctly on the fuse box. Moisture seeping in or dirt could otherwise impair
the operation of the fuses.
X Open the tailgate. X
To open: turn rotary catch :over the
cover anti-clockwise.
X Swing the cover down.
X Swing trim ;forwards. 362
Electrical fusesBreakdown assistance
Page 379 of 417

R
before raising the vehicle, secure it from
rolling away by applying the parking brake
and positioning wheel chocks. Never
release the parking brake while the vehicle
is raised.
R the jack must be placed on a firm, flat and
non-slip surface. On a loose surface, a
large, flat load-bearing underlay must be
used. On a slippery surface, a non-slip
underlay must be used, e.g. rubber mats.
R do not use wooden blocks or similar
objects as a jack underlay. Otherwise, the
jack will not be able to achieve its load-
bearing capacity due to the restricted
height.
R make sure that the distance between the
underside of the tyres and the ground does
not exceed 3 cm.
R never place your hands or feet under the
raised vehicle.
R do not lie under the vehicle.
R do not start the engine when the vehicle is
raised.
R do not open or close a door or the boot lid/
tailgate when the vehicle is raised.
R make sure that no persons are present in
the vehicle when the vehicle is raised. X
Using wheel wrench :, loosen the bolts on
the wheel you wish to change by about one full turn. Do not unscrew the bolts com-
pletely. Jacking points (example: CLS Coupé)
X
Position jack =at jacking point ;. Example
X Make sure that the base of the jack is posi-
tioned vertically under the jacking point.
X Turn crank ?clockwise until jack =sits
completely on jacking point ;and the
base of the jack lies evenly on the ground.
X Turn crank ?until the tyre is raised a max-
imum of 3 cm off the ground. 376
Changing a wheelWheels and tyres