2014 MERCEDES-BENZ CLS COUPE sunroof
[x] Cancel search: sunroofPage 20 of 417
Refuelling
Fuel gaug e....................................... 32
Important safety notes .................. 177
Notes for AMG vehicles ................. 401
Refuelling process ......................... 178
see Fuel
Remote control
Auxiliary heating/ventilation .......... 151
Changing the batteries (auxiliary
heating) ......................................... 152
Garage door opener ....................... 320
Programming (garage door
opener) .......................................... 320
Replacing bulbs
Important safety notes .................. 131
Overview of bulb types .................. 132
Replacing the battery (auxiliary
heating remote control) .................... 152
Reserve (fuel tank)
see Fuel
Reserve fuel
Display message ............................ 272
Warning lamp ................................. 295
Residual heat (climate control) ........ 149
Restraint system
Display message ............................ 266
Introduction ..................................... 42
Warning lamp ................................. 294
Warning lamp (function) ................... 43
Rev counter ........................................ 240
Reverse gear (selector lever) ........... 168
Reversing camera
Cleaning instructions ..................... 338
Function/note s............................. 214
Switching on/of f........................... 214
Reversing feature
Side windows ................................... 96
Sliding sunroof ............................... 100
Reversing function
Boot lid/tailgate .............................. 92
Reversing lamp
Changing bulb s.............................. 132
Reversing lamp (display message) .. 269
Roller sunblind
Rear window .................................. 315
Roof carrier ........................................ 312 Roof lining and carpets (cleaning
instructions)
...................................... 341
Roof load (maximum) ........................ 407 S
Safety Child restraint systems .................... 56
Children in the vehicle ..................... 55
Safety net
Attaching ....................................... 308
Important safety information ......... 307
Safety system
see Driving safety systems
Seat
Adjusting the active multicontour
seat ............................................... 110
Adjusting the multicontour seat ..... 109
Folding the backrest (rear com-
partment) forwards/back .............. 305
Massage function .......................... 110
Seat backrest display message ..... 284
Seat belt
Centre rear-compartment sea t........ 46
Correct usage .................................. 45
Switching belt adjustment on/off
(on-board computer) ...................... 257
Seat belts
Adjusting the driver's and front-
passenger seat belt ......................... 47
Adjusting the height ......................... 46
Cleaning ......................................... 340
Display message ............................ 265
Fastening ......................................... 46
Important safety guidelines ............. 44
Introduction ..................................... 44
Rear seat belt status indicator ......... 47
Releasing ......................................... 46
Warning lamp ................................. 287
Warning lamp (function) ................... 47
Seats
Adjusting (electrically) ................... 106
Adjusting lumbar support .............. 111
Adjusting the 4-way lumbar sup-
port ................................................ 111
Adjusting the head restraint .......... 107
Cleaning the cover ......................... 340
Correct driver's seat position ........ 104 Index
17
Page 21 of 417

Important safety notes .................. 105
Overview ........................................ 105
Seat heating problem .................... 112
Seat ventilation problem ................ 113
Storing settings (memory func-
tion) ............................................... 119
Switching seat heating on/off ....... 111
Switching the seat ventilation on/
off .................................................. 112
Selector lever
Cleaning .........................................3 40
Sensors (cleaning instructions) ....... 337
Service
see ASSYST PLUS
Service Centre
see Qualified specialist workshop
Service menu (on-board com-
puter) ................................................. .251
Service products
AdBlue® special additive s............. 403
Brake fluid ..................................... 405
Coolant (engine) ............................ 405
Engine oil ....................................... 404
Fuel ................................................ 399
Important safety notes .................. 399
Washer fluid ................................... 406
Setting the air distribution ............... 145
Setting the airflow ............................ 146
Settings
Factory (on-board computer) ......... 258
On-board compute r....................... 251
SETUP (on-board computer) ............. 258
Side lamps
Switching on/of f........................... 124
Side windows
Convenience closing ........................ 97
Convenience opening ...................... 97
Important safety notes .................... 96
Opening/closing .............................. 96
Problem (malfunction) ..................... 99
Resetting ......................................... 98
Sidebag ................................................ 50
Sliding sunroof
Important safety information ........... 99
Opening/closing ............................ 100
Problem (malfunction) ................... 102
Rain closing feature ....................... 101 Resetting ....................................... 101
Snow chains ...................................... 367
Socket
Luggage compartment ................... 319
Under the armrest ......................... 318
Sockets
Centre console .............................. 318
General notes ................................ 317
Rear compartment ......................... 318
Spare wheel
Storing ........................................... 392
Specialist workshop ............................ 26
Spectacles compartment ................. 301
Speed Limit Assist
Activating/deactivating the warn-ing function .................................... 249
Display message ............................ 275
Display message in the multifunc- tion display .................................... 220
Important safety notes .................. 219
Speed, controlling
see Cruise control
Speedometer
Digital ............................................ 244
In the Instrument cluster ................. 32
Segments ...................................... 241
Selecting the unit of measure-
ment .............................................. 252
see Instrument cluster
SPEEDTRONIC
Deactivating variable ..................... 191
Display message ............................ 278
Function/note s............................. 189
Important safety notes .................. 189
LIM indicator lamp ......................... 189
Permanent ..................................... 191
Selecting ........................................ 190
Storing the current speed .............. 190
Variabl e......................................... 189
SPORT handling mode
Activating/deactivating (AMG
vehicles) .......................................... 74
Warning lamp ................................. 292
Start/stop function
see ECO start/stop function
Starting (engine) ................................ 161
Steering (display message) .............. 28518
Index
Page 42 of 417

Overhead control panel
Function Page
:
u
Switches the rear
interior lighting on/off 131
;
|
Switches the auto-
matic interior lighting con-
trol on/off 131
=
p
Switches the right-
hand reading lamp on/off 130
?
ë
Deactivates tow-
away protection 79
A
Rear-view mirror 117 Function Page
B
Buttons for the garage door
opener 320
C
3
Opens/closes the
sliding sunroof 100
D
ê
Deactivates the inte-
rior motion sensor 79
E
p
Switches the left-
hand reading lamp on/off 130
F
c
Switches the front
interior lighting on/off 131Overhead control panel
39At a glance
Page 57 of 417
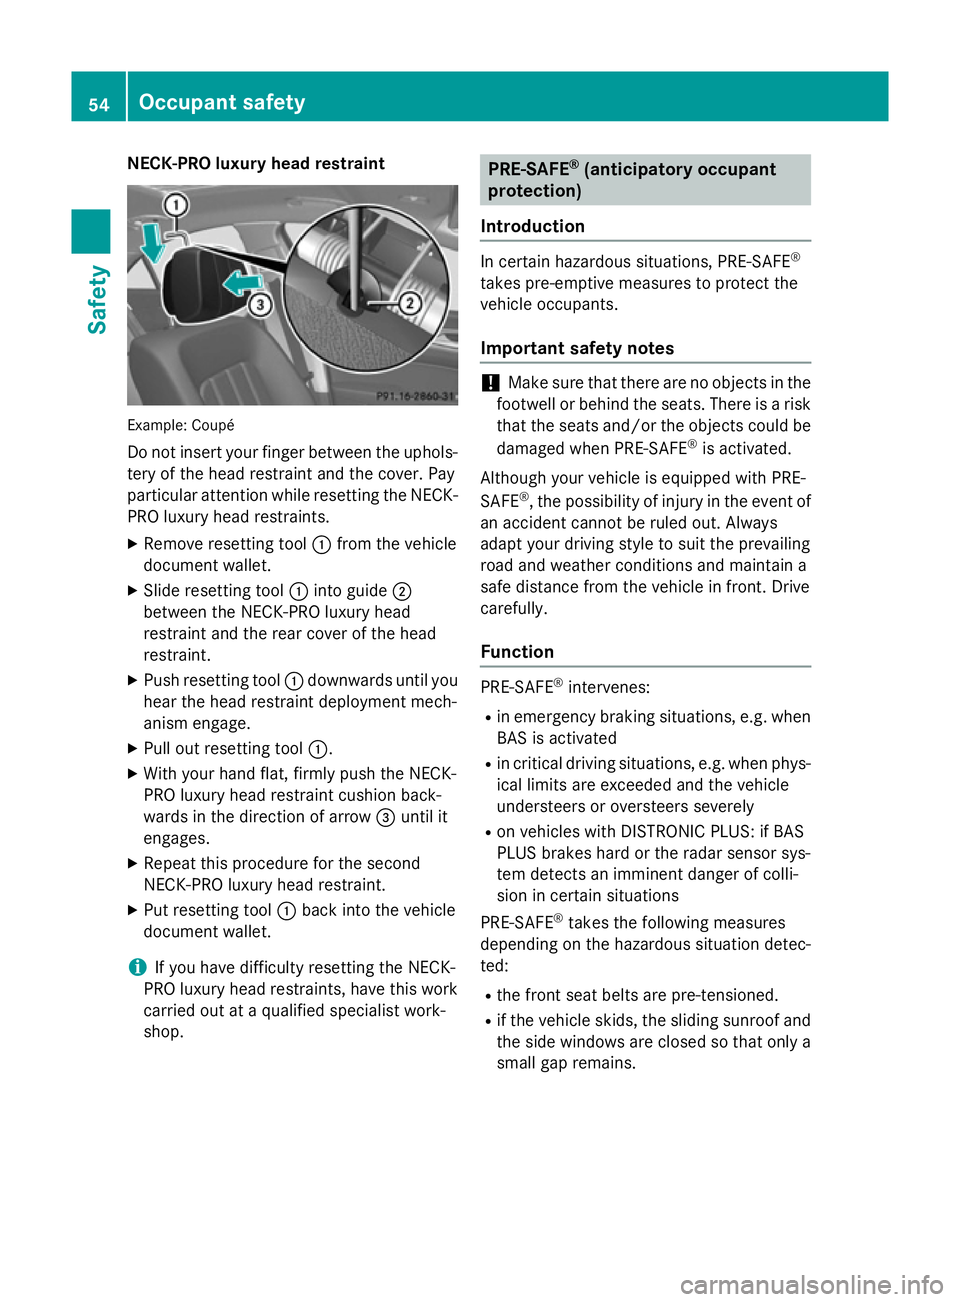
NECK-PRO luxury head restraint
Example: Coupé
Do not insert your finger between the uphols- tery of the head restraint and the cover. Pay
particular attention while resetting the NECK- PRO luxury head restraints.
X Remove resetting tool :from the vehicle
document wallet.
X Slide resetting tool :into guide ;
between the NECK-PRO luxury head
restraint and the rear cover of the head
restraint.
X Push resetting tool :downwards until you
hear the head restraint deployment mech-
anism engage.
X Pull out resetting tool :.
X With your hand flat, firmly push the NECK-
PRO luxury head restraint cushion back-
wards in the direction of arrow =until it
engages.
X Repeat this procedure for the second
NECK-PRO luxury head restraint.
X Put resetting tool :back into the vehicle
document wallet.
i If you have difficulty resetting the NECK-
PRO luxury head restraints, have this work carried out at a qualified specialist work-
shop. PRE-SAFE
®
(anticipatory occupant
protection)
Introduction In certain hazardous situations, PRE-SAFE
®
takes pre-emptive measures to protect the
vehicle occupants.
Important safety notes !
Make sure that there are no objects in the
footwell or behind the seats. There is a risk that the seats and/or the objects could be
damaged when PRE-SAFE ®
is activated.
Although your vehicle is equipped with PRE-
SAFE ®
, the possibility of injury in the event of
an accident cannot be ruled out. Always
adapt your driving style to suit the prevailing
road and weather conditions and maintain a
safe distance from the vehicle in front. Drive
carefully.
Function PRE-SAFE
®
intervenes:
R in emergency braking situations, e.g. when
BAS is activated
R in critical driving situations, e.g. when phys-
ical limits are exceeded and the vehicle
understeers or oversteers severely
R on vehicles with DISTRONIC PLUS: if BAS
PLUS brakes hard or the radar sensor sys-
tem detects an imminent danger of colli-
sion in certain situations
PRE-SAFE ®
takes the following measures
depending on the hazardous situation detec-
ted:
R the front seat belts are pre-tensioned.
R if the vehicle skids, the sliding sunroof and
the side windows are closed so that only a small gap remains. 54
Occupant safetySafety
Page 82 of 417
Tow-away protection
Function An audible and visual alarm is triggered if your
vehicle's angle of inclination is altered while
tow-away protection is primed. This can occur
if the vehicle is jacked up on one side, for
example.
Activating X
Make sure that:
R the doors are closed
R the boot lid/tailgate is closed
Only then is the tow-away protection
primed.
X Lock the vehicle with the key or KEYLESS-
GO.
Tow-away protection is primed after
approximately 30 seconds.
Deactivating X
To deactivate: unlock the vehicle with the
key or KEYLESS-GO.
Tow-away protection is switched off auto-
matically.
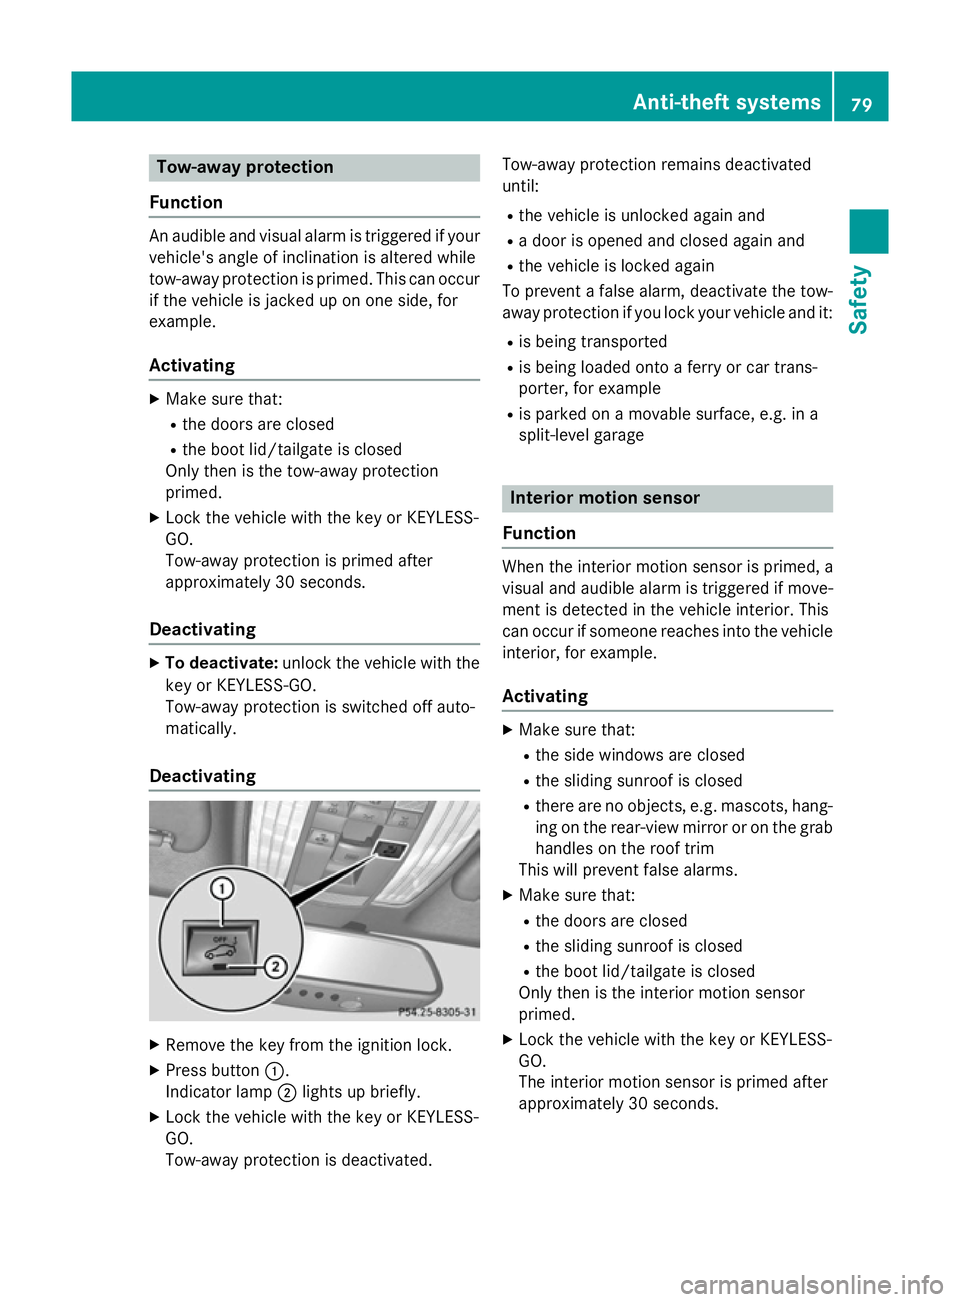
Deactivating X
Remove the key from the ignition lock.
X Press button :.
Indicator lamp ;lights up briefly.
X Lock the vehicle with the key or KEYLESS-
GO.
Tow-away protection is deactivated. Tow-away protection remains deactivated
until:
R the vehicle is unlocked again and
R a door is opened and closed again and
R the vehicle is locked again
To prevent a false alarm, deactivate the tow-
away protection if you lock your vehicle and it:
R is being transported
R is being loaded onto a ferry or car trans-
porter, for example
R is parked on a movable surface, e.g. in a
split-level garage Interior motion sensor
Function When the interior motion sensor is primed, a
visual and audible alarm is triggered if move-
ment is detected in the vehicle interior. This
can occur if someone reaches into the vehicle interior, for example.
Activating X
Make sure that:
R the side windows are closed
R the sliding sunroof is closed
R there are no objects, e.g. mascots, hang-
ing on the rear-view mirror or on the grab handles on the roof trim
This will prevent false alarms.
X Make sure that:
R the doors are closed
R the sliding sunroof is closed
R the boot lid/tailgate is closed
Only then is the interior motion sensor
primed.
X Lock the vehicle with the key or KEYLESS-
GO.
The interior motion sensor is primed after
approximately 30 second s. An
ti-theft systems
79Safety Z
Page 83 of 417

Deactivating
X
Unlock the vehicle with the key or KEY-
LESS-GO.
The interior motion sensor is automatically deactivated.
Deactivating X
Remove the key from the ignition lock.
X Press button :.
Indicator lamp ;flashes briefly.
X Lock the vehicle with the key or KEYLESS-
GO.
The interior motion sensor is deactivated.
The interior motion sensor remains deactiva-
ted until:
R the vehicle is unlocked again and
R a door is opened and closed again and
R the vehicle is locked again
To prevent a false alarm, deactivate the inte-
rior motion sensor if you lock your vehicle
and:
R people or animals remain in the vehicle
R the side windows remain open
R the sliding sunroof remains open
i UK only:
your vehicle is equipped with a
double lock function. The doors cannot be
opened from the inside if the vehicle has
been locked with the key or with KEYLESS- GO (Y page 89). Deactivate the interior
motion sensor before you lock the vehicle.
The doors can then be opened from the
inside after the vehicle has been locked from the outside. Observe the "Important
safety notes" (Y page 88).80
Anti-theft syste
msSafety
Page 84 of 417
Useful information
..............................82
Key ....................................................... 82
Doors .................................................... 88
Boot/luggage compartment ..............91
Side windows ...................................... 96
Sliding sunroof .................................... 99 81Opening and closing
Page 100 of 417
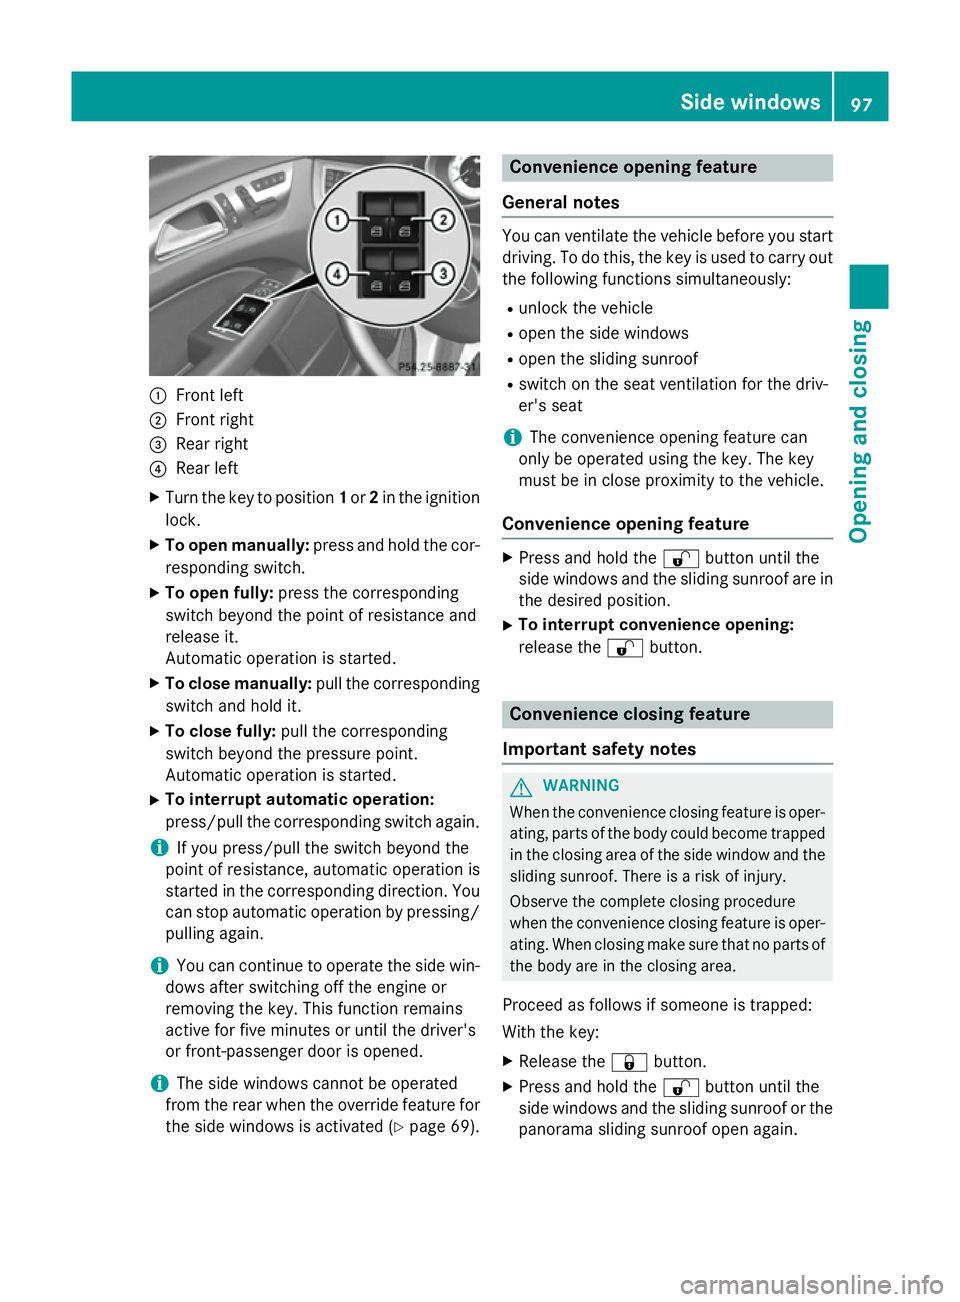
:
Front left
; Front right
= Rear right
? Rear left
X Turn the key to position 1or 2in the ignition
lock.
X To open manually: press and hold the cor-
responding switch.
X To open fully: press the corresponding
switch beyond the point of resistance and
release it.
Automatic operation is started.
X To close manually: pull the corresponding
switch and hold it.
X To close fully: pull the corresponding
switch beyond the pressure point.
Automatic operation is started.
X To interrupt automatic operation:
press/pull the corresponding switch again.
i If you press/pull the switch beyond the
point of resistance, automatic operation is
started in the corresponding direction. You
can stop automatic operation by pressing/ pulling again.
i You can continue to operate the side win-
dows after switching off the engine or
removing the key. This function remains
active for five minutes or until the driver's
or front-passenger door is opened.
i The side windows cannot be operated
from the rear when the override feature for
the side windows is activated (Y page 69). Convenience opening feature
General notes You can ventilate the vehicle before you start
driving. To do this, the key is used to carry out the following functions simultaneously:
R unlock the vehicle
R open the side windows
R open the sliding sunroof
R switch on the seat ventilation for the driv-
er's seat
i The convenience opening feature can
only be operated using the key. The key
must be in close proximity to the vehicle.
Convenience opening feature X
Press and hold the %button until the
side windows and the sliding sunroof are in the desired position.
X To interrupt convenience opening:
release the %button. Convenience closing feature
Important safety notes G
WARNING
When the convenience closing feature is oper- ating, parts of the body could become trapped
in the closing area of the side window and the
sliding sunroof. There is a risk of injury.
Observe the complete closing procedure
when the convenience closing feature is oper-
ating. When closing make sure that no parts of the body are in the closing area.
Proceed as follows if someone is trapped:
With the key:
X Release the &button.
X Press and hold the %button until the
side windows and the sliding sunroof or the
panorama sliding sunroof open again. Side windows
97Opening and closing Z