2014 MERCEDES-BENZ CLS COUPE width
[x] Cancel search: widthPage 203 of 417
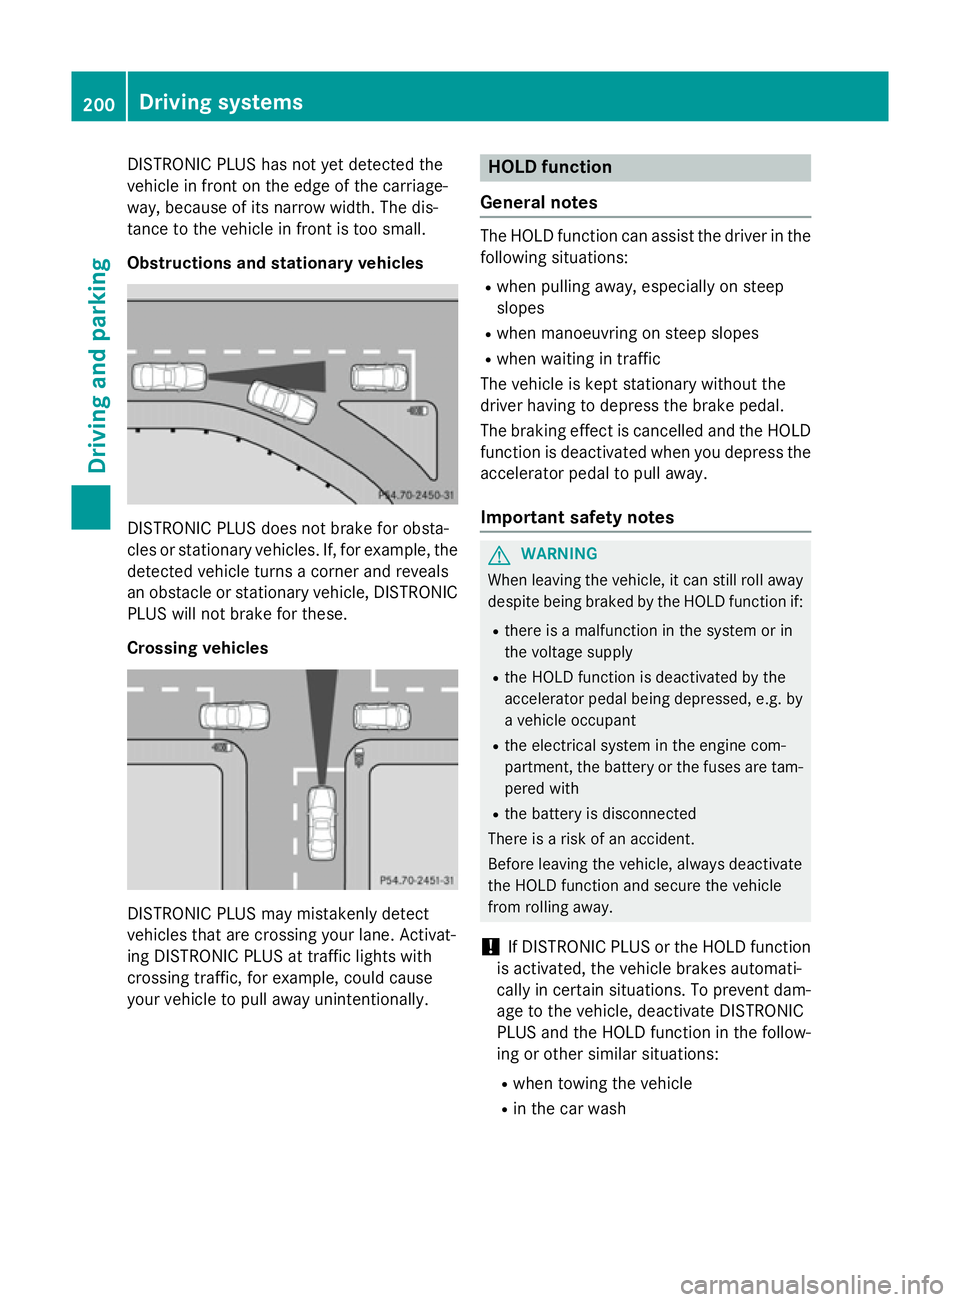
DISTRONIC PLUS has not yet detected the
vehicle in front on the edge of the carriage-
way, because of its narrow width. The dis-
tance to the vehicle in front is too small.
Obstructions and stationary vehicles DISTRONIC PLUS does not brake for obsta-
cles or stationary vehicles. If, for example, the
detected vehicle turns a corner and reveals
an obstacle or stationary vehicle, DISTRONIC PLUS will not brake for these.
Crossing vehicles DISTRONIC PLUS may mistakenly detect
vehicles that are crossing your lane. Activat-
ing DISTRONIC PLUS at traffic lights with
crossing traffic, for example, could cause
your vehicle to pull away unintentionally. HOLD function
General notes The HOLD function can assist the driver in the
following situations:
R when pulling away, especially on steep
slopes
R when manoeuvring on steep slopes
R when waiting in traffic
The vehicle is kept stationary without the
driver having to depress the brake pedal.
The braking effect is cancelled and the HOLD function is deactivated when you depress the
accelerator pedal to pull away.
Important safety notes G
WARNING
When leaving the vehicle, it can still roll away despite being braked by the HOLD function if:
R there is a malfunction in the system or in
the voltage supply
R the HOLD function is deactivated by the
accelerator pedal being depressed, e.g. by
a vehicle occupant
R the electrical system in the engine com-
partment, the battery or the fuses are tam-
pered with
R the battery is disconnected
There is a risk of an accident.
Before leaving the vehicle, always deactivate
the HOLD function and secure the vehicle
from rolling away.
! If DISTRONIC PLUS or the HOLD function
is activated, the vehicle brakes automati-
cally in certain situations. To prevent dam-
age to the vehicle, deactivate DISTRONIC
PLUS and the HOLD function in the follow-
ing or other similar situations:
R when towing the vehicle
R in the car wash 200
Driving systemsDriving an
d parking
Page 218 of 417
To deactivate:
the reversing camera deacti-
vates if you shift the transmission to Por after
driving forwards a short distance.
Displays in the COMAND display The reversing camera may show a distorted
view of obstacles or show them incorrectly or
not at all. Obstacles are not shown by the
reversing camera in the following locations:
R very close to the rear bumper
R under the rear bumper
R in the area immediately above the tailgate/
boot
i The following reversing camera messages
in the COMAND display correspond to the
display in the CLS Coupé. The details of the
display of the guide lines differ slightly for
the CLS Shooting Brake.
! Objects not at ground level may appear to
be further away than they actually are, e.g.:
R the bumper of a parked vehicle
R the drawbar of a trailer
R the ball coupling of a trailer tow hitch
R the rear section of an HGV
R a slanted post
Use the guidelines only for orientation.
Approach objects no further than the bot-
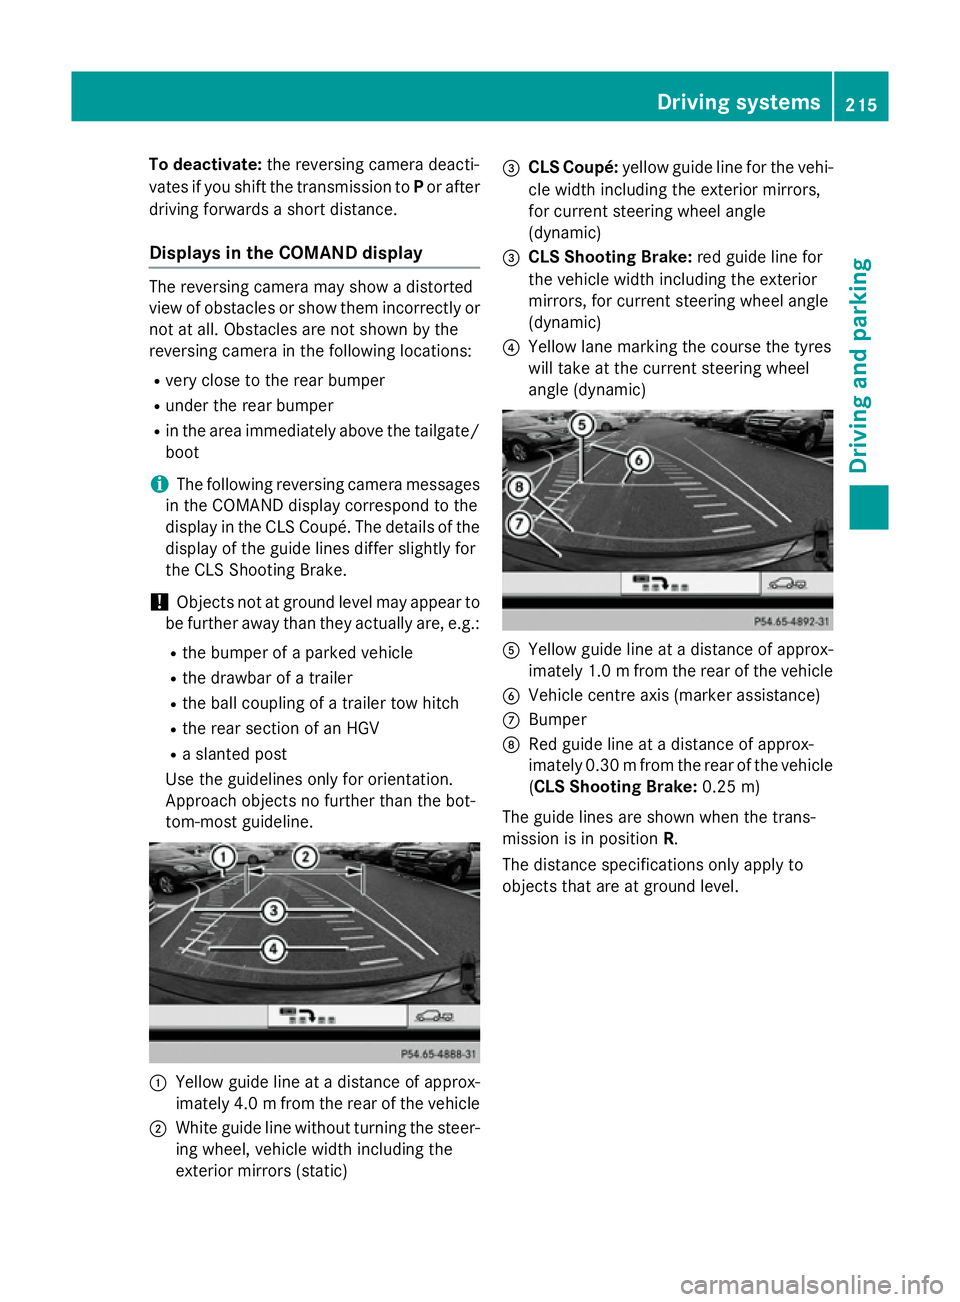
tom-most guideline. :
Yellow guide line at a distance of approx-
imately 4.0 mfrom the rear of the vehicle
; White guide line without turning the steer-
ing wheel, vehicle width including the
exterior mirrors (static) =
CLS Coupé: yellow guide line for the vehi-
cle width including the exterior mirrors,
for current steering wheel angle
(dynamic)
= CLS Shooting Brake: red guide line for
the vehicle width including the exterior
mirrors, for current steering wheel angle
(dynamic)
? Yellow lane marking the course the tyres
will take at the current steering wheel
angle (dynamic) A
Yellow guide line at a distance of approx-
imately 1.0 mfrom the rear of the vehicle
B Vehicle centre axis (marker assistance)
C Bumper
D Red guide line at a distance of approx-
imately 0.30 mfrom the rear of the vehicle
(CLS Shooting Brake: 0.25 m)
The guide lines are shown when the trans-
mission is in position R.
The distance specifications only apply to
objects that are at ground level. Driving systems
215Driving and parking Z
Page 219 of 417
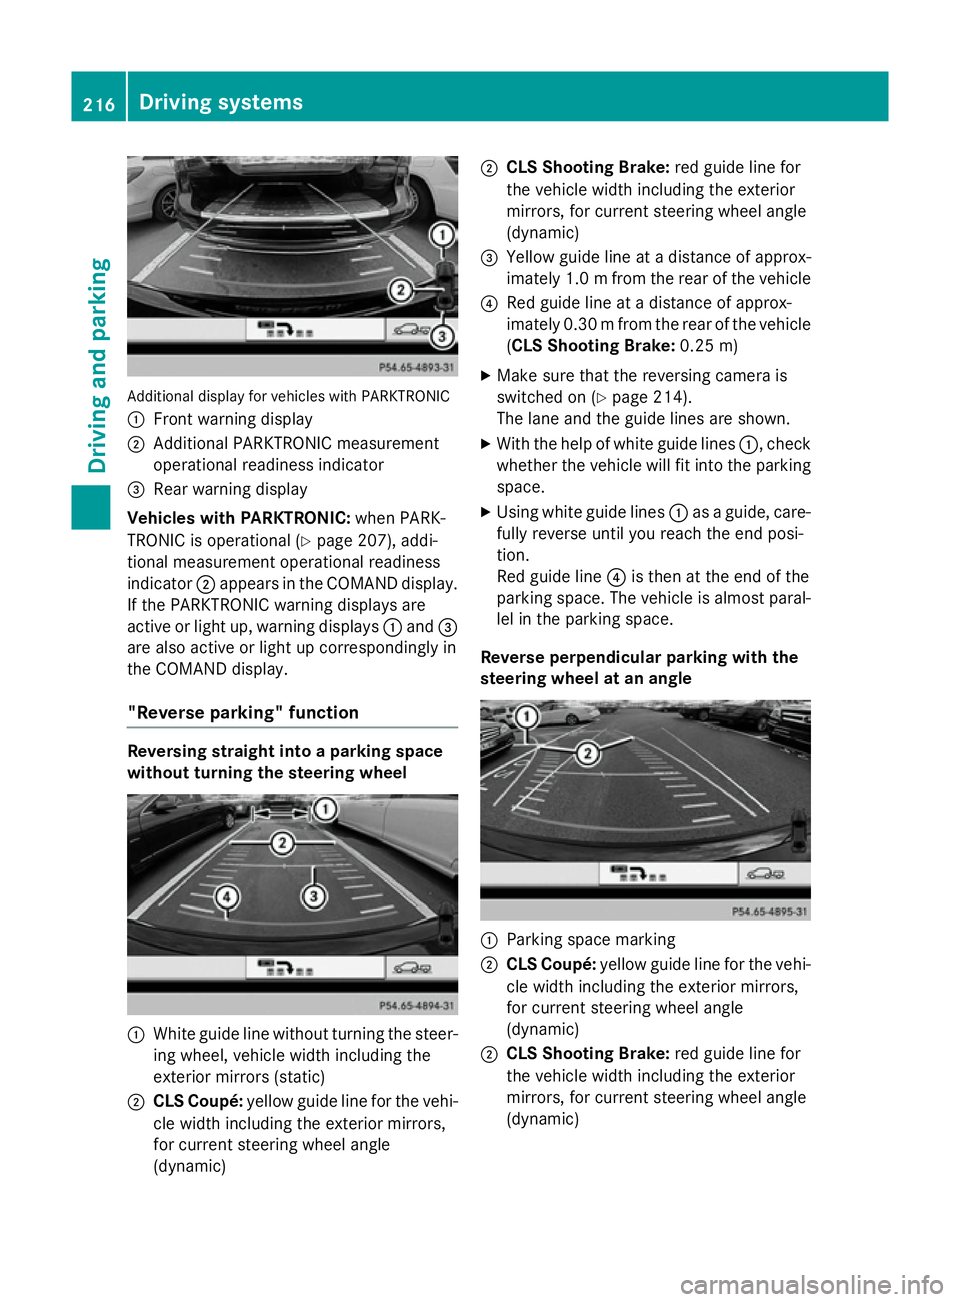
Additional display for vehicles with PARKTRONIC
: Front warning display
; Additional PARKTRONIC measurement
operational readiness indicator
= Rear warning display
Vehicles with PARKTRONIC: when PARK-
TRONIC is operational (Y page 207), addi-
tional measurement operational readiness
indicator ;appears in the COMAND display.
If the PARKTRONIC warning displays are
active or light up, warning displays :and =
are also active or light up correspondingly in
the COMAND display.
"Reverse parking" function Reversing straight into a parking space
without turning the steering wheel :
White guide line without turning the steer-
ing wheel, vehicle width including the
exterior mirrors (static)
; CLS Coupé: yellow guide line for the vehi-
cle width including the exterior mirrors,
for current steering wheel angle
(dynamic) ;
CLS Shooting Brake: red guide line for
the vehicle width including the exterior
mirrors, for current steering wheel angle
(dynamic)
= Yellow guide line at a distance of approx-
imately 1.0 mfrom the rear of the vehicle
? Red guide line at a distance of approx-
imately 0.30 mfrom the rear of the vehicle
(CLS Shooting Brake: 0.25 m)
X Make sure that the reversing camera is
switched on (Y page 214).
The lane and the guide lines are shown.
X With the help of white guide lines :, check
whether the vehicle will fit into the parking space.
X Using white guide lines :as a guide, care-
fully reverse until you reach the end posi-
tion.
Red guide line ?is then at the end of the
parking space. The vehicle is almost paral-
lel in the parking space.
Reverse perpendicular parking with the
steering wheel at an angle :
Parking space marking
; CLS Coupé: yellow guide line for the vehi-
cle width including the exterior mirrors,
for current steering wheel angle
(dynamic)
; CLS Shooting Brake: red guide line for
the vehicle width including the exterior
mirrors, for current steering wheel angle
(dynamic) 216
Driving systemsDriving and parking
Page 220 of 417
X
Make sure that the reversing camera is
switched on (Y page 214).
The lane and the guide lines are shown.
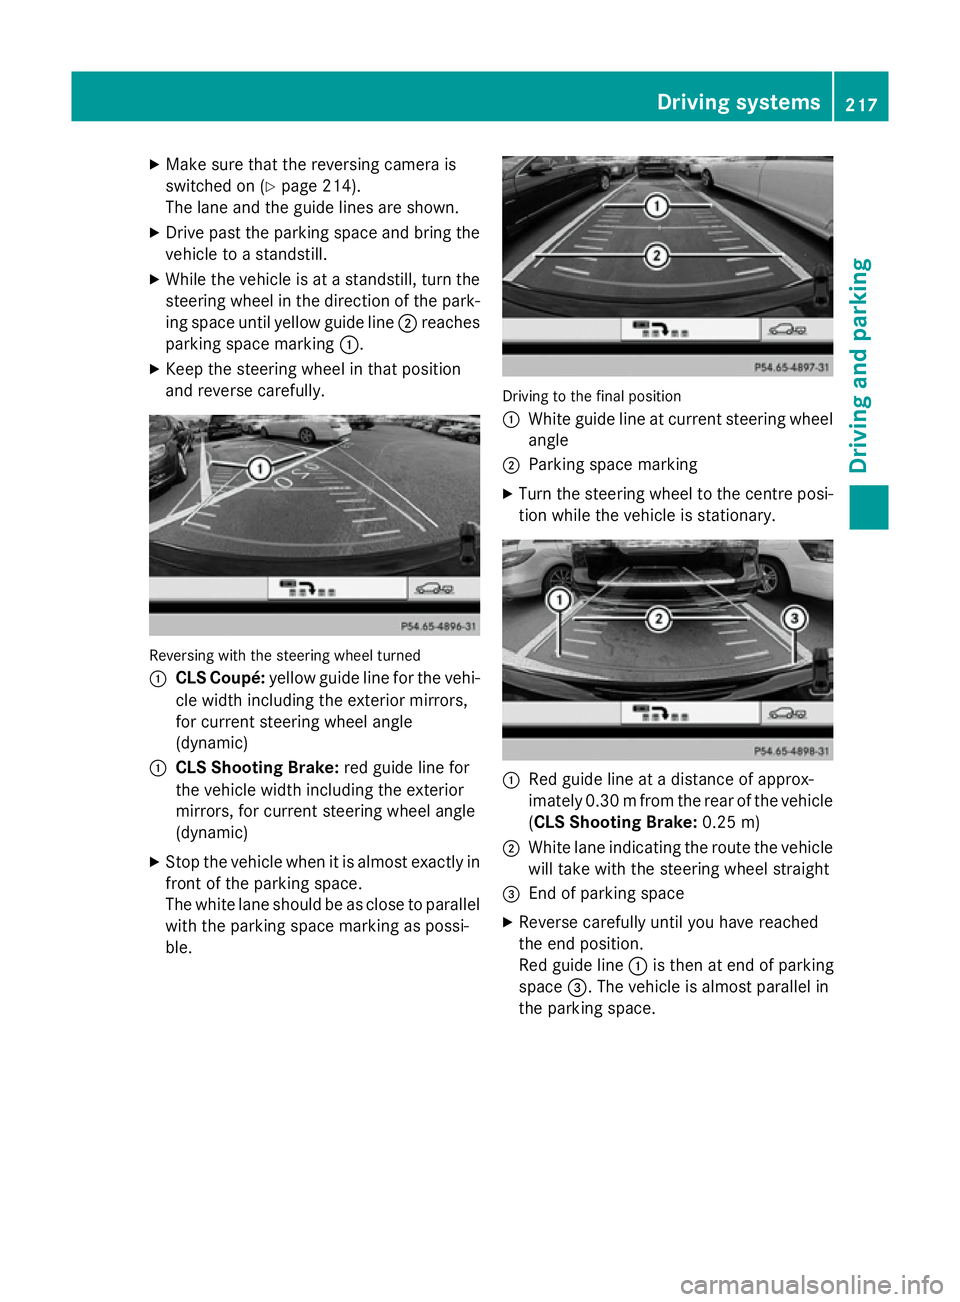
X Drive past the parking space and bring the
vehicle to a standstill.
X While the vehicle is at a standstill, turn the
steering wheel in the direction of the park- ing space until yellow guide line ;reaches
parking space marking :.
X Keep the steering wheel in that position
and reverse carefully. Reversing with the steering wheel turned
:
CLS Coupé: yellow guide line for the vehi-
cle width including the exterior mirrors,
for current steering wheel angle
(dynamic)
: CLS Shooting Brake: red guide line for
the vehicle width including the exterior
mirrors, for current steering wheel angle
(dynamic)
X Stop the vehicle when it is almost exactly in
front of the parking space.
The white lane should be as close to parallel with the parking space marking as possi-
ble. Driving to the final position
:
White guide line at current steering wheel
angle
; Parking space marking
X Turn the steering wheel to the centre posi-
tion while the vehicle is stationary. :
Red guide line at a distance of approx-
imately 0.30 mfrom the rear of the vehicle
(CLS Shooting Brake: 0.25 m)
; White lane indicating the route the vehicle
will take with the steering wheel straight
= End of parking space
X Reverse carefully until you have reached
the end position.
Red guide line :is then at end of parking
space =. The vehicle is almost parallel in
the parking space. Driving systems
217Driving and parking Z
Page 368 of 417
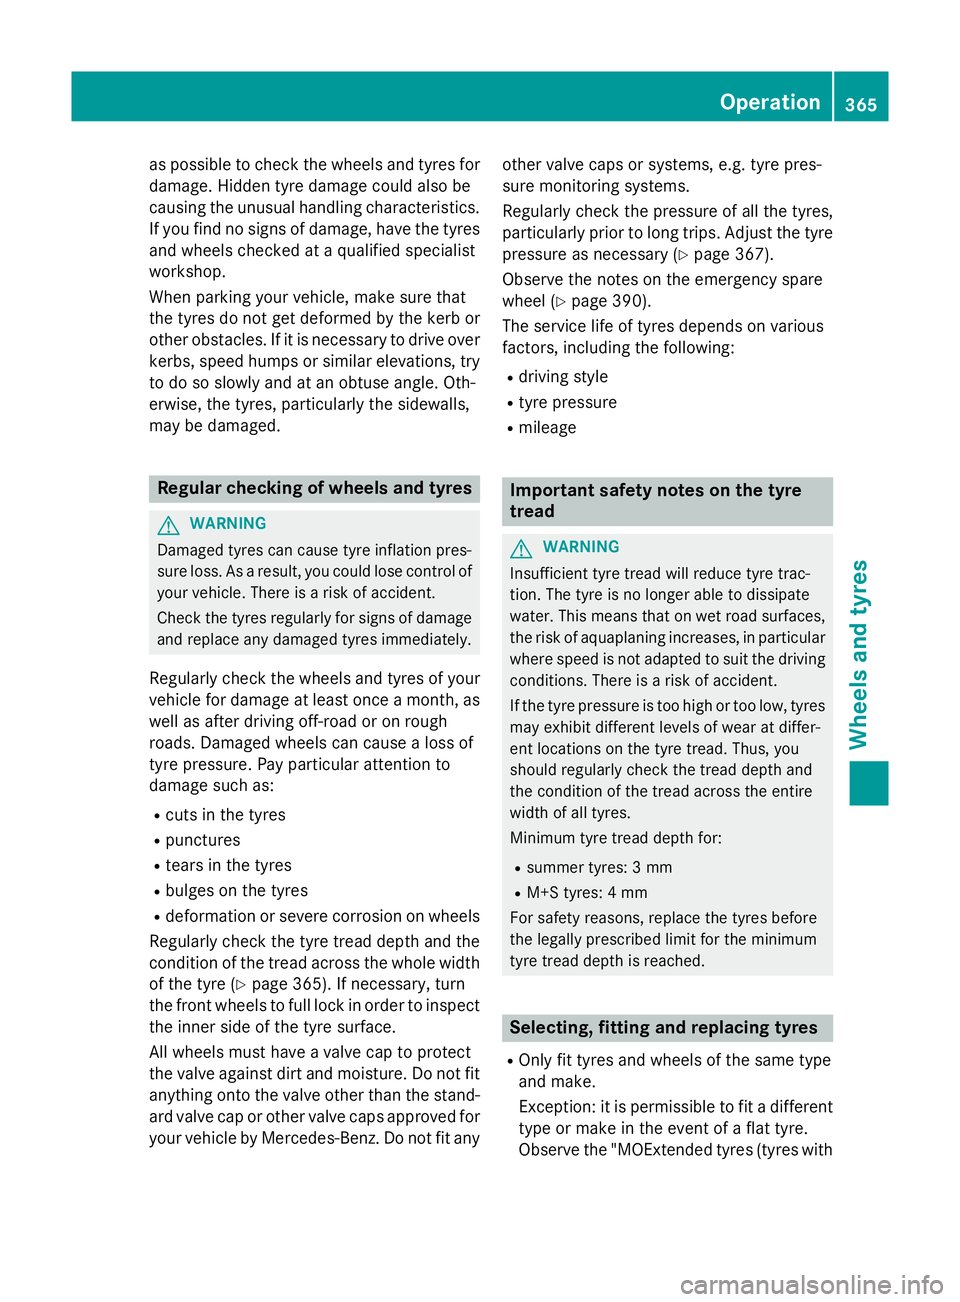
as possible to check the wheels and tyres for
damage. Hidden tyre damage could also be
causing the unusual handling characteristics.
If you find no signs of damage, have the tyres and wheels checked at a qualified specialist
workshop.
When parking your vehicle, make sure that
the tyres do not get deformed by the kerb or
other obstacles. If it is necessary to drive over
kerbs, speed humps or similar elevations, try
to do so slowly and at an obtuse angle. Oth-
erwise, the tyres, particularly the sidewalls,
may be damaged. Regular checking of wheels and tyres
G
WARNING
Damaged tyres can cause tyre inflation pres-
sure loss. As a result, you could lose control of your vehicle. There is a risk of accident.
Check the tyres regularly for signs of damage and replace any damaged tyres immediately.
Regularly check the wheels and tyres of your
vehicle for damage at least once a month, as well as after driving off-road or on rough
roads. Damaged wheels can cause a loss of
tyre pressure. Pay particular attention to
damage such as:
R cuts in the tyres
R punctures
R tears in the tyres
R bulges on the tyres
R deformation or severe corrosion on wheels
Regularly check the tyre tread depth and the condition of the tread across the whole width
of the tyre (Y page 365). If necessary, turn
the front wheels to full lock in order to inspect
the inner side of the tyre surface.
All wheels must have a valve cap to protect
the valve against dirt and moisture. Do not fit
anything onto the valve other than the stand-
ard valve cap or other valve caps approved for
your vehicle by Mercedes-Benz. Do not fit any other valve caps or systems, e.g. tyre pres-
sure monitoring systems.
Regularly check the pressure of all the tyres,
particularly prior to long trips. Adjust the tyre
pressure as necessary (Y page 367).
Observe the notes on the emergency spare
wheel (Y page 390).
The service life of tyres depends on various
factors, including the following:
R driving style
R tyre pressure
R mileage Important safety notes on the tyre
tread
G
WARNING
Insufficient tyre tread will reduce tyre trac-
tion. The tyre is no longer able to dissipate
water. This means that on wet road surfaces, the risk of aquaplaning increases, in particularwhere speed is not adapted to suit the driving
conditions. There is a risk of accident.
If the tyre pressure is too high or too low, tyres may exhibit different levels of wear at differ-
ent locations on the tyre tread. Thus, you
should regularly check the tread depth and
the condition of the tread across the entire
width of all tyres.
Minimum tyre tread depth for:
R summer tyres: 3 mm
R M+S tyres: 4 mm
For safety reasons, replace the tyres before
the legally prescribed limit for the minimum
tyre tread depth is reached. Selecting, fitting and replacing tyres
R Only fit tyres and wheels of the same type
and make.
Exception: it is permissible to fit a different type or make in the event of a flat tyre.
Observe the "MOExtended tyres (tyres with Operation
365Wheels and tyres Z
Page 382 of 417
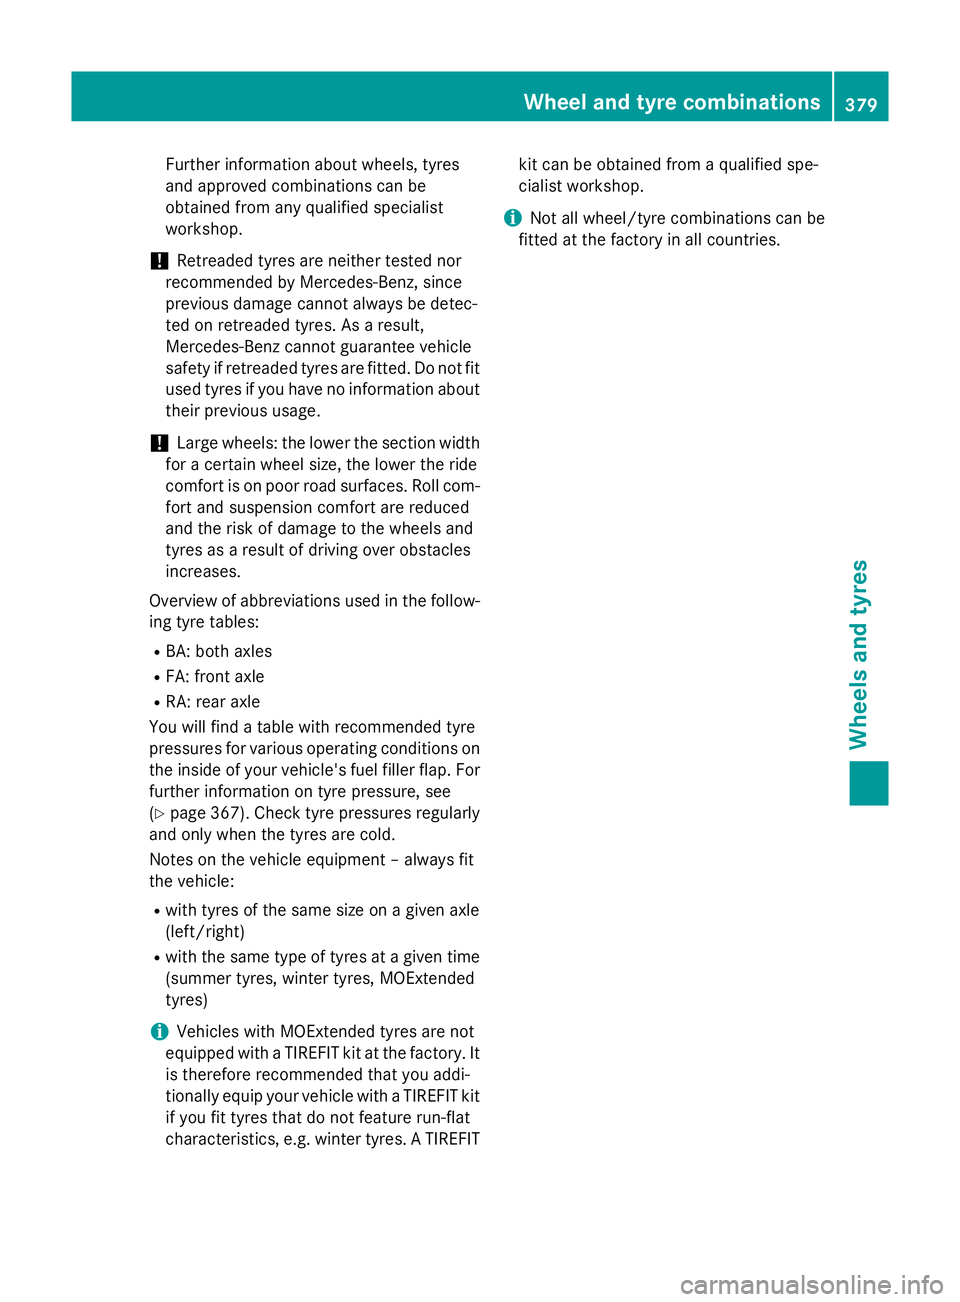
Further information about wheels, tyres
and approved combinations can be
obtained from any qualified specialist
workshop.
! Retreaded tyres are neither tested nor
recommended by Mercedes-Benz, since
previous damage cannot always be detec-
ted on retreaded tyres. As a result,
Mercedes-Benz cannot guarantee vehicle
safety if retreaded tyres are fitted. Do not fit
used tyres if you have no information about their previous usage.
! Large wheels: the lower the section width
for a certain wheel size, the lower the ride
comfort is on poor road surfaces. Roll com-
fort and suspension comfort are reduced
and the risk of damage to the wheels and
tyres as a result of driving over obstacles
increases.
Overview of abbreviations used in the follow- ing tyre tables:
R BA: both axles
R FA: front axle
R RA: rear axle
You will find a table with recommended tyre
pressures for various operating conditions on
the inside of your vehicle's fuel filler flap. For
further information on tyre pressure, see
(Y page 367). Check tyre pressures regularly
and only when the tyres are cold.
Notes on the vehicle equipment – always fit
the vehicle:
R with tyres of the same size on a given axle
(left/right)
R with the same type of tyres at a given time
(summer tyres, winter tyres, MOExtended
tyres)
i Vehicles with MOExtended tyres are not
equipped with a TIREFIT kit at the factory. It
is therefore recommended that you addi-
tionally equip your vehicle with a TIREFIT kit
if you fit tyres that do not feature run-flat
characteristics, e.g. winter tyres. A TIREFIT kit can be obtained from a qualified spe-
cialist workshop.
i Not all wheel/tyre combinations can be
fitted at the factory in all countries. Wheel and tyre combinations
379Wheels and tyres Z
Page 410 of 417
Vehicle data
General notes
Please note that for the specified vehicle
data:
R the heights specified may vary as a result
of:
- tyres
- load
- condition of the suspension
- optional equipment
R optional equipment reduces the maximum
payload.
R vehicle-specific weight information can be
found on the vehicle identification plate
(Y page 398).
R only for certain countries: you can find vehi-
cle-specific vehicle data in the COC docu-
ments (CERTIFICATE OF CONFORMITY).
These documents are delivered with your
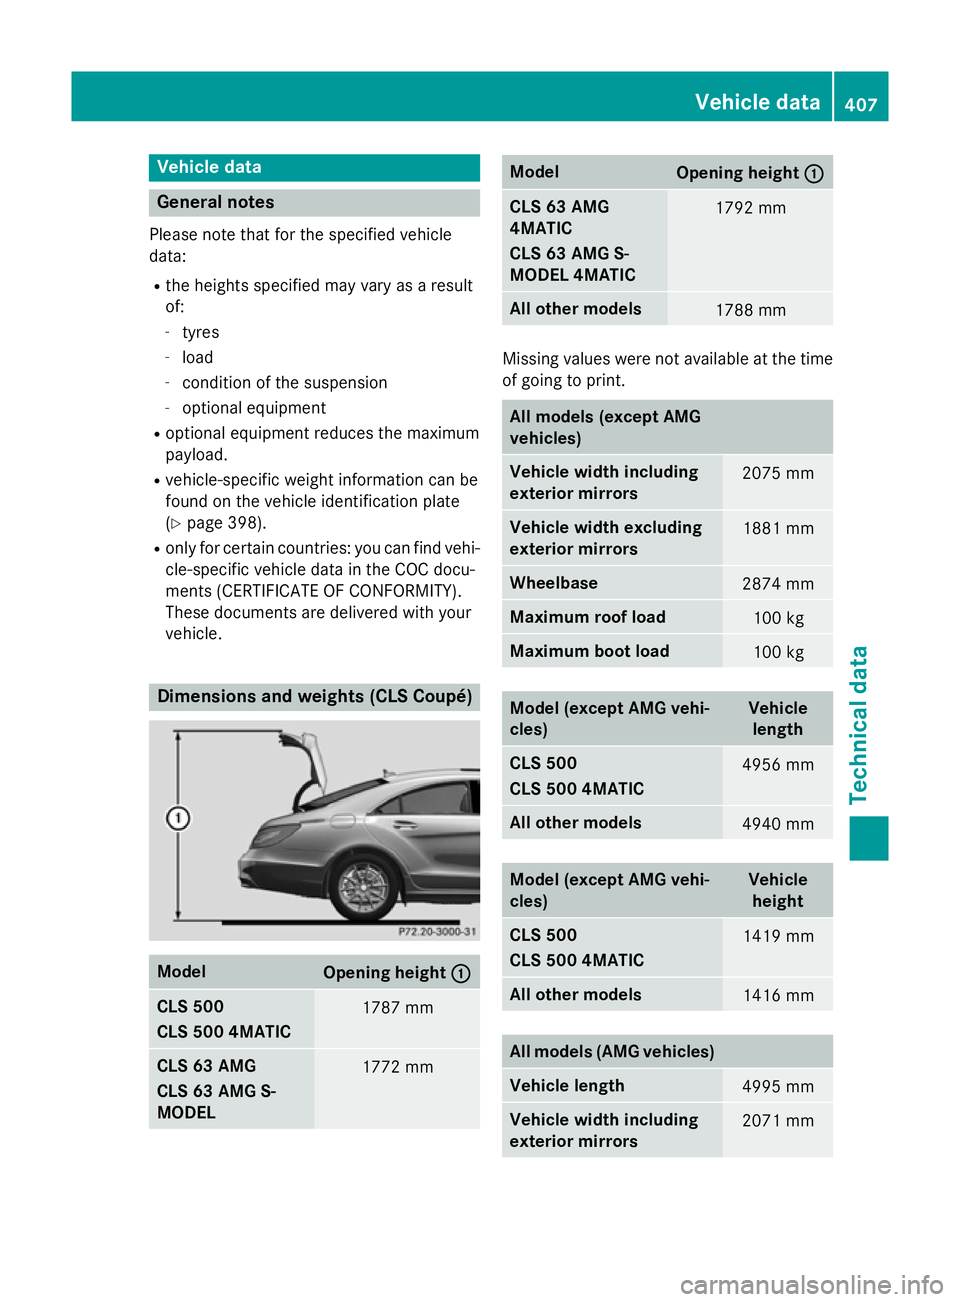
vehicle. Dimensions and weights (CLS Coupé)
Model
Opening height
: : CLS 500
CLS 500 4MATIC
1787 mm
CLS 63 AMG
CLS 63 AMG S-
MODEL
1772 mm Model
Opening height
: : CLS 63 AMG
4MATIC
CLS 63 AMG S-
MODEL 4MATIC
1792 mm
All other models
1788 mm
Missing values were not available at the time
of going to print. All models (except AMG
vehicles)
Vehicle width including
exterior mirrors
2075 mm
Vehicle width excluding
exterior mirrors
1881 mm
Wheelbase
2874 mm
Maximum roof load
100 kg
Maximum boot load
100 kg
Model (except AMG vehi-
cles) Vehicle
length CLS 500
CLS 500 4MATIC
4956 mm
All other models
4940 mm
Model (except AMG vehi-
cles) Vehicle
height CLS 500
CLS 500 4MATIC
1419 mm
All other models
1416 mm
All models (AMG vehicles)
Vehicle length
4995 mm
Vehicle width including
exterior mirrors
2071 mmVehicle data
407Technical data Z
Page 411 of 417
All models (AMG vehicles)
Vehicle width excluding
exterior mirrors
1881 mm
Wheelbase
2874 mm
Maximum roof load
100 kg
Maximum boot load
Model (AMG vehicles) Vehicle
height CLS 63 AMG
CLS 63 AMG S-MODEL
1396 mm
CLS 63 AMG 4MATIC
CLS 63 AMG S-MODEL
4MATIC
1416 mm
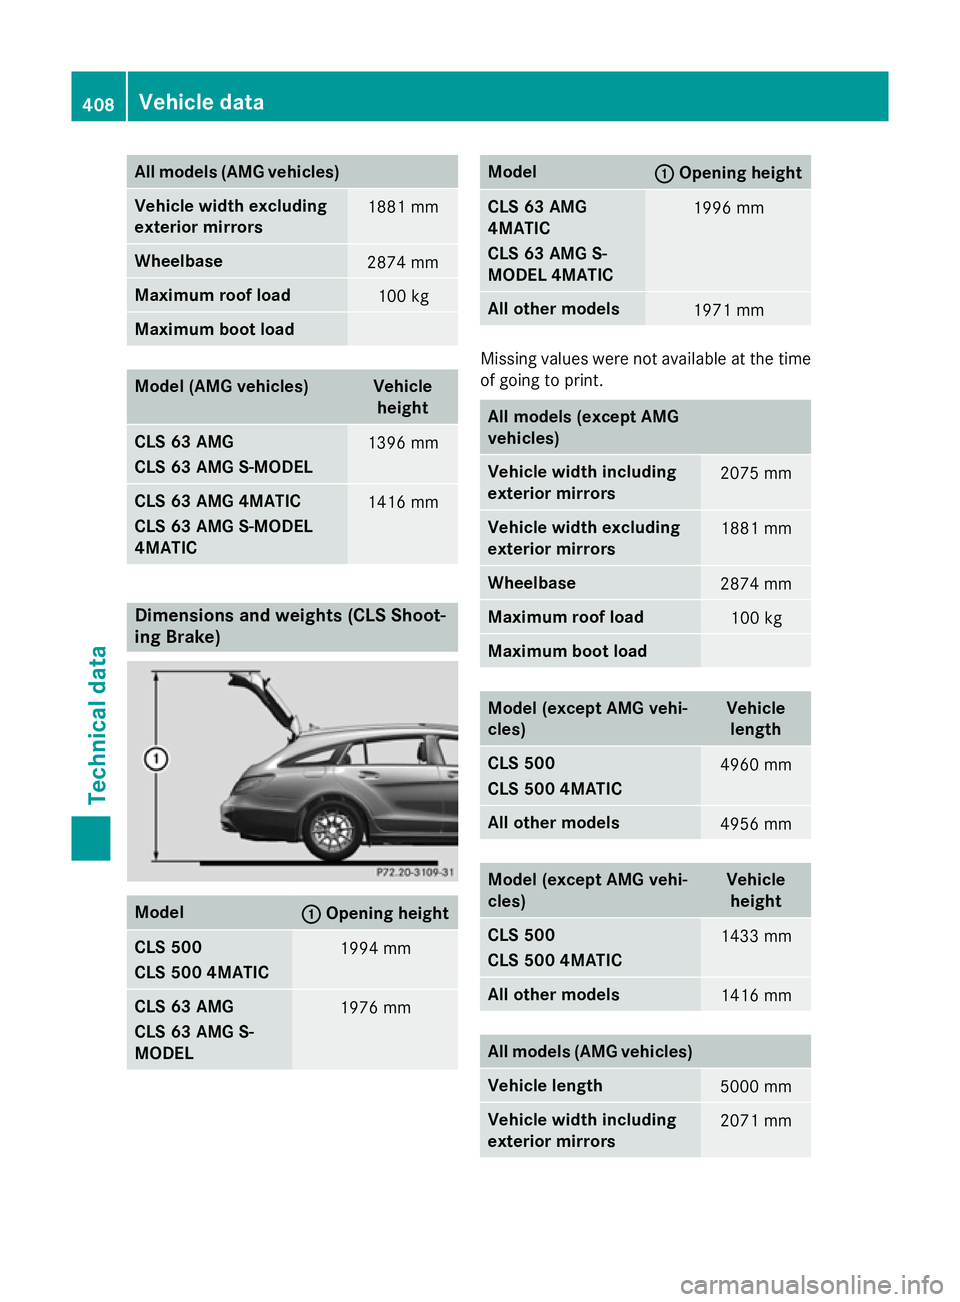
Dimensions and weights (CLS Shoot-
ing Brake)
Model
: :
Opening height CLS 500
CLS 500 4MATIC
1994 mm
CLS 63 AMG
CLS 63 AMG S-
MODEL
1976 mm Model
: :
Opening height CLS 63 AMG
4MATIC
CLS 63 AMG S-
MODEL 4MATIC
1996 mm
All other models
1971 mm
Missing values were not available at the time
of going to print. All models (except AMG
vehicles)
Vehicle width including
exterior mirrors
2075 mm
Vehicle width excluding
exterior mirrors
1881 mm
Wheelbase
2874 mm
Maximum roof load
100 kg
Maximum boot load
Model (except AMG vehi-
cles) Vehicle
length CLS 500
CLS 500 4MATIC
4960 mm
All other models
4956 mm
Model (except AMG vehi-
cles) Vehicle
height CLS 500
CLS 500 4MATIC
1433 mm
All other models
1416 mm
All models (AMG vehicles)
Vehicle length
5000 mm
Vehicle width including
exterior mirrors
2071 mm408
Vehicle dataTechnical data