2014 MERCEDES-BENZ CLS COUPE height adjustment
[x] Cancel search: height adjustmentPage 20 of 417
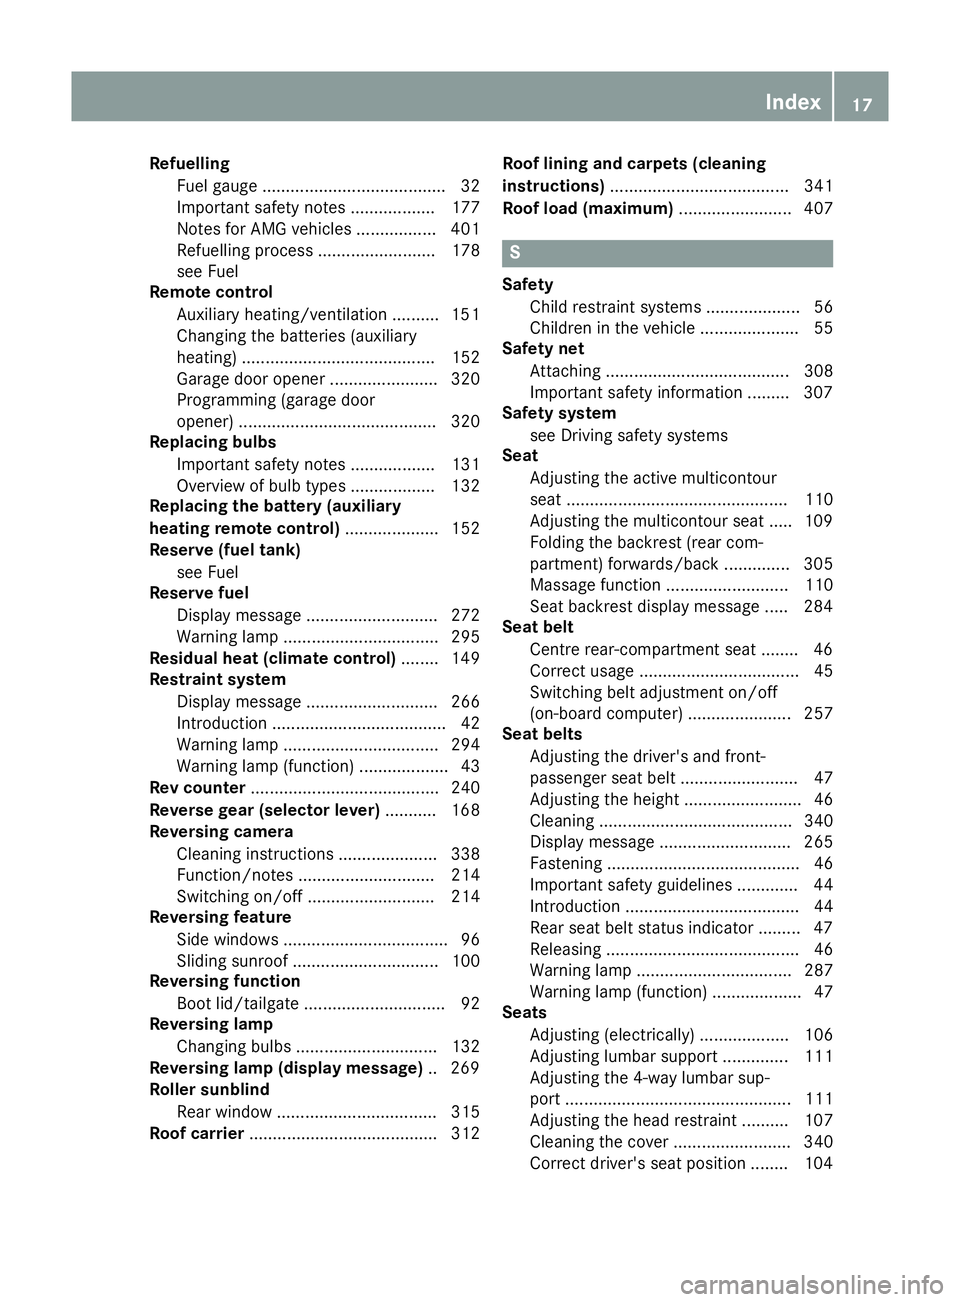
Refuelling
Fuel gaug e....................................... 32
Important safety notes .................. 177
Notes for AMG vehicles ................. 401
Refuelling process ......................... 178
see Fuel
Remote control
Auxiliary heating/ventilation .......... 151
Changing the batteries (auxiliary
heating) ......................................... 152
Garage door opener ....................... 320
Programming (garage door
opener) .......................................... 320
Replacing bulbs
Important safety notes .................. 131
Overview of bulb types .................. 132
Replacing the battery (auxiliary
heating remote control) .................... 152
Reserve (fuel tank)
see Fuel
Reserve fuel
Display message ............................ 272
Warning lamp ................................. 295
Residual heat (climate control) ........ 149
Restraint system
Display message ............................ 266
Introduction ..................................... 42
Warning lamp ................................. 294
Warning lamp (function) ................... 43
Rev counter ........................................ 240
Reverse gear (selector lever) ........... 168
Reversing camera
Cleaning instructions ..................... 338
Function/note s............................. 214
Switching on/of f........................... 214
Reversing feature
Side windows ................................... 96
Sliding sunroof ............................... 100
Reversing function
Boot lid/tailgate .............................. 92
Reversing lamp
Changing bulb s.............................. 132
Reversing lamp (display message) .. 269
Roller sunblind
Rear window .................................. 315
Roof carrier ........................................ 312 Roof lining and carpets (cleaning
instructions)
...................................... 341
Roof load (maximum) ........................ 407 S
Safety Child restraint systems .................... 56
Children in the vehicle ..................... 55
Safety net
Attaching ....................................... 308
Important safety information ......... 307
Safety system
see Driving safety systems
Seat
Adjusting the active multicontour
seat ............................................... 110
Adjusting the multicontour seat ..... 109
Folding the backrest (rear com-
partment) forwards/back .............. 305
Massage function .......................... 110
Seat backrest display message ..... 284
Seat belt
Centre rear-compartment sea t........ 46
Correct usage .................................. 45
Switching belt adjustment on/off
(on-board computer) ...................... 257
Seat belts
Adjusting the driver's and front-
passenger seat belt ......................... 47
Adjusting the height ......................... 46
Cleaning ......................................... 340
Display message ............................ 265
Fastening ......................................... 46
Important safety guidelines ............. 44
Introduction ..................................... 44
Rear seat belt status indicator ......... 47
Releasing ......................................... 46
Warning lamp ................................. 287
Warning lamp (function) ................... 47
Seats
Adjusting (electrically) ................... 106
Adjusting lumbar support .............. 111
Adjusting the 4-way lumbar sup-
port ................................................ 111
Adjusting the head restraint .......... 107
Cleaning the cover ......................... 340
Correct driver's seat position ........ 104 Index
17
Page 58 of 417
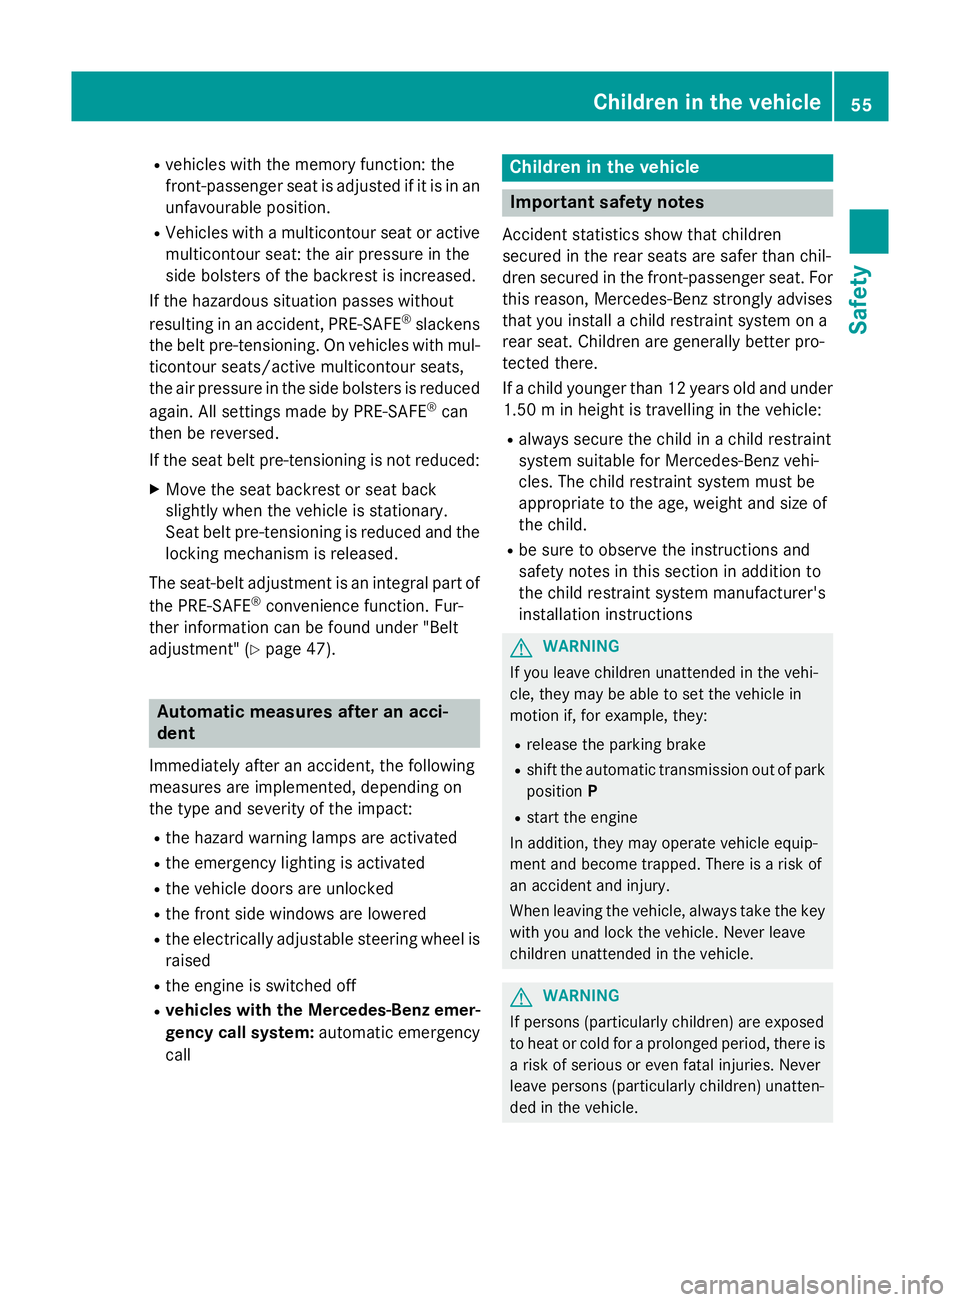
R
vehicles with the memory function: the
front-passenger seat is adjusted if it is in an unfavourable position.
R Vehicles with a multicontour seat or active
multicontour seat: the air pressure in the
side bolsters of the backrest is increased.
If the hazardous situation passes without
resulting in an accident, PRE-SAFE ®
slackens
the belt pre-tensioning. On vehicles with mul-
ticontour seats/active multicontour seats,
the air pressure in the side bolsters is reduced
again. All settings made by PRE-SAFE ®
can
then be reversed.
If the seat belt pre-tensioning is not reduced:
X Move the seat backrest or seat back
slightly when the vehicle is stationary.
Seat belt pre-tensioning is reduced and the
locking mechanism is released.
The seat-belt adjustment is an integral part of
the PRE-SAFE ®
convenience function. Fur-
ther information can be found under "Belt
adjustment" (Y page 47). Automatic measures after an acci-
dent
Immediately after an accident, the following
measures are implemented, depending on
the type and severity of the impact:
R the hazard warning lamps are activated
R the emergency lighting is activated
R the vehicle doors are unlocked
R the front side windows are lowered
R the electrically adjustable steering wheel is
raised
R the engine is switched off
R vehicles with the Mercedes-Benz emer-
gency call system: automatic emergency
call Children in the vehicle
Important safety notes
Accident statistics show that children
secured in the rear seats are safer than chil-
dren secured in the front-passenger seat. For this reason, Mercedes-Benz strongly advises
that you install a child restraint system on a
rear seat. Children are generally better pro-
tected there.
If a child younger than 12 years old and under
1.50 m in height is travelling in the vehicle:
R always secure the child in a child restraint
system suitable for Mercedes-Benz vehi-
cles. The child restraint system must be
appropriate to the age, weight and size of
the child.
R be sure to observe the instructions and
safety notes in this section in addition to
the child restraint system manufacturer's
installation instructions G
WARNING
If you leave children unattended in the vehi-
cle, they may be able to set the vehicle in
motion if, for example, they:
R release the parking brake
R shift the automatic transmission out of park
position P
R start the engine
In addition, they may operate vehicle equip-
ment and become trapped. There is a risk of
an accident and injury.
When leaving the vehicle, always take the key
with you and lock the vehicle. Never leave
children unattended in the vehicle. G
WARNING
If persons (particularly children) are exposed
to heat or cold for a prolonged period, there is a risk of serious or even fatal injuries. Never
leave persons (particularly children) unatten-
ded in the vehicle. Children in the vehicle
55Safety Z
Page 67 of 417
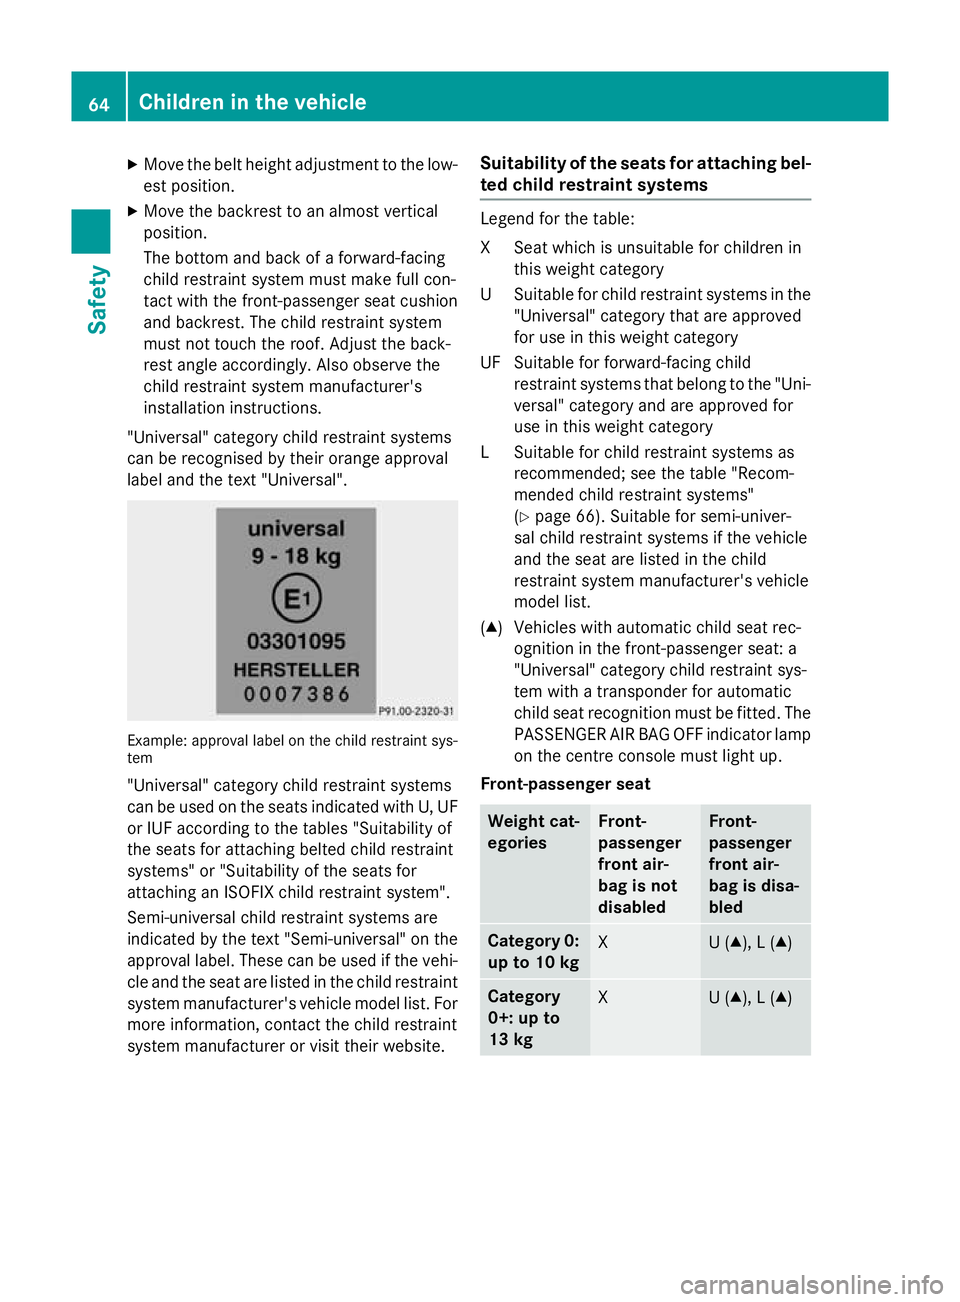
X
Move the belt height adjustment to the low-
est position.
X Move the backrest to an almost vertical
position.
The bottom and back of a forward-facing
child restraint system must make full con-
tact with the front-passenger seat cushion
and backrest. The child restraint system
must not touch the roof. Adjust the back-
rest angle accordingly. Also observe the
child restraint system manufacturer's
installation instructions.
"Universal" category child restraint systems
can be recognised by their orange approval
label and the text "Universal". Example: approval label on the child restraint sys-
tem
"Universal" category child restraint systems
can be used on the seats indicated with U, UF
or IUF according to the tables "Suitability of
the seats for attaching belted child restraint
systems" or "Suitability of the seats for
attaching an ISOFIX child restraint system".
Semi-universal child restraint systems are
indicated by the text "Semi-universal" on the
approval label. These can be used if the vehi-
cle and the seat are listed in the child restraint system manufacturer's vehicle model list. For
more information, contact the child restraint
system manufacturer or visit their website. Suitability of the seats for attaching bel-
ted child restraint systems Legend for the table:
XS
eat which is unsuitable for children in
this weight category
US uitable for child restraint systems in the
"Universal" category that are approved
for use in this weight category
UF Suitable for forward-facing child restraint systems that belong to the "Uni-versal" category and are approved for
use in this weight category
LS uitable for child restraint systems as
recommended; see the table "Recom-
mended child restraint systems"
(Y page 66). Suitable for semi-univer-
sal child restraint systems if the vehicle
and the seat are listed in the child
restraint system manufacturer's vehicle
model list.
(▲) Vehicles with automatic child seat rec- ognition in the front-passenger seat: a
"Universal" category child restraint sys-
tem with a transponder for automatic
child seat recognition must be fitted. The
PASSENGER AIR BAG OFF indicator lamp
on the centre console must light up.
Front-passenger seat Weight cat-
egories Front-
passenger
front air-
bag is not
disabled Front-
passenger
front air-
bag is disa-
bled
Category 0:
up to 10 kg X U (▲), L (▲)
Category
0+: up to
13 kg
X U (▲), L (▲)64
Children in the vehicleSafety
Page 108 of 417
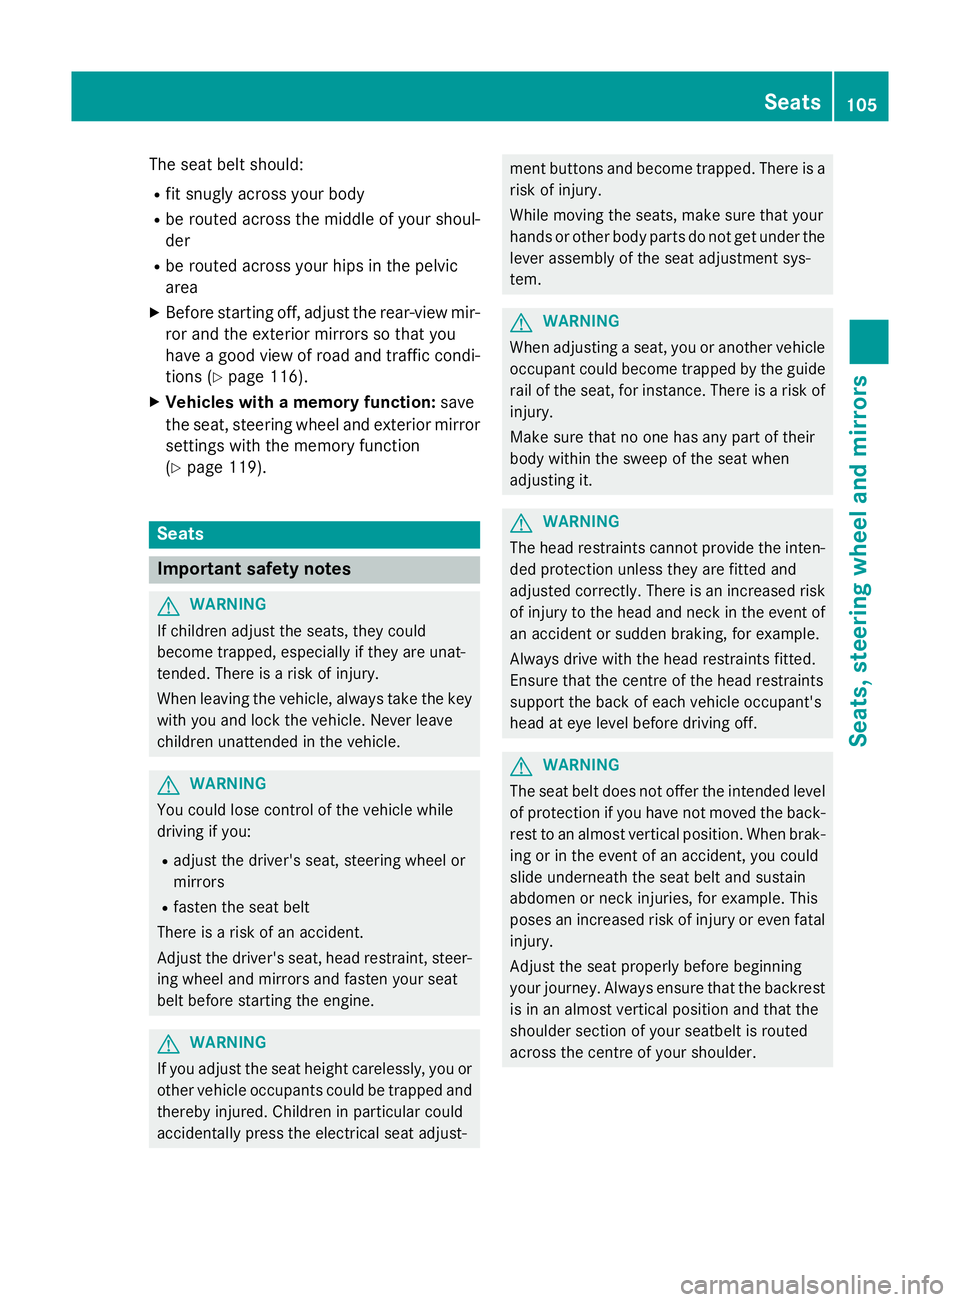
The seat belt should:
R fit snugly across your body
R be routed across the middle of your shoul-
der
R be routed across your hips in the pelvic
area
X Before starting off, adjust the rear-view mir-
ror and the exterior mirrors so that you
have a good view of road and traffic condi-
tions (Y page 116).
X Vehicles with a memory function: save
the seat, steering wheel and exterior mirror
settings with the memory function
(Y page 119). Seats
Important safety notes
G
WARNING
If children adjust the seats, they could
become trapped, especially if they are unat-
tended. There is a risk of injury.
When leaving the vehicle, always take the key with you and lock the vehicle. Never leave
children unattended in the vehicle. G
WARNING
You could lose control of the vehicle while
driving if you:
R adjust the driver's seat, steering wheel or
mirrors
R fasten the seat belt
There is a risk of an accident.
Adjust the driver's seat, head restraint, steer-
ing wheel and mirrors and fasten your seat
belt before starting the engine. G
WARNING
If you adjust the seat height carelessly, you or other vehicle occupants could be trapped andthereby injured. Children in particular could
accidentally press the electrical seat adjust- ment buttons and become trapped. There is a
risk of injury.
While moving the seats, make sure that your
hands or other body parts do not get under the
lever assembly of the seat adjustment sys-
tem. G
WARNING
When adjusting a seat, you or another vehicle occupant could become trapped by the guiderail of the seat, for instance. There is a risk of
injury.
Make sure that no one has any part of their
body within the sweep of the seat when
adjusting it. G
WARNING
The head restraints cannot provide the inten-
ded protection unless they are fitted and
adjusted correctly. There is an increased risk of injury to the head and neck in the event of
an accident or sudden braking, for example.
Always drive with the head restraints fitted.
Ensure that the centre of the head restraints
support the back of each vehicle occupant's
head at eye level before driving off. G
WARNING
The seat belt does not offer the intended level of protection if you have not moved the back-
rest to an almost vertical position. When brak-
ing or in the event of an accident, you could
slide underneath the seat belt and sustain
abdomen or neck injuries, for example. This
poses an increased risk of injury or even fatal injury.
Adjust the seat properly before beginning
your journey. Always ensure that the backrest
is in an almost vertical position and that the
shoulder section of your seatbelt is routed
across the centre of your shoulder. Seats
105Seats, steering wheel and mirrors Z
Page 109 of 417
!
To avoid damage to the seats and the seat
heating, observe the following information:
R do not spill any liquids on the seats. If
liquid is spilled on the seats, dry them as soon as possible.
R if the seat covers are damp or wet, do not
switch on the seat heating. The seat
heating should also not be used to dry
the seats.
R clean the seat covers as recommended;
see "Interior care".
R do not transport heavy loads on the
seats. Do not place sharp objects on the seat cushions, e.g. knives, nails or tools. The seats should only be occupied by
passengers, if possible.
R when the seat heating is in operation, do
not cover the seats with insulating mate-
rials, e.g. blankets, coats, bags, seat cov- ers, child seats or booster seats.
! Make sure that there are no objects in the
footwell under or behind the seats when
moving the seats back. There is a risk that
the seats and/or the objects could be dam- aged.
i The head restraints in the front seats are
fitted with the NECK-PRO system
(Y page 53). For this reason, it is not pos-
sible to remove the head restraints from
the front seats.
For more information, contact a qualified
specialist workshop.
i Further related subjects:
R Through-loading facility in the rear bench
seat (Y page 305)
R Through-loading facility in the rear bench
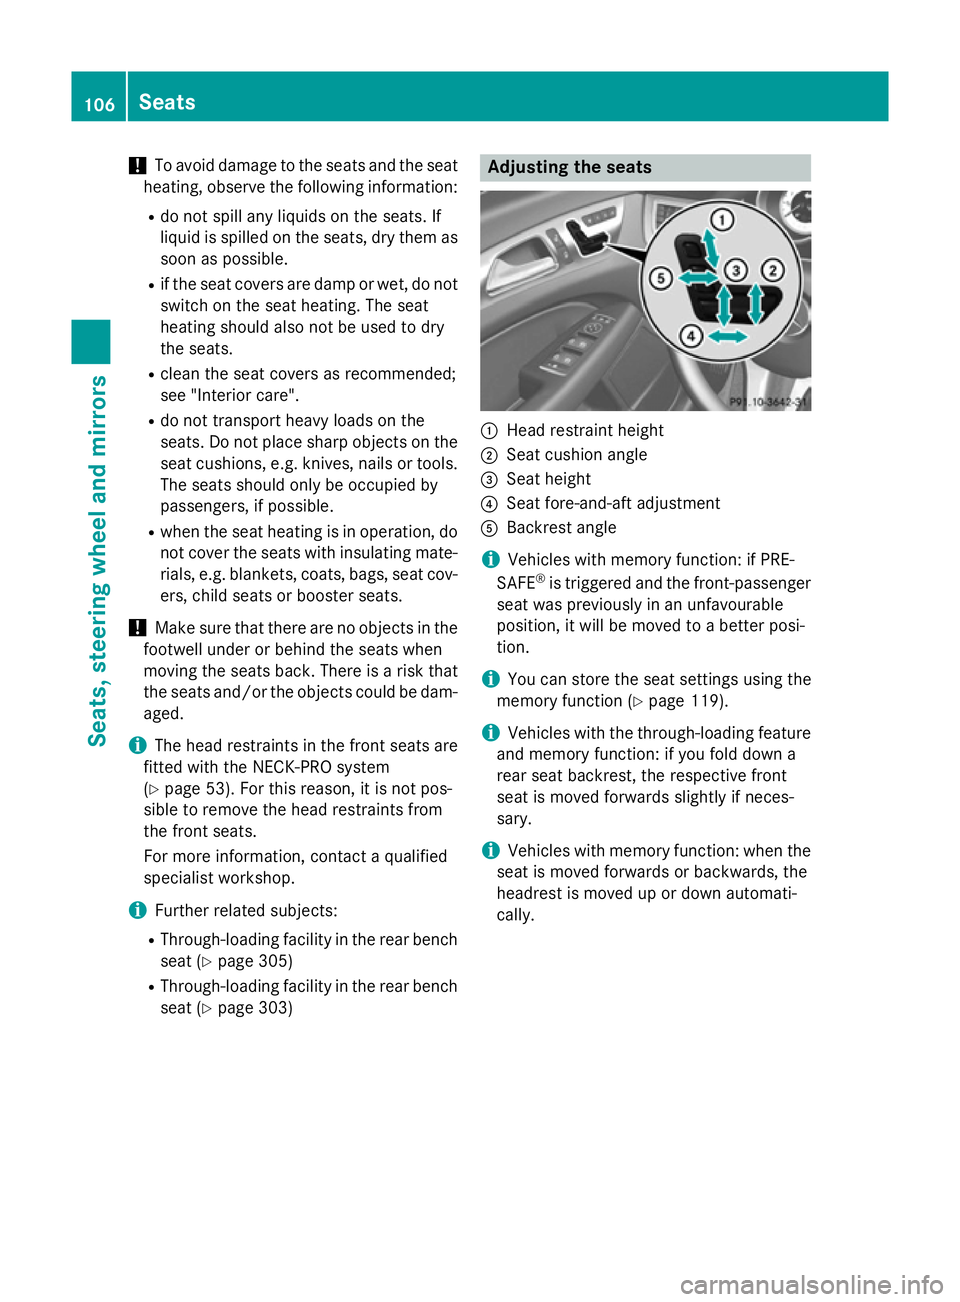
seat (Y page 303) Adjusting the seats
:
Head restraint height
; Seat cushion angle
= Seat height
? Seat fore-and-aft adjustment
A Backrest angle
i Vehicles with memory function: if PRE-
SAFE ®
is triggered and the front-passenger
seat was previously in an unfavourable
position, it will be moved to a better posi-
tion.
i You can store the seat settings using the
memory function (Y page 119).
i Vehicles with the through-loading feature
and memory function: if you fold down a
rear seat backrest, the respective front
seat is moved forwards slightly if neces-
sary.
i Vehicles with memory function: when the
seat is moved forwards or backwards, the
headrest is moved up or down automati-
cally. 106
SeatsSeats, steering wheel and mirrors
Page 111 of 417
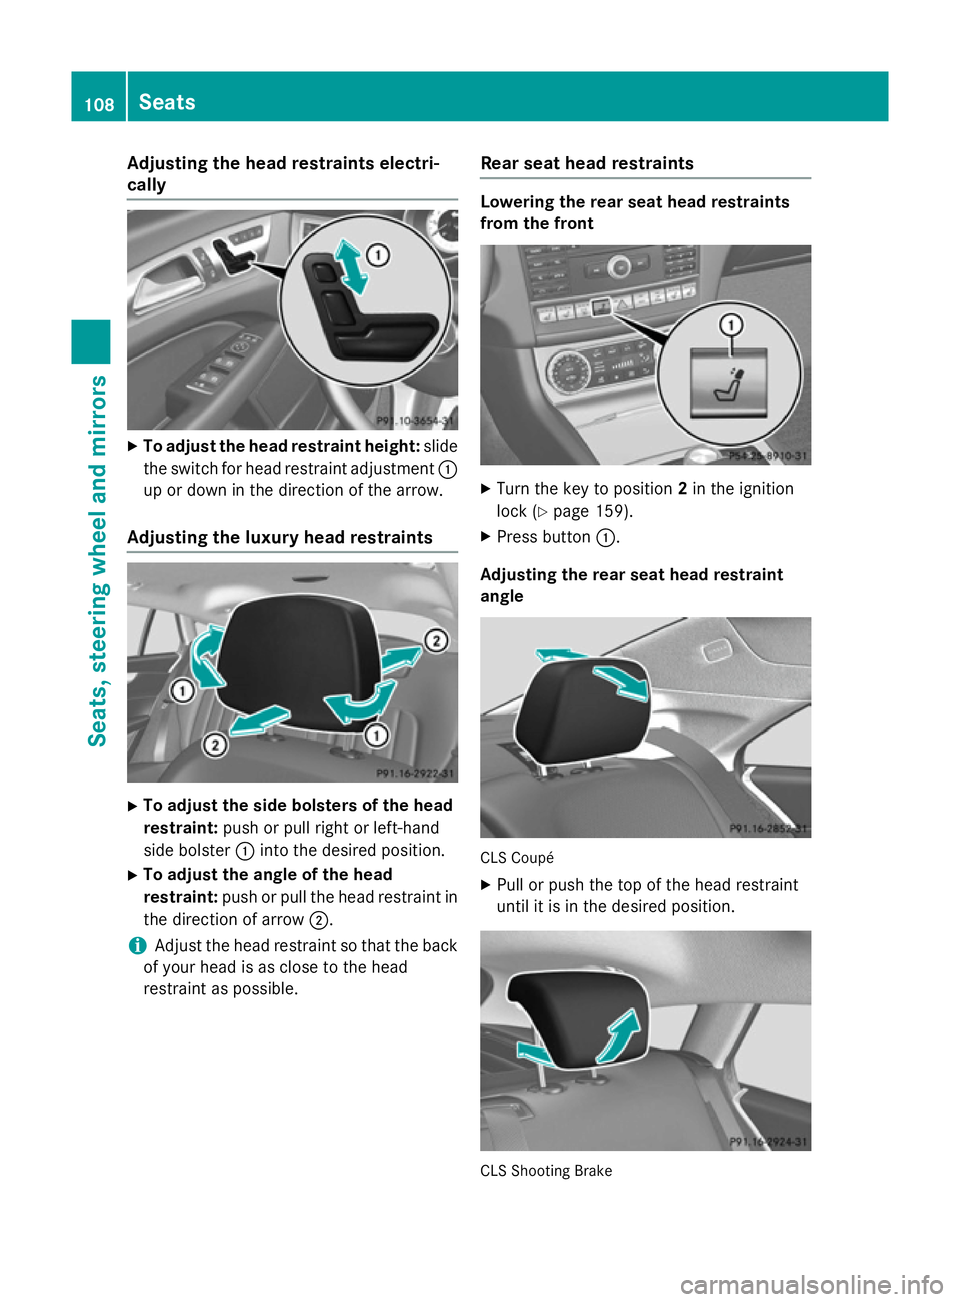
Adjusting the head restraints electri-
cally X
To adjust the head restraint height: slide
the switch for head restraint adjustment :
up or down in the direction of the arrow.
Adjusting the luxury head restraints X
To adjust the side bolsters of the head
restraint: push or pull right or left-hand
side bolster :into the desired position.
X To adjust the angle of the head
restraint: push or pull the head restraint in
the direction of arrow ;.
i Adjust the head restraint so that the back
of your head is as close to the head
restraint as possible. Rear seat head restraints Lowering the rear seat head restraints
from the front
X
Turn the key to position 2in the ignition
lock (Y page 159).
X Press button :.
Adjusting the rear seat head restraint
angle CLS Coupé
X Pull or push the top of the head restraint
until it is in the desired position. CLS Shooting Brake108
SeatsSeats
, steering wheel and mirrors
Page 116 of 417
Problems with the seat ventilation
Problem
Possible causes/consequences and
M
MSolutions The seat ventilation has
switched off prema-
turely or cannot be
switched on. The on-board voltage is too low because too many electrical con-
sumers are switched on.
X Switch off electrical consumers that you do not need, such as
the rear window heating or interior lighting.
Once the battery is sufficiently charged, the seat ventilation will
switch back on automatically. Steering wheel
Important safety notes
G
WARNING
You could lose control of the vehicle while
driving if you:
R adjust the driver's seat, steering wheel or
mirrors
R fasten the seat belt
There is a risk of an accident.
Adjust the driver's seat, head restraint, steer-
ing wheel and mirrors and fasten your seat
belt before starting the engine. G
WARNING
Children could become trapped by the steer-
ing wheel if they adjust it. There is a risk of
injury.
When leaving the vehicle, always take the key with you and lock the vehicle. Never leave
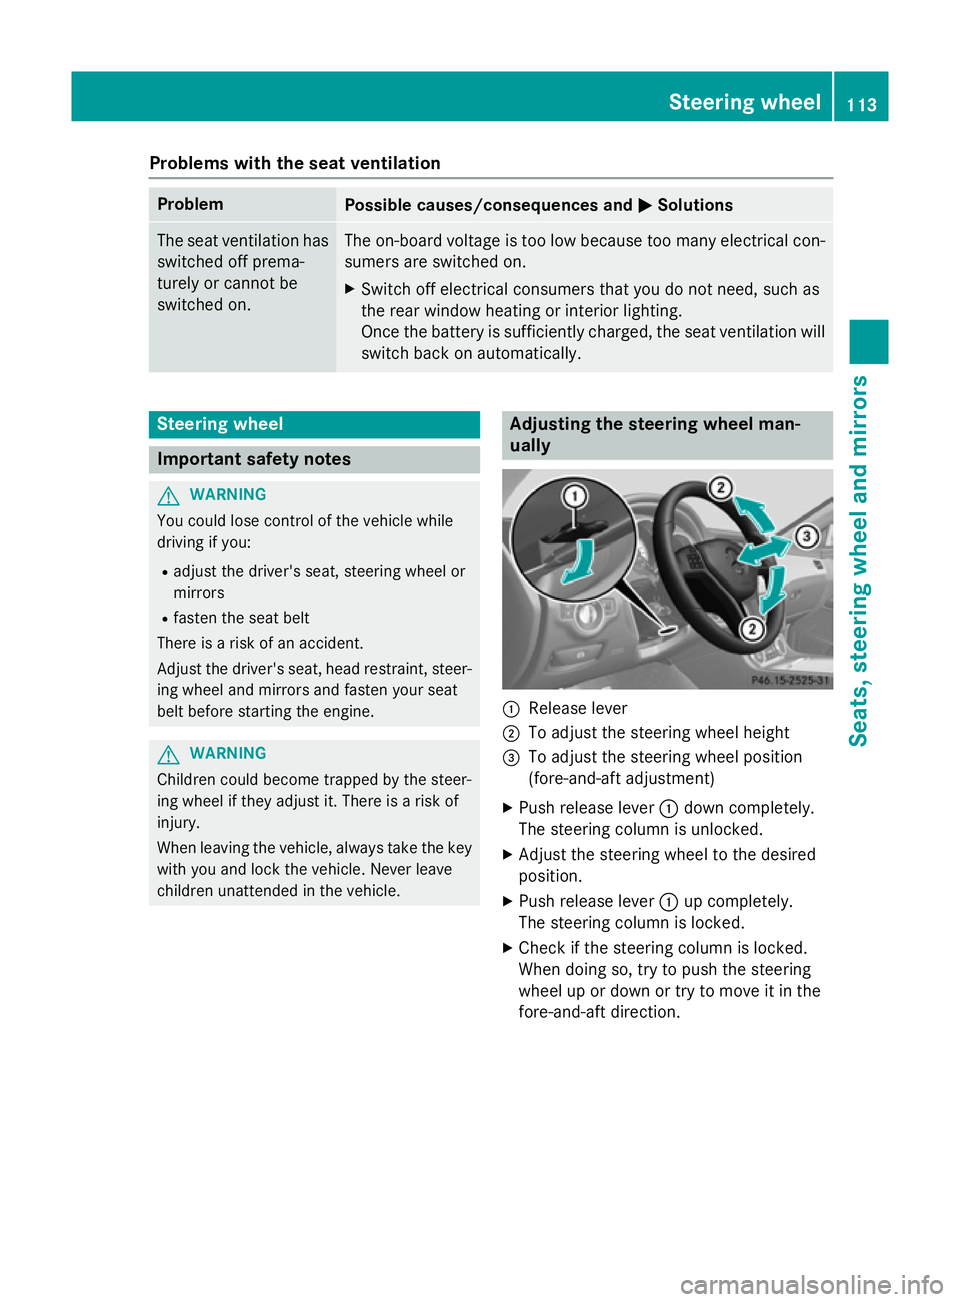
children unattended in the vehicle. Adjusting the steering wheel man-
ually
:
Release lever
; To adjust the steering wheel height
= To adjust the steering wheel position
(fore-and-aft adjustment)
X Push release lever :down completely.
The steering column is unlocked.
X Adjust the steering wheel to the desired
position.
X Push release lever :up completely.
The steering column is locked.
X Check if the steering column is locked.
When doing so, try to push the steering
wheel up or down or try to move it in the
fore-and-aft direction. Steering wheel
113Seats, steering wheel and mirrors Z
Page 117 of 417
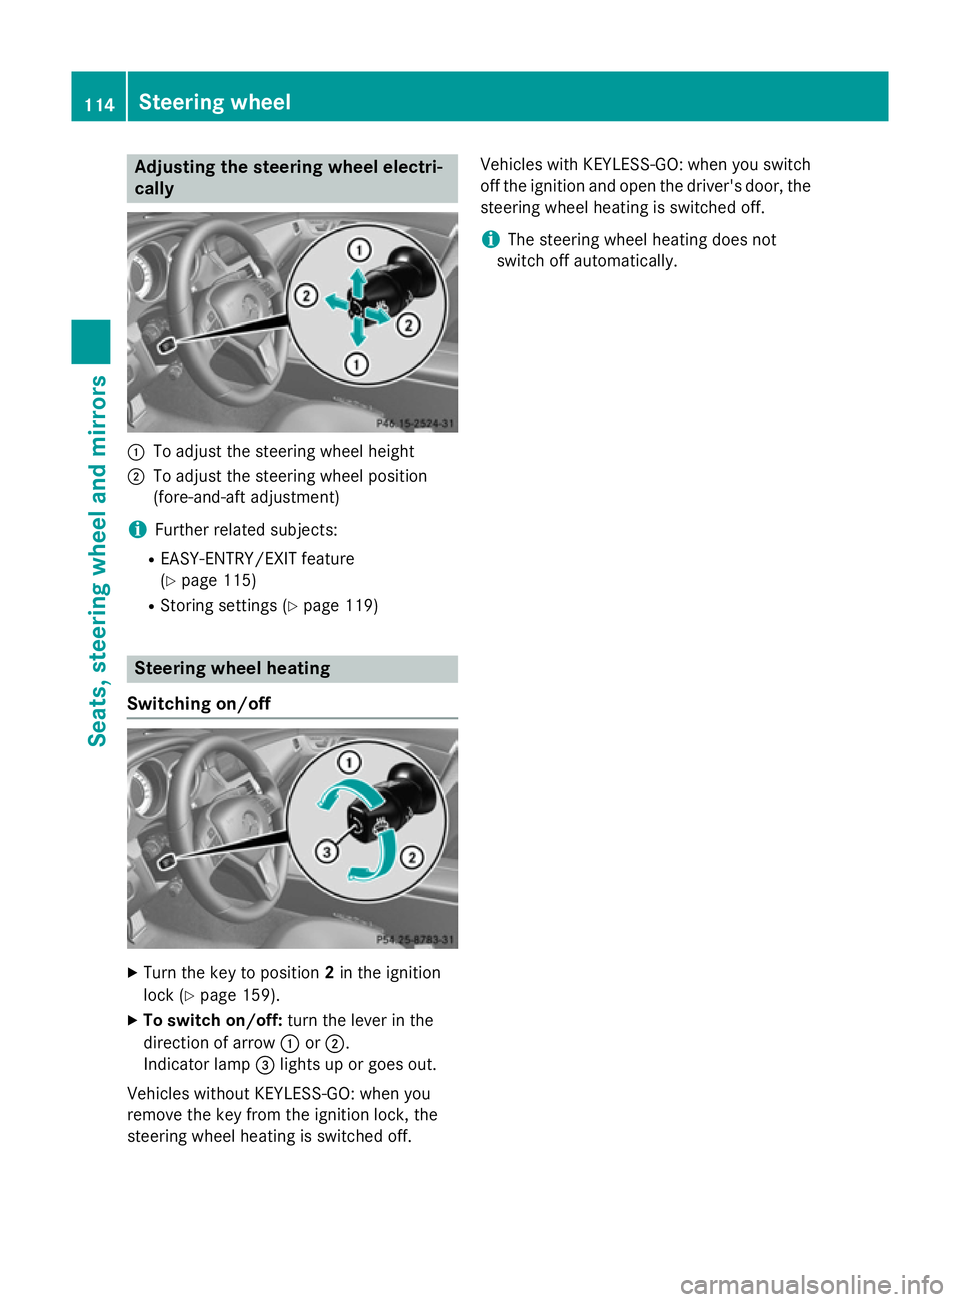
Adjusting the steering wheel electri-
cally :
To adjust the steering wheel height
; To adjust the steering wheel position
(fore-and-aft adjustment)
i Further related subjects:
R EASY-ENTRY/EXIT feature
(Y page 115)
R Storing settings (Y page 119)Steering wheel heating
Switching on/off X
Turn the key to position 2in the ignition
lock (Y page 159).
X To switch on/off: turn the lever in the
direction of arrow :or;.
Indicator lamp =lights up or goes out.
Vehicles without KEYLESS-GO: when you
remove the key from the ignition lock, the
steering wheel heating is switched off. Vehicles with KEYLESS-GO: when you switch
off the ignition and open the driver's door, the steering wheel heating is switched off.
i The steering wheel heating does not
switch off automatically. 114
Steering wheelSeats
, steering wheel and mirrors