2014 MERCEDES-BENZ CLS COUPE remote control
[x] Cancel search: remote controlPage 8 of 417

Switching the function on/off
(ATA) ................................................ 78
Alarm system
see ATA (Anti-Theft Alarm system)
Ambient lighting
Setting the brightness (on-board
computer) ...................................... 253
Setting the colour (on-board com-
puter) ............................................. 254
AMG RIDE CONTROL sports sus-
pension ............................................... 204
Anti-glare film .................................... 326
Anti-lock braking system
see ABS (Anti-lock Braking System)
Anti-Theft Alarm system
see ATA (Anti-Theft Alarm system)
Aquaplaning ....................................... 185
Ashtray ............................................... 315
Assistance display (on-board com-
puter) .................................................. 249
Assistance menu (on-board com-
puter) .................................................. 249
ASSYST PLUS
Displaying a service message ........ 333
Hiding a service message .............. 333
Notes ............................................. 332
Resetting the service interval dis-
play ................................................ 333
Service message ............................ 332
Special service requirements ......... 333
ATA (Anti-Theft Alarm system)
Activating/deactivating ................... 78
Function ........................................... 78
Interior motion sensor ..................... 79
Switching off the alarm .................... 78
Tow-away protectio n ........................79
ATTENTION ASSIST
Activating/deactivating ................. 250
Display message ............................ 274
Function/notes ............................ .218
Authorised workshop
see Qualified specialist workshop
AUTO lights
Display message ............................ 269
see Lights
Automatic engine start (ECO start/
stop function) ................................... .164 Automatic engine switch-off (ECO
start/stop function)
.......................... 163
Automatic headlamp mode .............. 123
Automatic transmission
Accelerator pedal position ............. 171
Automatic drive program .............. .173
Changing gear ............................... 171
DIRECT SELECT lever ..................... 168
Display message ............................ 282
Drive program displa y.................... 169
Driving tips .................................... 171
Emergency running mod e.............. 177
Engaging drive position .................. 170
Engaging neutral ............................ 170
Engaging park position (AMG vehi- cles) ............................................... 168
Engaging reverse gear ................... 169
Engaging the park position ............ 169
Kickdown ....................................... 171
Manual drive progra m.................... 174
Manual drive program (AMG vehi-
cles) ............................................... 175
Manual drive program (vehicles
with Sports package AMG) ............ 175
Overview ........................................ 167
Problem (fault) ............................... 177
Program selector button ................ 171
Pulling away ................................... 162
Selector lever ................................ 168
Starting the engine ........................ 161
Steering wheel gearshift paddle s... 173
Trailer towing ................................. 171
Transmission position display ........ 168
Transmission position display
(DIRECT SELECT lever) ................... 169
Transmission positions .................. 170
Automatic transmission emer-
gency running mode ......................... 177
Auxiliary heating
Activating/deactivating ................. 150
Activating/deactivating (on the
centre console ).............................. 151
Display message ............................ 284
Important safety notes .................. 150
Problem (display message) ............ 154
Remote control .............................. 151
Setting ........................................... 256
Setting the departure time ............. 152 Index
5
Page 9 of 417

Auxiliary ventilation
Activating/deactivating ................ .150
Activating/deactivating (on the
centre console ).............................. 151
Problem (display message) ............ 154
Remote control .............................. 151
Axle load, permissible (trailer tow-
ing) ...................................................... 410 B
Ball coupling Folding in ....................................... 236
Folding out ..................................... 234
BAS (Brake Assist System) ................. 70
BAS PLUS (Brake Assist System
PLUS) .................................................... 71
Battery (key)
Checking .......................................... 85
Important safety notes .................... 85
Replacing ......................................... 86
Battery (vehicle)
Charging ........................................ 353
Display message ............................ 271
Important safety notes .................. 351
Jump starting ................................. 355
Belt
see Seat belts
Belt tensioner
Activation ......................................... 51
Blind Spot Assist
Activating/deactivating ................. 250
Display message ............................ 276
Notes/function .............................. 223
Trailer towing ................................. 225
see Active Blind Spot Assist
BlueTEC (AdBlue®) ............................ 403
Bluetooth® SAP V3 telephone
module
see Separate operating instructions
Bonnet
Closing ........................................... 329
Display message ............................ 283
Important safety notes .................. 328
Opening ......................................... 328
Boot
Emergency release .......................... 95
Important safety notes .................... 91 Opening/closing (automatically
from inside) ...................................... 94
Opening/closing (automatically
from outside) ................................... 92
Opening/closing (manually from
outside) ............................................ 92
Boot lid
Display message ............................ 283
Opening dimensions ...................... 407
Boot load (maximum) ........................ 407
Bottle holders .................................... 314
Box (boot) ........................................... 308
Brake Assist
see BAS (Brake Assist System)
Brake fluid
Display message ............................ 264
Notes ............................................. 405
Brake lamps
Adaptive ........................................... 72
Display message ............................ 268
Brakes
ABS .................................................. 70
BAS .................................................. 70
BAS PLUS ........................................ 71
Brake fluid (notes) ......................... 405
Display message ............................ 262
Driving tips .................................... 183
High-performance brake system .... 184
HOLD function ............................... 200
Important safety notes .................. 183
Parking brake ................................ 181
Warning lamp ................................. 288
Breakdown
see Flat tyre
see Towing away
Bulbs
see Replacing bulbs C
Calling up a fault see Display messages
Car
see Vehicle
Car key
see Key
Car wash (care) ................................. 3346
Index
Page 20 of 417
Refuelling
Fuel gaug e....................................... 32
Important safety notes .................. 177
Notes for AMG vehicles ................. 401
Refuelling process ......................... 178
see Fuel
Remote control
Auxiliary heating/ventilation .......... 151
Changing the batteries (auxiliary
heating) ......................................... 152
Garage door opener ....................... 320
Programming (garage door
opener) .......................................... 320
Replacing bulbs
Important safety notes .................. 131
Overview of bulb types .................. 132
Replacing the battery (auxiliary
heating remote control) .................... 152
Reserve (fuel tank)
see Fuel
Reserve fuel
Display message ............................ 272
Warning lamp ................................. 295
Residual heat (climate control) ........ 149
Restraint system
Display message ............................ 266
Introduction ..................................... 42
Warning lamp ................................. 294
Warning lamp (function) ................... 43
Rev counter ........................................ 240
Reverse gear (selector lever) ........... 168
Reversing camera
Cleaning instructions ..................... 338
Function/note s............................. 214
Switching on/of f........................... 214
Reversing feature
Side windows ................................... 96
Sliding sunroof ............................... 100
Reversing function
Boot lid/tailgate .............................. 92
Reversing lamp
Changing bulb s.............................. 132
Reversing lamp (display message) .. 269
Roller sunblind
Rear window .................................. 315
Roof carrier ........................................ 312 Roof lining and carpets (cleaning
instructions)
...................................... 341
Roof load (maximum) ........................ 407 S
Safety Child restraint systems .................... 56
Children in the vehicle ..................... 55
Safety net
Attaching ....................................... 308
Important safety information ......... 307
Safety system
see Driving safety systems
Seat
Adjusting the active multicontour
seat ............................................... 110
Adjusting the multicontour seat ..... 109
Folding the backrest (rear com-
partment) forwards/back .............. 305
Massage function .......................... 110
Seat backrest display message ..... 284
Seat belt
Centre rear-compartment sea t........ 46
Correct usage .................................. 45
Switching belt adjustment on/off
(on-board computer) ...................... 257
Seat belts
Adjusting the driver's and front-
passenger seat belt ......................... 47
Adjusting the height ......................... 46
Cleaning ......................................... 340
Display message ............................ 265
Fastening ......................................... 46
Important safety guidelines ............. 44
Introduction ..................................... 44
Rear seat belt status indicator ......... 47
Releasing ......................................... 46
Warning lamp ................................. 287
Warning lamp (function) ................... 47
Seats
Adjusting (electrically) ................... 106
Adjusting lumbar support .............. 111
Adjusting the 4-way lumbar sup-
port ................................................ 111
Adjusting the head restraint .......... 107
Cleaning the cover ......................... 340
Correct driver's seat position ........ 104 Index
17
Page 85 of 417
Useful information
i This Owner's Manual describes all mod-
els, series and optional equipment for your
vehicle that were available at the time of
going to press. National variations are pos- sible. Note that your vehicle may not be
equipped with all of the functions descri-
bed. This is also the case for systems and
functions relevant to safety.
i Read the information on qualified special-
ist workshops: (Y page 26). Key
Important safety notes
United Kingdom only: G
WARNING
When the double locks are activated, the
doors can no longer be opened from the
inside. People in the vehicle can no longer get out, e.g. in hazardous situations. There is a
risk of injury.
Therefore, do not leave any people unsuper-
vised in the vehicle, particularly children, eld-
erly people or people in need of special assis-
tance. Do not activate the double lock when
people are in the vehicle.
If the vehicle has been locked from the out-
side, the double-lock function is activated as
standard. It is then not possible to open the
doors from inside the vehicle. You can deac-
tivate the double-lock function by deactivat-
ing the interior motion sensor (Y page 79).
The doors can then be opened from the inside after the vehicle has been locked from the
outside. The anti-theft alarm system is trig-
gered if the door is opened from the inside.
Switch off the alarm (Y page 78).
All countries: G
WARNING
If children are left unsupervised in the vehicle, they could:
R open doors, thereby endangering other per-
sons or road users
R get out and be struck by oncoming traffic
R operate vehicle equipment and become
trapped, for example
In addition, the children could also set the
vehicle in motion, for example, if they:
R release the parking brake
R shift the automatic transmission out of park
position P or shift manual transmission into
neutral
R start the engine
There is a risk of an accident and injury.
When leaving the vehicle, always take the key with you and lock the vehicle. Never leave
children and animals unattended in the vehi-
cle. Keep the keys out of the reach of children. G
WARNING
If persons (particularly children) are exposed
to heat or cold for a prolonged period, there is a risk of serious or even fatal injuries. Never
leave persons (particularly children) unatten-
ded in the vehicle. G
WARNING
If you attach heavy or large objects to the key, the key could be unintentionally turned in the
ignition lock. This could cause the engine to
be switched off. There is a risk of an accident.
Do not attach any heavy or large objects to the
key. Remove any bulky keyrings before insert-
ing the key into the ignition lock.
! Keep the key away from strong magnetic
fields. Otherwise, the remote control func-
tion could be affected.
Strong magnetic fields can occur in the
vicinity of powerful electrical installations. 82
KeyOpening and closing
Page 90 of 417
Problems with the key
Problem
Possible causes/consequences and
M
MSolutions You can no longer lock
or unlock the vehicle
using the key. The key battery is discharged or nearly discharged.
X Check the key battery (Y page 85) and replace it if necessary
(Y page 86).
If this does not work: X Lock (Y page 90) or unlock (Y page 90) the vehicle using the
emergency key element. The key is faulty.
X Lock (Y page 90) or unlock (Y page 90) the vehicle using the
emergency key element.
X Have the key checked at a qualified specialist workshop. You can no longer lock
or unlock the vehicle
using KEYLESS-GO. The key battery is discharged or nearly discharged.
X Check the key battery (Y page 85) and replace it if necessary
(Y page 86).
If this does not work: X Lock (Y page 90) or unlock (Y page 90) the vehicle using the
emergency key element. There is interference from a powerful source of radio waves.
X Lock (Y page 90) or unlock (Y page 90) the vehicle using the
emergency key element. There is a fault with KEYLESS-GO.
X Lock/unlock the vehicle using the remote control function of
the key.
X Have the vehicle and key checked at a qualified specialist work-
shop.
If the vehicle can also not be locked/unlocked using the remote
control function:
X Lock (Y page 90) or unlock (Y page 90) the vehicle using the
emergency key element.
X Have the vehicle and key checked at a qualified specialist work-
shop. You have lost a key. X
Have the key deactivated at a qualified specialist workshop.
X Report the loss immediately to the vehicle insurers.
X If necessary, have the locks changed as well. You have lost the emer-
gency key element. X
Report the loss immediately to the vehicle insurers.
X If necessary, have the locks changed as well. Key
87Opening and closing Z
Page 153 of 417
Auxiliary heating
Important safety notes G
DANGER
If the exhaust pipe is blocked or sufficient
ventilation is not possible, toxic exhaust
fumes can enter the vehicle, especially car-
bon monoxide. This is the case, e.g. in
enclosed spaces, or if the vehicle is stuck in
snow. There is a risk of fatal injuries.
You should switch off the auxiliary heating in
enclosed spaces which do not have an extrac- tion system, e.g. a garage. If the vehicle is
stuck in snow and you must leave the auxiliary
heating running, keep the exhaust pipe and
the area around the vehicle clear of snow. To guarantee a sufficient supply of fresh air, open
a window on the side of the vehicle away from the wind. G
WARNING
When the auxiliary heating is switched on,
parts of the vehicle can become very hot.
Flammable materials such as leaves, grass or twigs may ignite if they come into contact
with:
R hot parts of the exhaust system
R the exhaust gas itself
There is a risk of fire.
When the auxiliary heating is switched on,
make sure that:
R no flammable materials come into contact
with hot vehicle components
R the exhaust gas can escape from the
exhaust pipe unhindered
R the exhaust gas does not come into contact
with flammable materials.
The auxiliary heating and the exhaust gas dis- charge location can be found in front of the
right-hand front wheel.
! Operating the auxiliary heating/ventila-
tion draws on the vehicle battery. After you
have heated or ventilated the vehicle a maximum of two times, drive for a longer
distance.
i Switch the auxiliary heating on regularly
once a month for about ten minutes.
The auxiliary heating heats the air in the vehi- cle interior to the set temperature. This
occurs without using the heat of the running
engine. The auxiliary heating is operated
directly using the vehicle's fuel. For this rea-
son, the tank content must be at least at
reserve fuel level to ensure that the auxiliary
heating functions.
The auxiliary heating/ventilation automati-
cally adjusts to changes in temperature and
weather conditions. For this reason, the aux- iliary heating could switch from ventilation
mode to heating mode or from heating mode
to ventilation mode.
The auxiliary heating switches off automati-
cally after 50 minutes. This time limit can be
altered. To do this, visit a qualified specialist
workshop.
You cannot use the auxiliary ventilation to
cool the vehicle interior to a temperature
lower than the outside temperature.
Before switching on X
Turn the key to position 2in the ignition
lock (Y page 159).
X Set the desired temperature.
Auxiliary heating or ventilation can also be
switched on if the manually set climate con-
trol is activated. Optimum comfort can be
attained when the system is set to automatic
mode. Set the temperature to 22 †.
The auxiliary heating/ventilation can be acti-
vated or deactivated using the remote control or the button on the centre console.
The on-board computer can be used to spec-ify up to three departure times, one of which
may be preselected (Y page 256).150
Operating the climate control systemClimate cont
rol
Page 154 of 417
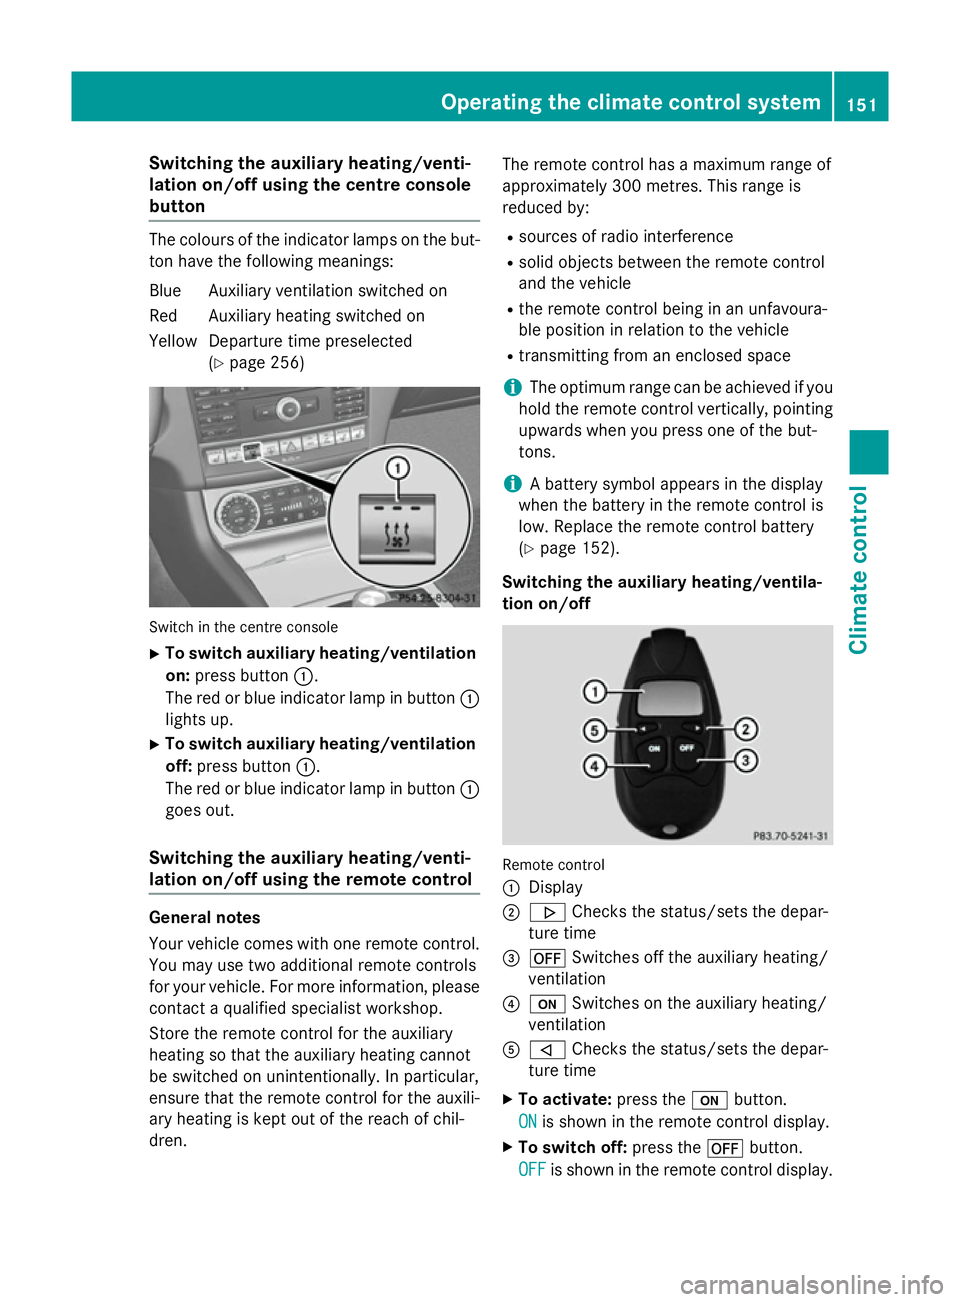
Switching the auxiliary heating/venti-
lation on/off using the centre console
button The colours of the indicator lamps on the but-
ton have the following meanings:
Blue Auxiliary ventilation switched on
Red Auxiliary heating switched on
Yellow Departure time preselected (Ypage 256) Switch in the centre console
X To switch auxiliary heating/ventilation
on: press button :.
The red or blue indicator lamp in button :
lights up.
X To switch auxiliary heating/ventilation
off: press button :.
The red or blue indicator lamp in button :
goes out.
Switching the auxiliary heating/venti-
lation on/off using the remote control General notes
Your vehicle comes with one remote control.
You may use two additional remote controls
for your vehicle. For more information, please
contact a qualified specialist workshop.
Store the remote control for the auxiliary
heating so that the auxiliary heating cannot
be switched on unintentionally. In particular,
ensure that the remote control for the auxili-
ary heating is kept out of the reach of chil-
dren. The remote control has a maximum range of
approximately 300 metres. This range is
reduced by:
R sources of radio interference
R solid objects between the remote control
and the vehicle
R the remote control being in an unfavoura-
ble position in relation to the vehicle
R transmitting from an enclosed space
i The optimum range can be achieved if you
hold the remote control vertically, pointing
upwards when you press one of the but-
tons.
i A battery symbol appears in the display
when the battery in the remote control is
low. Replace the remote control battery
(Y page 152).
Switching the auxiliary heating/ventila-
tion on/off Remote control
:
Display
; . Checks the status/sets the depar-
ture time
= ^ Switches off the auxiliary heating/
ventilation
? u Switches on the auxiliary heating/
ventilation
A , Checks the status/sets the depar-
ture time
X To activate: press theubutton.
ON
ON is shown in the remote control display.
X To switch off: press the^button.
OFF OFF is shown in the remote control display. Operating the climate control system
151Climate control Z
Page 155 of 417
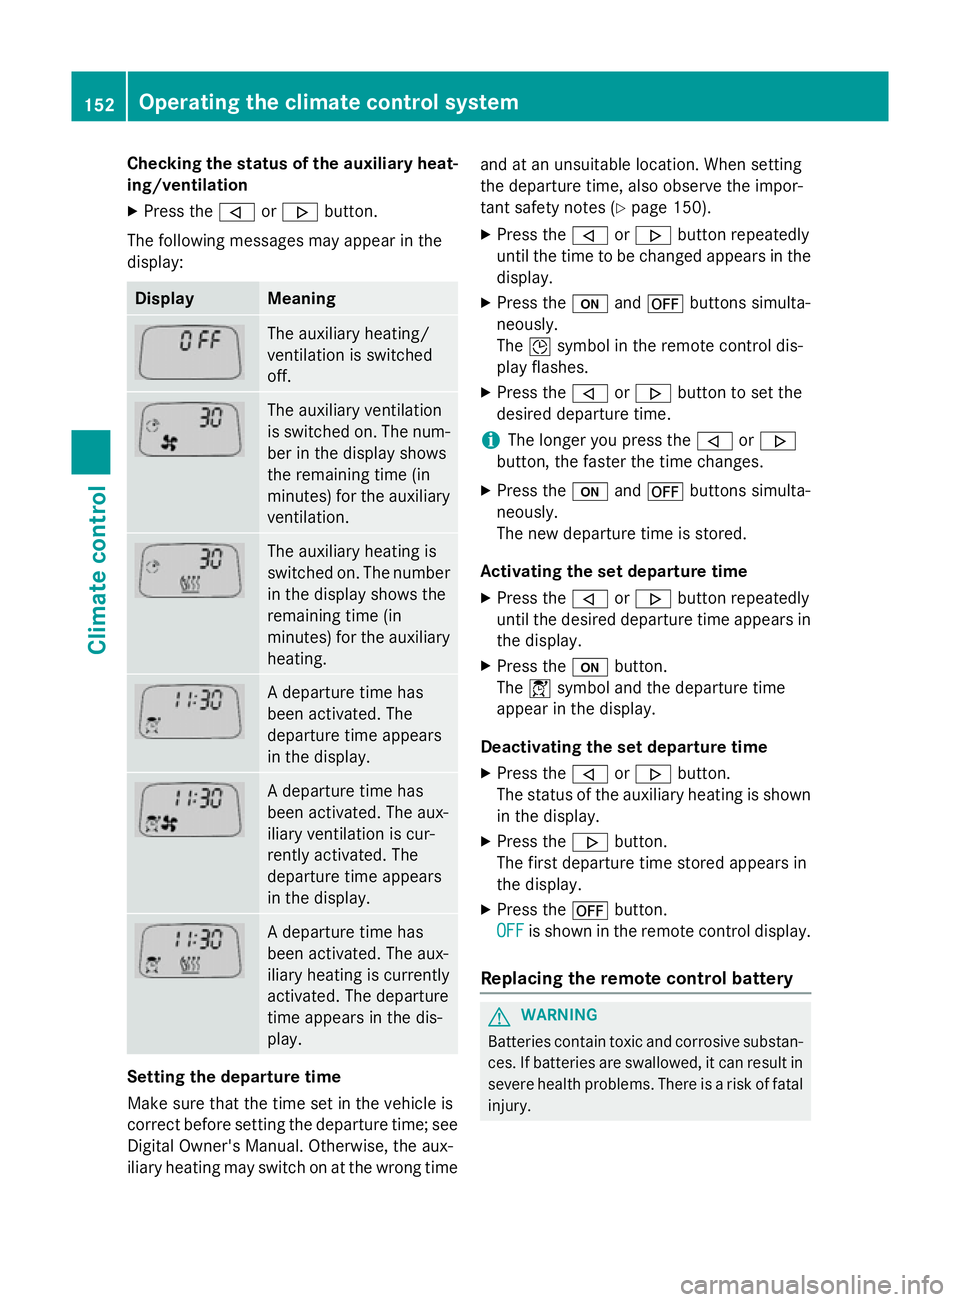
Checking the status of the auxiliary heat-
ing/ventilation
X Press the ,or. button.
The following messages may appear in the
display: Display Meaning
The auxiliary heating/
ventilation is switched
off.
The auxiliary ventilation
is switched on. The num-
ber in the display shows
the remaining time (in
minutes) for the auxiliary
ventilation. The auxiliary heating is
switched on. The number
in the display shows the
remaining time (in
minutes) for the auxiliary heating. A departure time has
been activated. The
departure time appears
in the display.
A departure time has
been activated. The aux-
iliary ventilation is cur-
rently activated. The
departure time appears
in the display.
A departure time has
been activated. The aux-
iliary heating is currently
activated. The departure
time appears in the dis-
play.
Setting the departure time
Make sure that the time set in the vehicle is
correct before setting the departure time; see Digital Owner's Manual. Otherwise, the aux-
iliary heating may switch on at the wrong time and at an unsuitable location. When setting
the departure time, also observe the impor-
tant safety notes (Y
page 150).
X Press the ,or. button repeatedly
until the time to be changed appears in the display.
X Press the uand^ buttons simulta-
neously.
The Îsymbol in the remote control dis-
play flashes.
X Press the ,or. button to set the
desired departure time.
i The longer you press the
,or.
button, the faster the time changes.
X Press the uand^ buttons simulta-
neously.
The new departure time is stored.
Activating the set departure time X Press the ,or. button repeatedly
until the desired departure time appears in
the display.
X Press the ubutton.
The Ísymbol and the departure time
appear in the display.
Deactivating the set departure time
X Press the ,or. button.
The status of the auxiliary heating is shown in the display.
X Press the .button.
The first departure time stored appears in
the display.
X Press the ^button.
OFF
OFF is shown in the remote control display.
Replacing the remote control battery G
WARNING
Batteries contain toxic and corrosive substan- ces. If batteries are swallowed, it can result in
severe health problems. There is a risk of fatal injury. 152
Operating the climate control systemClimate control