2014 MERCEDES-BENZ CLS COUPE child lock
[x] Cancel search: child lockPage 10 of 417

Care
Automatic car wash ...................... .334
Carpets .......................................... 341
Display .......................................... .339
Exhaust pipe .................................. 338
Exterior lighting ............................ .337
Gear or selector lever .................... 340
High-pressure cleaner .................... 335
Interior .......................................... .339
Matt paintwork .............................. 336
Night View Assist Plus ................... 339
Notes ............................................. 334
Paint .............................................. 336
Plastic trim ................................... .339
Reversing camera .......................... 338
Roof lining ...................................... 341
Seat belt ........................................ 340
Seat cover ..................................... 340
Sensors ......................................... 337
Steering wheel ............................... 340
Trim pieces ................................... .340
Washing by hand ........................... 335
Wheels .......................................... .336
Windows ........................................ 337
Wiper blades .................................. 337
Wooden load compartment floor ... 341
Wooden trim .................................. 340
CD player/CD changer(on-board
computer) .......................................... 246
Central locking
Automatic locking (on-board com-
puter) ............................................. 255
Locking/unlocking (key ).................. 83
Centre console
Lower section .................................. 37
Lower section (AMG vehicles) .......... 38
Upper section .................................. 36
Changing bulbs
Reversing lamps ............................ 132
Child seat
Automatic recognition ..................... 59
Forward-facing restraint system ...... 62
ISOFIX .............................................. 57
On the front-passenger sea t............ 61
Problem (malfunction) ..................... 63
Rearward-facing restraint system .... 62
Recommendations ........................... 66
Suitable positions ............................ 63 Top Tether ....................................... 57
Child-proof locks
Important safety notes .................... 68
Rear doors ....................................... 69
Children
Restraint systems ............................ 56
Cigarette lighter ................................ 317
Cleaning
Mirror turn signal ........................... 337
Trailer tow hitch ............................. 338
Climate control
Auxiliary heating/ventilation .......... 150
Controlling automaticall y............... 144
Convenience opening/closing
(air-recirculation mode) ................. 148
Cooling with air dehumidification .. 143
Demisting the windows .................. 147
Demisting the windscreen ............. 146
Important safety notes .................. 138
Indicator lamp ................................ 144
Information about using
THERMATIC automatic climate
control ........................................... 139
Information on using
THERMOTRONIC automatic cli-
mate control .................................. 142
Overview of systems ...................... 138
Problem with the rear window
heating .......................................... 148
Problems with cooling with air
dehumidification ............................ 144
Rear control panel ......................... 141
Setting the air distribution ............. 145
Setting the air vents ...................... 154
Setting the airflow ......................... 146
Setting the climate mode (AIR
FLOW) ............................................ 144
Setting the temperature ................ 145
Setting the temperature,
THERMATIC ................................... 145
Setting the temperature,
THERMOTRONIC ............................ 145
Switching air-recirculation mode
on/of f............................................ 148
Switching on/of f........................... 142
Switching residual heat on/off ...... 149
Switching the rear window heat-
ing on/of f...................................... 147 Index
7
Page 16 of 417

Insect protection on the radiator
.... 329
Instrument cluster
Overview .......................................... 32
Settings ........................................ .252
Warning and indicator lamps ........... 34
Instrument cluster lighting .............. 252
Intelligent Light System
Activating/deactivating ................. 253
Display message ............................ 269
Overview ........................................ 127
Setting the dipped-beam head-
lamps for driving on the right/left .. 253
Interior lighting
Automatic control system .............. 130
Delayed switch-off (on-board
computer) ...................................... 254
Emergency lighting ........................ 131
Manual control ............................... 131
Overview ........................................ 130
Reading lamp ................................. 130
Setting brightness for display/
switches (on-board computer) ....... 252
Setting the ambient lighting
brightness (on-board computer) .... 253
Setting the ambient lighting col-
our (on-board computer) ................ 254
Interior motion sensor
Deactivating ..................................... 80
Function .......................................... .79
Priming ............................................ 79
Switching off .................................... 80
ISOFIX child seat securing system ....57J
Jack Storage location ............................3 45
Using ............................................. 375
Jump starting (engine) ......................355 K
Key Changing the battery ....................... 86
Checking the battery ....................... 85
Convenience closing feature ............ 98
Convenience opening feature .......... 97
Display message ............................ 285 Door central locking/unlocking ....... 83
Emergency key element ................... 84
Important safety notes .................... 82
Loss ................................................. 87
Modifying the programming ............. 84
Overview .......................................... 82
Positions (ignition lock) ................. 159
Problem (malfunction) ..................... 87
Starting the engine ........................ 161
Key positions
Key ................................................ 159
KEYLESS GO .................................. 159
KEYLESS-GO
Convenience closing ........................ 98
Display message ............................ 285
Locking ............................................ 83
Removing the Start/Stop button ... 160
Start/Stop button .......................... 159
Starting the engine ........................ 162
Unlocking ......................................... 83
Kickdown
Driving tips ................................... .171
Manual drive program .................... 176
Kneebag ............................................... 49 L
Lamps see Warning and indicator lamps
Lane Keeping Assist
Activating/deactivating ................. 251
Display message ............................ 275
Function/informatio n.................... 225
Lane package ..................................... 223
Lap time (RACETIMER) ...................... 259
Lashing eyelets ................................. 306
Licence plate lamp (display mes-
sage) ................................................... 268
Light sensor (display message) ....... 269
Lighting
see Lights
Lights
Activating/deactivating the Intel-
ligent Light System ........................ 253
Activating/deactivating the inte-
rior lighting delayed switch-off ....... 254
Active light function ....................... 127
Adaptive Highbeam Assist ............. 128 Index
13
Page 45 of 417

Useful information
i This Owner's Manual describes all mod-
els, series and optional equipment for your
vehicle that were available at the time of
going to press. National variations are pos- sible. Note that your vehicle may not be
equipped with all of the functions descri-
bed. This is also the case for systems and
functions relevant to safety.
i Read the information on qualified special-
ist workshops: (Y page 26). Panic alarm
X
To activate: press!button :for
approximately one second.
An alarm sounds and the exterior lighting
flashes.
X To deactivate: press!button :
again.
or
X Insert the key into the ignition lock.
or X Press the KEYLESS-GO Start/Stop button.
The KEYLESS-GO key must be in the vehi-
cle.
i The panic alarm function is only available
in certain countries. Occupant safety
Introduction to the restraint system
The restraint system reduces the risk of vehi- cle occupants coming into contact with parts
of the vehicle's interior in the event of an
accident. Furthermore, the restraint system
can also reduce the forces to which vehicle
occupants are subjected during an accident.
The restraint system includes:
R Seat belt system
R Airbags
R Child restraint system
R Child seat securing system
The various components of the restraint sys-
tem work complementary to one another. It
can only provide maximum protection if all
vehicle occupants:
R have their seat belt correctly fastened
(Y page 45)
R have correctly adjusted their seat and head
restraint (Y page 105).
As the driver, you must also ensure that the
steering wheel is correctly adjusted. Observe
the information relating to the correct driver's
seat position (Y page 104).
Additionally, you must ensure that an airbag
can deploy freely (Y page 48).
An airbag is supplementary to a correctly fas- tened seatbelt and, as an additional safety
device, provides greater protection for vehi-
cle occupants in an accident situation. If the
protection provided by the seat belt is suffi-
cient, the airbags do not deploy. Furthermore,
in the event of an accident, only airbags which
provide greater protection in the given acci-
dent situation deploy. However, seat belts
and airbags generally do not protect against
objects penetrating the vehicle from the out- side.
Information on how the restraint system
operates can be found in "Deployment of the
seat belt tensioner and airbags"
(Y page 51). 42
Occupant safetySafety
Page 47 of 417
facing child restraint systems on the front-
passenger seat.
R All other persons: the PASSENGER AIR
BAG OFF indicator lamp must be off. Be
sure to observe the notes on "Seat belts"
(Y page 44) and "Airbags" (Y page 48).
There you can also find information on the
correct seat position.
Observe the information on automatic child
seat recognition in the front-passenger seat
(Y page 59). Seat belts
Introduction A correctly fastened seat belt is the most
effective means of limiting the movement of a
vehicle occupant during a collision or in the
event that the vehicle overturns. This reduces
the risk of vehicle occupants coming into con- tact with parts of the vehicle interior or being
ejected from it. Furthermore, the seat belt
helps to keep the vehicle occupant in the best position in relation to a deployed airbag.
The seat belt system consists of:
R seat belts
R belt tensioners for the front seat belts and
the outer seat belts in the rear
R seat belt force limiters for the front seat
belts and the outer seat belts in the rear
If the seat belt is pulled quickly or suddenly
from the belt sash guide, the inertia reel
locks. The belt strap cannot be pulled out fur- ther.
In an impact, the belt tensioner tightens the
belt to pull it close to the body. It does not pullthe vehicle occupant back in the direction of
the seat backrest, however.
In addition, the belt tensioner cannot com-
pensate for the seat position being incorrect
or for an incorrectly worn seat belt.
If the seat belt is also fitted with a belt force
limiter and this is triggered, the force exerted by the seat belt on the vehicle occupant is
reduced.
The belt force limiters on the front seats are
synchronised with the front airbags, which
take on a part of the deceleration force. This
helps to reduce the forces to which vehicle
occupants are subjected during an accident.
! If the co-driver's seat is not occupied, do
not engage the seat belt tongue in the
buckle on the co-driver's seat. Otherwise,
the belt tensioner could be triggered in the
event of an accident and would have to be
replaced.
Important safety notes G
WARNING
The seat belt cannot perform its intended pro- tective function if it is not fastened correctly. Also, an improperly fastened seat belt can
cause additional injuries in the event of an
accident, sudden braking or abrupt changes
of direction. There is an increased risk of
injury, possibly even fatal.
Always make sure that all vehicle occupants
are wearing their seat belt and positioned cor-
rectly. G
WARNING
The seat belt does not offer the intended level of protection if you have not moved the back-
rest to an almost vertical position. When brak-
ing or in the event of an accident, you could
slide underneath the seat belt and sustain
abdomen or neck injuries, for example. This
poses an increased risk of injury or even fatal injury.
Adjust the seat properly before beginning
your journey. Always ensure that the backrest
is in an almost vertical position and that the
shoulder section of your seatbelt is routed
across the centre of your shoulder. G
WARNING
Persons under 1.50 mtall cannot wear the
seat belts correctly without a suitable, addi- 44
Occupant safetySafety
Page 49 of 417
R
only one person is using a seat belt.
Infants and children must never travel sit-
ting on the lap of a vehicle occupant. In the
event of an accident, they could be crushed between the vehicle occupant and seat
belt.
R objects are never secured with a seat belt if
the seat belt is also being used by one of the vehicle's occupants.
Seat belts are only intended to secure and
restrain vehicle occupants. Always observe
the "Loading guidelines" for securing objects,
luggage or loads (Y page 300).
Fastening and adjusting the seat belts Observe the safety notes on the seat belt
(Y page 44) and the notes on correct use of
seat belts (Y page 45).
If the centre rear seat belt is being used, also
observe the information about the seat belt
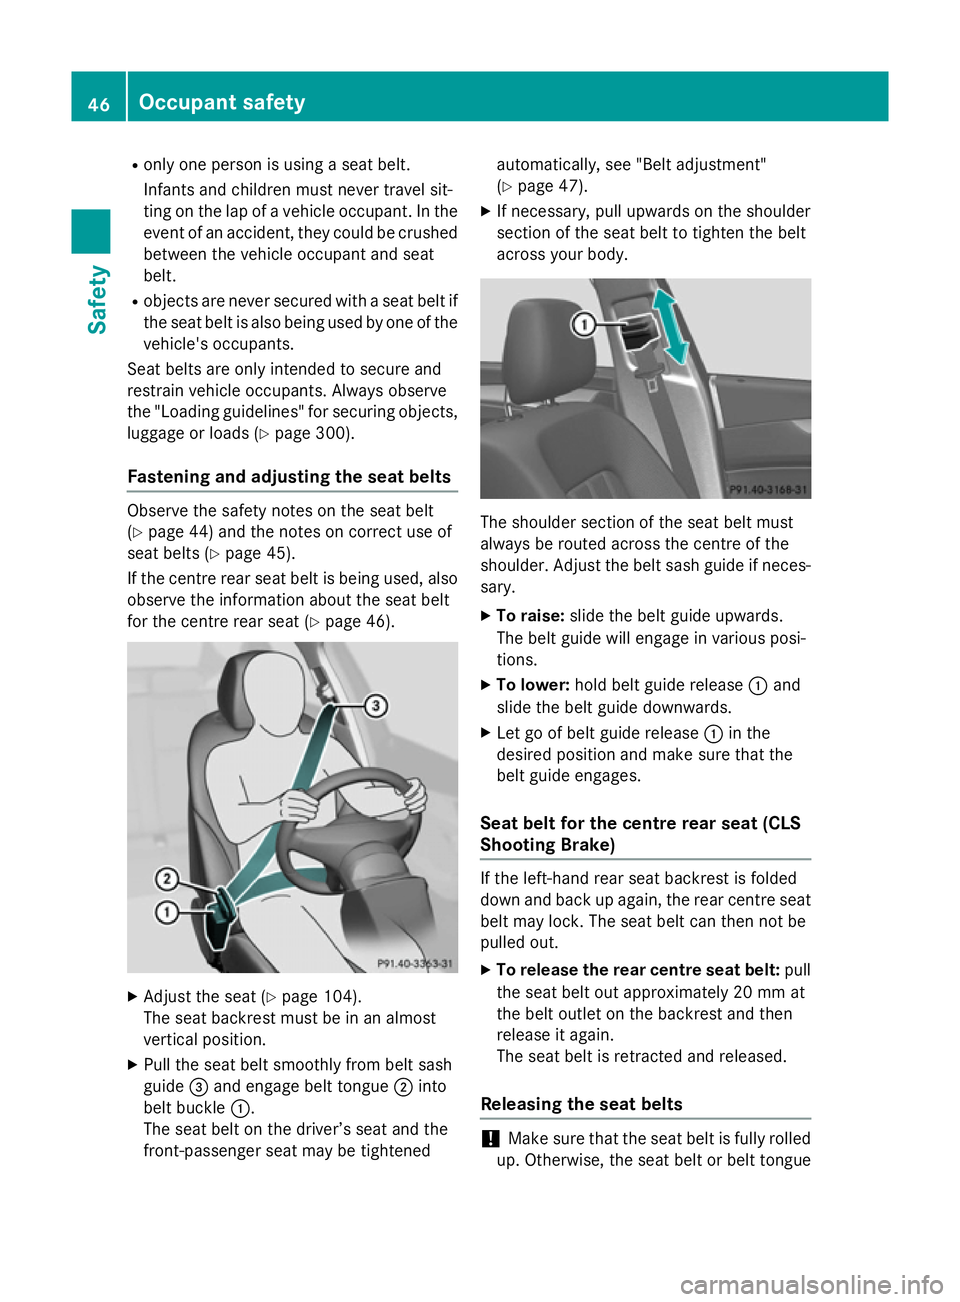
for the centre rear seat (Y page 46).X
Adjust the seat (Y page 104).
The seat backrest must be in an almost
vertical position.
X Pull the seat belt smoothly from belt sash
guide =and engage belt tongue ;into
belt buckle :.
The seat belt on the driver’s seat and the
front-passenger seat may be tightened automatically, see "Belt adjustment"
(Y
page 47).
X If necessary, pull upwards on the shoulder
section of the seat belt to tighten the belt
across your body. The shoulder section of the seat belt must
always be routed across the centre of the
shoulder. Adjust the belt sash guide if neces-
sary.
X To raise: slide the belt guide upwards.
The belt guide will engage in various posi-
tions.
X To lower: hold belt guide release :and
slide the belt guide downwards.
X Let go of belt guide release :in the
desired position and make sure that the
belt guide engages.
Seat belt for the centre rear seat (CLS
Shooting Brake) If the left-hand rear seat backrest is folded
down and back up again, the rear centre seat
belt may lock. The seat belt can then not be
pulled out.
X To release the rear centre seat belt: pull
the seat belt out approximately 20 mm at
the belt outlet on the backrest and then
release it again.
The seat belt is retracted and released.
Releasing the seat belts !
Make sure that the seat belt is fully rolled
up. Otherwise, the seat belt or belt tongue 46
Occupant safetySafety
Page 58 of 417
R
vehicles with the memory function: the
front-passenger seat is adjusted if it is in an unfavourable position.
R Vehicles with a multicontour seat or active
multicontour seat: the air pressure in the
side bolsters of the backrest is increased.
If the hazardous situation passes without
resulting in an accident, PRE-SAFE ®
slackens
the belt pre-tensioning. On vehicles with mul-
ticontour seats/active multicontour seats,
the air pressure in the side bolsters is reduced
again. All settings made by PRE-SAFE ®
can
then be reversed.
If the seat belt pre-tensioning is not reduced:
X Move the seat backrest or seat back
slightly when the vehicle is stationary.
Seat belt pre-tensioning is reduced and the
locking mechanism is released.
The seat-belt adjustment is an integral part of
the PRE-SAFE ®
convenience function. Fur-
ther information can be found under "Belt
adjustment" (Y page 47). Automatic measures after an acci-
dent
Immediately after an accident, the following
measures are implemented, depending on
the type and severity of the impact:
R the hazard warning lamps are activated
R the emergency lighting is activated
R the vehicle doors are unlocked
R the front side windows are lowered
R the electrically adjustable steering wheel is
raised
R the engine is switched off
R vehicles with the Mercedes-Benz emer-
gency call system: automatic emergency
call Children in the vehicle
Important safety notes
Accident statistics show that children
secured in the rear seats are safer than chil-
dren secured in the front-passenger seat. For this reason, Mercedes-Benz strongly advises
that you install a child restraint system on a
rear seat. Children are generally better pro-
tected there.
If a child younger than 12 years old and under
1.50 m in height is travelling in the vehicle:
R always secure the child in a child restraint
system suitable for Mercedes-Benz vehi-
cles. The child restraint system must be
appropriate to the age, weight and size of
the child.
R be sure to observe the instructions and
safety notes in this section in addition to
the child restraint system manufacturer's
installation instructions G
WARNING
If you leave children unattended in the vehi-
cle, they may be able to set the vehicle in
motion if, for example, they:
R release the parking brake
R shift the automatic transmission out of park
position P
R start the engine
In addition, they may operate vehicle equip-
ment and become trapped. There is a risk of
an accident and injury.
When leaving the vehicle, always take the key
with you and lock the vehicle. Never leave
children unattended in the vehicle. G
WARNING
If persons (particularly children) are exposed
to heat or cold for a prolonged period, there is a risk of serious or even fatal injuries. Never
leave persons (particularly children) unatten-
ded in the vehicle. Children in the vehicle
55Safety Z
Page 60 of 417
i
It is advisable to use Mercedes-Benz care
products to clean child restraint systems
recommended by Mercedes-Benz. You can obtain information about this at any
Mercedes-Benz Service Centre. ISOFIX child seat securing system
G
WARNING
ISOFIX child restraint systems do not offer
sufficient protective effect for children whose weight is greater than 22 kg who are securedusing the safety belt integrated in the child
restraint system. The child could, for example, not be restrained correctly in the event of an
accident. This poses an increased risk of
injury or even fatal injury.
If the child weighs more than 22 kg, only use
ISOFIX child restraint systems with which the child is also secured with the vehicle seat belt. Also secure the child restraint system with the
Top Tether belt, if available.
When fitting a child restraint system, be sure to observe the manufacturer's installation
instructions and the instructions for correct
use of the child restraint system
(Y page 63).
Before every trip, make sure that the ISOFIX
child restraint system is engaged correctly in both ISOFIX securing rings.
! When fitting the child restraint system,
make sure that the seat belt for the centre
seat does not get trapped. Otherwise, the
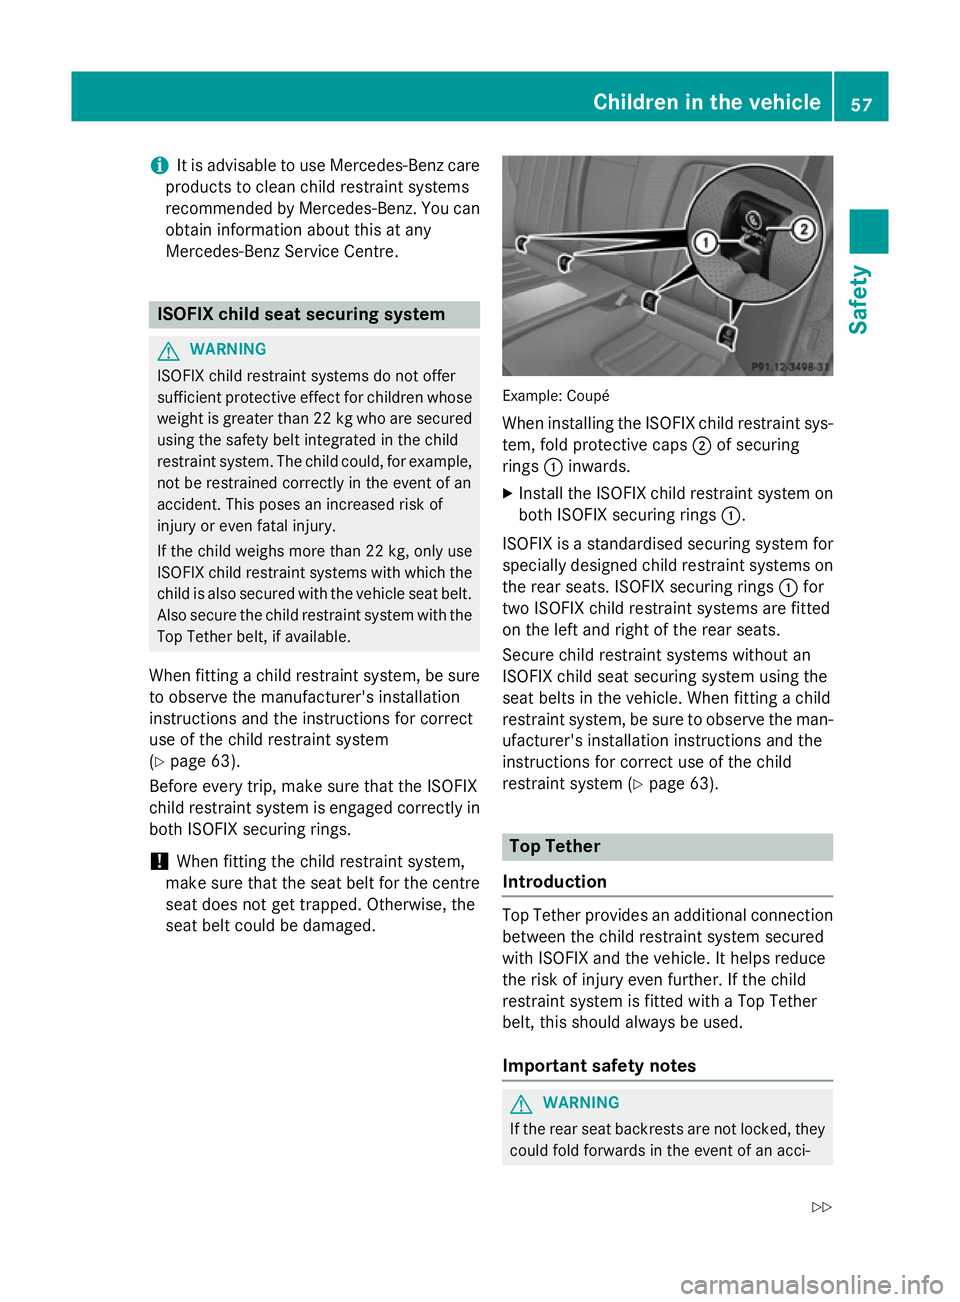
seat belt could be damaged. Example: Coupé
When installing the ISOFIX child restraint sys- tem, fold protective caps ;of securing
rings :inwards.
X Install the ISOFIX child restraint system on
both ISOFIX securing rings :.
ISOFIX is a standardised securing system for specially designed child restraint systems on
the rear seats. ISOFIX securing rings :for
two ISOFIX child restraint systems are fitted
on the left and right of the rear seats.
Secure child restraint systems without an
ISOFIX child seat securing system using the
seat belts in the vehicle. When fitting a child
restraint system, be sure to observe the man-
ufacturer's installation instructions and the
instructions for correct use of the child
restraint system (Y page 63). Top Tether
Introduction Top Tether provides an additional connection
between the child restraint system secured
with ISOFIX and the vehicle. It helps reduce
the risk of injury even further. If the child
restraint system is fitted with a Top Tether
belt, this should always be used.
Important safety notes G
WARNING
If the rear seat backrests are not locked, they
could fold forwards in the event of an acci- Children in the vehicle
57Safety
Z
Page 61 of 417
dent, heavy braking or sudden changes of
direction. As a result, child restraint systems
cannot perform their intended protective
function. Rear seat backrests that are not
locked can also cause additional injuries, e.g. in the event of an accident. This poses an
increased risk of injury or even fatal injury.
Always lock rear seat backrests after fitting a Top Tether belt. Observe the lock verificationindicator. Adjust the rear seat backrests so
that they are in an upright position.
If the rear seat backrest is not engaged and
locked, this will be shown in the multifunction display in the instrument cluster. A warning
tone also sounds.
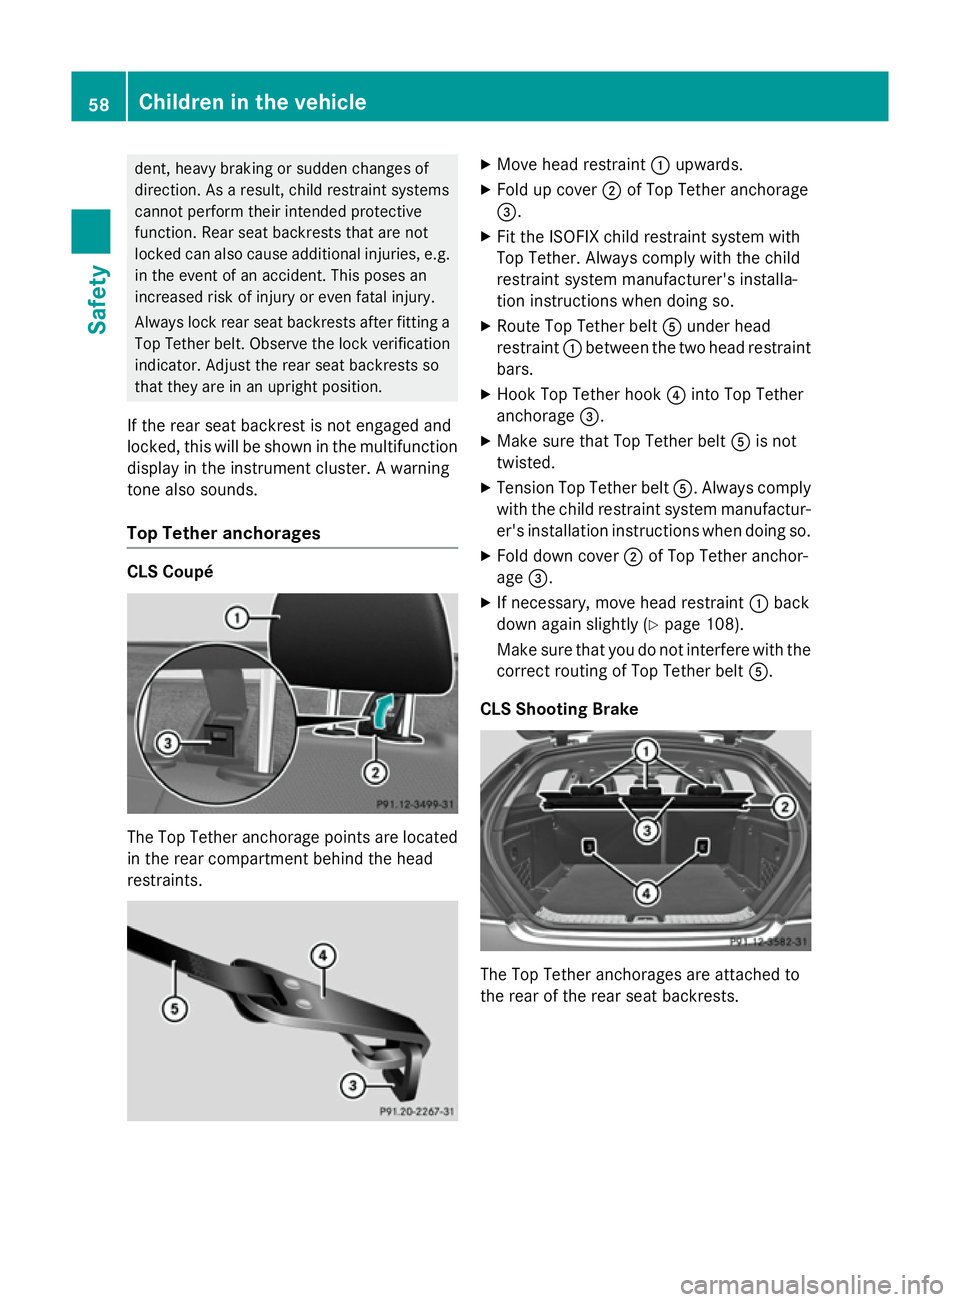
Top Tether anchorages CLS Coupé
The Top Tether anchorage points are located
in the rear compartment behind the head
restraints. X
Move head restraint :upwards.
X Fold up cover ;of Top Tether anchorage
=.
X Fit the ISOFIX child restraint system with
Top Tether. Always comply with the child
restraint system manufacturer's installa-
tion instructions when doing so.
X Route Top Tether belt Aunder head
restraint :between the two head restraint
bars.
X Hook Top Tether hook ?into Top Tether
anchorage =.
X Make sure that Top Tether belt Ais not
twisted.
X Tension Top Tether belt A. Always comply
with the child restraint system manufactur- er's installation instructions when doing so.
X Fold down cover ;of Top Tether anchor-
age =.
X If necessary, move head restraint :back
down again slightly (Y page 108).
Make sure that you do not interfere with the
correct routing of Top Tether belt A.
CLS Shooting Brake The Top Tether anchorages are attached to
the rear of the rear seat backrests.58
Children in the vehicleSafety