2014 MERCEDES-BENZ CLS COUPE set clock
[x] Cancel search: set clockPage 93 of 417
If the vehicle has been locked using the lock-
ing button for the central locking, or has been locked automatically, and a door is opened
from the inside:
R the vehicle will be fully unlocked if it had
previously been fully unlocked
R only the door which has been opened form
the inside is unlocked if only the driver's
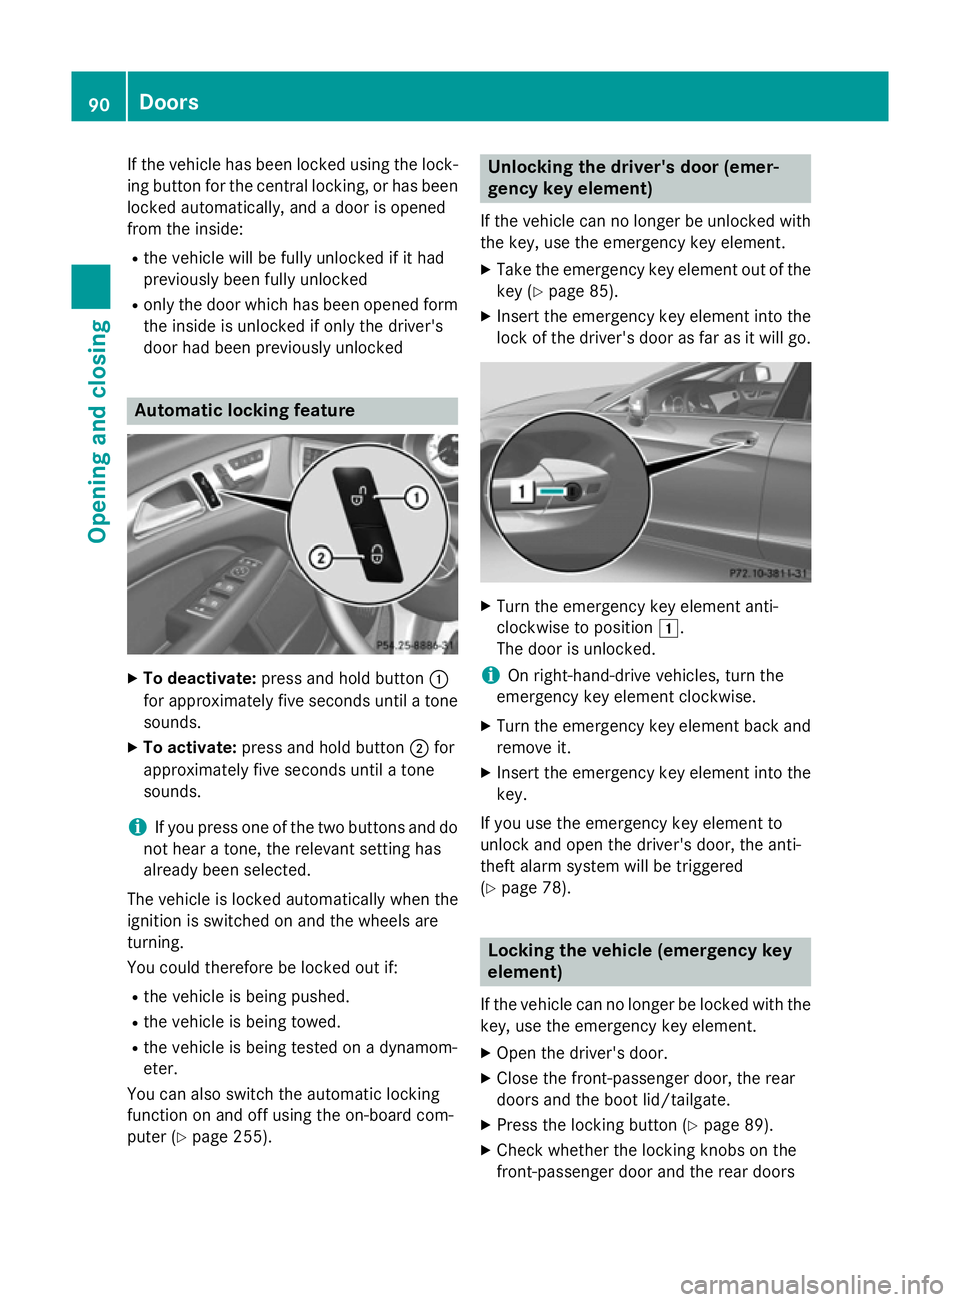
door had been previously unlocked Automatic locking feature
X
To deactivate: press and hold button :
for approximately five seconds until a tone sounds.
X To activate: press and hold button ;for
approximately five seconds until a tone
sounds.
i If you press one of the two buttons and do
not hear a tone, the relevant setting has
already been selected.
The vehicle is locked automatically when the
ignition is switched on and the wheels are
turning.
You could therefore be locked out if:
R the vehicle is being pushed.
R the vehicle is being towed.
R the vehicle is being tested on a dynamom-
eter.
You can also switch the automatic locking
function on and off using the on-board com-
puter (Y page 255). Unlocking the driver's door (emer-
gency key element)
If the vehicle can no longer be unlocked with
the key, use the emergency key element.
X Take the emergency key element out of the
key (Y page 85).
X Insert the emergency key element into the
lock of the driver's door as far as it will go. X
Turn the emergency key element anti-
clockwise to position 1.
The door is unlocked.
i On right-hand-drive vehicles, turn the
emergency key element clockwise.
X Turn the emergency key element back and
remove it.
X Insert the emergency key element into the
key.
If you use the emergency key element to
unlock and open the driver's door, the anti-
theft alarm system will be triggered
(Y page 78). Locking the vehicle (emergency key
element)
If the vehicle can no longer be locked with the
key, use the emergency key element.
X Open the driver's door.
X Close the front-passenger door, the rear
doors and the boot lid/tailgate.
X Press the locking button (Y page 89).
X Check whether the locking knobs on the
front-passenger door and the rear doors 90
DoorsOpening and closing
Page 99 of 417
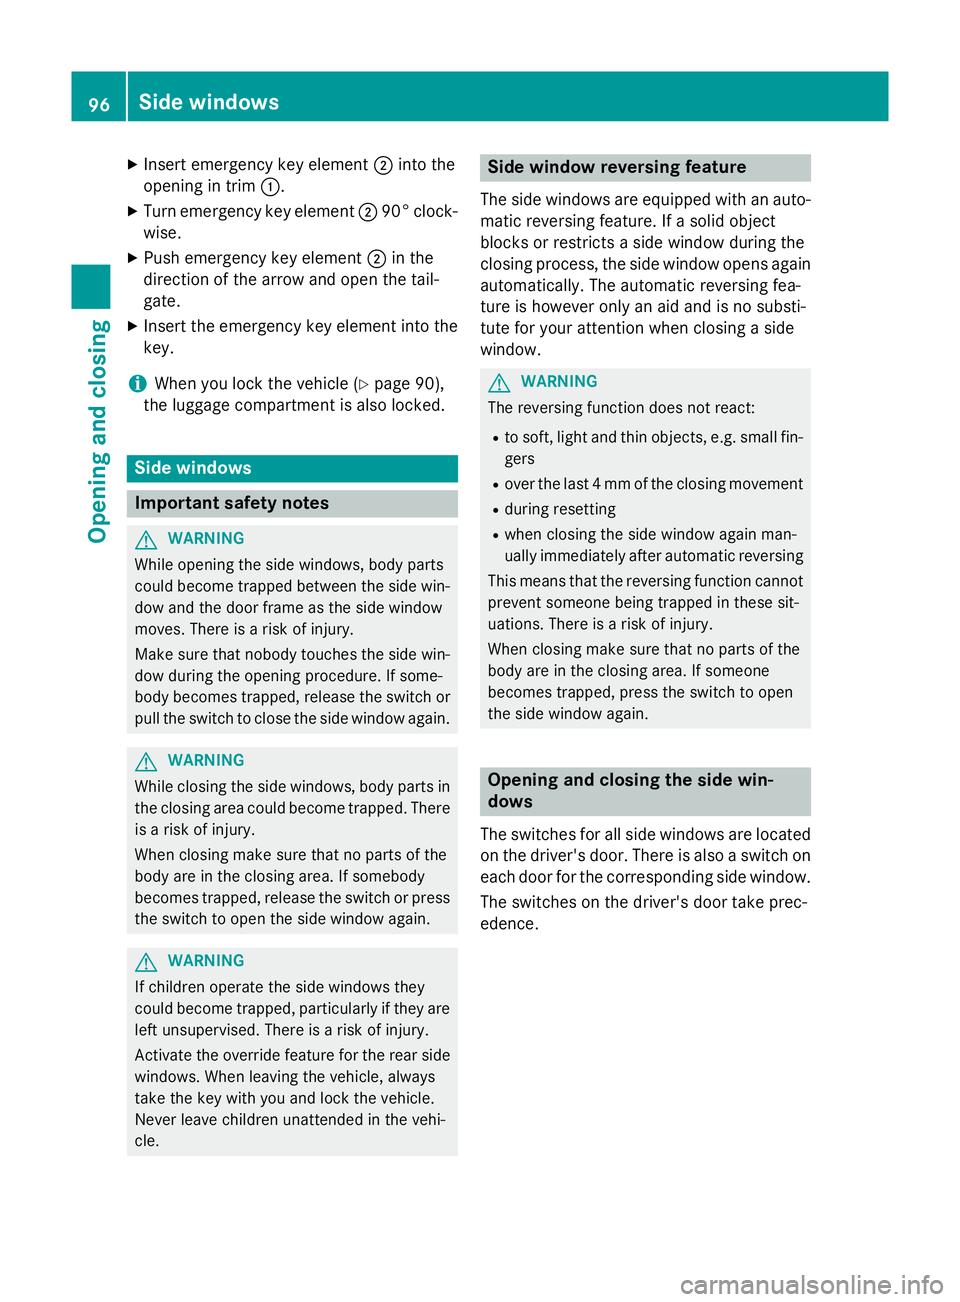
X
Insert emergency key element ;into the
opening in trim :.
X Turn emergency key element ;90° clock-
wise.
X Push emergency key element ;in the
direction of the arrow and open the tail-
gate.
X Insert the emergency key element into the
key.
i When you lock the vehicle (Y
page 90),
the luggage compartment is also locked. Side windows
Important safety notes
G
WARNING
While opening the side windows, body parts
could become trapped between the side win- dow and the door frame as the side window
moves. There is a risk of injury.
Make sure that nobody touches the side win-
dow during the opening procedure. If some-
body becomes trapped, release the switch or pull the switch to close the side window again. G
WARNING
While closing the side windows, body parts in the closing area could become trapped. There is a risk of injury.
When closing make sure that no parts of the
body are in the closing area. If somebody
becomes trapped, release the switch or press
the switch to open the side window again. G
WARNING
If children operate the side windows they
could become trapped, particularly if they are left unsupervised. There is a risk of injury.
Activate the override feature for the rear side
windows. When leaving the vehicle, always
take the key with you and lock the vehicle.
Never leave children unattended in the vehi-
cle. Side window reversing feature
The side windows are equipped with an auto- matic reversing feature. If a solid object
blocks or restricts a side window during the
closing process, the side window opens again
automatically. The automatic reversing fea-
ture is however only an aid and is no substi-
tute for your attention when closing a side
window. G
WARNING
The reversing function does not react:
R to soft, light and thin objects, e.g. small fin-
gers
R over the last 4 mm of the closing movement
R during resetting
R when closing the side window again man-
ually immediately after automatic reversing
This means that the reversing function cannot prevent someone being trapped in these sit-
uations. There is a risk of injury.
When closing make sure that no parts of the
body are in the closing area. If someone
becomes trapped, press the switch to open
the side window again. Opening and closing the side win-
dows
The switches for all side windows are located on the driver's door. There is also a switch on
each door for the corresponding side window.
The switches on the driver's door take prec-
edence. 96
Side windowsOpening and closing
Page 135 of 417
R
you drop it
R you scratch it
Only operate bulbs in enclosed lamps
designed for that purpose. Only fit spare
bulbs of the same type and the specified volt- age.
Marks on the glass tube reduce the service
life of the bulbs. Do not touch the glass tube
with your bare hands. If necessary, clean the
glass tube when cold with alcohol or spirit and
rub it off with a lint-free cloth.
Protect bulbs from moisture during opera-
tion. Do not allow bulbs to come into contact
with liquids.
You can neither replace xenon bulbs nor LED bulbs. Have LED bulbs replaced at a qualified
specialist workshop.
Replace only the bulbs listed (Y page 132).
Have the bulbs that you cannot replace your-
self replaced at a qualified specialist work-
shop.
If you require assistance replacing bulbs, con-
sult a qualified specialist workshop.
If the new bulb still does not light up, consult a qualified specialist workshop.
Bulbs and lamps are an important aspect of
vehicle safety. You must therefore make sure
that these function correctly at all times.
Have the headlamp setting checked regularly. Overview of bulb replacement – bulbs
You can replace the following bulbs. The
details for the bulb type can be found in the
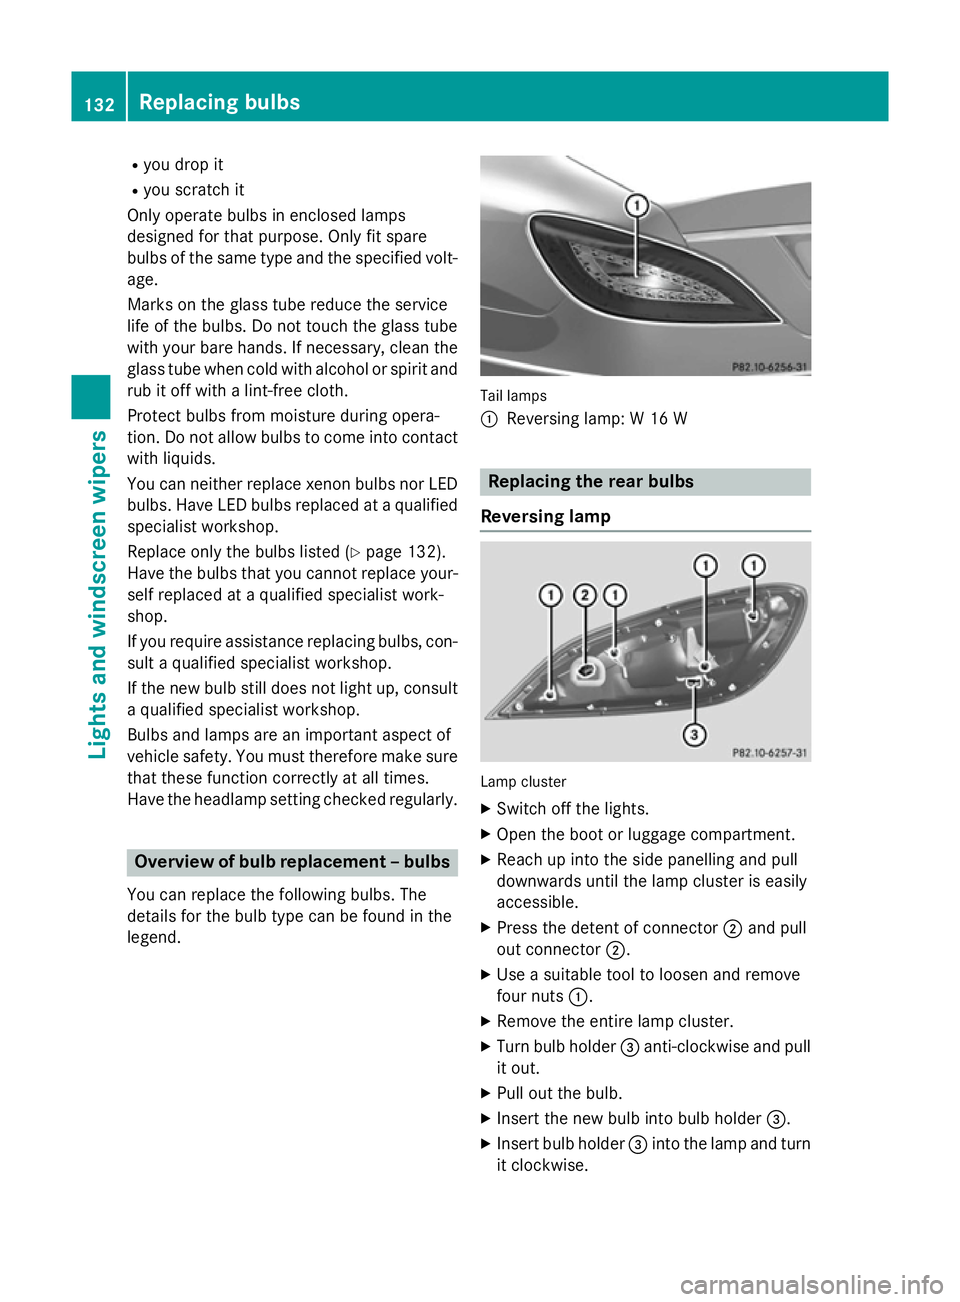
legend. Tail lamps
:
Reversing lamp: W 16 W Replacing the rear bulbs
Reversing lamp Lamp cluster
X
Switch off the lights.
X Open the boot or luggage compartment.
X Reach up into the side panelling and pull
downwards until the lamp cluster is easily
accessible.
X Press the detent of connector ;and pull
out connector ;.
X Use a suitable tool to loosen and remove
four nuts :.
X Remove the entire lamp cluster.
X Turn bulb holder =anti-clockwise and pull
it out.
X Pull out the bulb.
X Insert the new bulb into bulb holder =.
X Insert bulb holder =into the lamp and turn
it clockwise. 132
Replacing bulbsLigh
ts and windscreen wipers
Page 148 of 417
Setting the temperature
THERMATIC automatic climate control Different temperatures can be set for the
driver's and front-passenger sides.
X Turn the key to position 2in the ignition
lock (Y page 159).
X To increase/reduce: turn temperature
control :orB clockwise or anti-clock-
wise (Y page 139).
Only change the temperature setting in
small increments. Start at 22 †.
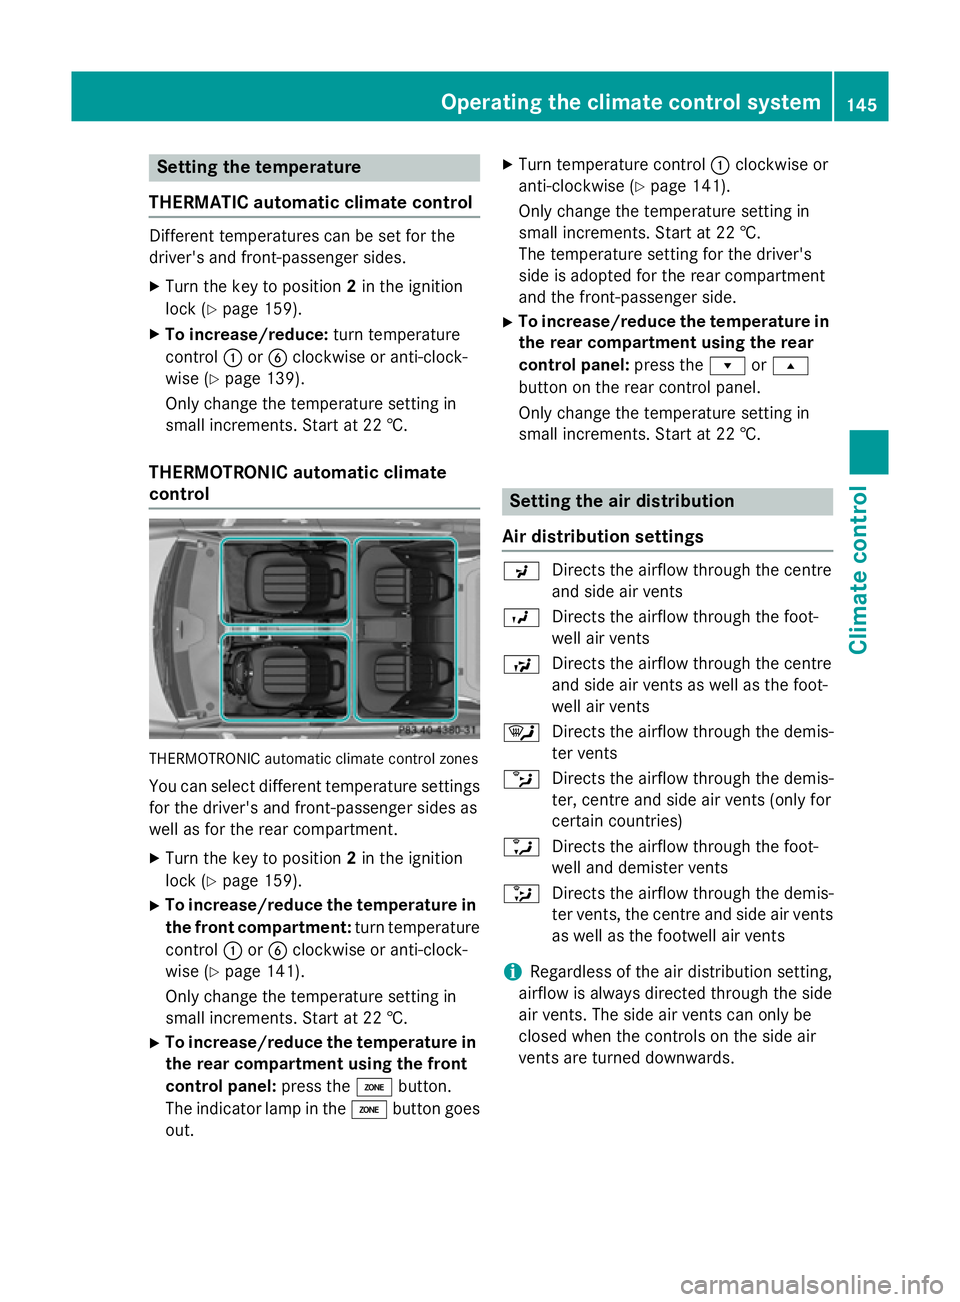
THERMOTRONIC automatic climate
control THERMOTRONIC automatic climate control zones
You can select different temperature settings for the driver's and front-passenger sides as
well as for the rear compartment.
X Turn the key to position 2in the ignition
lock (Y page 159).
X To increase/reduce the temperature in
the front compartment: turn temperature
control :orB clockwise or anti-clock-
wise (Y page 141).
Only change the temperature setting in
small increments. Start at 22 †.
X To increase/reduce the temperature in
the rear compartment using the front
control panel: press theábutton.
The indicator lamp in the ábutton goes
out. X
Turn temperature control :clockwise or
anti-clockwise (Y page 141).
Only change the temperature setting in
small increments. Start at 22 †.
The temperature setting for the driver's
side is adopted for the rear compartment
and the front-passenger side.
X To increase/reduce the temperature in
the rear compartment using the rear
control panel: press therors
button on the rear control panel.
Only change the temperature setting in
small increments. Start at 22 †. Setting the air distribution
Air distribution settings P
Directs the airflow through the centre
and side air vents
O Directs the airflow through the foot-
well air vents
S Directs the airflow through the centre
and side air vents as well as the foot-
well air vents
¯ Directs the airflow through the demis-
ter vents
b Directs the airflow through the demis-
ter, centre and side air vents (only for
certain countries)
a Directs the airflow through the foot-
well and demister vents
_ Directs the airflow through the demis-
ter vents, the centre and side air vents as well as the footwell air vents
i Regardless of the air distribution setting,
airflow is always directed through the side
air vents. The side air vents can only be
closed when the controls on the side air
vents are turned downwards. Operating the climate control system
145Climate control
Page 149 of 417
Setting the air distribution
X
Turn the key to position 2in the ignition
lock (Y page 159).
X Press the _button repeatedly until the
desired symbol appears in the display. Setting the airflow
X Turn the key to position 2in the ignition
lock (Y page 159).
X To increase: press theKbutton.
X To reduce: press theIbutton.
i You can use THERMOTRONIC automatic
climate control to set the airflow in the rear compartment separately.
If the battery is not charged sufficiently, the
blower output may be reduced. Once the bat-
tery is sufficiently charged again, full blower
output will be available. Switching the ZONE function on/off
X To switch on: press theábutton.
The indicator lamp above the ábutton
lights up.
THERMATIC automatic climate control: the temperature setting for the driver's side is
not adopted for the front-passenger side.
THERMOTRONIC automatic climate con-
trol: the temperature setting for the driver's
side is not adopted for the front-passenger
side and the rear compartment.
X To switch off: press theábutton.
The indicator lamp above the ábutton
goes out.
THERMATIC automatic climate control: the
temperature setting for the driver's side is
adopted for the front-passenger side.
THERMOTRONIC automatic climate con-
trol: the temperature setting for the driver's
side is adopted for the front-passenger side and the rear compartment. Demisting the windscreen
You can use this function to defrost the wind-
screen or to demist the inside of the wind-
screen and the side windows.
Switch off the windscreen demisting function
as soon as the windscreen is clear again.
X Turn the key to position 2in the ignition
lock (Y page 159).
X To activate: press the¬button.
The indicator lamp in the ¬button lights
up.
The climate control system switches to the
following functions:
R high airflow
R high temperature
R air distribution to the windscreen and
front side windows
R air-recirculation mode off
If the battery is not charged sufficiently, the
blower output may be reduced. Once the bat- tery is sufficiently charged again, full blower
output will be available again.
X To deactivate: press the¬button.
The indicator lamp in the ¬button goes
out. The previous settings are reactivated.
Air-recirculation mode remains deactiva-
ted.
or
X Press the Ãbutton.
The indicator lamp in the ¬button goes
out. Airflow and air distribution are set to
automatic mode.
or
X THERMATIC automatic climate control:
turn temperature controls :orB clock-
wise or anti-clockwise (Y page 139).
THERMOTRONIC automatic climate con-
trol: turn temperature controls :orB
clockwise or anti-clockwise (Y page 141).
or X Press the KorI button. 146
Operating the climate control systemClimate control
Page 158 of 417
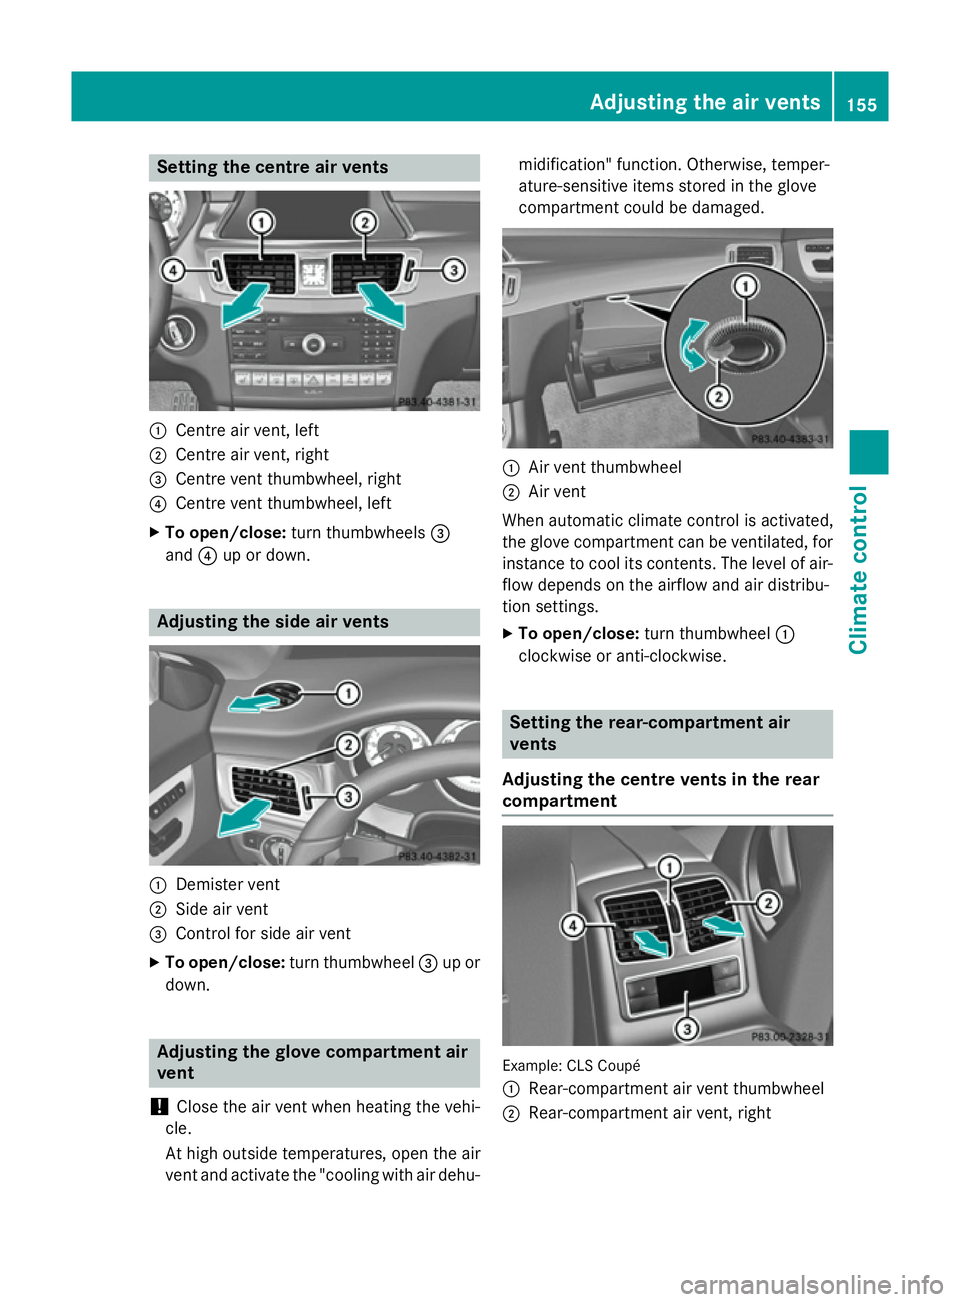
Setting the centre air vents
:
Centre air vent, left
; Centre air vent, right
= Centre vent thumbwheel, right
? Centre vent thumbwheel, left
X To open/close: turn thumbwheels =
and ?up or down. Adjusting the side air vents
:
Demister vent
; Side air vent
= Control for side air vent
X To open/close: turn thumbwheel =up or
down. Adjusting the glove compartment air
vent
! Close the air vent when heating the vehi-
cle.
At high outside temperatures, open the air
vent and activate the "cooling with air dehu- midification" function. Otherwise, temper-
ature-sensitive items stored in the glove
compartment could be damaged.
:
Air vent thumbwheel
; Air vent
When automatic climate control is activated,
the glove compartment can be ventilated, for
instance to cool its contents. The level of air-
flow depends on the airflow and air distribu-
tion settings.
X To open/close: turn thumbwheel :
clockwise or anti-clockwise. Setting the rear-compartment air
vents
Adjusting the centre vents in the rear
compartment Example: CLS Coupé
:
Rear-compartment air vent thumbwheel
; Rear-compartment air vent, right Adjusting the air vents
155Climate control Z
Page 258 of 417
X
Press the =or; button on the steer-
ing wheel to select the Settings Settingsmenu.
X Press the :or9 button to select the
Light
Light submenu.
X Press ato confirm.
X Press the :or9 button to select the
Light. delay Light. delay function.
If the Light. delay
Light. delay function has been
switched on, the vehicle interior is dis-
played in orange in the multifunction dis-
play.
X Press the abutton to save the setting.
Vehicle Setting permanent SPEEDTRONIC
X Press the =or; button on the steer-
ing wheel to select the Settings Settingsmenu.
X Press the :or9 button to select the
Vehicle
Vehicle submenu.
X Press ato confirm.
X Press :or9 to select the Limit
Limit
speed (winter tyres):
speed (winter tyres): function.
You will see the current setting.
X Press ato confirm.
X Press the :or9 button to adjust
permanent SPEEDTRONIC in increments of
ten (230 km/h 230 km/h to160 km/h
160 km/h). The Off
Offset-
ting switches permanent SPEEDTRONIC
off.
X Press the abutton to store the entry.
For further information on permanent SPEED- TRONIC (Y page 191).
Switching the automatic locking feature
on/off
X Press the =or; button on the steer-
ing wheel to select the Settings Settingsmenu.
X Press the :or9 button to select the
Vehicle
Vehicle submenu.
X Press ato confirm.
X Press the :or9 button to select the
Auto. door locks
Auto. door locks function.
When the Auto. door locks
Auto. door locks function is
switched on, the vehicle doors are dis- played in orange in the multifunction dis-
play.
X Press the abutton to save the setting.
If you activate the Auto. door locks Auto. door locks func-
tion, the vehicle is centrally locked above a
speed of around 15 km/h.
Further information on the automatic locking feature (Y page 90).
Activating/deactivating the acoustic
locking confirmation
If you switch on the Acoustic AcousticLock
Lockfunction,
an acoustic signal sounds when you lock the
vehicle.
X Press the =or; button on the steer-
ing wheel to select the Settings
Settingsmenu.
X Press the :or9 button to select the
Vehicle
Vehicle submenu.
X Press ato confirm.
X Press the :or9 button to select the
Acoustic Lock
Acoustic Lock function.
If the Acoustic
Acoustic Lock
Lockfunction is activated,
the & symbol in the multifunction dis-
play lights up orange.
X Press the abutton to save the setting.
Activating/deactivating the radar sensor
system X Press the =or; button on the steer-
ing wheel to select the Settings Settingsmenu.
X Press the :or9 button to select the
Vehicle
Vehicle submenu.
X Press ato confirm.
X Press the 9or: button to select
Radar sensor (See Owner's Man.):
Radar sensor (See Owner's Man.):.
You will see the selected setting: on onoroff
off.
X Press the abutton to save the setting.
The following systems are switched off when
the radar sensor system is deactivated:
R DISTRONIC PLUS (Y page 191)
R BAS PLUS (Y page 71)
R PRE-SAFE ®
Brake (Y page 76)
R Blind Spot Assist (Y page 223)
R Active Blind Spot Assist (Y page 227) Menus and submenus
255On-board computer and displays Z
Page 356 of 417
The battery and the cover of the positive
terminal clamp must be fitted securely dur-
ing operation.
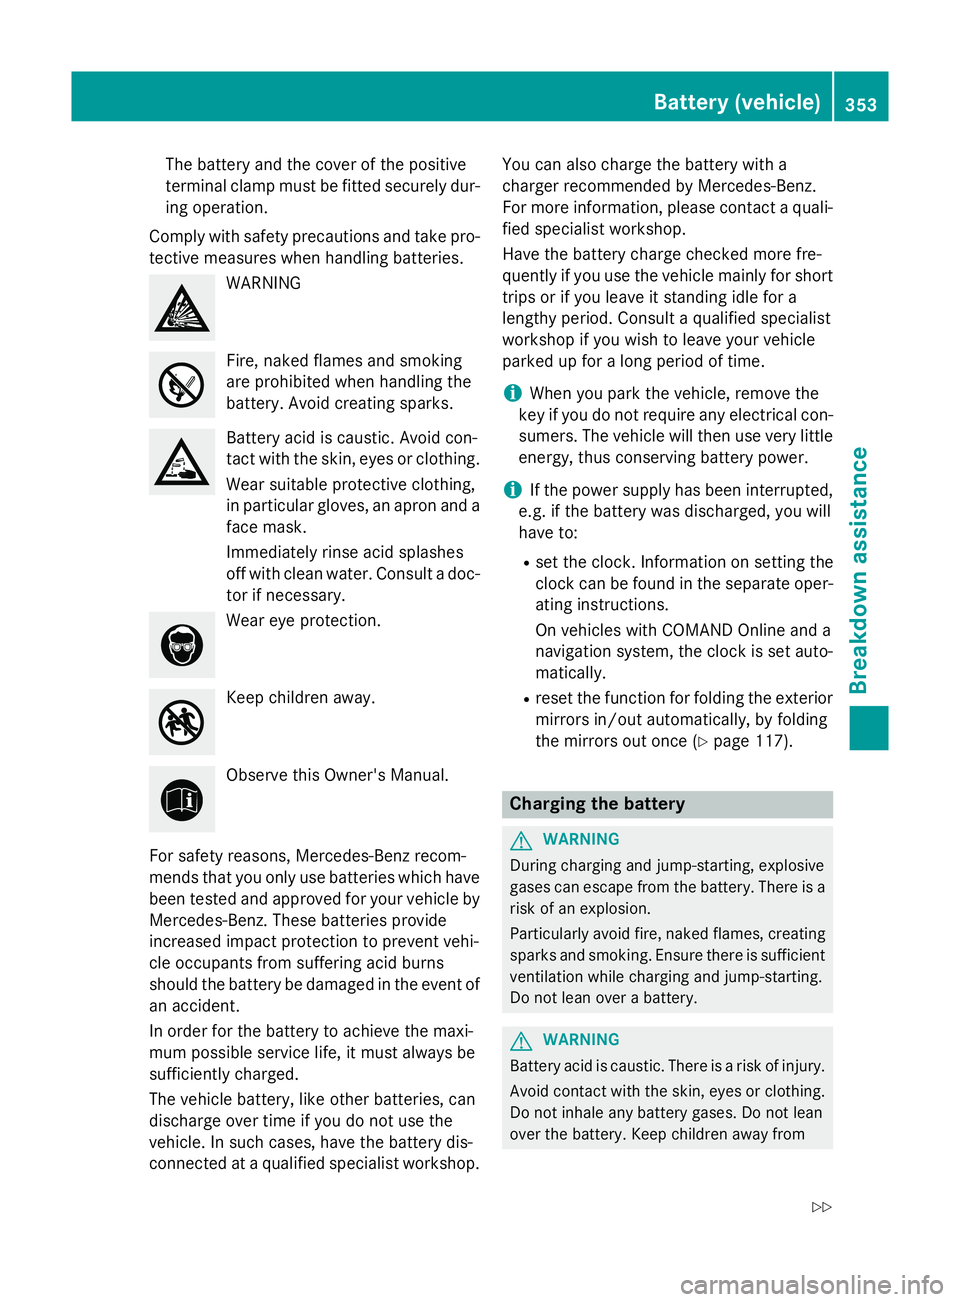
Comply with safety precautions and take pro-
tective measures when handling batteries. WARNING
Fire, naked flames and smoking
are prohibited when handling the
battery. Avoid creating sparks.
Battery acid is caustic. Avoid con-
tact with the skin, eyes or clothing.
Wear suitable protective clothing,
in particular gloves, an apron and a
face mask.
Immediately rinse acid splashes
off with clean water. Consult a doc-
tor if necessary. Wear eye protection.
Keep children away.
Observe this Owner's Manual.
For safety reasons, Mercedes-Benz recom-
mends that you only use batteries which have been tested and approved for your vehicle by
Mercedes-Benz. These batteries provide
increased impact protection to prevent vehi-
cle occupants from suffering acid burns
should the battery be damaged in the event of
an accident.
In order for the battery to achieve the maxi-
mum possible service life, it must always be
sufficiently charged.
The vehicle battery, like other batteries, can
discharge over time if you do not use the
vehicle. In such cases, have the battery dis-
connected at a qualified specialist workshop. You can also charge the battery with a
charger recommended by Mercedes-Benz.
For more information, please contact a quali-
fied specialist workshop.
Have the battery charge checked more fre-
quently if you use the vehicle mainly for short
trips or if you leave it standing idle for a
lengthy period. Consult a qualified specialist
workshop if you wish to leave your vehicle
parked up for a long period of time.
i When you park the vehicle, remove the
key if you do not require any electrical con-
sumers. The vehicle will then use very little energy, thus conserving battery power.
i If the power supply has been interrupted,
e.g. if the battery was discharged, you will
have to:
R set the clock. Information on setting the
clock can be found in the separate oper-
ating instructions.
On vehicles with COMAND Online and a
navigation system, the clock is set auto- matically.
R reset the function for folding the exterior
mirrors in/out automatically, by folding
the mirrors out once (Y page 117). Charging the battery
G
WARNING
During charging and jump-starting, explosive
gases can escape from the battery. There is a risk of an explosion.
Particularly avoid fire, naked flames, creating
sparks and smoking. Ensure there is sufficient
ventilation while charging and jump-starting.
Do not lean over a battery. G
WARNING
Battery acid is caustic. There is a risk of injury. Avoid contact with the skin, eyes or clothing.
Do not inhale any battery gases. Do not lean
over the battery. Keep children away from Battery (vehicle)
353Breakdown assistance
Z