2014 MERCEDES-BENZ CLS COUPE run flat
[x] Cancel search: run flatPage 13 of 417

Brakes ........................................... 183
Downhill gradient ........................... 183
Driving abroad ............................... 122
Driving in winter ............................. 185
Driving on flooded roads ................ 185
Driving on wet roads ...................... 185
General .......................................... 182
Icy road surfaces ........................... 185
Limited braking efficiency on sal-
ted roads ....................................... 184
New brake pads/linings ................ 184
Running-in tips ............................... 158
Snow chains .................................. 367
Symmetrical dipped bea m............. 122
Towing a trailer .............................. 233
Wet road surface ........................... 184
DVD audio
Operating (on-board computer) ..... 246
DVD video
Operating (on-board computer) ..... 247 E
EASY-ENTRY feature Activating/deactivating ................. 257
Function/note s............................. 115
EASY-EXIT feature
Crash-responsive ........................... 116
Function/note s............................. 115
Switching on/of f........................... 257
EASY-PACK convenience box ........... 308
EASY-PACK load-securing kit
Components and storage .............. 310
Inserting the brackets into the
loading rai l..................................... 310
EASY-PACK luggage compartment
management system ........................ 310
EBD (electronic brake force distri-
bution)
Display message ............................ 264
Function/note s................................ 76
ECO display
Function/note s............................. 182
On-board computer ....................... 244
ECO start/stop function
Automatic engine switch-off .......... 163
Deactivating/activating ................. 164
General information ....................... 163 Important safety notes .................. 163
Introduction ................................... 163
Electrical fuses
see Fuses
Electromagnetic compatibility
Declaration of conformity ................ 25
Electronic Stability Program
see ESP® (Electronic Stability Program)
Emergency
Automatic measures after an acci-
dent ................................................. 55
Emergency key
Unlocking the driver's door .............. 90
Emergency key element
Function/note s................................ 84
Inserting .......................................... 85
Locking vehicle ................................ 90
Removing ......................................... 85
Emergency release
Driver's door .................................... 90
Fuel filler fla p................................. 179
Emergency spare wheel
General notes ................................ 391
Important safety notes .................. 390
Inflating the collapsible spare
wheel ............................................. 392
Removing ....................................... 391
Storage location ............................ 391
Stowing .......................................... 392
Technical data ............................... 394
Emergency unlocking
Tailgate ............................................ 95
Vehicle ............................................. 90
Engine
Display message ............................ 270
ECO start/stop function ................ 163
Engine number ............................... 399
Jump-starting ................................. 355
Running irregularly ......................... 166
Starting problems .......................... 166
Starting the engine with the key .... 161
Starting with KEYLESS GO ............. 162
Stopping ........................................ 181
Tow-starting (vehicle) ..................... 360
Warning lamp (engine diagnos-
tics) ............................................... 295
Engine electronics
Notes ............................................. 396 10
Index
Page 177 of 417
R
you are driving slower than 60 km/h
R you are driving faster than 160 km/h
Automatic drive program S Drive program
S(or, in the case of AMG vehi-
cles, drive programs Sand S+) is character-
ised by the following:
R sporty engine and automatic transmission
settings
R the automatic transmission shifting up
later
R as a result of the later automatic transmis-
sion shift points, the fuel consumption pos-sibly being higher
Manual drive program M General notes
In this drive program, you can briefly change
gear yourself by using the steering wheel
gearshift paddles. The transmission must be
in position D.
You can activate manual drive program Min
the E,E+ (CLS 350) and Sautomatic drive
programs.
i In addition to temporary drive program
M,
you can also activate permanent drive pro- gram M(Y page 171).
Further information about permanent drive program M(Y page 175).
Activating
X Shift the transmission to position D.
X Pull the left or right steering wheel gearshift
paddle (Y page 173).
Manual drive program Mis temporarily acti-
vated. The selected gear and Mappear in
the multifunction display.
Shifting gears
If you pull on the left or right steering wheel
gearshift paddle, the automatic transmission switches to manual drive program Mfor a
limited amount of time. Depending on which
gearshift paddle is pulled, the automatic transmission immediately shifts into the next
gear up or down, if permitted.
X To shift up: pull the right-hand steering
wheel gearshift paddle (Y page 173).
The automatic transmission shifts up to the next gear.
i If the maximum engine speed on the cur-
rently engaged gear is reached and you
continue to accelerate, the automatic
transmission automatically shifts up in
order to prevent engine damage.
X To shift down: pull on the left-hand steer-
ing wheel gearshift paddle (Y page 173).
The automatic transmission shifts down to
the next gear.
i If the engine exceeds the maximum
engine speed when shifting down, the auto- matic transmission protects against engine
damage by not shifting down.
i Automatic downshifting occurs when
coasting.
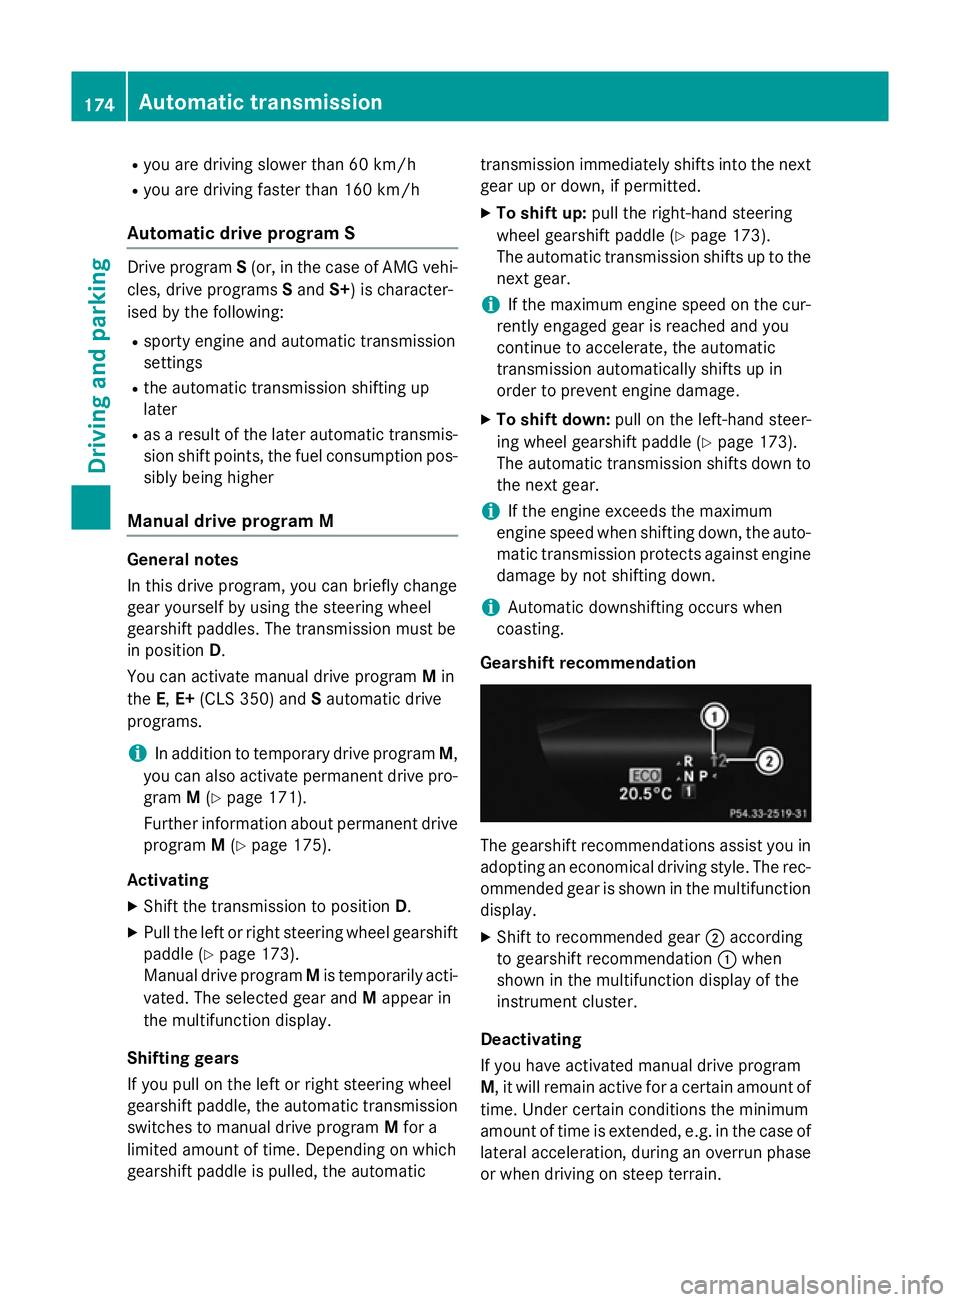
Gearshift recommendation The gearshift recommendations assist you in
adopting an economical driving style. The rec- ommended gear is shown in the multifunction
display.
X Shift to recommended gear ;according
to gearshift recommendation :when
shown in the multifunction display of the
instrument cluster.
Deactivating
If you have activated manual drive program
M, it will remain active for a certain amount of time. Under certain conditions the minimum
amount of time is extended, e.g. in the case oflateral acceleration, during an overrun phase
or when driving on steep terrain. 174
Automatic transmissionDriving and pa
rking
Page 283 of 417
Tyres
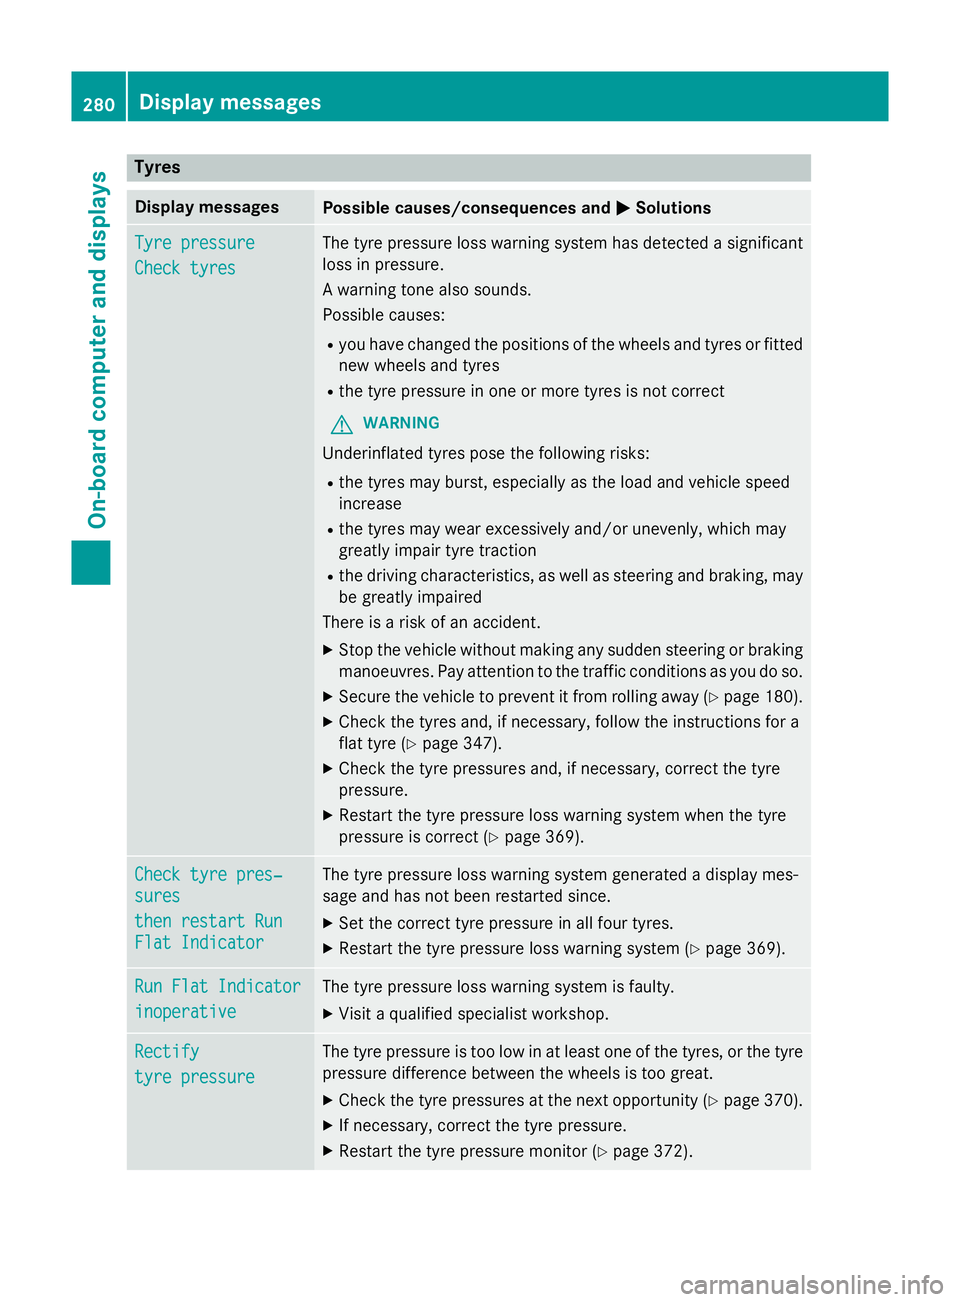
Display messages
Possible causes/consequences and
M
MSolutions Tyre pressure
Tyre pressure
Check tyres Check tyres The tyre pressure loss warning system has detected a significant
loss in pressure.
A warning tone also sounds.
Possible causes:
R you have changed the positions of the wheels and tyres or fitted
new wheels and tyres
R the tyre pressure in one or more tyres is not correct
G WARNING
Underinflated tyres pose the following risks:
R the tyres may burst, especially as the load and vehicle speed
increase
R the tyres may wear excessively and/or unevenly, which may
greatly impair tyre traction
R the driving characteristics, as well as steering and braking, may
be greatly impaired
There is a risk of an accident.
X Stop the vehicle without making any sudden steering or braking
manoeuvres. Pay attention to the traffic conditions as you do so.
X Secure the vehicle to prevent it from rolling away (Y page 180).
X Check the tyres and, if necessary, follow the instructions for a
flat tyre (Y page 347).
X Check the tyre pressures and, if necessary, correct the tyre
pressure.
X Restart the tyre pressure loss warning system when the tyre
pressure is correct (Y page 369).Check tyre pres‐ Check tyre pres‐
sures sures
then restart Run then restart Run
Flat Indicator Flat Indicator The tyre pressure loss warning system generated a display mes-
sage and has not been restarted since.
X Set the correct tyre pressure in all four tyres.
X Restart the tyre pressure loss warning system (Y page 369).Run Flat Indicator Run Flat Indicator
inoperative inoperative The tyre pressure loss warning system is faulty.
X Visit a qualified specialist workshop. Rectify
Rectify
tyre pressure tyre pressure The tyre pressure is too low in at least one of the tyres, or the tyre
pressure difference between the wheels is too great.
X Check the tyre pressures at the next opportunity (Y page 370).
X If necessary, correct the tyre pressure.
X Restart the tyre pressure monitor (Y page 372).280
Display
messagesOn-board computer and displays
Page 350 of 417
Flat tyre
Preparing the vehicle
Your vehicle may be equipped with: R MOExtended tyres (tyres with run-flat char-
acteristics) (Y page 347)
Vehicle preparation is not necessary on
vehicles with MOExtended tyres.
R a TIREFIT kit (Y page 345)
R an emergency spare wheel (only for certain
countries) (Y page 390)
Information on changing/fitting a wheel
(Y page 373).
X Stop the vehicle as far away as possible
from traffic on solid, non-slippery and level
ground.
X Switch on the hazard warning lamps.
X Secure the vehicle against rolling away
(Y page 180).
X If possible, bring the front wheels into the
straight-ahead position.
X Vehicles with AIRMATIC: make sure that
"normal" level is selected (Y page 202).
X Switch off the engine.
X Vehicles without KEYLESS-GO: remove
the key from the ignition lock.
X Vehicles with KEYLESS-GO: open the
driver's door.
The on-board electronics now have status
0 . This is the same as the key having been
removed.
X Vehicles with KEYLESS-GO: remove the
Start/Stop button from the ignition lock
(Y page 159).
X All occupants must get out of the vehicle.
Make sure that they are not endangered as they do so.
X Make sure that no one is near the danger
area while a wheel is being changed. Any-
one who is not directly assisting in the
wheel change should, for example, stand
behind the barrier.
X Get out of the vehicle. Pay attention to traf-
fic conditions when doing so. X
Close the driver's door.
X Place the warning triangle a suitable dis-
tance away (Y page 344). Observe legal
requirements. MOExtended tyres (tyres with run-flat
characteristics)
General notes With MOExtended tyres (tyres with run-flat
characteristics), you can continue to drive
your vehicle even if there is a total loss of
pressure in one or more tyres. The affected
tyre must not show any clearly visible dam-
age.
You can recognise MOExtended tyres by the
MOExtended marking which appears on the
tyre wall. You will find this marking next to the
tyre size designation, the load-bearing capa-
city and the speed index.
MOExtended tyres may only be used in con-
junction with an active tyre pressure loss
warning system or tyre pressure monitoring
system.
If the pressure loss warning message
appears in the multifunction display:
R observe the instructions in the display mes-
sages (Y page 280).
R check the tyre for damage.
R if driving on, observe the following notes.
The maximum driving distance is approx-
imately 80 km when the vehicle is partially
laden and approximately 30 km when the
vehicle is fully laden.
In addition to the vehicle load, the driving dis- tance possible depends upon:
R speed
R road condition
R outside temperature
The driving distance possible in run-flat mode may be reduced by extreme driving condi-
tions/manoeuvres, or it can be increased
through a moderate style of driving. Flat tyre
347Breakdown assistance
Page 351 of 417
The maximum permissible distance which
can be driven in run-flat mode is counted from the moment the tyre pressure loss warning
appears in the multifunction display.
You must not exceed a maximum speed of
80 km/h.
i When replacing one or all tyres, make
sure that you use only:
R the tyre size specified for the vehicle and
R tyre(s) marked "MOExtended"
If a tyre has gone flat and cannot be
replaced with an MOExtended tyre, a
standard tyre may be used as a temporary
measure. Make sure that you use the
proper size and type (summer or winter
tyre).
i Vehicles with MOExtended tyres are not
equipped with a TIREFIT kit at the factory. It
is therefore recommended that you addi-
tionally equip your vehicle with a TIREFIT kit if you fit tyres that do not feature run-flat
characteristics, e.g. winter tyres. A TIREFIT
kit can be obtained from a qualified spe-
cialist workshop.
Important safety notes G
WARNING
When driving in emergency mode, the driving characteristics deteriorate, e.g. when corner-
ing, accelerating quickly and when braking.
There is a risk of accident.
Do not exceed the stated maximum speed.
Avoid abrupt steering and driving manoeu-
vres, and driving over obstacles (kerbs, pot-
holes, off-road). This applies in particular to a laden vehicle.
Stop driving in emergency mode if:
R you hear banging noises.
R the vehicle starts to shake.
R you see smoke and smell rubber.
R ESP ®
is intervening constantly.
R there are tears in the sidewalls of the tyre. After driving in emergency mode, have the
wheel rims checked at a qualified specialist
workshop with regard to their further use. The faulty tyre must be replaced. TIREFIT kit
Important safety notes TIREFIT is a tyre sealant.
You can use TIREFIT to seal punctures of up to
4 mm, particularly those in the tyre tread. You
can use TIREFIT at outside temperatures
down to Ò20 †. G
WARNING
In the following situations, the tyre sealant is
unable to provide sufficient breakdown assis- tance, as it is unable to seal the tyre properly:
R there are cuts or punctures in the tyre
larger than those mentioned above.
R the wheel rim is damaged.
R you have driven at very low tyre pressures
or on a flat tyre.
There is a risk of an accident.
Do not drive any further. Contact a qualified
specialist workshop. G
WARNING
The tyre sealant is harmful and causes irrita-
tion. It must not come into contact with your
skin, eyes or clothing or be swallowed. Do not inhale TIREFIT fumes. Keep tyre sealant away
from children. There is a risk of injury.
If you come into contact with the tyre sealant,
observe the following:
R Rinse off the tyre sealant from your skin
immediately with water.
R If the tyre sealant comes into contact with
your eyes, immediately rinse them thor-
oughly with clean water.
R If tyre sealant is swallowed, immediately
rinse your mouth out thoroughly and drink
plenty of water. Do not induce vomiting,
and seek medical attention immediately. 348
Flat tyreBreakdown assistance
Page 353 of 417
Do not switch off the tyre inflation com-
pressor during this phase.
X Let the tyre inflation compressor run for
five minutes. The tyre should then have
attained a pressure of at least 180 kPa
(1.8 bar/26 psi).
If a pressure of 180 kP a(1.8 bar/26 psi) has
been attained after five minutes, see "Tyre
pressure reached" (Y page 350).
If a tyre pressure of 180 kPa (1.8 bar/26 psi)
has not been attained after five minutes, see "Tyre pressure not reached" (Y page 350).
i If the tyre sealant leaks out, allow it to dry.
It can then be removed like a layer of film.
If you get tyre sealant on your clothing,
have it cleaned as soon as possible with
perchloroethylene.
Tyre pressure not reached If a pressure of 180 kPa (1.8 bar/26 psi) has
not been attained after five minutes:
X Switch off the tyre inflation compressor.
X Unscrew the filler hose from the valve of
the faulty tyre.
X Very slowly drive forwards or reverse
approximately 10 m.
X Pump up the tyre again.
After a maximum of five minutes the tyre
pressure must be at least 180 kPa (1.8 bar/ 26 psi). G
WARNING
If the required tyre pressure is not reached
after the specified time, the tyre is too badly
damaged. The tyre sealant cannot repair the
tyre in this instance. Damaged tyres and a tyre pressure that is too low can significantly
impair the vehicle's braking and driving char-
acteristics. There is a risk of accident.
Do not continue driving. Contact a qualified
specialist workshop. Tyre pressure reached G
WARNING
A tyre temporarily sealed with tyre sealant
impairs the driving characteristics and is not
suitable for higher speeds. There is a risk of
accident.
You should therefore adapt your driving style
accordingly and drive carefully. Do not exceed the specified maximum speed with a tyre that
has been repaired using tyre sealant.
! After use, excess tyre sealant may run out
of the filler hose. This could cause stains.
Therefore, place the filler hose in the plastic
bag which contained the TIREFIT kit. H
Environmental note
Have the used tyre sealant bottle disposed of professionally, e.g. at a qualified specialist
workshop.
If a tyre pressure of 180 kPa (1.8 ba r/26 psi)
has been attained after five minutes:
X Switch off the tyre inflation compressor.
X Unscrew the filler hose from the valve of
the faulty tyre.
X Stow the tyre sealant bottle, the tyre infla-
tion compressor and the warning triangle.
X Pull away immediately.
The maximum speed for a tyre sealed with
tyre sealant is 80 km/h. The upper part of
the TIREFIT sticker must be affixed to the
instrument cluster where it will be easily
seen by the driver.
X Stop after driving for approximately ten
minutes and check the tyre pressure with
the tyre inflation compressor.
The tyre pressure must now be at least
130 kPa (1.3 bar/19 psi). G
WARNING
If the required tyre pressure is not reached
after driving for a short period, the tyre is too badly damaged. The tyre sealant cannot
repair the tyre in this instance. Damaged tyres and a tyre pressure that is too low can signif- 350
Flat tyreBreakdown assistance
Page 367 of 417
Useful information
i This Owner's Manual describes all mod-
els, series and optional equipment for your
vehicle that were available at the time of
going to press. National variations are pos- sible. Note that your vehicle may not be
equipped with all of the functions descri-
bed. This is also the case for systems and
functions relevant to safety.
i Read the information on qualified special-
ist workshops: (Y page 26). Important safety notes
G
WARNING
If wheels and tyres of the wrong size are used, the wheel brakes or suspension components
may be damaged. There is a risk of an acci-
dent.
Always replace wheels and tyres with those
that fulfil the specifications of the original
part.
When replacing wheels, make sure to fit the
correct:
R designation
R type
When replacing tyres, make sure to fit the
correct:
R designation
R manufacturer
R type G
WARNING
A flat tyre severely impairs the driving, steer-
ing and braking characteristics of the vehicle.
There is a risk of accident.
Tyres without run-flat characteristics:
R do not drive with a flat tyre.
R immediately replace the flat tyre with your
emergency spare wheel or spare wheel, or
consult a qualified specialist workshop. Tyres with run-flat characteristics:
R pay attention to the information and warn-
ing notices on MOExtended tyres (tyres
with run-flat characteristics).
Accessories that are not approved for your
vehicle by Mercedes-Benz or are not being
used correctly can impair the operating
safety.
Before purchasing and using non-approved
accessories, visit a qualified specialist work-
shop and enquire about:
R suitability
R legal stipulations
R factory recommendations
Information on the dimensions and types of
wheels and tyres for your vehicle can be
found under "Wheel/tyre combinations"
(Y page 378)(Y page 380).
Information on air pressure for the tyres on
your vehicle can be found:
R on the tyre pressure label on the fuel filler
flap (Y page 178)
R under "Tyre pressure" (Y page 367)
Modification work on the brake system and
wheels is not permitted. The use of wheel
spacers or brake dust shields is not permit-
ted. This invalidates the general operating
permit for the vehicle.
i Further information on wheels and tyres
can be obtained at any qualified specialist
workshop. Operation
Information on driving
Check the tyre pressures when the vehicle is
heavily laden and, if necessary, adjust.
While driving, pay attention to vibrations,
noises and unusual handling characteristics,
e.g. pulling to one side. This may indicate that the wheels or tyres are damaged. If you sus-
pect that a tyre is defective, reduce your
speed immediately. Stop the vehicle as soon 364
OperationWheels and tyres
Page 369 of 417
run-flat characteristics)" section
(Y
page 347).
R Only fit tyres of the correct size onto the
wheels.
R Run in new tyres at moderate speeds for
the first 100 km. They only reach their full
performance after this distance.
R Do not drive with tyres which have too little
tread depth. This otherwise significantly
reduces the traction on wet roads (aqua-
planing).
R Replace the tyres after six years at the lat-
est, regardless of wear.
Observe the notes on the emergency spare
wheel (Y page 390). MOExtended tyres (tyres with run-flat
characteristics)
With MOExtended tyres (tyres with run-flat
characteristics), you can continue to drive
your vehicle even if there is a total loss of
pressure in one or more tyres.
Only use MOExtended tyres in conjunction
with an activated tyre pressure loss warning
system or tyre pressure monitoring system
and only on tyres specifically inspected by
Mercedes‑Benz.
Notes on driving with MOExtended tyres with a flat tyre (Y page 347).
i Vehicles with MOExtended tyres are not
equipped with a TIREFIT kit at the factory. It
is therefore recommended that you addi-
tionally equip your vehicle with a TIREFIT kit if you fit tyres that do not feature run-flat
characteristics, e.g. winter tyres. A TIREFIT
kit can be obtained from a qualified spe-
cialist workshop. Winter operation
General notes
Have your vehicle winterproofed at a qualified specialist workshop at the onset of winter. Observe the notes in the "Changing a wheel"
section (Y page 373). Driving with summer tyres
At temperatures below +7 †, summer tyres
lose elasticity and therefore traction and
braking power. Change the tyres on your vehi- cle to M+S tyres. Using summer tyres at very
cold temperatures could cause tears to form, thereby damaging the tyres permanently.
Mercedes-Benz cannot accept responsibility
for this type of damage. G
WARNING
Damaged tyres can cause tyre inflation pres-
sure loss. As a result, you could lose control of your vehicle. There is a risk of accident.
Check the tyres regularly for signs of damageand replace any damaged tyres immediately. M+S tyres
G
WARNING
M+S tyres with a tyre tread depth of less than 4 mm are not suitable for use in winter as they
do not provide sufficient traction. There is a
risk of accident.
M+S tyres with a tread depth of less than
4 mm must be replaced.
At temperatures below +7 †, use winter tyres or all-season tyres. Both types of tyre are
identified by the M+S marking.
Only winter tyres bearing the isnowflake
symbol in addition to the M+S marking pro-
vide the best possible grip in wintry road con- ditions.
Only these tyres will allow driving safety sys-
tems such as ABS and ESP ®
to function opti-
mally in winter. These tyres have been devel-
oped specifically for driving in snow.
Use M+S tyres of the same make and tread on all wheels to maintain safe handling charac-
teristics. 366
Winter operationWheels and tyres