2014 MERCEDES-BENZ CLS COUPE tailgate
[x] Cancel search: tailgatePage 88 of 417
If you unlock the vehicle using the emergency
key element, the fuel filler flap will not be
unlocked automatically.
X To unlock the fuel filler flap: insert the
key into the ignition lock.
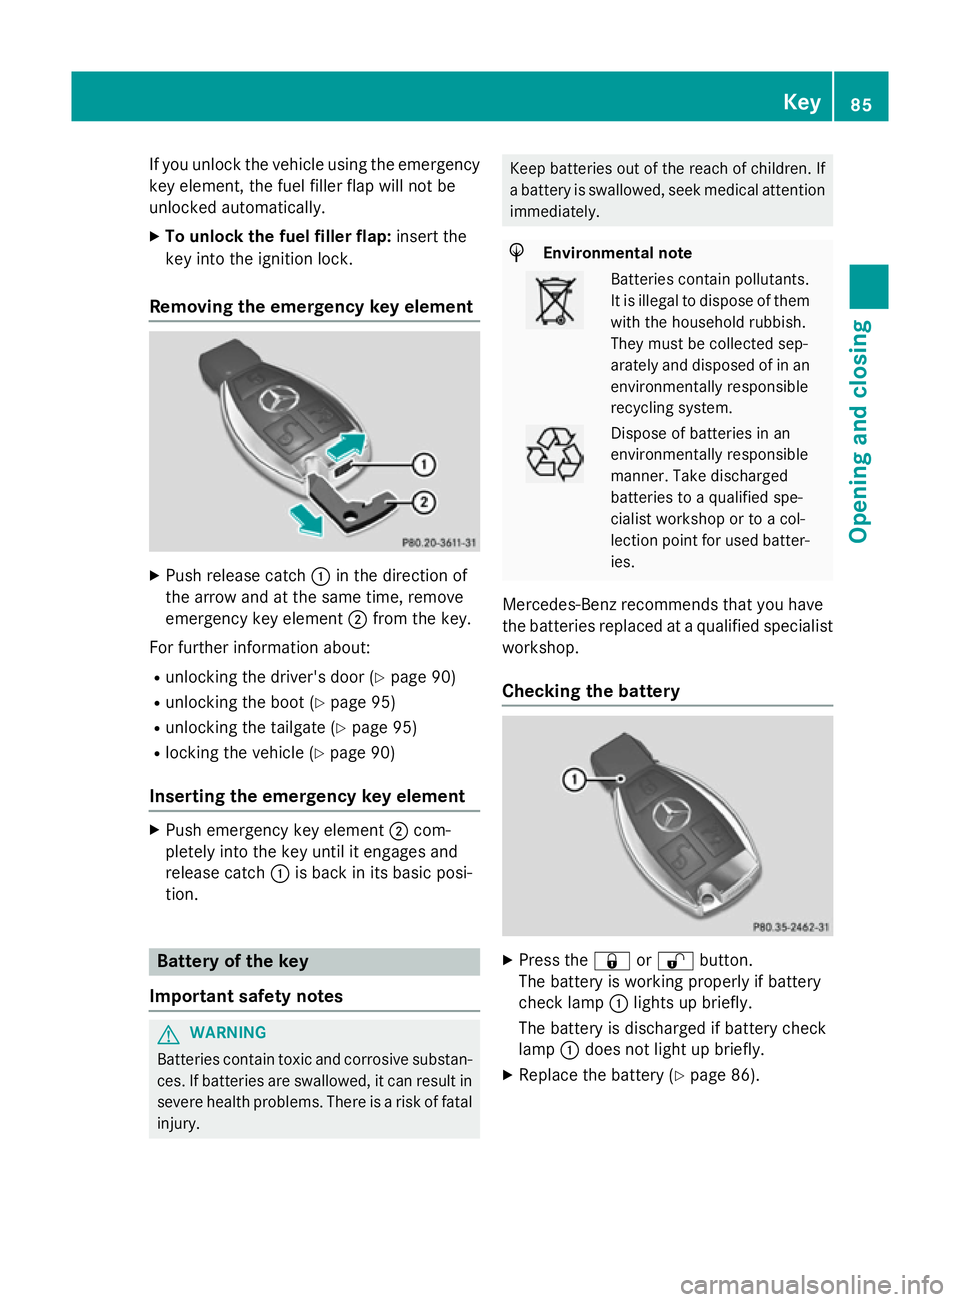
Removing the emergency key element X
Push release catch :in the direction of
the arrow and at the same time, remove
emergency key element ;from the key.
For further information about: R unlocking the driver's door (Y page 90)
R unlocking the boot (Y page 95)
R unlocking the tailgate (Y page 95)
R locking the vehicle (Y page 90)
Inserting the emergency key element X
Push emergency key element ;com-
pletely into the key until it engages and
release catch :is back in its basic posi-
tion. Battery of the key
Important safety notes G
WARNING
Batteries contain toxic and corrosive substan- ces. If batteries are swallowed, it can result in
severe health problems. There is a risk of fatal injury. Keep batteries out of the reach of children. If
a battery is swallowed, seek medical attention
immediately. H
Environmental note Batteries contain pollutants.
It is illegal to dispose of them
with the household rubbish.
They must be collected sep-
arately and disposed of in anenvironmentally responsible
recycling system. Dispose of batteries in an
environmentally responsible
manner. Take discharged
batteries to a qualified spe-
cialist workshop or to a col-
lection point for used batter-
ies.
Mercedes-Benz recommends that you have
the batteries replaced at a qualified specialist workshop.
Checking the battery X
Press the &or% button.
The battery is working properly if battery
check lamp :lights up briefly.
The battery is discharged if battery check
lamp :does not light up briefly.
X Replace the battery (Y page 86). Key
85Opening and closing Z
Page 93 of 417
If the vehicle has been locked using the lock-
ing button for the central locking, or has been locked automatically, and a door is opened
from the inside:
R the vehicle will be fully unlocked if it had
previously been fully unlocked
R only the door which has been opened form
the inside is unlocked if only the driver's
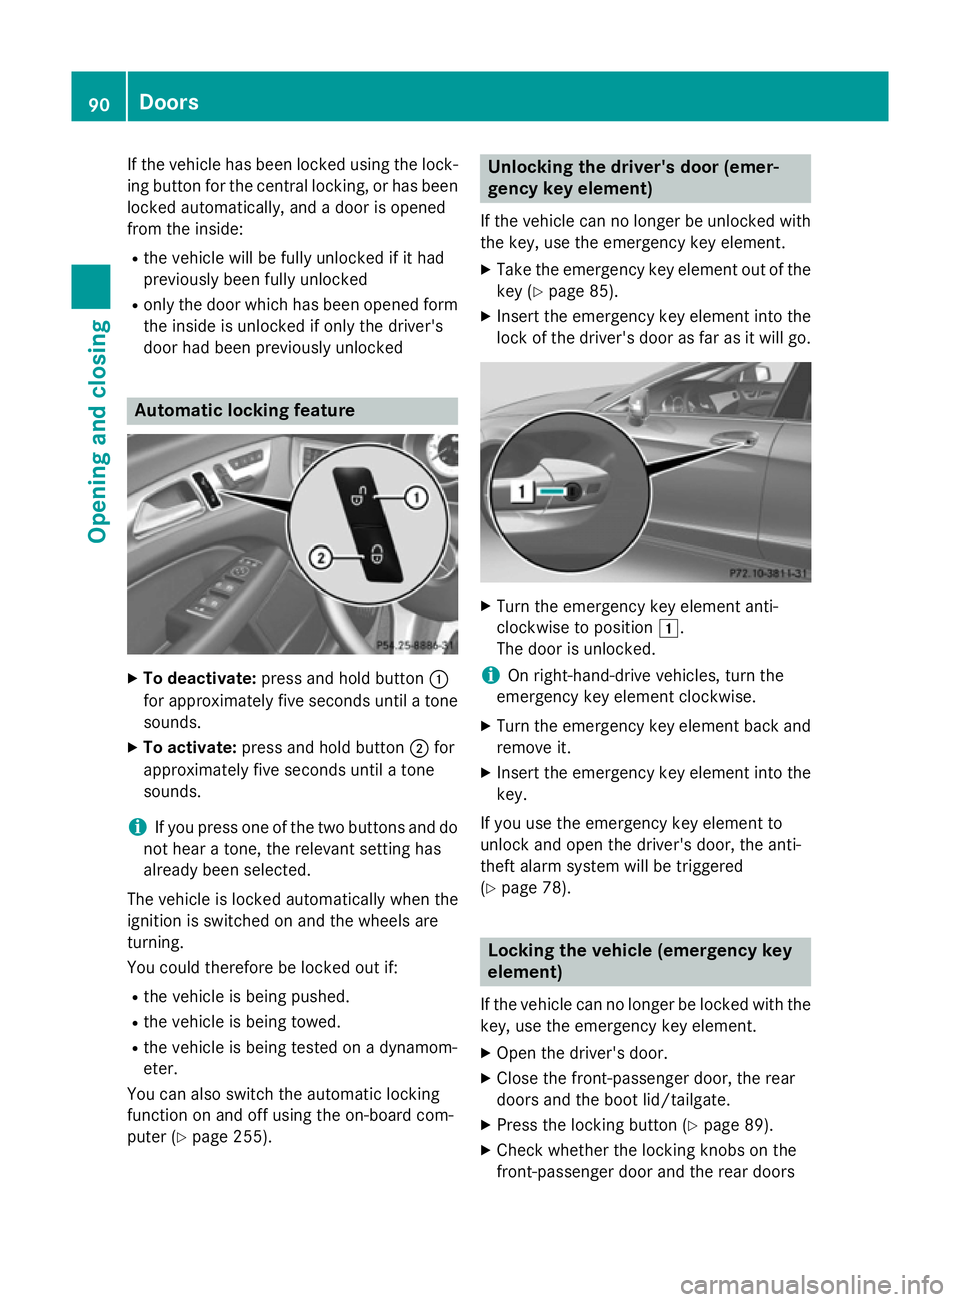
door had been previously unlocked Automatic locking feature
X
To deactivate: press and hold button :
for approximately five seconds until a tone sounds.
X To activate: press and hold button ;for
approximately five seconds until a tone
sounds.
i If you press one of the two buttons and do
not hear a tone, the relevant setting has
already been selected.
The vehicle is locked automatically when the
ignition is switched on and the wheels are
turning.
You could therefore be locked out if:
R the vehicle is being pushed.
R the vehicle is being towed.
R the vehicle is being tested on a dynamom-
eter.
You can also switch the automatic locking
function on and off using the on-board com-
puter (Y page 255). Unlocking the driver's door (emer-
gency key element)
If the vehicle can no longer be unlocked with
the key, use the emergency key element.
X Take the emergency key element out of the
key (Y page 85).
X Insert the emergency key element into the
lock of the driver's door as far as it will go. X
Turn the emergency key element anti-
clockwise to position 1.
The door is unlocked.
i On right-hand-drive vehicles, turn the
emergency key element clockwise.
X Turn the emergency key element back and
remove it.
X Insert the emergency key element into the
key.
If you use the emergency key element to
unlock and open the driver's door, the anti-
theft alarm system will be triggered
(Y page 78). Locking the vehicle (emergency key
element)
If the vehicle can no longer be locked with the
key, use the emergency key element.
X Open the driver's door.
X Close the front-passenger door, the rear
doors and the boot lid/tailgate.
X Press the locking button (Y page 89).
X Check whether the locking knobs on the
front-passenger door and the rear doors 90
DoorsOpening and closing
Page 94 of 417
are still visible. Press down the locking
knobs by hand, if necessary.
X Close the driver's door.
X Take the emergency key element out of the
key (Y page 85).
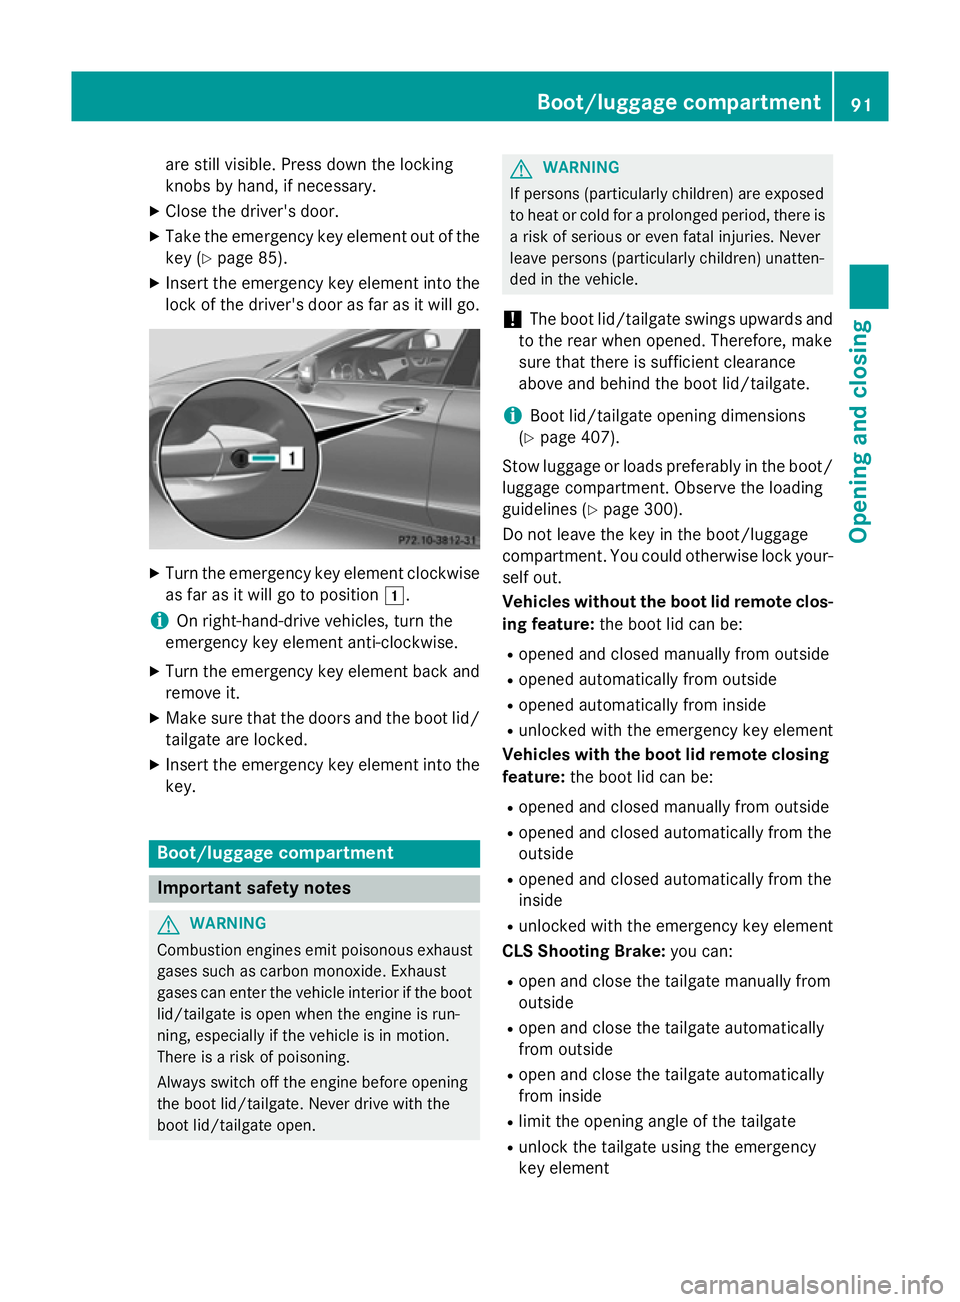
X Insert the emergency key element into the
lock of the driver's door as far as it will go. X
Turn the emergency key element clockwise
as far as it will go to position 1.
i On right-hand-drive vehicles, turn the
emergency key element anti-clockwise.
X Turn the emergency key element back and
remove it.
X Make sure that the doors and the boot lid/
tailgate are locked.
X Insert the emergency key element into the
key. Boot/luggage compartment
Important safety notes
G
WARNING
Combustion engines emit poisonous exhaust
gases such as carbon monoxide. Exhaust
gases can enter the vehicle interior if the boot
lid/tailgate is open when the engine is run-
ning, especially if the vehicle is in motion.
There is a risk of poisoning.
Always switch off the engine before opening
the boot lid/tailgate. Never drive with the
boot lid/tailgate open. G
WARNING
If persons (particularly children) are exposed
to heat or cold for a prolonged period, there is a risk of serious or even fatal injuries. Never
leave persons (particularly children) unatten-
ded in the vehicle.
! The boot lid/tailgate swings upwards and
to the rear when opened. Therefore, make
sure that there is sufficient clearance
above and behind the boot lid/tailgate.
i Boot lid/tailgate opening dimensions
(Y page 407).
Stow luggage or loads preferably in the boot/ luggage compartment. Observe the loading
guidelines (Y page 300).
Do not leave the key in the boot/luggage
compartment. You could otherwise lock your- self out.
Vehicles without the boot lid remote clos-
ing feature: the boot lid can be:
R opened and closed manually from outside
R opened automatically from outside
R opened automatically from inside
R unlocked with the emergency key element
Vehicles with the boot lid remote closing feature: the boot lid can be:
R opened and closed manually from outside
R opened and closed automatically from the
outside
R opened and closed automatically from the
inside
R unlocked with the emergency key element
CLS Shooting Brake: you can:
R open and close the tailgate manually from
outside
R open and close the tailgate automatically
from outside
R open and close the tailgate automatically
from inside
R limit the opening angle of the tailgate
R unlock the tailgate using the emergency
key element Boot/luggage compartment
91Opening and closing Z
Page 95 of 417
Boot lid/tailgate reversing function
The boot lid/tailgate is equipped with an
automatic reversing feature. It reacts if a solid
object obstructs or restricts the boot lid/tail-
gate during the closing procedure. The boot
lid/tailgate opens again automatically. The
automatic reversing function is only an aid
and is not a substitute for your attentiveness to the boot lid/tailgate while it is closing. G
WARNING
The reversing function does not react:
R to soft, light and thin objects, e.g. small fin-
gers
R over the last 8 mm of the closing path
This means that the reversing feature cannot
prevent someone being trapped in these sit-
uations. There is a risk of injury.
When closing make sure that no parts of the
body are in the closing area.
If someone is trapped:
R press the Fbutton on the key, or
R press the remote operating switch on the
driver's door, or
R press the closing or locking button on the
boot lid/tailgate, or
R pull the handle on the boot lid/tailgate Opening/closing from the outside
Opening Example: CLS Coupé, handle X
Press the %button on the key.
X CLS Coupé: pull handle:.
X Raise the boot lid.
CLS Shooting Brake: if you pull handle:
and keep it in this position, you can open the
tailgate manually. If you release the handle,
the tailgate opens automatically.
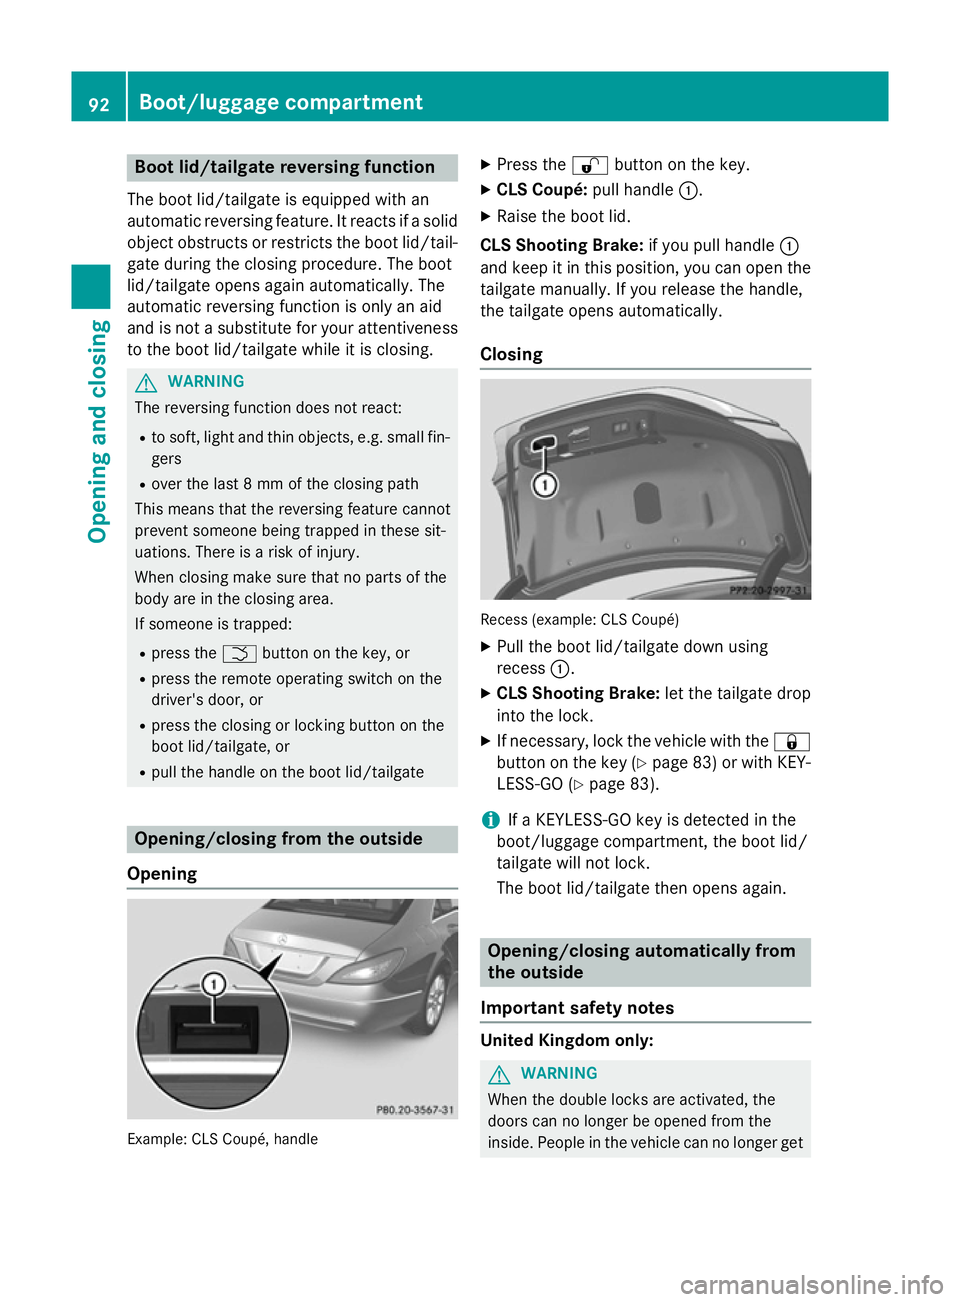
Closing Recess (example: CLS Coupé)
X Pull the boot lid/tailgate down using
recess :.
X CLS Shooting Brake: let the tailgate drop
into the lock.
X If necessary, lock the vehicle with the &
button on the key (Y page 83)or with KEY-
LESS-GO (Y page 83).
i If a KEYLESS-GO key is detected in the
boot/luggage compartment, the boot lid/
tailgate will not lock.
The boot lid/tailgate then opens again. Opening/closing automatically from
the outside
Important safety notes United Kingdom only:
G
WARNING
When the double locks are activated, the
doors can no longer be opened from the
inside. People in the vehicle can no longer get 92
Boot/luggage compartmentOpening and closing
Page 96 of 417

out, e.g. in hazardous situations. There is a
risk of injury.
Therefore, do not leave any people unsuper-
vised in the vehicle, particularly children, eld- erly people or people in need of special assis-
tance. Do not activate the double lock when
people are in the vehicle.
If the vehicle has been locked from the out-
side, the double-lock function is activated as
standard. It is then not possible to open the
doors from inside the vehicle. You can deac-
tivate the double-lock function by deactivat-
ing the interior motion sensor (Y page 79).
The doors can then be opened from the inside after the vehicle has been locked from the
outside. The anti-theft alarm system is trig-
gered if the door is opened from the inside.
Switch off the alarm (Y page 78).
All countries: G
WARNING
Parts of the body could become trapped dur-
ing automatic closing of the boot lid or tail-
gate. Moreover, people, e.g. children, may be standing in the closing area or may enter the
closing area during the closing process. There
is a risk of injury.
Make sure that nobody is in the vicinity of the closing area during the closing process.
Use one of the following options to stop the
closing process:
R Press the Fbutton on the key.
R Press the remote operating switch on the
driver's door.
R Press the closing or locking button on the
boot lid/tailgate.
R Pull the handle on the boot lid/tailgate.
! The boot lid/tailgate swings upwards and
to the rear when opened. Therefore, make
sure that there is sufficient clearance
above and behind the boot lid/tailgate.
i Boot lid/tailgate opening dimensions
(Y page 407). Opening You can open the boot lid/tailgate automati-
cally with the key or the handle in the boot
lid/tailgate.
X Press and hold the Fbutton on the key
until the boot lid/tailgate opens.
or
X If the boot lid/tailgate is unlocked, pull the
handle of the boot lid/tailgate and release
it again immediately (Y page 92).
Closing Closing button and locking button (example: CLS
Coupé)
X To close: press closing button :in the
boot lid/tailgate.
CLS Coupé with boot lid remote closing
feature and KEYLESS-GO: you can simulta-
neously close the boot lid and lock the vehi-
cle. The KEYLESS-GO key must be in the rear
detection range of the vehicle.
X Press locking button ;in the boot lid.
If all the doors are closed, the vehicle locks.
CLS Shooting Brake: you can simultane-
ously close the tailgate and lock the vehicle.
The KEYLESS-GO key must be in the rear
detection range of the vehicle.
X Press locking button ;on the tailgate.
If all the doors are closed, the vehicle locks.
i If KEYLESS-GO detects a key in the boot/
luggage compartment, the boot lid/tail-
gate opens again after it is closed. Boot/luggage compartment
93Opening and closing Z
Page 97 of 417
If KEYLESS-GO detects a second key out-
side the vehicle, the boot lid/tailgate
remains closed. Opening/closing automatically from
the inside
Important safety notes G
WARNING
Parts of the body could become trapped dur-
ing automatic closing of the boot lid or tail-
gate. Moreover, people, e.g. children, may be standing in the closing area or may enter the
closing area during the closing process. There
is a risk of injury.
Make sure that nobody is in the vicinity of the closing area during the closing process.
Use one of the following options to stop the
closing process:
R Press the Fbutton on the key.
R Press the remote operating switch on the
driver's door.
R Press the closing or locking button on the
boot lid/tailgate.
R Pull the handle on the boot lid/tailgate.
! The boot lid/tailgate swings upwards and
to the rear when opened. Therefore, make
sure that there is sufficient clearance
above and behind the boot lid/tailgate.
i Boot lid/tailgate opening dimensions
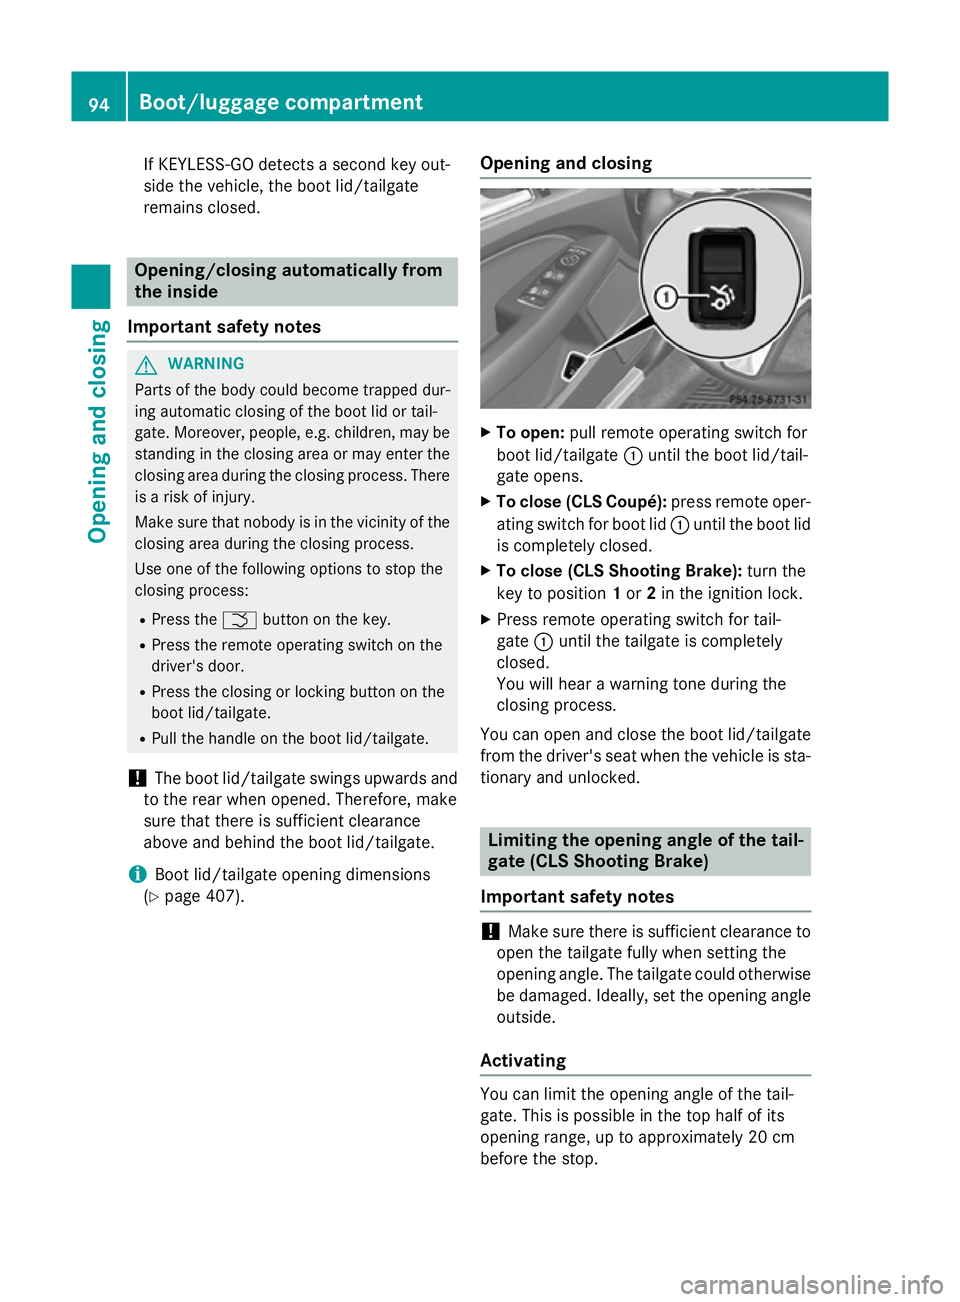
(Y page 407). Opening and closing X
To open: pull remote operating switch for
boot lid/tailgate :until the boot lid/tail-
gate opens.
X To close (CLS Coupé): press remote oper-
ating switch for boot lid :until the boot lid
is completely closed.
X To close (CLS Shooting Brake): turn the
key to position 1or 2in the ignition lock.
X Press remote operating switch for tail-
gate :until the tailgate is completely
closed.
You will hear a warning tone during the
closing process.
You can open and close the boot lid/tailgate
from the driver's seat when the vehicle is sta-
tionary and unlocked. Limiting the opening angle of the tail-
gate (CLS Shooting Brake)
Important safety notes !
Make sure there is sufficient clearance to
open the tailgate fully when setting the
opening angle. The tailgate could otherwise
be damaged. Ideally, set the opening angle outside.
Activating You can limit the opening angle of the tail-
gate. This is possible in the top half of its
opening range, up to approximately 20 cm
before the stop. 94
Boot/luggage compartmentOpening and closing
Page 98 of 417
X
To open the tailgate: pull the handle on
the tailgate.
X To stop the opening procedure at the
desired position: press the closing button
(Y page 92) in the tailgate or pull the handle
on the outside of the tailgate again.
X To store the position: press and hold the
closing button in the tailgate until you hear a short tone.
The opening angle limiter is activated. The
tailgate then stops in the stored position
when opened.
Deactivating X
Press and hold the closing button
(Y page 92) in the tailgate until you hear
two short tones. Unlocking the boot (CLS Coupé)
! The boot lid swings upwards when
opened. Therefore, make sure that there is sufficient clearance above the boot lid.
If the boot cannot be unlocked with the key or
KEYLESS-GO, use the emergency key ele-
ment.
If you use the emergency key element to
unlock and open the boot lid, the anti-theft
alarm system will be triggered (Y page 78).
X Take the emergency key element out of the
key (Y page 85).
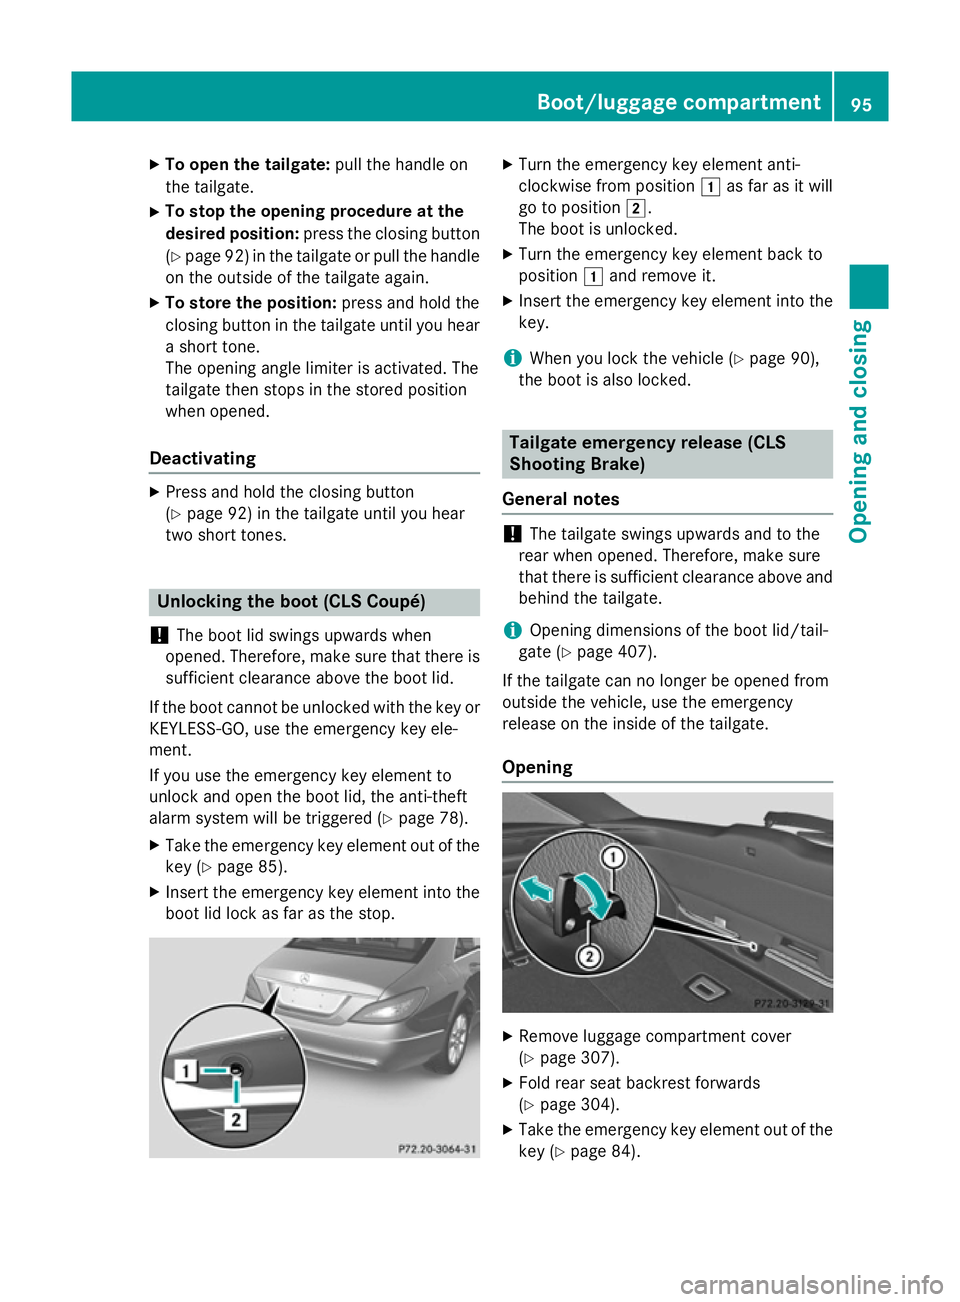
X Insert the emergency key element into the
boot lid lock as far as the stop. X
Turn the emergency key element anti-
clockwise from position 1as far as it will
go to position 2.
The boot is unlocked.
X Turn the emergency key element back to
position 1and remove it.
X Insert the emergency key element into the
key.
i When you lock the vehicle (Y
page 90),
the boot is also locked. Tailgate emergency release (CLS
Shooting Brake)
General notes !
The tailgate swings upwards and to the
rear when opened. Therefore, make sure
that there is sufficient clearance above and behind the tailgate.
i Opening dimensions of the boot lid/tail-
gate (Y page 407).
If the tailgate can no longer be opened from
outside the vehicle, use the emergency
release on the inside of the tailgate.
Opening X
Remove luggage compartment cover
(Y page 307).
X Fold rear seat backrest forwards
(Y page 304).
X Take the emergency key element out of the
key (Y page 84). Boot/luggage compartment
95Opening and closing Z
Page 137 of 417
Switching the rear window wiper on/
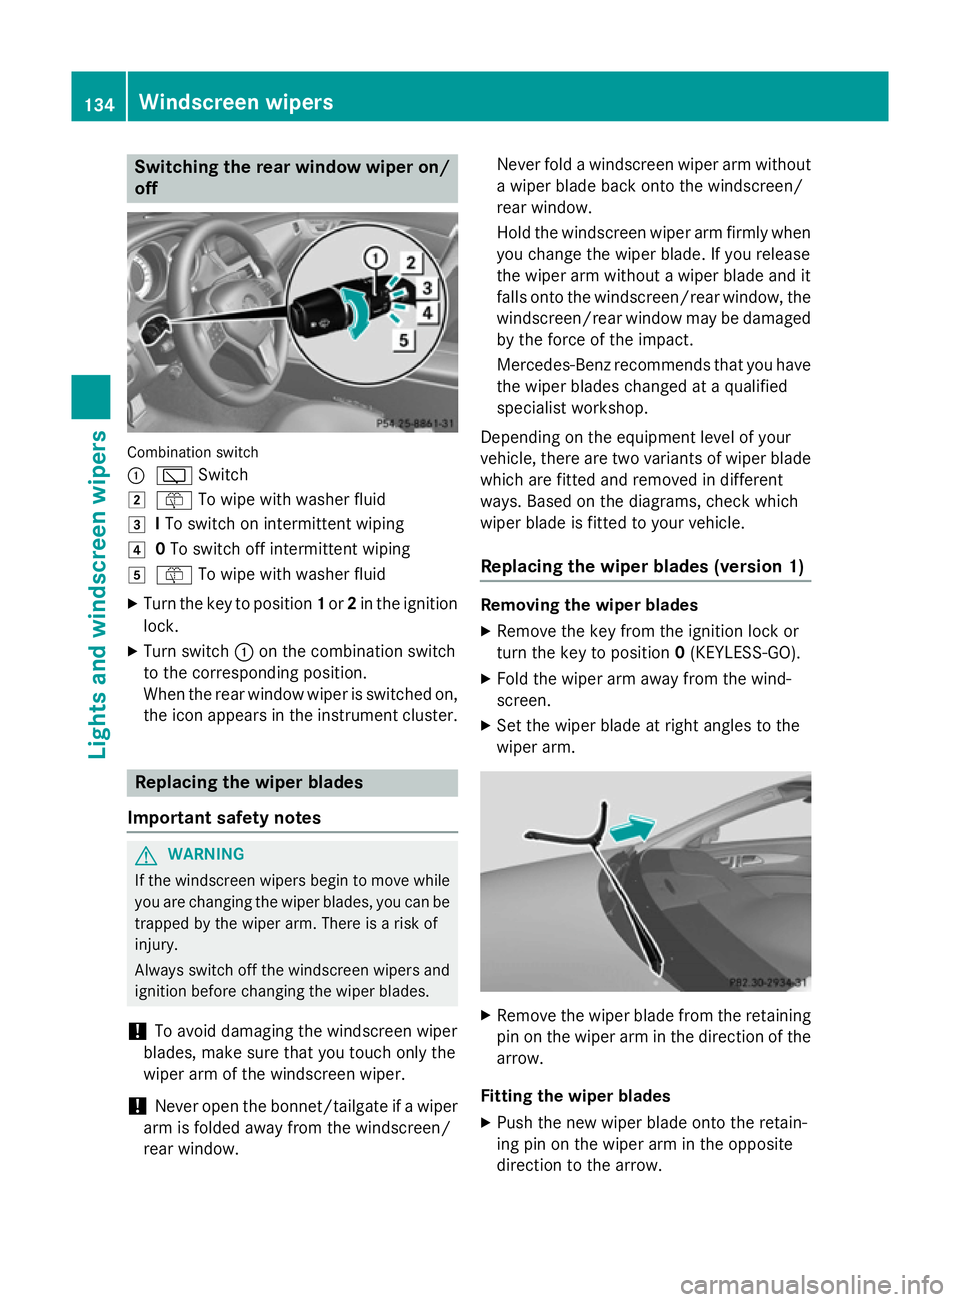
off Combination switch
:
è Switch
2 ô To wipe with washer fluid
3 ITo switch on intermittent wiping
4 0To switch off intermittent wiping
5 ô To wipe with washer fluid
X Turn the key to position 1or 2in the ignition
lock.
X Turn switch :on the combination switch
to the corresponding position.
When the rear window wiper is switched on,
the icon appears in the instrument cluster. Replacing the wiper blades
Important safety notes G
WARNING
If the windscreen wipers begin to move while
you are changing the wiper blades, you can be trapped by the wiper arm. There is a risk of
injury.
Always switch off the windscreen wipers and
ignition before changing the wiper blades.
! To avoid damaging the windscreen wiper
blades, make sure that you touch only the
wiper arm of the windscreen wiper.
! Never open the bonnet/tailgate if a wiper
arm is folded away from the windscreen/
rear window. Never fold a windscreen wiper arm without
a wiper blade back onto the windscreen/
rear window.
Hold the windscreen wiper arm firmly when
you change the wiper blade. If you release
the wiper arm without a wiper blade and it
falls onto the windscreen/rear window, the windscreen/rear window may be damaged
by the force of the impact.
Mercedes-Benz recommends that you have
the wiper blades changed at a qualified
specialist workshop.
Depending on the equipment level of your
vehicle, there are two variants of wiper blade which are fitted and removed in different
ways. Based on the diagrams, check which
wiper blade is fitted to your vehicle.
Replacing the wiper blades (version 1) Removing the wiper blades
X Remove the key from the ignition lock or
turn the key to position 0(KEYLESS-GO).
X Fold the wiper arm away from the wind-
screen.
X Set the wiper blade at right angles to the
wiper arm. X
Remove the wiper blade from the retaining
pin on the wiper arm in the direction of thearrow.
Fitting the wiper blades
X Push the new wiper blade onto the retain-
ing pin on the wiper arm in the opposite
direction to the arrow. 134
Windscreen wipersLights and windscreen wipers