2014 MERCEDES-BENZ CL-Class light
[x] Cancel search: lightPage 97 of 274
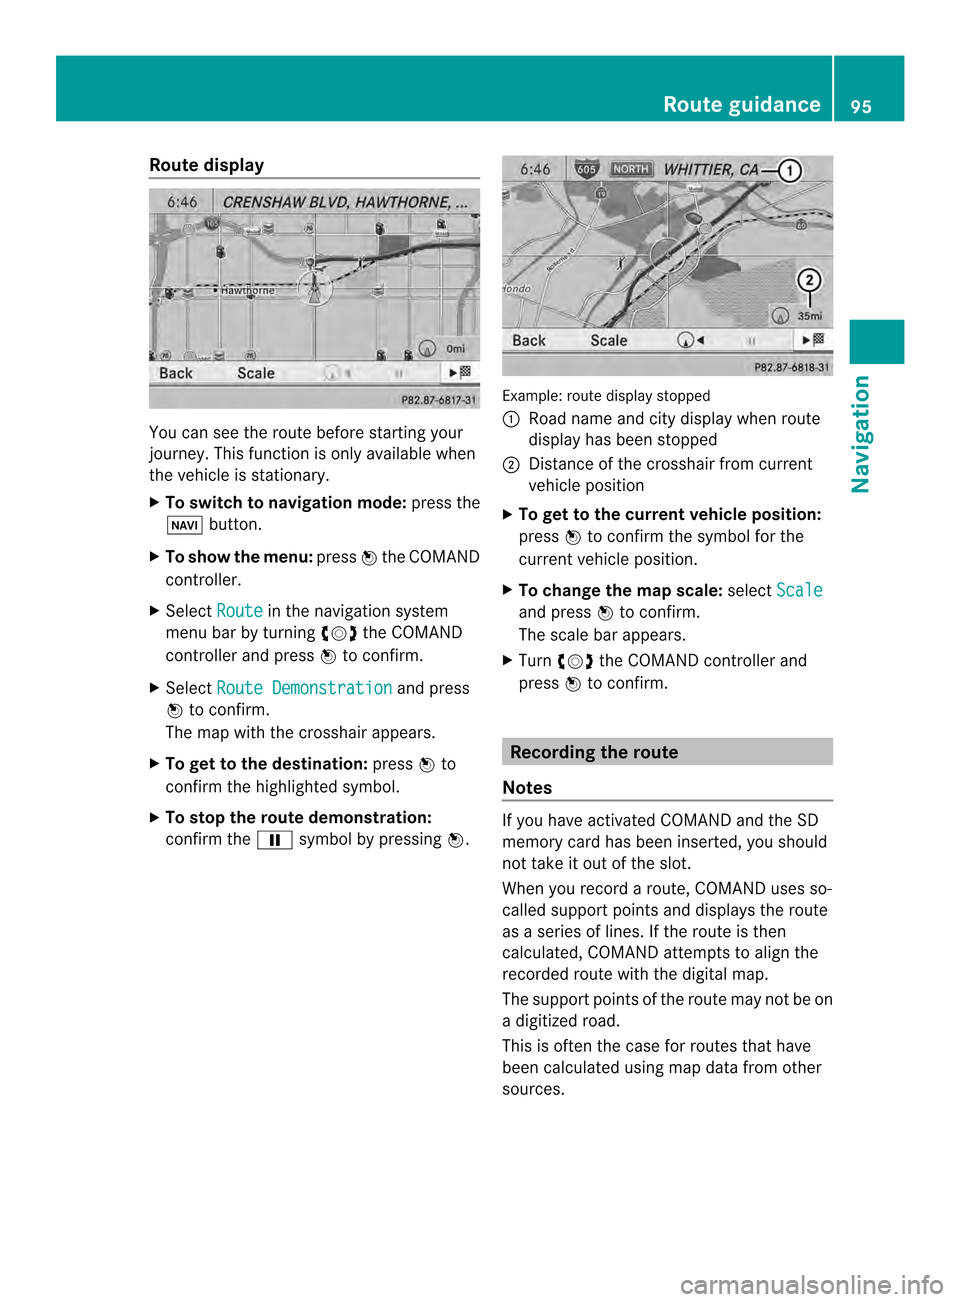
Route display
You can see the route before starting your
journey .This function is only available when
the vehicle is stationary.
X To switch to navigation mode: press the
0012 button.
X To show the menu: press0037the COMAND
controller.
X Select Route in the navigation system
menu bar by turning 003C0012003Dthe COMAND
controller and press 0037to confirm.
X Select Route Demonstration and press
0037 to confirm.
The map with the crosshair appears.
X To get to the destination: press0037to
confirm the highlighted symbol.
X To stop the route demonstration:
confirm the 0009symbol by pressing 0037. Example: route display stopped
0001
Road name and city display when route
display has been stopped
0002 Distance of the crosshair from current
vehicle position
X To get to the current vehicle position:
press 0037to confirm the symbol for the
current vehicle position.
X To change the map scale: selectScale and press
0037to confirm.
The scale bar appears.
X Turn 003C0012003D the COMAND controller and
press 0037to confirm. Recording the route
Notes If you have activated COMAND and the SD
memory card has been inserted, you should
not take it out of the slot.
When you record a route, COMAND uses so-
called support points and displays the route
as a series of lines. If the route is then
calculated, COMAND attemptst
o align the
recorded route with the digital map.
The support points of the route may not be on
a digitized road.
This is often the case for routes that have
been calculated using map data from other
sources. Route guidance
95Navigation Z
Page 100 of 274
appropriateness for use may be affected by
various factors such as time of day, time of
year and immediate weather conditions that
canno tbe judged or taken into consideration
by the COMAND system.
Route guidance to a destination that is
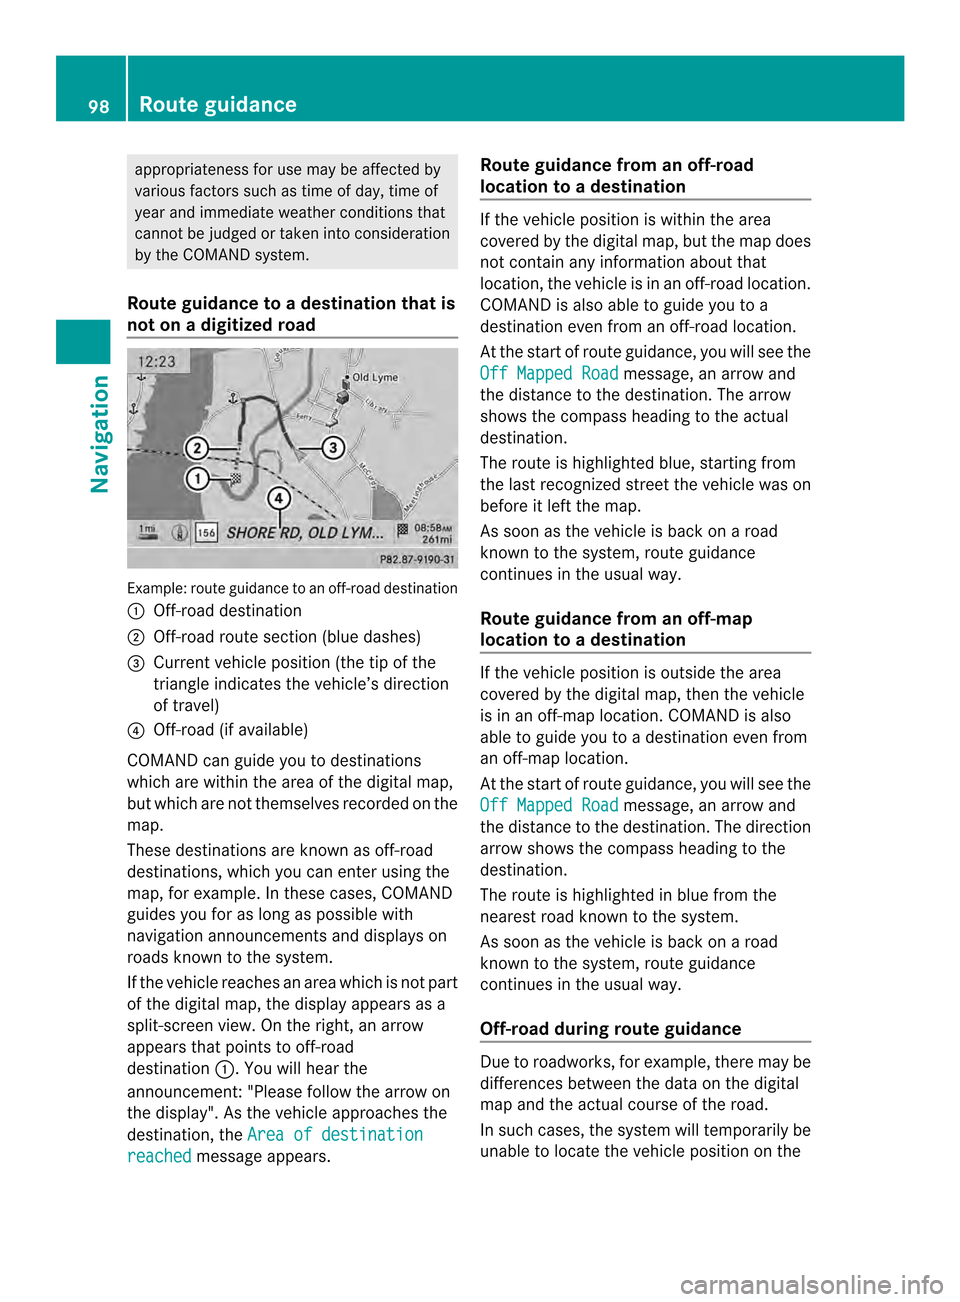
not on a digitized road Example: route guidance to an off-road destination
0001 Off-road destination
0002 Off-road route section (blue dashes)
0014 Current vehicle position (the tip of the
triangle indicates the vehicle’s direction
of travel)
0013 Off-road (if available)
COMAND can guide you to destinations
which are within the area of the digital map,
but which are not themselves recorded on the
map.
These destinations are known as off-road
destinations, which you can enter using the
map, for example. In these cases, COMAND
guides you for as long as possible with
navigation announcements and displays on
roads known to the system.
If the vehicle reaches an area which is not part
of the digital map, the display appears as a
split-screen view. On the right, an arrow
appears that points to off-road
destination 0001.You will hear the
announcement:" Please follow the arrow on
the display" .As the vehicle approaches the
destination, the Area of destination reached message appears. Route guidance from an off-road
location to
adestination If the vehicle position is within the area
covered by the digital map, but the map does
not contain any information about that
location, the vehicle is in an off-road location.
COMAND is also able to guide you to a
destination even from an off-road location.
At the start of route guidance, you will see the
Off Mapped Road
message, an arrow and
the distance to the destination .The arrow
shows the compass heading to the actual
destination.
The route is highlighted blue, starting from
the last recognized street the vehicle was on
before it left the map.
As soon as the vehicle is back on a road
known to the system, route guidance
continues in the usual way.
Route guidance from an off-map
location to adestination If the vehicle position is outside the area
covered by the digital map, then the vehicle
is in an off-map location .COMAND is also
able to guide you to a destination even from
an off-map location.
At the start of route guidance, you will see the
Off Mapped Road message, an arrow and
the distance to the destination. The direction
arrow shows the compass heading to the
destination.
The route is highlighted in blue from the
nearest road known to the system.
As soon as the vehicle is back on a road
known to the system, route guidance
continues in the usual way.
Off-road during route guidance Due to roadworks, for example, there may be
differences between the data on the digital
map and the actual course of the road.
In such cases, the system will temporarily be
unable to locate the vehicle position on the98
Route guidanceNavigation
Page 103 of 274
X
Select Traffic in the navigation system
menu bar by turning 003C0012003Dthe COMAND
controlle rand press 0037to confirm.
X Select Traffic Symbol Information by
turning 003C0012003Dthe COMAND controller and
press 0037to confirm.
X Select Next or
Previous by turning
003C0012003D
the COMAND controller and press 0037to
confirm in order to continue highlighting
traffic symbols.
X To change the map scale: selectMap by
sliding 00360012the COMAND controller and
press 0037to confirm.
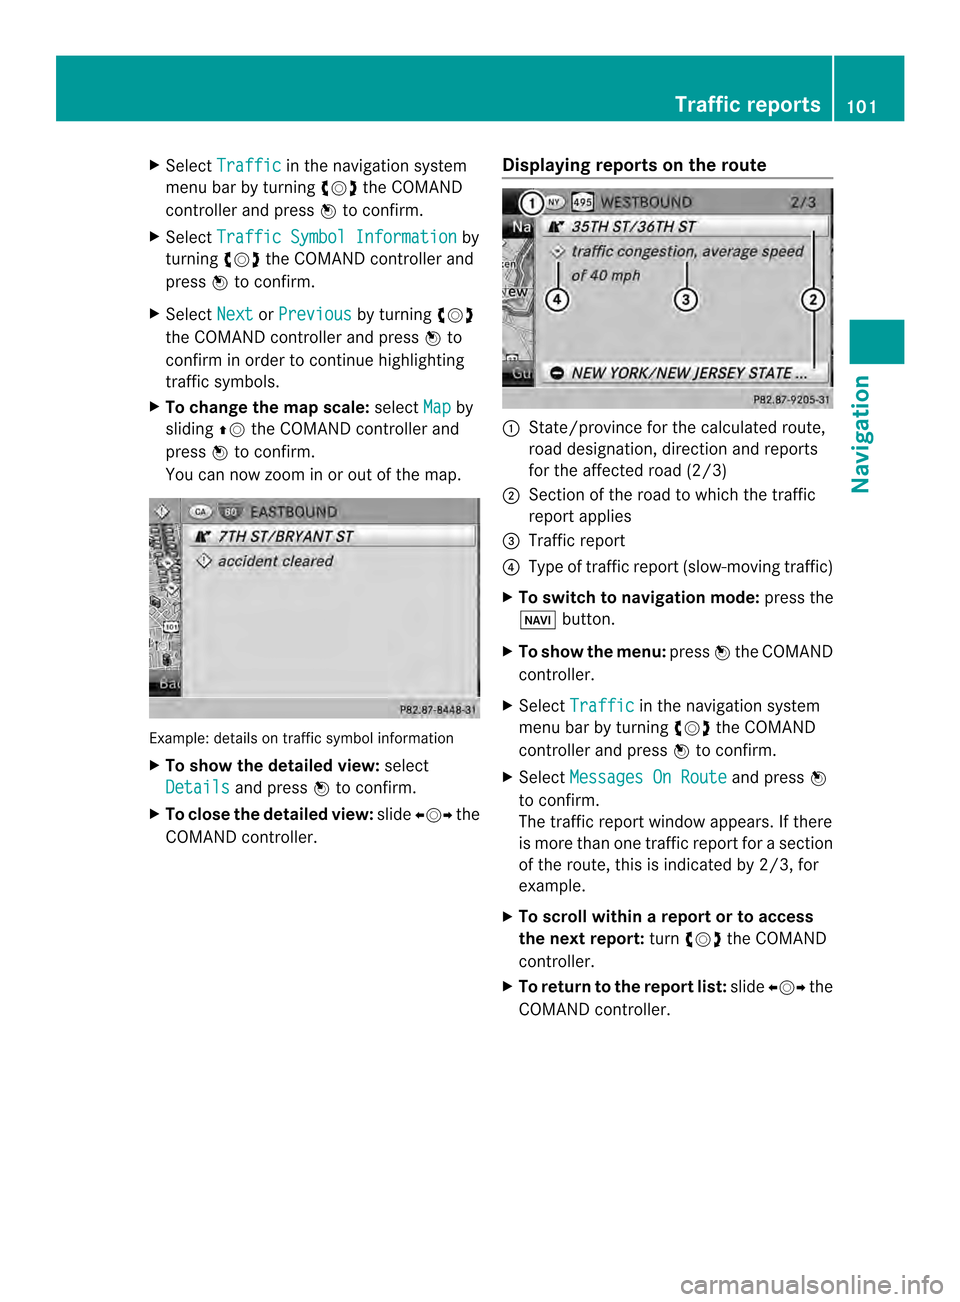
You can now zoom in or out of the map. Example: details on traffi
csymbol information
X To show the detaile dview: select
Details and press
0037to confirm.
X To close the detailed view: slide003400120035 the
COMAND controller. Displaying reports on the route 0001
State/province for the calculated route,
road designation, direction and reports
for the affected road (2/3)
0002 Section of the road to which the traffic
repor tapplies
0014 Traffic report
0013 Type of traffic report (slow-moving traffic)
X To switch to navigation mode: press the
0012 button.
X To show the menu: press0037the COMAND
controller.
X Select Traffic in the navigation system
menu bar by turning 003C0012003Dthe COMAND
controller and press 0037to confirm.
X Select Messages On Route and press
0037
to confirm.
The traffic report window appears. If there
is more than one traffic report for a section
of the route, this is indicated by 2/3, for
example.
X To scroll within arepor tort o access
the next report: turn003C0012003D the COMAND
controller.
X To retur ntothe report list: slide003400120035 the
COMAND controller. Traffic reports
101Navigation Z
Page 106 of 274
X
Slide 00120036the COMAND controller
repeatedly until the destination memory
list appears as a selection list.
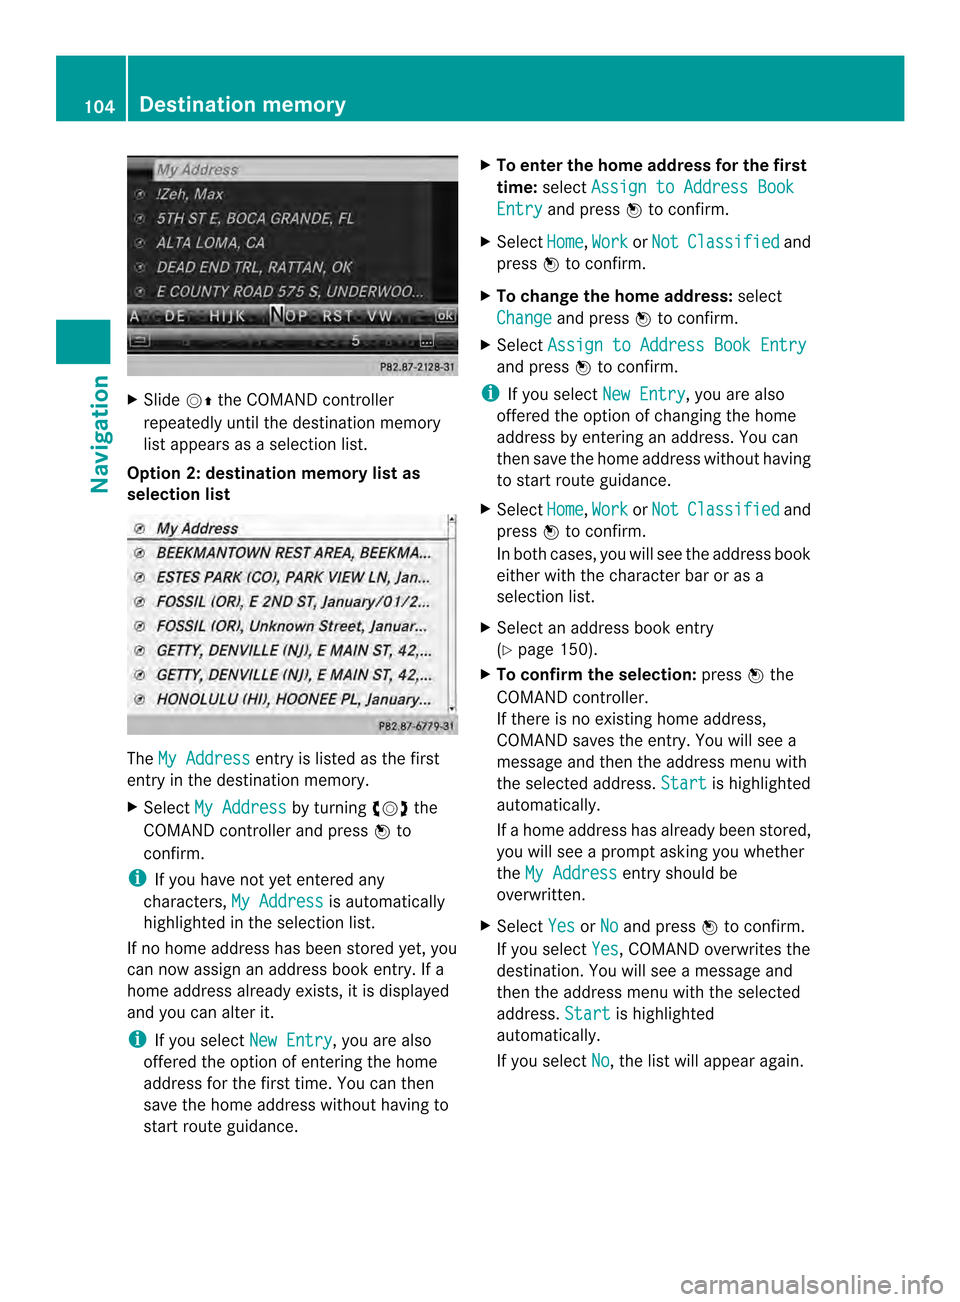
Option 2: destination memory list as
selection list The
My Address entry is listed as the first
entry in the destination memory.
X Select My Address by turning
003C0012003Dthe
COMAND controlle rand press 0037to
confirm.
i If you have not yet entered any
characters, My Address is automatically
highlighted in the selection list.
If no home address has been stored yet, you
can now assign an address book entry. If a
home address already exists, it is displayed
and you can alter it.
i If you select New Entry , you are also
offered the optio nofentering the home
address for the first time. You can then
save the home address withou thaving to
start route guidance. X
To enter th ehome address for th efirst
time: select Assign to Address Book Entry and press
0037to confirm.
X Select Home ,
Work or
Not Classified and
press 0037to confirm.
X To change the home address: select
Change and press
0037to confirm.
X Select Assign to Address Book Entry and press
0037to confirm.
i If you select New Entry , you are also
offered the optio nofchanging the home
address by entering an address. You can
then save the home address without having
to start route guidance.
X Select Home ,
Work or
Not Classified and
press 0037to confirm.
In both cases, you will see the address book
either with the character bar or as a
selection list.
X Select an address book entry
(Y page 150).
X To confirm the selection: press0037the
COMAND controller.
If there is no existing home address,
COMAND saves the entry. You will see a
message and then the address menu with
the selected address. Start is highlighted
automatically.
If a home address has already been stored,
you will see a prompt asking you whether
the My Address entry should be
overwritten.
X Select Yes or
No and press
0037to confirm.
If you select Yes , COMAND overwrites the
destination. You will see a message and
then the address menu with the selected
address. Start is highlighted
automatically.
If you select No , the list will appeara
gain.104
Destination memoryNavigation
Page 132 of 274
list. In this case, start a new search to
update the Bluetooth
®
telephone list.
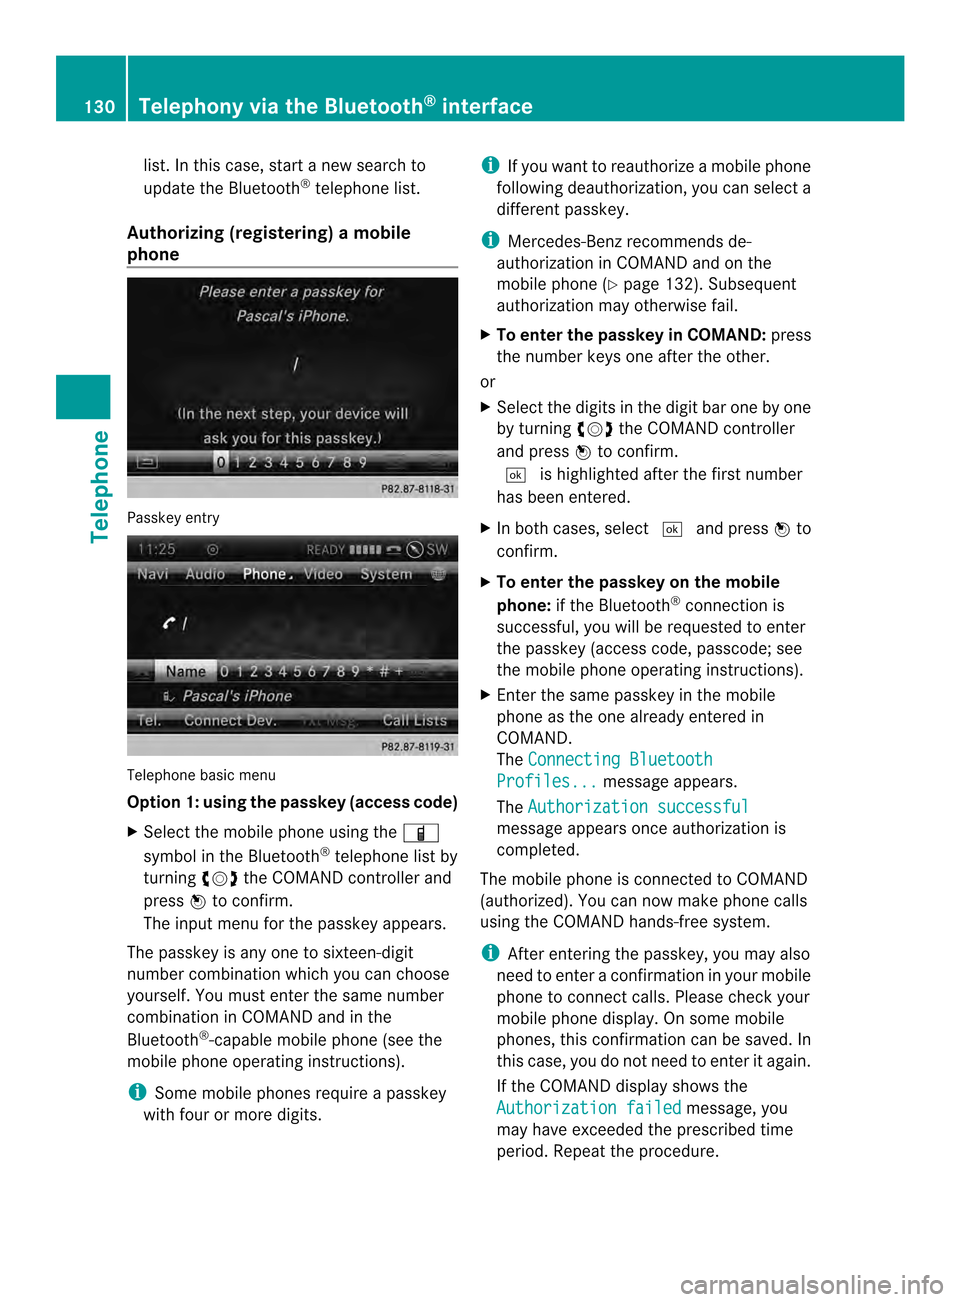
Authorizing (registering) amobile
phone Passkey entry
Telephone basic menu
Option 1: using the passkey (access code)
X
Select the mobile phone usin gthe 000D
symbol in the Bluetooth ®
telephone list by
turning 003C0012003Dthe COMAND controller and
press 0037to confirm.
The input menu for the passkey appears.
The passkey is any one to sixteen-digit
number combination which you can choose
yourself. You must enter the same number
combination in COMAND and in the
Bluetooth ®
-capable mobile phone (see the
mobile phone operating instructions).
i Some mobile phones require a passkey
with four or more digits. i
If you want to reauthorize a mobile phone
following deauthorization, you can select a
different passkey.
i Mercedes-Ben zrecommends de-
authorization in COMAND and on the
mobile phone ( Ypage 132). Subsequent
authorization may otherwise fail.
X To enter the passkey in COMAND: press
the number keys one after the other.
or
X Select the digits in the digit bar one by one
by turning 003C0012003Dthe COMAND controller
and press 0037to confirm.
0004 is highlighted after the first number
has been entered.
X In both cases, select 0004and press 0037to
confirm.
X To enter the passkey on the mobile
phone: if the Bluetooth ®
connection is
successful, you will be requested to enter
the passkey (access code, passcode; see
the mobile phone operating instructions).
X Enter the same passkey in the mobile
phone as the one already entered in
COMAND.
The Connecting Bluetooth Profiles... message appears.
The Authorization successful message appears once authorization is
completed.
The mobile phone is connected to COMAND
(authorized). You can now make phone calls
using the COMAND hands-free system.
i After entering the passkey, you may also
need to enter a confirmation in your mobile
phone to connectc alls. Please check your
mobile phone display. On som emobile
phones, this confirmation can be saved. In
this case, you do not need to enter it again.
If the COMAND display shows the
Authorization failed message, you
may have exceeded the prescribed time
period. Repeat the procedure. 130
Telephony via the Bluetooth ®
interfaceTelephone
Page 142 of 274
Sym
bol Explanation
0004
Entry that has been imported from
the memory card or USB device
000A
Entry imported via the Bluetooth
®
interface Searching for a phone book entry
Using the character bar You determine the first letter of the entry you
are looking for with the first character you
enter.
X Select a character by turning 003C0012003Dthe
COMAND Controller and press 0037to
confirm.
The first entry in the list that starts with the
letter selected is highlighted. If there are
similar entries, the next different character
is shown. For example, with entries such as
Christel and
Christine , the beginnings
of the names are similar. In this case, you
will be offered a choice between E and
I .
X Select the characters of the entry you are
searching for one by one and press 0037to
confirm.
When the selection is clear, COMAND
switches automatically to the selection list.
X To complete the search: slide00120036the
COMAND controller repeatedly or press
and hold 0037until the character bar
disappears.
The selection list appears.
Information about character entry
(Y page 34) Using the number keypad You determine the first letter of the entry you
are looking for with the first character you
enter.
X
Press the appropriate number keys as
many times as necessary and one after the
other.
Further information on character entry using
the number keypad (direct entry)
(Y page 36).
Directly from the list You can switch to the list at any time during
character entry.
X
Slide 00120036the COMAND controller
repeatedly or press and hold 0037until the
character bar disappears.
or
X Select 0004and press 0037to confirm.
X To selecta n entry:turn003C0012003D the
COMAND controller until the desired entry
is highlighted and press 0037to confirm.
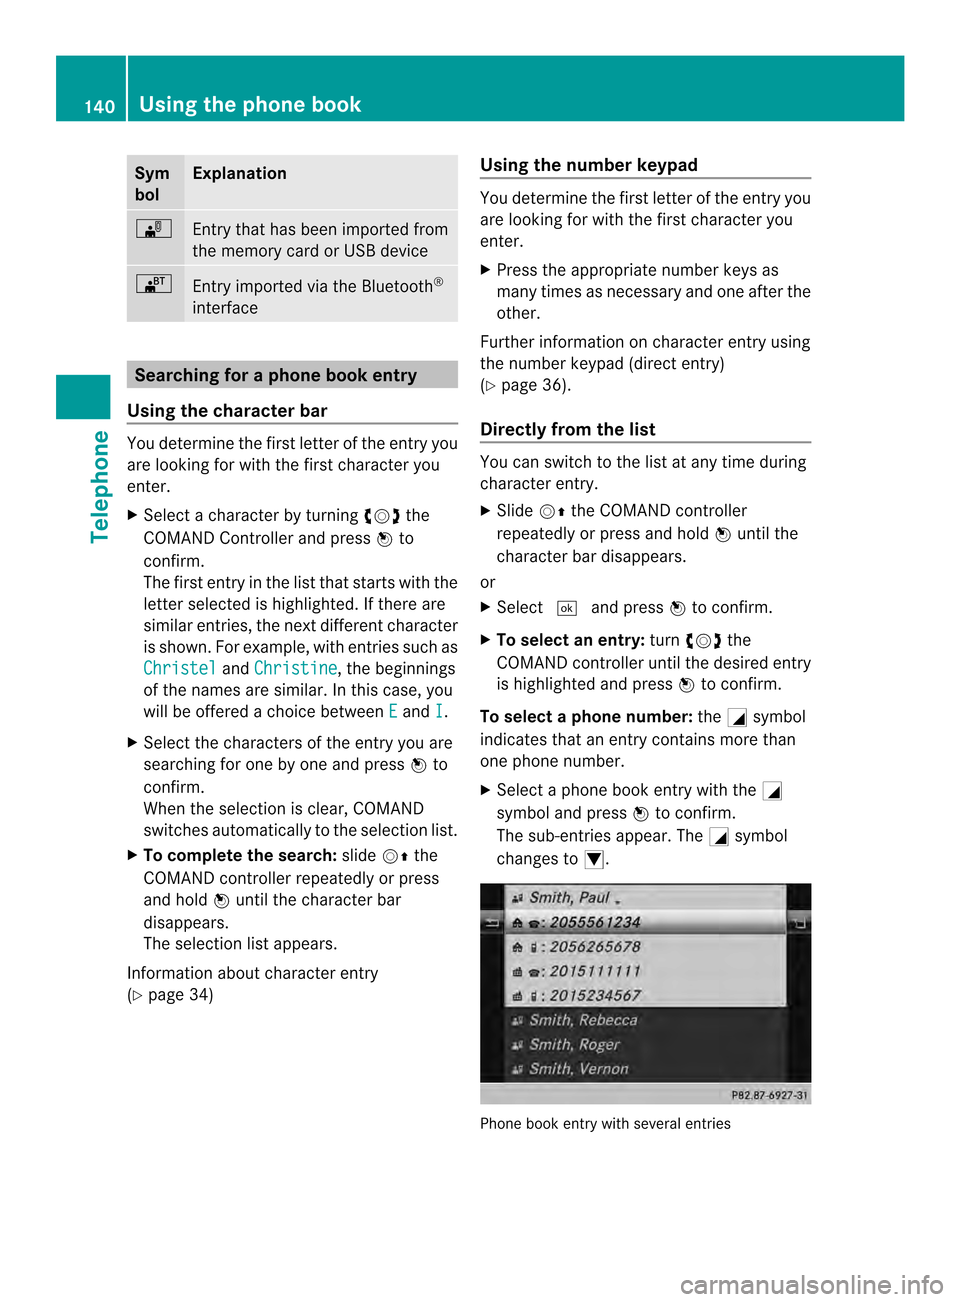
To select aphone number: the0002symbol
indicates that an entry contains more than
one phone number.
X Select a phone book entry with the 0002
symbol and press 0037to confirm.
The sub-entries appear. The 0002symbol
changes to 0003. Phone book entry with several entries140
Using the phone bookTelephone
Page 143 of 274
X
Select a sub-entry by turning 003C0012003Dand
press 0037to confirm.
X To return to the phone book using the
character bar: select0024in the list and
press 0037to confirm.
or
X Press the 000Aback button. Displaying details for an entry
X Select an entry in the selection list by
turning 003C0012003Dthe COMAND controller.
X Select the list symbol to the right of the
entry by sliding 00120035the COMAND
controlle rand press 0037to confirm.
X Select Details and press
0037to confirm.
The detailed view appears.
X To close the detailed display: slide
003400120035 repeatedly until the entry is
highlighted again.
or
X Press the 000Aback button. Deleting an entry from the phone
book
If the entry contains only phone numbers, it
is deleted from the phone book and address
book.
If it contains additional data, such as a
navigable destination, the entry is deleted in
the phone book. However, the entry is
retained in the address book.
X Select an entry in the selection list by
turning 003C0012003Dthe COMAND controller.
X Select the list symbol to the right of the
entry by sliding 00120035the COMAND
controller and press 0037to confirm.
X Select Delete and press
0037to confirm.
Ap rompt appears asking whethe rthe entry
should be deleted. X
Select Yes or
No and press
0037to confirm.
If you select Yes , the entry is deleted in
accordance with the rules described above.
If you select No , the process will be
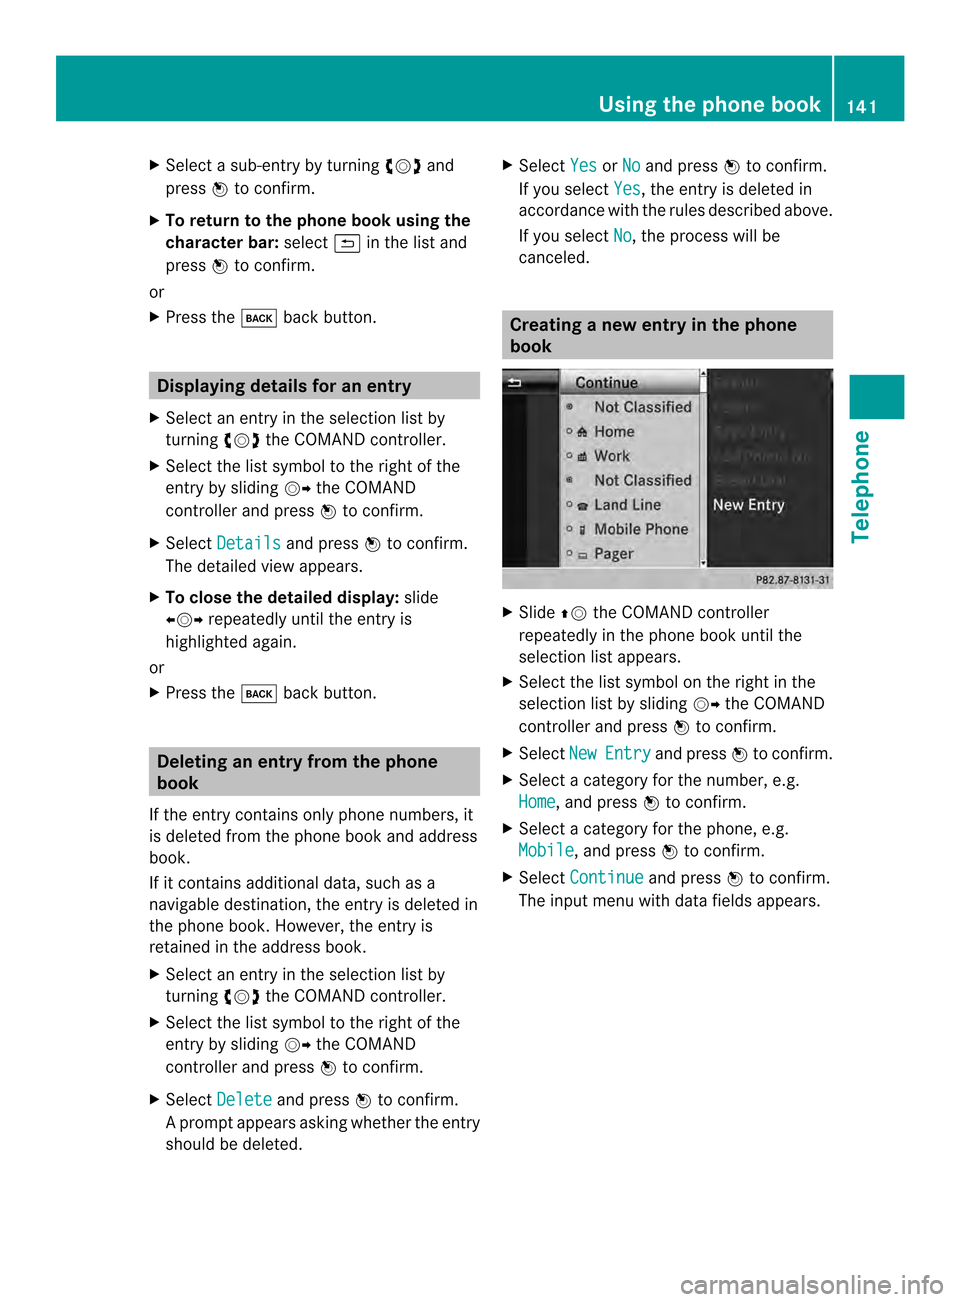
canceled. Creating a new entry in the phone
book
X
Slide 00360012the COMAND controller
repeatedly in the phone book until the
selection list appears.
X Select the list symbol on the right in the
selection list by sliding 00120035the COMAND
controller and press 0037to confirm.
X Select New Entry and press
0037to confirm.
X Select a category for the number, e.g.
Home , and press
0037to confirm.
X Select a category for the phone, e.g.
Mobile , and press
0037to confirm.
X Select Continue and press
0037to confirm.
The input menu with data fields appears. Using the phone book
141Telephone Z
Page 144 of 274
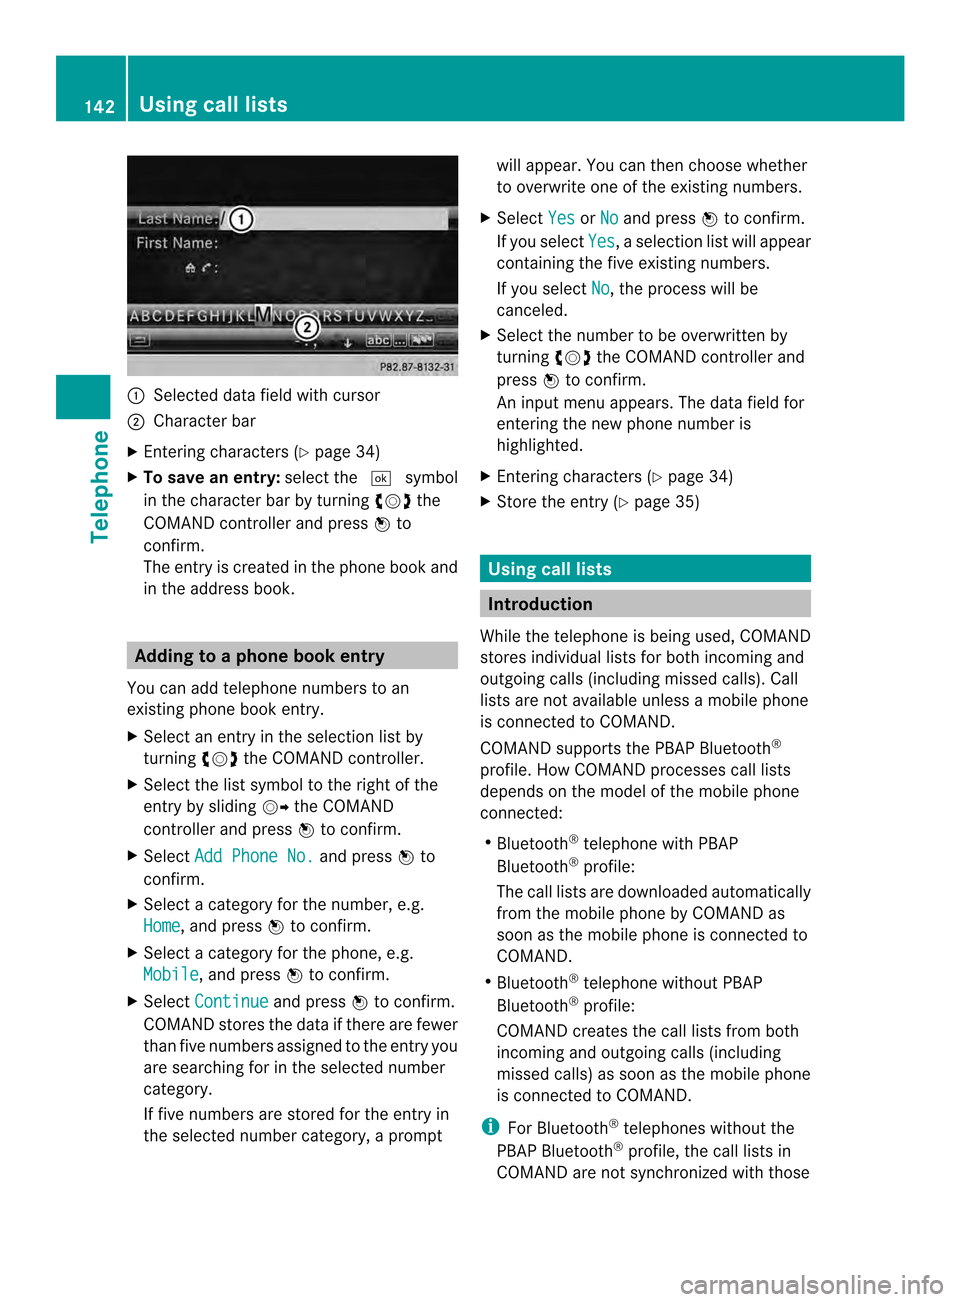
0001
Selected data field with cursor
0002 Character bar
X Entering characters ( Ypage 34)
X To save an entry: select the0004symbol
in the character bar by turning 003C0012003Dthe
COMAND controlle rand press 0037to
confirm.
The entry is created in the phone book and
in the address book. Adding to a phone book entry
You can add telephone numbers to an
existing phone book entry.
X Select an entry in the selection list by
turning 003C0012003Dthe COMAND controller.
X Select the list symbol to the right of the
entry by sliding 00120035the COMAND
controller and press 0037to confirm.
X Select Add Phone No. and press
0037to
confirm.
X Select a category for the number, e.g.
Home , and press
0037to confirm.
X Select a category for the phone, e.g.
Mobile , and press
0037to confirm.
X Select Continue and press
0037to confirm.
COMAND stores the data if there are fewer
tha nfive numbers assigned to the entry you
are searching for in the selected number
category.
If five numbers are stored for the entry in
the selected number category, a prompt will appear. You can the
nchoose whether
to overwrite one of the existing numbers.
X Select Yes or
No and press
0037to confirm.
If you select Yes , a selection list will appear
containing the five existing numbers.
If you select No , the process will be
canceled.
X Select the number to be overwritten by
turning 003C0012003Dthe COMAND controller and
press 0037to confirm.
An input menu appears. The data field for
entering the new phone number is
highlighted.
X Entering characters (Y page 34)
X Store the entry( Ypage 35) Using call lists
Introduction
While the telephone is being used, COMAND
stores individual lists for both incoming and
outgoing calls (including missed calls). Call
lists are not available unless a mobile phone
is connected to COMAND.
COMAND supports the PBAP Bluetooth ®
profile. How COMAND processes call lists
depends on the model of the mobile phone
connected:
R Bluetooth ®
telephone with PBAP
Bluetooth ®
profile:
The call lists are downloaded automatically
from the mobile phone by COMAND as
soon as the mobile phone is connected to
COMAND.
R Bluetooth ®
telephone without PBAP
Bluetooth ®
profile:
COMAND creates the call lists from both
incoming and outgoing calls (including
missed calls) as soon as the mobile phone
is connected to COMAND.
i For Bluetooth ®
telephones without the
PBAP Bluetooth ®
profile, the call lists in
COMAND are not synchronized with those 142
Using call listsTelephone