2014 MERCEDES-BENZ CL-Class light
[x] Cancel search: lightPage 236 of 274

you may be able to influence events by
selecting and triggering actions. The type and
number of actions depend on the DVD.
X
Selec tanaction by sliding 003600120008or003400120035 the
COMAND controlle rand press 0037to
execute it.
A menu appears and the first entry,
Select , is highlighted.
X Press 0037the COMAND controller. AUX video mode
Connecting external video sources
External video sources may have different
volumes, which can mea nthat system
messages such as traffic announcements and
navigation system announcements are much
louder. If necessary, deactivate the system
messages or adjust their volume manually.
If your vehicle is equipped with Media
Interface, you can connect an external video
source (AUX video) (Y page 219).
The 1/8 inch audio/video jacks are in the
center console stowage compartment.
i In vehicles with a rear view camera, the
AUX video jack cannot be used for external
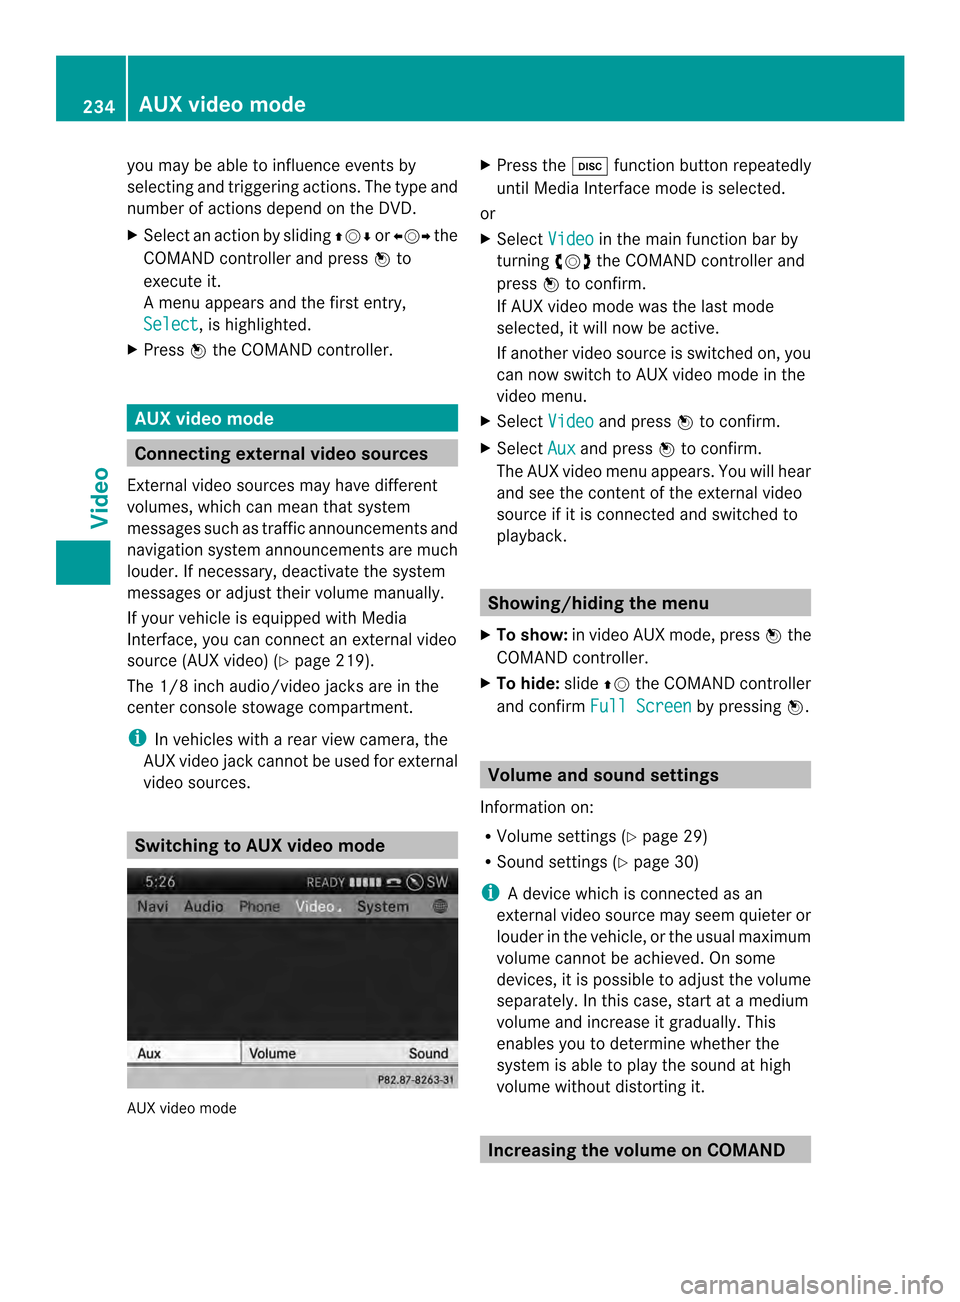
video sources. Switching to AUX video mode
AUX video mode X
Press the 0007function button repeatedly
until Media Interface mode is selected.
or
X Select Video in the main function bar by
turning 003C0012003Dthe COMAND controller and
press 0037to confirm.
If AUX video mode was the last mode
selected, it will now be active.
If another video source is switched on, you
can now switch to AUX video mode in the
video menu.
X Select Video and press
0037to confirm.
X Select Aux and press
0037to confirm.
The AUX video menu appears. You will hear
and see the content of the external video
source if it is connected and switched to
playback. Showing/hiding the menu
X To show: in video AUX mode, press 0037the
COMAND controller.
X To hide: slide00360012the COMAND controller
and confirm Full Screen by pressing
0037. Volume and sound settings
Information on:
R Volume settings (Y page 29)
R Sound settings (Y page 30)
i Adevice which is connected as an
external video source may seem quieter or
louder in the vehicle, or the usual maximum
volume cannot be achieved. On some
devices, it is possible to adjust the volume
separately. In this case, start at a medium
volume and increase it gradually .This
enables you to determine whether the
system is able to play the sound at high
volume without distorting it. Increasing the volume on COMAND234
AUX video modeVideo
Page 241 of 274

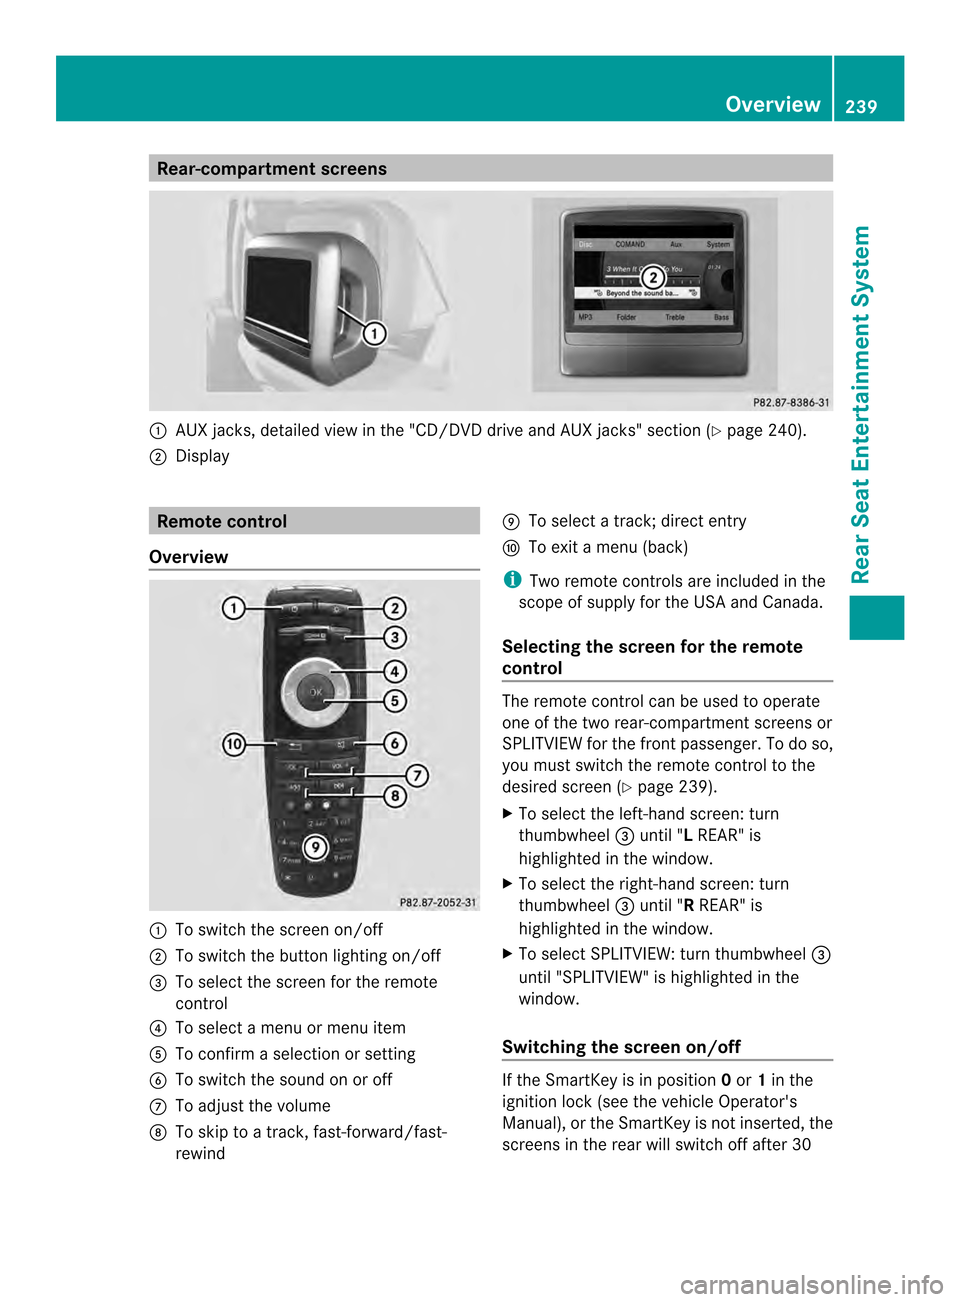
Rear-compartment screens
0001
AUX jacks, detailed view in the "CD/DVD drive and AUX jacks" section (Y page 240).
0002 Display Remote control
Overview 0001
To switch the screen on/off
0002 To switch the button lighting on/off
0014 To select the screen for the remote
control
0013 To select a menu or menu item
0011 To confirm a selection or setting
0012 To switch the sound on or off
0005 To adjust the volume
0006 To skip to a track, fast-forward/fast-
rewind 0007
To select a track; direct entry
0008 To exi tamenu (back)
i Two remote controls are included in the
scope of supply for the USA and Canada.
Selecting the screen for the remote
control The remote control can be used to operate
one of the two rear-compartment screens or
SPLITVIEW for the front passenger. To do so,
you must switch the remote control to the
desired screen (Y
page 239).
X To select the left-hand screen: turn
thumbwheel 0014until "L REAR" is
highlighted in the window.
X To select the right-hand screen: turn
thumbwheel 0014until "R REAR" is
highlighted in the window.
X To select SPLITVIEW: turn thumbwheel 0014
until "SPLITVIEW" is highlighted in the
window.
Switching the screen on/off If the SmartKey is in position
0or 1in the
ignitio nlock (see the vehicle Operator's
Manual), or the SmartKey is not inserted, the
screens in the rear will switch off after 30 Overview
239Rear Seat Entertainment System Z
Page 242 of 274

minutes. Before the screens switch off, they
show a message to this effect.
You can switch the screens back on.
However, this will discharge the starter
battery.
X
Point the remote control at the rear-
compartment screen which has been
selected for remote operation.
X Press button 0001on the remote control
(Y page 239).
The respective rear-compartment screen
switches on or off.
i You can only switch the screens on using
the remote control if the ignition is
switched on.
Switching the button lighting on/off X
Press button 0002on the remote control
(Y page 239).
Depending on the previous status, the
button lighting is switched on or off.
i If you do not use the remote control for
about 15 seconds, the button lighting
switches off automatically.
Switching the sound on or off X
Press button 0012on the remote control
(Y page 239).
The sound is switched on/off.
Selecting amenu/menu item and
confirming your selection X
Select a menu/menu item using the
0006000A0008 buttons on the
remote control and press the 0016button to
confirm. CD/DVD drive and AUX jacks
0001
CD/DVD slot
0002 AUX, right-hand (R) jac kfor audio signal
(red)
0014 AUX, left-hand (L) jack for audio signal
(white)
0013 AUX, video (V) jack (yellow)
0011 CD/DVD eject button
The AUX jacks shown are for the AUX drive.
Identical jacks can be found on the right-hand
side of the rear-compartment screens (AUX
display) (Y page 239).240
OverviewRear Seat Entertainment System
Page 245 of 274

H
Environmental note
Dispose of discharged batteries in an
environmentally responsible manner.
Batteries are required for the remote control
and for the two sets of cordless headphones.
The batteries can be replaced (Y page 242).
On the remote control 0001
Battery compartment
0002 Catch tab
0014 Battery compartment cover
0013 Retaining lugs
0011 Batteries
The remote control contains 2 type AAA,
1.5 V batteries.
X To open the battery compartment:
remove battery compartment cover 0014on
the back of the remote control.
X To do so, press down retaining lug 0002and
take off battery compartment cover 0014.
X Remove discharged batteries 0011from the
tray.
X Inser tthe new batteries. Observe the
polarity markings on the batteries and
battery compartmentw hen doing so.
Left-hand battery: the positive pole (+)
must face upwards. Right-hand battery: the positive pole (+)
must face downwards.
X To close the battery compartment:
insert battery compartment cover 0014
starting with retaining lugs 0013into the
battery compartment and allow catch
tab 0002to engage in place.
On the cordless headphones 0001
Battery compartment cover
The cordless headphones contain two type
AAA,1 .5 V batteries.
X To open the battery compartment: flip
battery compartment cover 0001upwards.
As you do so, hold the left-hand side of the
headphones as shown to prevent the
batteries from falling out.
X Remove the discharged batteries from the
tray.
X Insert the new batteries. Observe the
polarity markings on the batteries and
battery compartment when doing so.
Left-hand battery :the positive pole (+)
must face upwards.
Right-hand battery: the positive pole (+)
must face downwards.
X To close the battery compartment:
press battery compartment cover
downwards until it engages into place.
If the batteries have been inserted
correctly, the indicator lamp will light up
green when the headphones are switched
on. Overview
243Rear Seat Entertainment System Z
Page 248 of 274

X
Select Settings using the
0009button
and press 0016to confirm.
X Select Language using the
00080009
buttons and press the 0016button to confirm.
The list of languages appears .A0027dot
indicates the current setting.
X Select a language using the 00080009
buttons and press the 0016button to confirm.
The Rear Seat Entertainment System
activates the selected language. Switching the displa
ydesign
X Select Settings using the
0009button
and press 0016to confirm.
X Select Day Mode ,
Night Mode or
Automatic using the
00080009 buttons
and press the 0016button to confirm.
The dot indicates the curren tsetting. Design Explanation
Day Mode The display is set
permanently to day
design.
Night Mode The display is set
permanently to night
design.
Automatic The display design
changes depending on
the vehicle instrument
cluster illumination.
Setting the brightness
X Select Settings using the
0009button
and press 0016to confirm.
X Select Brightness using the
00080009
buttons and press the 0016button to confirm.
As cale appears. X
Adjust the brightness using the 00080009
buttons and press the 0016button to confirm.
The brightness ba rmoves up or down. The
picture becomes lighter or darker in
accordance with the scale. Showing/hiding the picture
X To hide the picture: selectDisplay Off in the system menu using the
0009000A
buttons on the remote control and press
the 0016button to confirm.
The picture is hidden.
X To display the picture: press the0016
button. CD/audio DVD and MP3 mode
Important safety notes
G
WARNING
The CD/DVD drive is a class 1laser product.
If you open the CD/DV Ddrive housing, you
could be exposed to invisible laser radiation.
This laser radiation could damage yourr etina.
There is a risk of injury.
Never open the housing. Always have
maintenance and repair work carried out at a
qualified specialist workshop. General notes
You will find information on the following
topics in the Audio section:
R notes on CDs/DVDs (Y page 206)
R notes on MP3 mode (Y page 204)
R notes on copyright (Y page 205)246
CD/audio DVD and MP3 modeRear Seat Entertainment System
Page 252 of 274

X
To switch to the superordinate folder:
select symbol 0001using the 00080009
buttons on the remote control and press
the 0016button to confirm.
The display shows the next folde rup. 0001
Folder selection symbol
0002 Folder symbol
X Select a folder using the 00080009buttons
and press the 0016button to confirm.
You will see the tracks in the folder.
X Select a trac kusing the 00080009 buttons
and press the 0016button to confirm.
The track is played and the corresponding
folder is now the active folder. Pause function
This function is only available in audio DVD
mode.
X To pause playback: select0009using
the 00090006000A buttons on the remote
control and press the 0016button to confirm.
The 0009 display changes to 0004.
X To continue playback: select0004and
press the 0016button to confirm.
The 0004 display changes to 0009.Stop function
This function is only available in audio DVD
mode. X
To interrupt playback: select0014using
the 00090006000A buttons on the remote
control and press the 0016button to confirm.
The 0009 display changes to 0004.
X To continue playback: select0004and
press the 0016button to confirm.
Playback continues from the point where it
was interrupted.
X To stop playback: while playback is
interrupted, select 0014againa nd press
the 0016button to confirm.
Playback stops and returns to the
beginning of the DVD. 0004is highlighted.
X To restart playback: select0004and
press the 0016button to confirm.
Playback starts from the beginning of the
DVD. Setting the audio format
Further information on audio formats is
available in the "Audio" section
(Y page 203).
X Select DVD-A using the
00090006000A
buttons on the remote control and press
0016 to confirm.
X Select Group using the
00080009 buttons
and press the 0016button to confirm.
The list of available audio formats appears.
The 0027dot indicates the format currently
selected.
X Select an audio format using the
00080009 buttons and press the 0016button
to confirm.
X To exit the menu: press the0006
or 000A button. Playbac
koptions
Further information on playback options is
available in the "Audio" section
(Y page 204). 250
CD/audio DVD and MP3 modeRear Seat Entertainment System
Page 255 of 274

X
To paus eplayback: select0009and press
the 0016button to confirm.
The 0009 display changes to 0004.
X To continue playback: select0004and
press the 0016button to confirm.
The menu is hidden. Stop function
X To show the menu: press the0016button
on the remote control.
or
X Select Menu while the navigation menu is
shown and press the 0016button to confirm.
X To interrupt playback: select0014and
press the 0016button to confirm.
The 0009 display changes to 0004.The
video image is hidden.
X To continue playback: select0004and
press the 0016button to confirm.
Playback continues from the point where it
was interrupted. The menu is hidden.
X To stop playback: while playback is
interrupted, select 0014again and press
the 0016button to confirm.
Playback stops and returns to the
beginning of the DVD. 0004is highlighted.
X To restart playback: select0004and
press the 0016button to confirm.
Playback starts from the beginning of the
DVD. Selecting
ascene/chapter
General notes Observe the information on DV
Dvideo mode
(Y page 231). Skipping forwards/backwards X
Press the 0006or000A button on the
remote control.
or
X Press the 0001or0002 button.
The navigation menu (Y page 230)appears
for approximately eight seconds.
Selecting ascene/chapter directly These examples illustrate how to select
scene/chapter 5.
X
Option 1: while the film is playing, press
the 0018 button on the remote control.
X Press the corresponding number key, such
as 5.
X Option 2: while the film is playing, press
the 0016button on the remote control and
show the menu.
X Select DVD-Video and press the
0016button
to confirm.
X Select DVD Functions and press the
0016
button to confirm.
X Select Scene Selection and press the
0016 button to confirm.
X Select 5 using the
0008or0009 buttonand
press the 0016button to confirm.
In both cases, playback will begi nfrom the
fifth scene/chapter after a brie fpause. Selecting
afilm/title
Option 1:
X Press the 0016button on the remote control
and show the menu.
X Select DVD-Video and press the
0016button
on the remote control to confirm. Video DVD mode
253Rear Seat Entertainment System Z
Page 258 of 274

remote control and press the
0016button to
execute it.
A menu appears and the first entry,
Select , is highlighted.
X Press the 0016button. Operation with an active COMAND
source
Switching the function on/off in
COMAND
You can transfer an audio or video source
selected in COMAND to the RearS eat
Entertainment System. If you subsequently
switch modes in COMAND, the new source
will not be transmitted to the Rear Seat
Entertainment System.
X To switch on the function in COMAND:
switch to the desired audio mode in
COMAND, e.g. CD mode (Y page 197), or
show the menu in video DVD mode
(Y page 230).
X Select the menu item at the bottom left,
e.g. CD in audio CD mode, by sliding
00120008
and turning 003C0012003Dthe COMAND controller
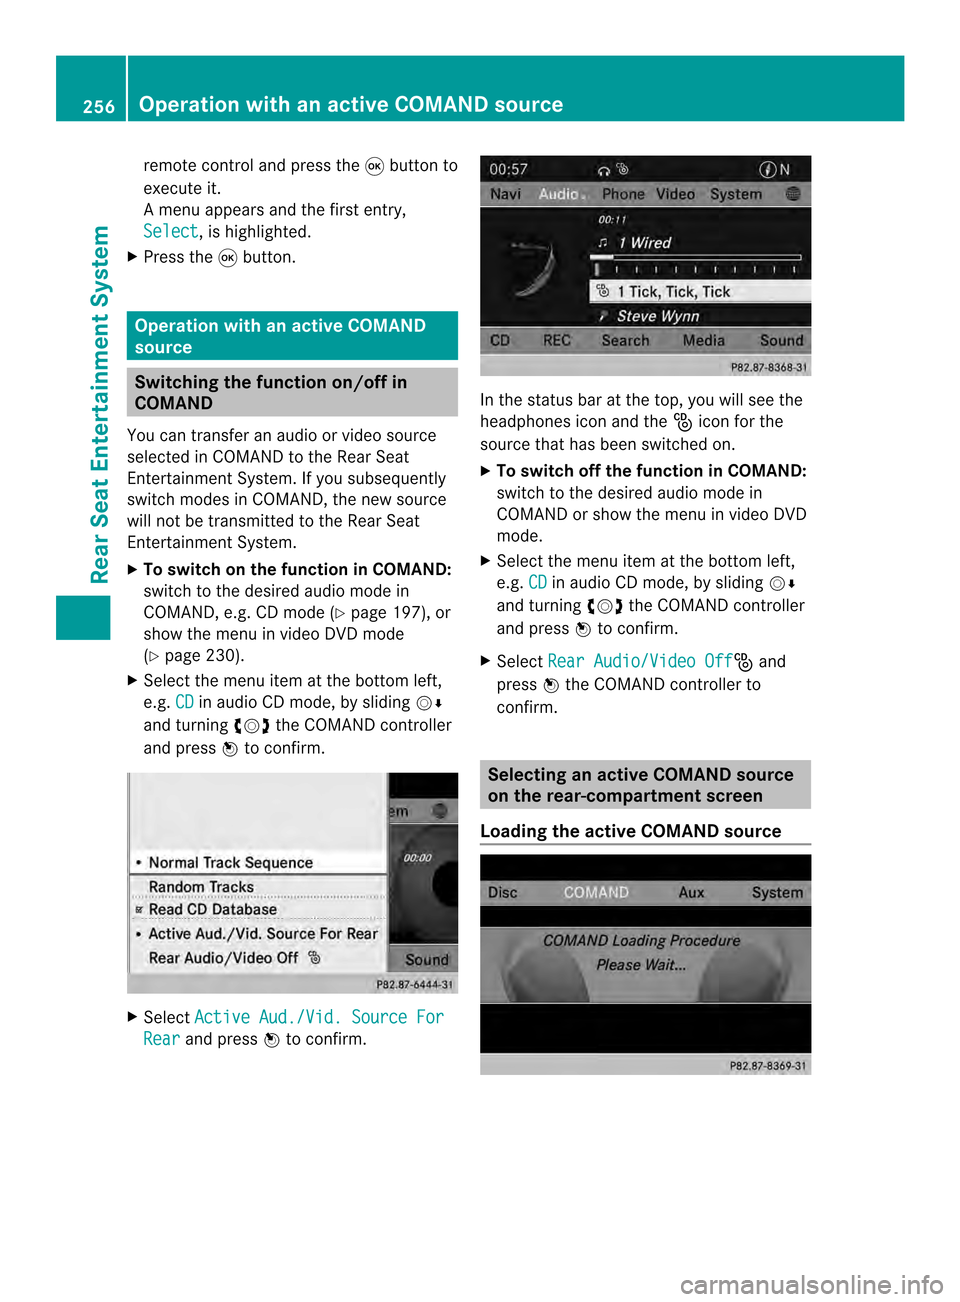
and press 0037to confirm. X
Select Active Aud./Vid. Source For Rear and press
0037to confirm. In the status bar at the top, you will see the
headphones icon and the
_icon for the
source that has been switched on.
X To switch off the function in COMAND:
switch to the desired audio mode in
COMAND or show the menu in video DVD
mode.
X Select the menu item at the bottom left,
e.g. CD in audio CD mode, by sliding
00120008
and turning 003C0012003Dthe COMAND controller
and press 0037to confirm.
X Select Rear Audio/Video Off _
and
press 0037the COMAND controller to
confirm. Selecting an active COMAND source
on the rear-compartment screen
Loading the active COMAND source 256
Operation with an active COMAND sourceRear Seat Entertainment System