2014 MERCEDES-BENZ CL-Class remote start
[x] Cancel search: remote startPage 12 of 274

Adjusting the brightness
................245
Adjusting the color ........................245
Adjusting the contrast ...................245
AUX mode ...................................... 258
CD/DVD audio and MP3 mode ...... 246
Changing the batteries ..................242
Changing the picture format ..........245
Cordles sheadphones .................... 241
Multipl eusers ................................ 244
Operating with the headphones .....244
Picture settings .............................. 245
System settings ............................. 245
Using the mai nloudspeaker ..........244
Video DVD mode ........................... 251
Rear view camera
Displaying the image ........................ 55
Receiving vCards ............................... 155
Redialing (telephone) ........................135
Remote control Button lighting ............................... 240
Rear Seat Entertainment System ...239
Rese tfunction ..................................... 47
Resetting (factory settings) ...............47
Route Estimated time of arrival ..................94
Route (navigation)
Calling up the "Routes" menu ..........96
Displaying the distance to the
destination ....................................... 94
Recording ........................................ 95
Route overview ................................ 94
Selecting an alternative route ..........93
Setting route options (avoiding:
highways, toll roads, tunnels,
ferries) ............................................. 62
Setting the route type (short
route, fast route, dynamic route or
economic route) ............................... 62
Starting calculation ..........................69
Route demonstration ..........................95
Route guidance Canceling ......................................... 92
Continuing ....................................... 92
Destination reached ......................... 92
General notes .................................. 88
Lane recommendations ...................90
Off-road ........................................... 97
Traffi creports .................................. 99 S
Safety notes Audio CD/DVD and MP3 mode .....193
Using the telephone ....................... 126
Video DVD mode ........................... 228
SatRadio
Displaying information ...................193
Notes ............................................. 188
Registering .................................... 189
Selecting acategor y...................... 190
Switching to ................................... 189
Saving the crosshair position ..........109
Screen Selecting for remote operation ......239
SD memory card
Ejecting .......................................... 197
Inserting ........................................ 197
Searc h&Send...................................... 87
Seats Activ emulticontour seat ..................52
Adjusting the lumba rsupport
(COMAND )....................................... 53
Balance (sea theating) ..................... 54
Multicontour sea t............................ 52
Resetting settings ............................ 55
Seat functions (COMAND) ...............52
Selecting for adjustment
(COMAND) ....................................... 52
Selecting aprovince ........................... 64
Selecting astate .................................. 64
Selecting stations Radi o............................................. 186
Sending DTMF tones .........................136
Settings Menu overview ................................. 22
Picture (COMAND) .........................228
Sound settings ................................. 30
Setting the audio format
Rear Seat Entertainment System ...255
Setting the language
COMAND ......................................... 45
Rear Seat Entertainment System ...255
Setting the night design .....................42
Setting the text reader speed ............44
Setting the volume Telephone call s................................ 30
Video AUX ..................................... 23410
Index
Page 222 of 274

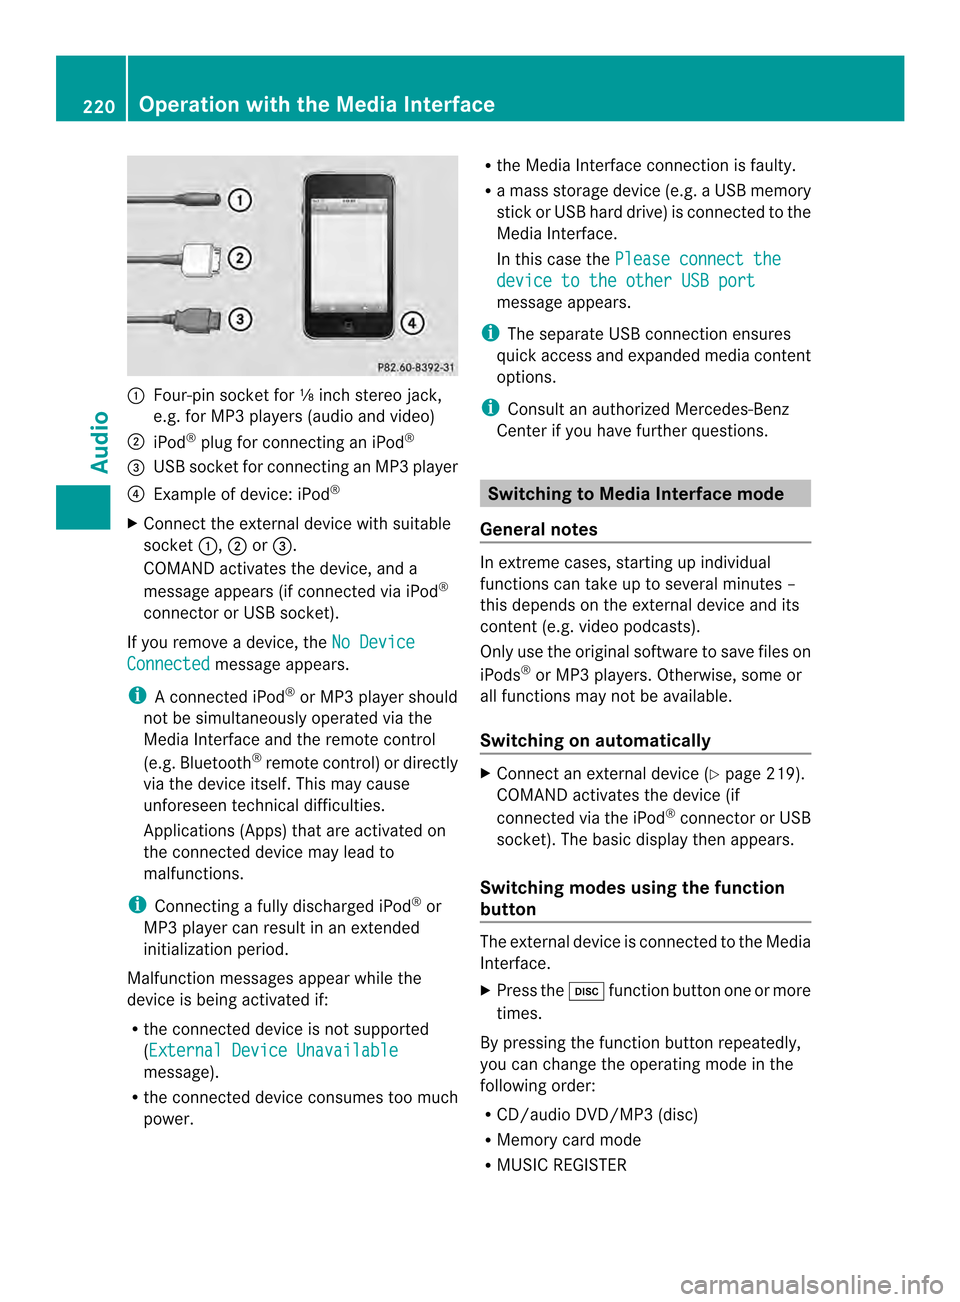
0001
Four-pin socket for ⅛ inch stereo jack,
e.g. for MP3 players (audio and video)
0002 iPod ®
plug for connecting an iPod ®
0014 USB socket for connecting an MP3 player
0013 Example of device: iPod ®
X Connect the external device with suitable
socket 0001,0002or0014.
COMAND activates the device, and a
message appears (i fconnected via iPod ®
connector or USB socket).
If you remove a device, the No DeviceConnected message appears.
i A connected iPod ®
or MP3 players hould
not be simultaneously operated via the
Media Interface and the remote control
(e.g. Bluetooth ®
remote control) or directly
via the device itself. This may cause
unforeseen technical difficulties.
Applications (Apps) that are activated on
the connected device may lead to
malfunctions.
i Connecting a fully discharged iPod ®
or
MP3 player can result in an extended
initialization period.
Malfunction messages appearw hile the
device is being activated if:
R the connected device is not supported
(External Device Unavailable message).
R the connected device consumes too much
power. R
the Media Interface connection is faulty.
R a mass storage device (e.g. a USB memory
stick or USB hard drive) is connected to the
Media Interface.
In this case the Please connect the device to the other USB port
message appears.
i The separate USB connection ensures
quick access and expanded media content
options.
i Consult an authorized Mercedes-Benz
Center if you have further questions. Switching to Media Interface mode
General notes In extreme cases, starting up individual
functions can take up to several minutes –
this depends on the external device and its
content (e.g. video podcasts).
Only use the original software to save files on
iPods
®
or MP3 players. Otherwise, some or
all functions may not be available.
Switching on automatically X
Connect an external device (Y page 219).
COMAND activates the device (if
connected via the iPod ®
connector or USB
socket). The basic display then appears.
Switching modes using the function
button The external device is connected to the Media
Interface.
X
Press the 0007function button one or more
times.
By pressing the function button repeatedly,
you can change the operating mode in the
following order:
R CD/audio DVD/MP3 (disc)
R Memory card mode
R MUSIC REGISTER 220
Operation with the Media InterfaceAudio
Page 242 of 274

minutes. Before the screens switch off, they
show a message to this effect.
You can switch the screens back on.
However, this will discharge the starter
battery.
X
Point the remote control at the rear-
compartment screen which has been
selected for remote operation.
X Press button 0001on the remote control
(Y page 239).
The respective rear-compartment screen
switches on or off.
i You can only switch the screens on using
the remote control if the ignition is
switched on.
Switching the button lighting on/off X
Press button 0002on the remote control
(Y page 239).
Depending on the previous status, the
button lighting is switched on or off.
i If you do not use the remote control for
about 15 seconds, the button lighting
switches off automatically.
Switching the sound on or off X
Press button 0012on the remote control
(Y page 239).
The sound is switched on/off.
Selecting amenu/menu item and
confirming your selection X
Select a menu/menu item using the
0006000A0008 buttons on the
remote control and press the 0016button to
confirm. CD/DVD drive and AUX jacks
0001
CD/DVD slot
0002 AUX, right-hand (R) jac kfor audio signal
(red)
0014 AUX, left-hand (L) jack for audio signal
(white)
0013 AUX, video (V) jack (yellow)
0011 CD/DVD eject button
The AUX jacks shown are for the AUX drive.
Identical jacks can be found on the right-hand
side of the rear-compartment screens (AUX
display) (Y page 239).240
OverviewRear Seat Entertainment System
Page 245 of 274

H
Environmental note
Dispose of discharged batteries in an
environmentally responsible manner.
Batteries are required for the remote control
and for the two sets of cordless headphones.
The batteries can be replaced (Y page 242).
On the remote control 0001
Battery compartment
0002 Catch tab
0014 Battery compartment cover
0013 Retaining lugs
0011 Batteries
The remote control contains 2 type AAA,
1.5 V batteries.
X To open the battery compartment:
remove battery compartment cover 0014on
the back of the remote control.
X To do so, press down retaining lug 0002and
take off battery compartment cover 0014.
X Remove discharged batteries 0011from the
tray.
X Inser tthe new batteries. Observe the
polarity markings on the batteries and
battery compartmentw hen doing so.
Left-hand battery: the positive pole (+)
must face upwards. Right-hand battery: the positive pole (+)
must face downwards.
X To close the battery compartment:
insert battery compartment cover 0014
starting with retaining lugs 0013into the
battery compartment and allow catch
tab 0002to engage in place.
On the cordless headphones 0001
Battery compartment cover
The cordless headphones contain two type
AAA,1 .5 V batteries.
X To open the battery compartment: flip
battery compartment cover 0001upwards.
As you do so, hold the left-hand side of the
headphones as shown to prevent the
batteries from falling out.
X Remove the discharged batteries from the
tray.
X Insert the new batteries. Observe the
polarity markings on the batteries and
battery compartment when doing so.
Left-hand battery :the positive pole (+)
must face upwards.
Right-hand battery: the positive pole (+)
must face downwards.
X To close the battery compartment:
press battery compartment cover
downwards until it engages into place.
If the batteries have been inserted
correctly, the indicator lamp will light up
green when the headphones are switched
on. Overview
243Rear Seat Entertainment System Z
Page 251 of 274

is shorter, it will skip to the start of the
previous track.
If the Random Tracks or
Random Folder playback option has been selected, the
track order is random.
Selecting by track list In audio CD mode, the track list contains all
tracks on the disc currently playing.
In audio DV
Dmode, the track list contains all
tracks in the currently active group; see
"Setting the audio format" (Y page 203).
In MP3 mode, the track list shows all tracks
in the currently active folder as well as the
folder structure, allowing you to select any
track on the MP3 CD.
X Select Tracks (audio CD/DVD mode) or
Folder (MP3 mode) using
the 00090006000A buttons on the remote
control, and confirm by pressing the 0016
button.
or
X Press the 0016button when the display/
selection window is active.
The track list appears. The 0027dot indicates
the current track.
X Select a track using the 00080009buttons
and press the 0016button to confirm.
Making aselection by entering the track
number directly X
Press the 0018button on the remote
control.
The track entry display appears.
Example: track 2
X Press number button 2.
Example: track 12
X Press the corresponding number keys in
rapid succession. X
Wait for approximately three seconds after
making the entry.
You will hear the track which has been
entered .The corresponding basic menu
then reappears.
i It is not possible to enter numbers that
exceed the number of tracks on the CD or
in the currently active folder. Fast forwarding/rewinding
X With the display/selection window active,
press the 0006or000A button on the
remote control repeatedly until you reach
the desired position.
or
X Press and hold the 0001or0002 button
until the desired position is reached. Selecting
afolder
This function is only available in MP3 mode.
X Select Folder in MP3 mode using
the 00090006000A buttons on the remote
control and press the 0016button to confirm.
or
X Press the 0016button when the display/
selectio nwindow is active.
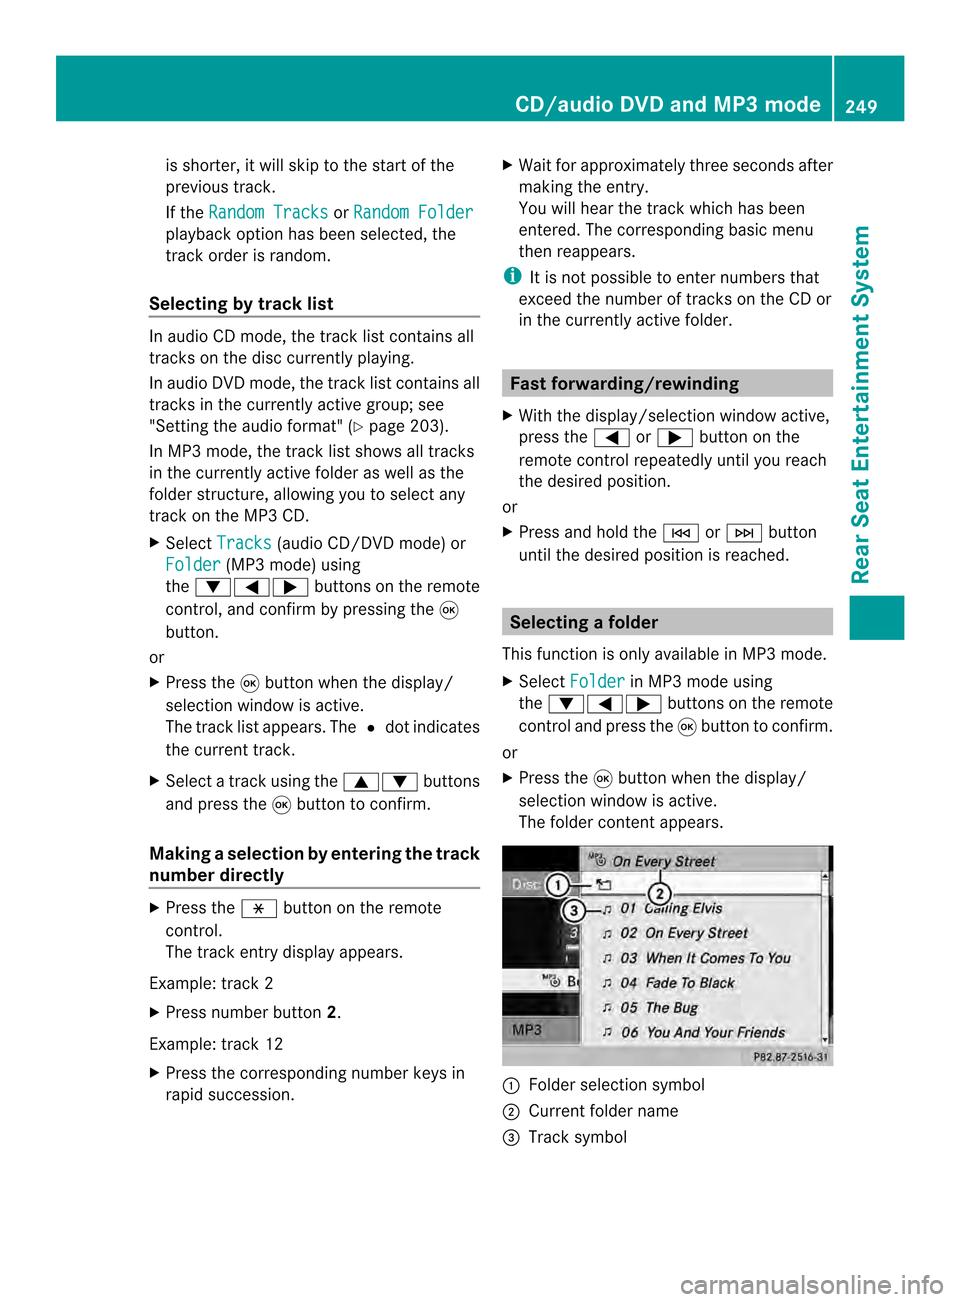
The folder conten tappears. 0001
Folder selection symbol
0002 Current folder name
0014 Track symbol CD/audio DVD and MP3 mode
249Rear Seat Entertainment System Z
Page 252 of 274

X
To switch to the superordinate folder:
select symbol 0001using the 00080009
buttons on the remote control and press
the 0016button to confirm.
The display shows the next folde rup. 0001
Folder selection symbol
0002 Folder symbol
X Select a folder using the 00080009buttons
and press the 0016button to confirm.
You will see the tracks in the folder.
X Select a trac kusing the 00080009 buttons
and press the 0016button to confirm.
The track is played and the corresponding
folder is now the active folder. Pause function
This function is only available in audio DVD
mode.
X To pause playback: select0009using
the 00090006000A buttons on the remote
control and press the 0016button to confirm.
The 0009 display changes to 0004.
X To continue playback: select0004and
press the 0016button to confirm.
The 0004 display changes to 0009.Stop function
This function is only available in audio DVD
mode. X
To interrupt playback: select0014using
the 00090006000A buttons on the remote
control and press the 0016button to confirm.
The 0009 display changes to 0004.
X To continue playback: select0004and
press the 0016button to confirm.
Playback continues from the point where it
was interrupted.
X To stop playback: while playback is
interrupted, select 0014againa nd press
the 0016button to confirm.
Playback stops and returns to the
beginning of the DVD. 0004is highlighted.
X To restart playback: select0004and
press the 0016button to confirm.
Playback starts from the beginning of the
DVD. Setting the audio format
Further information on audio formats is
available in the "Audio" section
(Y page 203).
X Select DVD-A using the
00090006000A
buttons on the remote control and press
0016 to confirm.
X Select Group using the
00080009 buttons
and press the 0016button to confirm.
The list of available audio formats appears.
The 0027dot indicates the format currently
selected.
X Select an audio format using the
00080009 buttons and press the 0016button
to confirm.
X To exit the menu: press the0006
or 000A button. Playbac
koptions
Further information on playback options is
available in the "Audio" section
(Y page 204). 250
CD/audio DVD and MP3 modeRear Seat Entertainment System
Page 254 of 274

control and confirm by pressing the
0016
button.
If the video DVD fulfills the playback
criteria, the fil meithe rstarts automatically
or the menu stored on the DVD appears. If
the DVD menu appears, you must start the
film manually.
X Select the corresponding menu ite minthe
DVD menu. Showing/hiding the control menu
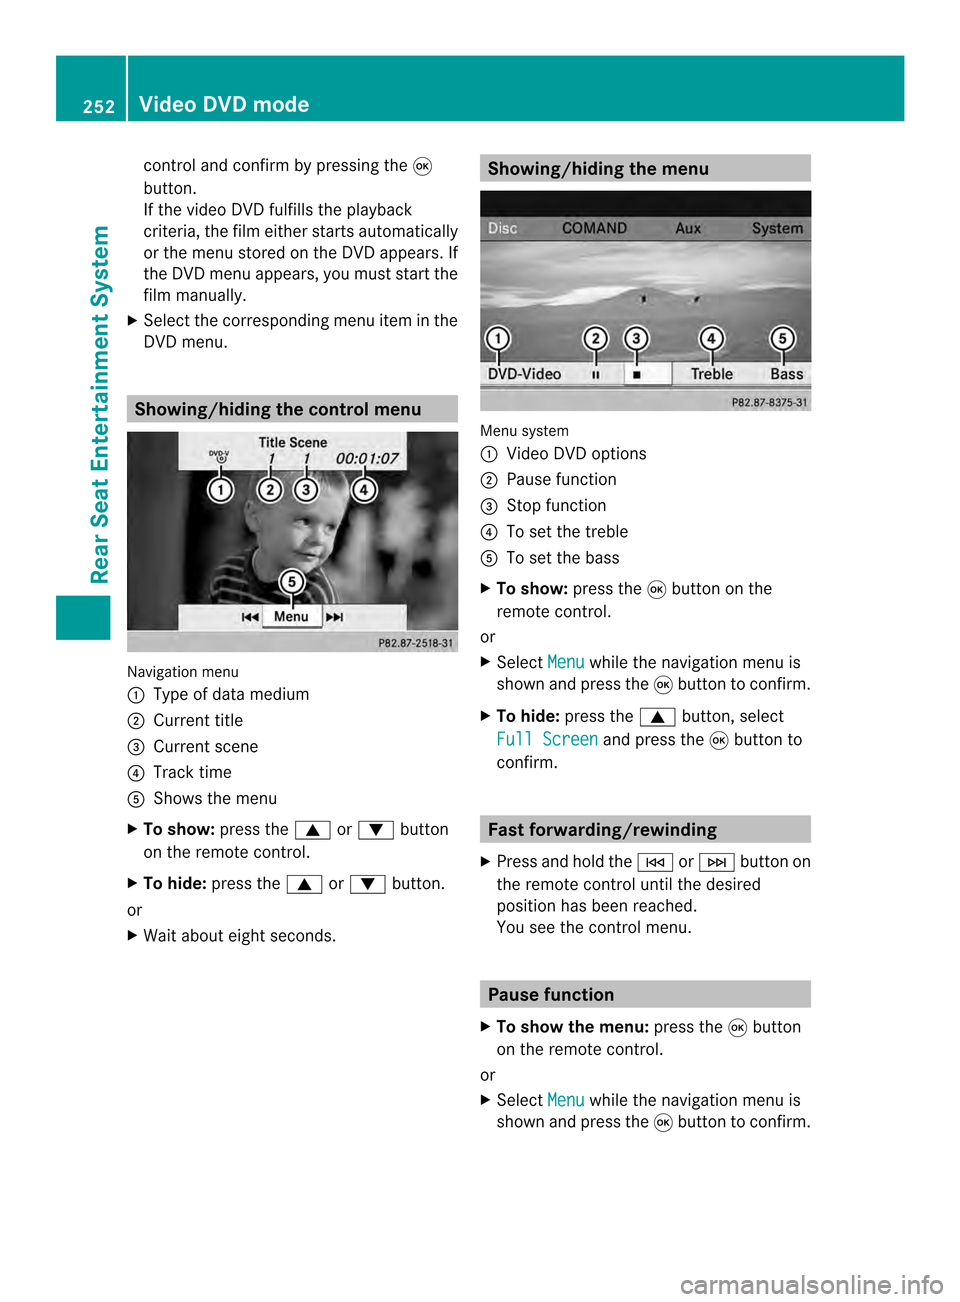
Navigation menu
0001
Type of data medium
0002 Current title
0014 Current scene
0013 Track time
0011 Shows the menu
X To show: press the0008or0009 button
on the remote control.
X To hide: press the 0008or0009 button.
or
X Wait about eight seconds. Showing/hiding the menu
Menu system
0001
Video DVD options
0002 Pause function
0014 Stop function
0013 To set the treble
0011 To set the bass
X To show: press the0016button on the
remote control.
or
X Select Menu while the navigation menu is
shown and press the 0016button to confirm.
X To hide: press the 0008button, select
Full Screen and press the
0016button to
confirm. Fast forwarding/rewinding
X Press and hold the 0001or0002 button on
the remote control until the desired
position has been reached.
You see the control menu. Pause function
X To show the menu: press the0016button
on the remote control.
or
X Select Menu while the navigation menu is
shown and press the 0016button to confirm. 252
Video DVD modeRear Seat Entertainment System
Page 255 of 274

X
To paus eplayback: select0009and press
the 0016button to confirm.
The 0009 display changes to 0004.
X To continue playback: select0004and
press the 0016button to confirm.
The menu is hidden. Stop function
X To show the menu: press the0016button
on the remote control.
or
X Select Menu while the navigation menu is
shown and press the 0016button to confirm.
X To interrupt playback: select0014and
press the 0016button to confirm.
The 0009 display changes to 0004.The
video image is hidden.
X To continue playback: select0004and
press the 0016button to confirm.
Playback continues from the point where it
was interrupted. The menu is hidden.
X To stop playback: while playback is
interrupted, select 0014again and press
the 0016button to confirm.
Playback stops and returns to the
beginning of the DVD. 0004is highlighted.
X To restart playback: select0004and
press the 0016button to confirm.
Playback starts from the beginning of the
DVD. Selecting
ascene/chapter
General notes Observe the information on DV
Dvideo mode
(Y page 231). Skipping forwards/backwards X
Press the 0006or000A button on the
remote control.
or
X Press the 0001or0002 button.
The navigation menu (Y page 230)appears
for approximately eight seconds.
Selecting ascene/chapter directly These examples illustrate how to select
scene/chapter 5.
X
Option 1: while the film is playing, press
the 0018 button on the remote control.
X Press the corresponding number key, such
as 5.
X Option 2: while the film is playing, press
the 0016button on the remote control and
show the menu.
X Select DVD-Video and press the
0016button
to confirm.
X Select DVD Functions and press the
0016
button to confirm.
X Select Scene Selection and press the
0016 button to confirm.
X Select 5 using the
0008or0009 buttonand
press the 0016button to confirm.
In both cases, playback will begi nfrom the
fifth scene/chapter after a brie fpause. Selecting
afilm/title
Option 1:
X Press the 0016button on the remote control
and show the menu.
X Select DVD-Video and press the
0016button
on the remote control to confirm. Video DVD mode
253Rear Seat Entertainment System Z