2014 MERCEDES-BENZ C-CLASS ESTATE tailgate
[x] Cancel search: tailgatePage 373 of 489
Useful information
i This Owner's Manual describes all mod-
els, series and optional equipment for your
vehicle that were available at the time of
going to press. National variations are pos- sible. Note that your vehicle may not be
equipped with all of the functions descri-
bed. This is also the case for systems and
functions relevant to safety.
i Read the information on qualified special-
ist workshops: (Y page 27). Stowage areas
Loading guidelines
G
WARNING
Combustion engines emit poisonous exhaust
gases such as carbon monoxide. If the tailgate is open when the engine is running, particu-
larly if the vehicle is moving, exhaust fumes
could enter the passenger compartment.
There is a risk of poisoning.
Turn off the engine before opening the tail-
gate. Never drive with the tailgate open. G
WARNING
If objects, luggage or loads are not secured or not secured sufficiently, they could slip, tip
over or be flung around and thereby hit vehicle
occupants. There is a risk of injury, especially when braking or abruptly changing directions.
Always store objects so that they cannot be
flung around. Secure objects, luggage or
loads against slipping or tipping before the
journey. G
WARNING
The exhaust tail pipe and tail pipe trim can
become very hot. If you come into contact
with these parts of the vehicle, you could burn
yourself. There is a risk of injury.
Always be particularly careful around the
exhaust tail pipe and the tail pipe trim. Allow these components to cool down before touch-
ing them.
The handling characteristics of a laden vehi-
cle are dependent on the distribution of the
load within the vehicle. For this reason, you
should observe the following notes when
transporting a load:
R never exceed the maximum permissible
gross vehicle weight or the permissible axle
loads for the vehicle (including occupants).
R the luggage compartment is the preferred
place to carry objects.
R position heavy loads as far forwards as pos-
sible and as low down in the luggage com-
partment as possible.
R the load must not protrude above the upper
edge of the seat backrests.
R always place the load behind unoccupied
seats if possible.
R secure the load with sufficiently strong and
wear-resistant lashing material. Pad sharp
edges for protection.
i Load restraints are available at any quali-
fied specialist workshop, e.g. a Mercedes-
Benz Service Centre. Stowage compartments
Important safety notes G
WARNING
If you do not correctly store objects in the
vehicle interior, they can slip or be flung
around, thus striking vehicle occupants.
There is a risk of injury, especially when brak- ing or abruptly changing directions.
R Always store objects so that they cannot be
flung around in these or in similar situa-
tions.
R Always make sure that objects do not pro-
trude from stowage compartments, lug-
gage nets or stowage nets. 370
Stowage areasStowing and features
Page 377 of 489
Observe the loading guidelines (Y
page 370).
The outside and the middle rear seat backr-
ests can be folded down separately to
increase the luggage compartment capacity.
The division ratio is 40% to 20% to 40%.
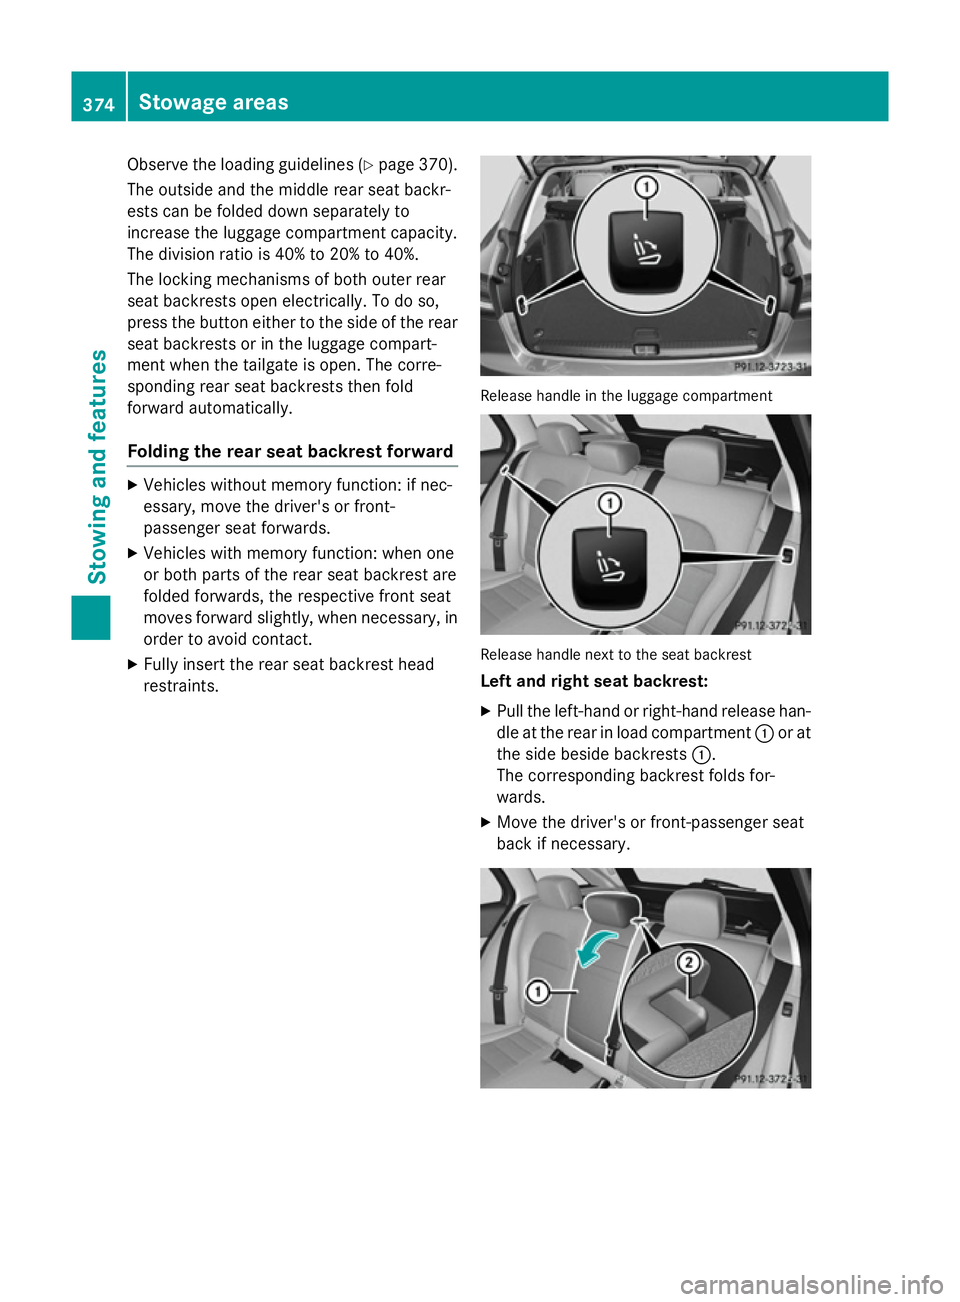
The locking mechanisms of both outer rear
seat backrests open electrically. To do so,
press the button either to the side of the rear seat backrests or in the luggage compart-
ment when the tailgate is open. The corre-
sponding rear seat backrests then fold
forward automatically.
Folding the rear seat backrest forward X
Vehicles without memory function: if nec-
essary, move the driver's or front-
passenger seat forwards.
X Vehicles with memory function: when one
or both parts of the rear seat backrest are
folded forwards, the respective front seat
moves forward slightly, when necessary, in order to avoid contact.
X Fully insert the rear seat backrest head
restraints. Release handle in the luggage compartment
Release handle next to the seat backrest
Left and right seat backrest:
X Pull the left-hand or right-hand release han-
dle at the rear in load compartment :or at
the side beside backrests :.
The corresponding backrest folds for-
wards.
X Move the driver's or front-passenger seat
back if necessary. 374
Stowage areasStowing and features
Page 380 of 489
using lashing material, even if you are using
the luggage compartment cover.
! When loading the vehicle, make sure that
you do not stack the load in the luggage
compartment higher than the lower edge of the side windows. Do not place heavy
objects on top of the luggage compartment
cover.
The luggage compartment cover and the
safety net are attached to anchorages on the right and left in the luggage compartment as a
combined luggage cover and net.
When the luggage compartment cover is clip-
ped in, there should be no objects obstructing
the downwards movement of the cover in the
luggage compartment when the tailgate is
closed. The luggage compartment cover will
otherwise be raised again.
Extending and retracting the luggage
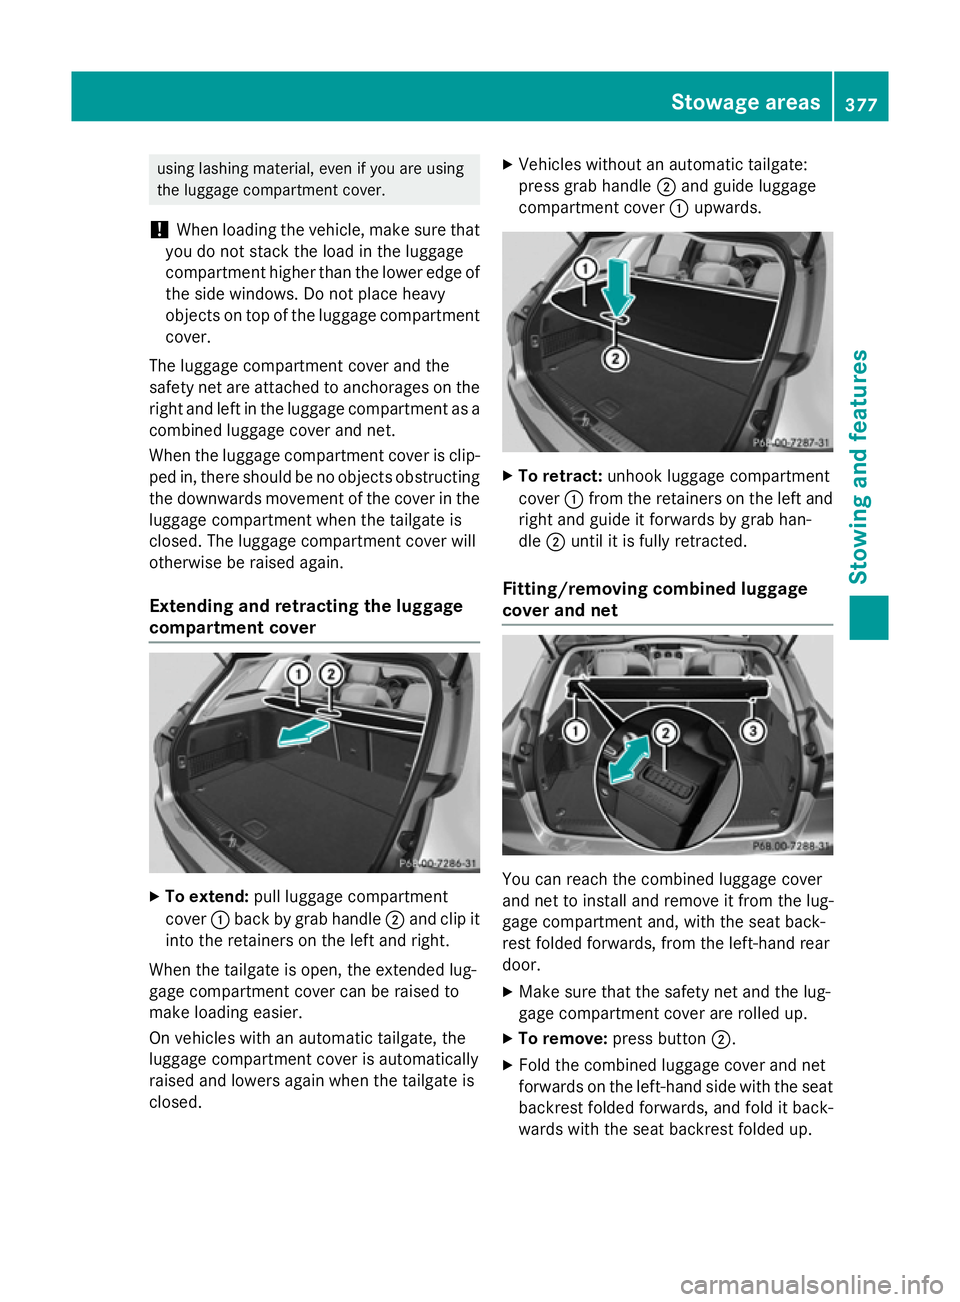
compartment cover X
To extend: pull luggage compartment
cover :back by grab handle ;and clip it
into the retainers on the left and right.
When the tailgate is open, the extended lug-
gage compartment cover can be raised to
make loading easier.
On vehicles with an automatic tailgate, the
luggage compartment cover is automatically
raised and lowers again when the tailgate is
closed. X
Vehicles without an automatic tailgate:
press grab handle ;and guide luggage
compartment cover :upwards. X
To retract: unhook luggage compartment
cover :from the retainers on the left and
right and guide it forwards by grab han-
dle ;until it is fully retracted.
Fitting/removing combined luggage
cover and net You can reach the combined luggage cover
and net to install and remove it from the lug-
gage compartment and, with the seat back-
rest folded forwards, from the left-hand rear
door.
X Make sure that the safety net and the lug-
gage compartment cover are rolled up.
X To remove: press button ;.
X Fold the combined luggage cover and net
forwards on the left-hand side with the seat
backrest folded forwards, and fold it back-
wards with the seat backrest folded up. Stowage areas
377Stowing and featu res Z
Page 382 of 489
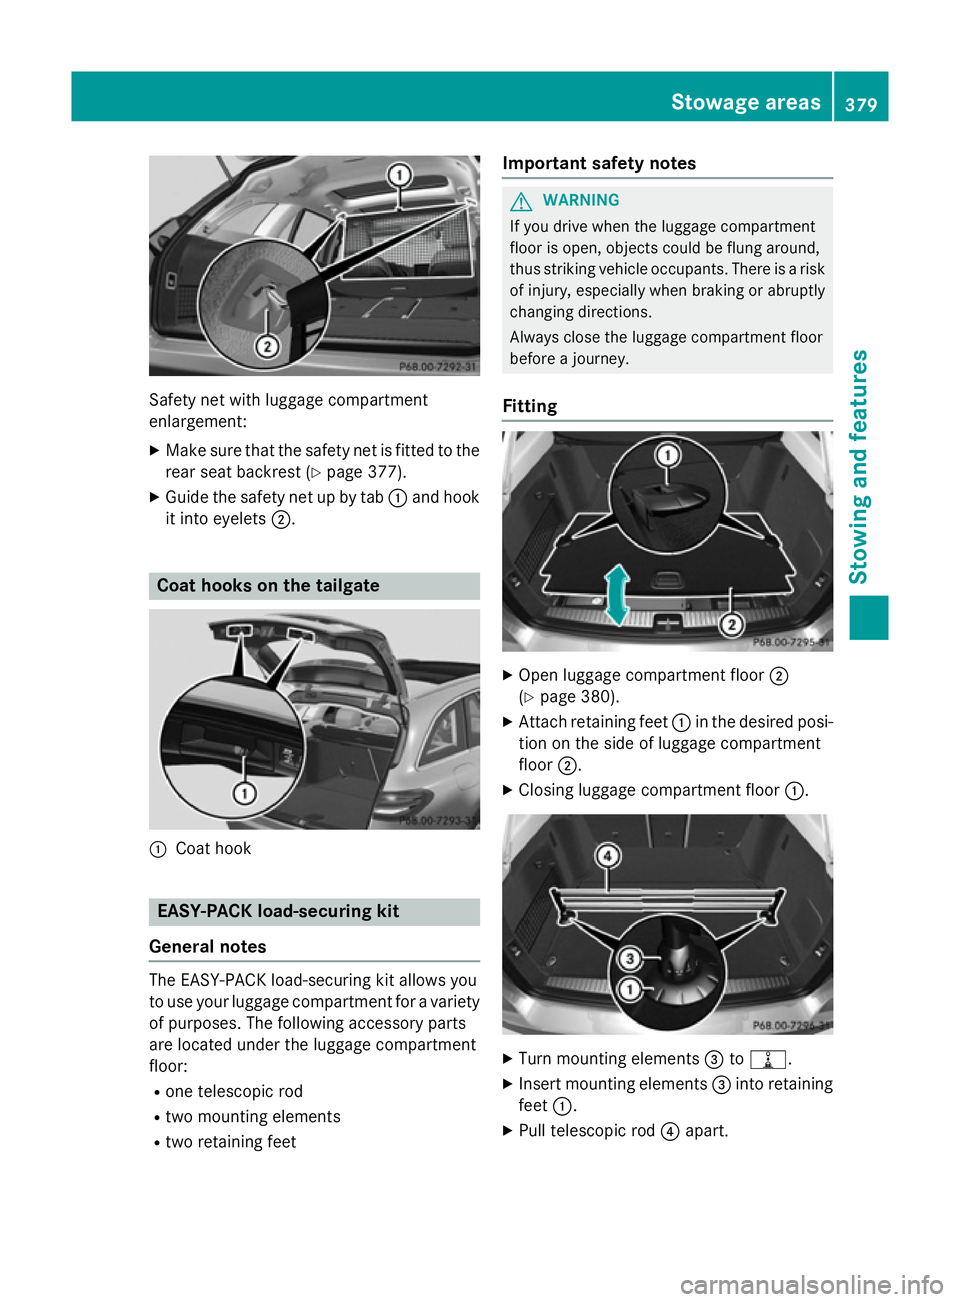
Safety net with luggage compartment
enlargement:
X Make sure that the safety net is fitted to the
rear seat backrest (Y page 377).
X Guide the safety net up by tab :and hook
it into eyelets ;. Coat hooks on the tailgate
:
Coat hook EASY-PACK load-securing kit
General notes The EASY-PACK load-securing kit allows you
to use your luggage compartment for a variety of purposes. The following accessory parts
are located under the luggage compartment
floor:
R one telescopic rod
R two mounting elements
R two retaining feet Important safety notes G
WARNING
If you drive when the luggage compartment
floor is open, objects could be flung around,
thus striking vehicle occupants. There is a risk of injury, especially when braking or abruptly
changing directions.
Always close the luggage compartment floor
before a journey.
Fitting X
Open luggage compartment floor ;
(Y page 380).
X Attach retaining feet :in the desired posi-
tion on the side of luggage compartment
floor ;.
X Closing luggage compartment floor :. X
Turn mounting elements =to=.
X Insert mounting elements =into retaining
feet :.
X Pull telescopic rod ?apart. Stowage areas
379Stowing and features Z
Page 383 of 489
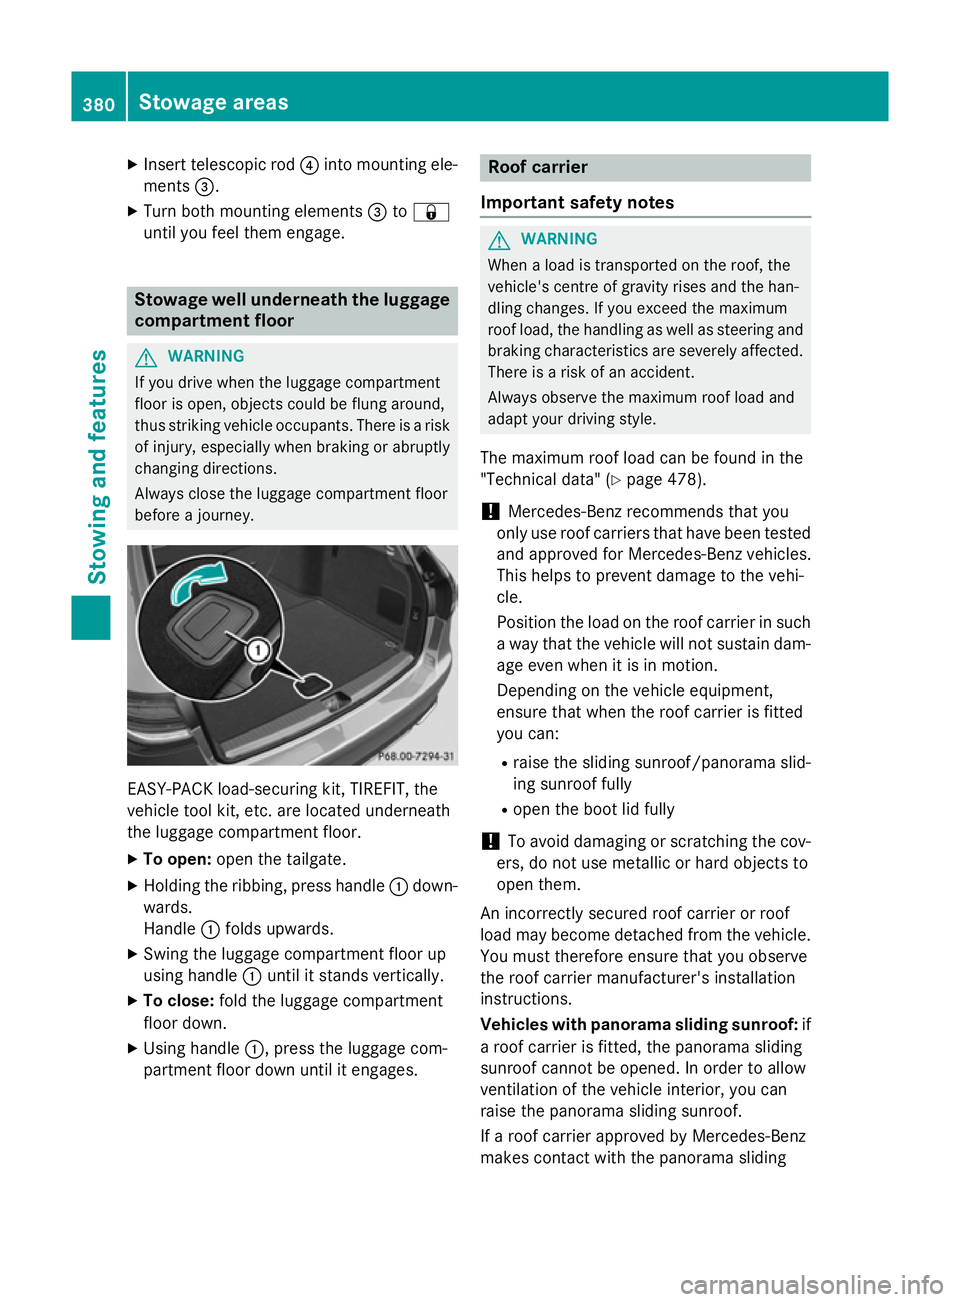
X
Insert telescopic rod ?into mounting ele-
ments =.
X Turn both mounting elements =to&
until you feel them engage. Stowage well underneath the luggage
compartment floor G
WARNING
If you drive when the luggage compartment
floor is open, objects could be flung around,
thus striking vehicle occupants. There is a risk of injury, especially when braking or abruptly
changing directions.
Always close the luggage compartment floor
before a journey. EASY-PACK load-securing kit, TIREFIT, the
vehicle tool kit, etc. are located underneath
the luggage compartment floor.
X To open: open the tailgate.
X Holding the ribbing, press handle :down-
wards.
Handle :folds upwards.
X Swing the luggage compartment floor up
using handle :until it stands vertically.
X To close: fold the luggage compartment
floor down.
X Using handle :, press the luggage com-
partment floor down until it engages. Roof carrier
Important safety notes G
WARNING
When a load is transported on the roof, the
vehicle's centre of gravity rises and the han-
dling changes. If you exceed the maximum
roof load, the handling as well as steering and braking characteristics are severely affected.
There is a risk of an accident.
Always observe the maximum roof load and
adapt your driving style.
The maximum roof load can be found in the
"Technical data" (Y page 478).
! Mercedes-Benz recommends that you
only use roof carriers that have been tested
and approved for Mercedes-Benz vehicles.
This helps to prevent damage to the vehi-
cle.
Position the load on the roof carrier in such
a way that the vehicle will not sustain dam-
age even when it is in motion.
Depending on the vehicle equipment,
ensure that when the roof carrier is fitted
you can:
R raise the sliding sunroof/panorama slid-
ing sunroof fully
R open the boot lid fully
! To avoid damaging or scratching the cov-
ers, do not use metallic or hard objects to
open them.
An incorrectly secured roof carrier or roof
load may become detached from the vehicle.
You must therefore ensure that you observe
the roof carrier manufacturer's installation
instructions.
Vehicles with panorama sliding sunroof: if
a roof carrier is fitted, the panorama sliding
sunroof cannot be opened. In order to allow
ventilation of the vehicle interior, you can
raise the panorama sliding sunroof.
If a roof carrier approved by Mercedes-Benz
makes contact with the panorama sliding 380
Stowage areasStowing and features
Page 413 of 489
Useful information
i This Owner's Manual describes all mod-
els, series and optional equipment for your
vehicle that were available at the time of
going to press. National variations are pos- sible. Note that your vehicle may not be
equipped with all of the functions descri-
bed. This is also the case for systems and
functions relevant to safety.
i Read the information on qualified special-
ist workshops: (Y page 27). Where will I find...?
Warning triangle
Removing/replacing the warning trian-
gle X
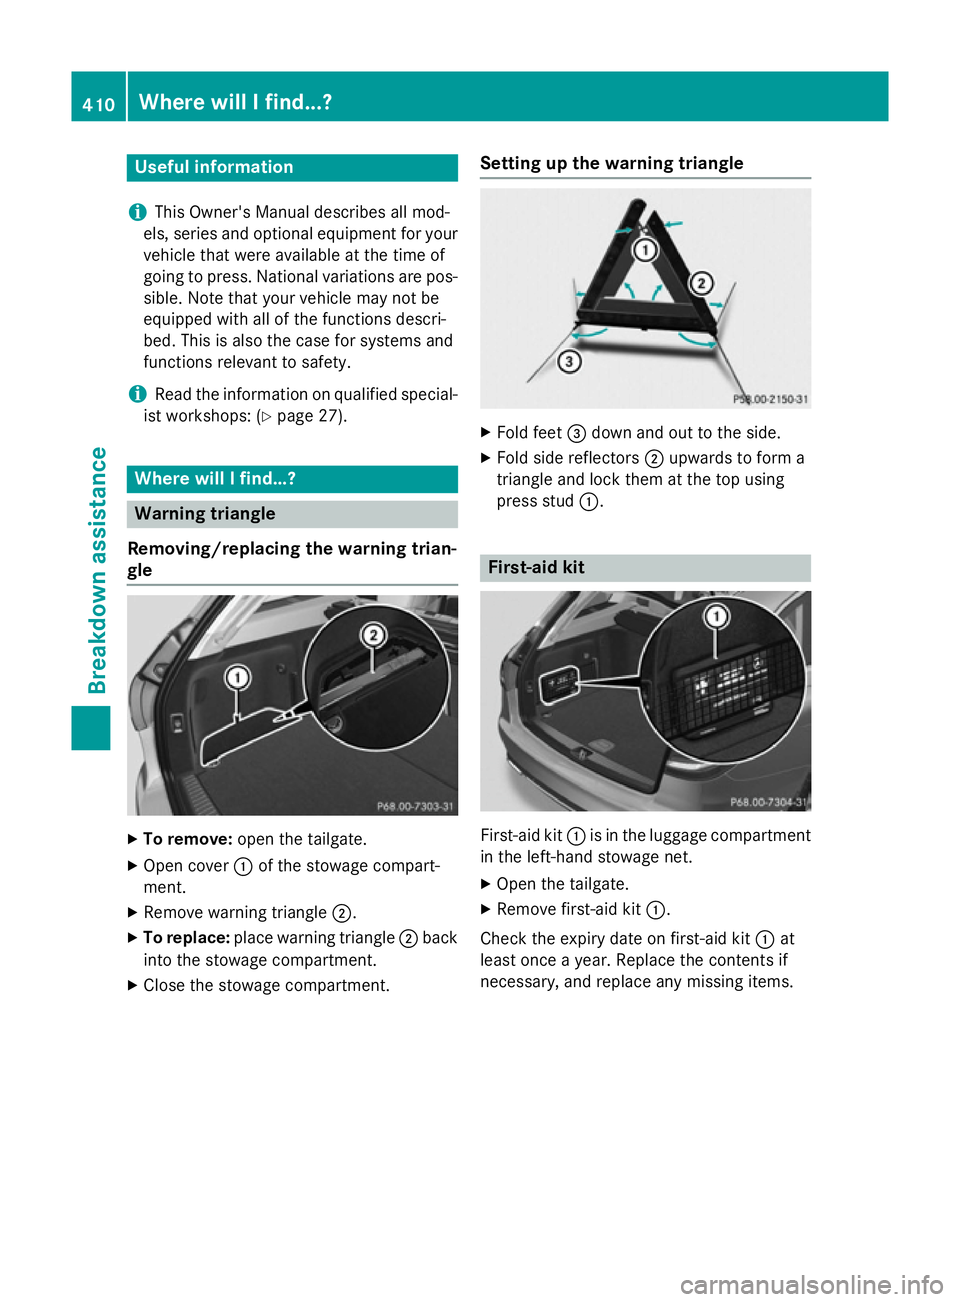
To remove: open the tailgate.
X Open cover :of the stowage compart-
ment.
X Remove warning triangle ;.
X To replace: place warning triangle ;back
into the stowage compartment.
X Close the stowage compartment. Setting up the warning triangle X
Fold feet =down and out to the side.
X Fold side reflectors ;upwards to form a
triangle and lock them at the top using
press stud :. First-aid kit
First-aid kit
:is in the luggage compartment
in the left-hand stowage net.
X Open the tailgate.
X Remove first-aid kit :.
Check the expiry date on first-aid kit :at
least once a year. Replace the contents if
necessary, and replace any missing items. 410
Where will I find...?Breakdown assistance
Page 414 of 489
Fire extinguisher
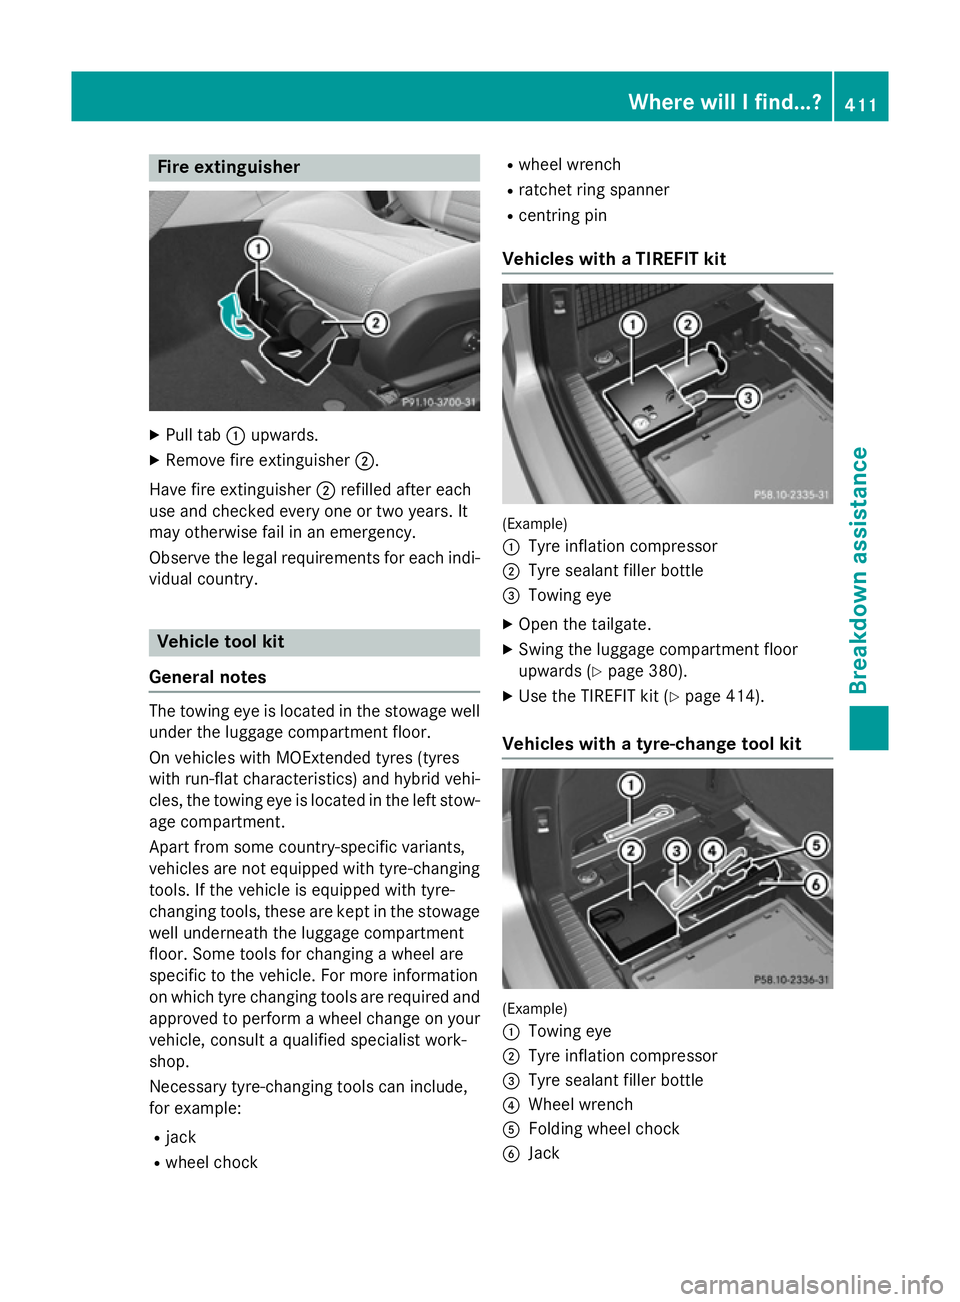
X
Pull tab :upwards.
X Remove fire extinguisher ;.
Have fire extinguisher ;refilled after each
use and checked every one or two years. It
may otherwise fail in an emergency.
Observe the legal requirements for each indi-
vidual country. Vehicle tool kit
General notes The towing eye is located in the stowage well
under the luggage compartment floor.
On vehicles with MOExtended tyres (tyres
with run-flat characteristics) and hybrid vehi-
cles, the towing eye is located in the left stow- age compartment.
Apart from some country-specific variants,
vehicles are not equipped with tyre-changing
tools. If the vehicle is equipped with tyre-
changing tools, these are kept in the stowage well underneath the luggage compartment
floor. Some tools for changing a wheel are
specific to the vehicle. For more information
on which tyre changing tools are required and
approved to perform a wheel change on your vehicle, consult a qualified specialist work-
shop.
Necessary tyre-changing tools can include,
for example:
R jack
R wheel chock R
wheel wrench
R ratchet ring spanner
R centring pin
Vehicles with a TIREFIT kit (Example)
:
Tyre inflation compressor
; Tyre sealant filler bottle
= Towing eye
X Open the tailgate.
X Swing the luggage compartment floor
upwards (Y page 380).
X Use the TIREFIT kit (Y page 414).
Vehicles with a tyre-change tool kit (Example)
:
Towing eye
; Tyre inflation compressor
= Tyre sealant filler bottle
? Wheel wrench
A Folding wheel chock
B Jack Where will I find...?
411Breakdown assistance
Page 415 of 489
The tyre-change tool kit is kept in a tray in the
stowage well under the luggage compartment
floor.
X Open the tailgate.
X Swing the luggage compartment floor
upwards (Y page 380) and open the left-
hand stowage compartment.
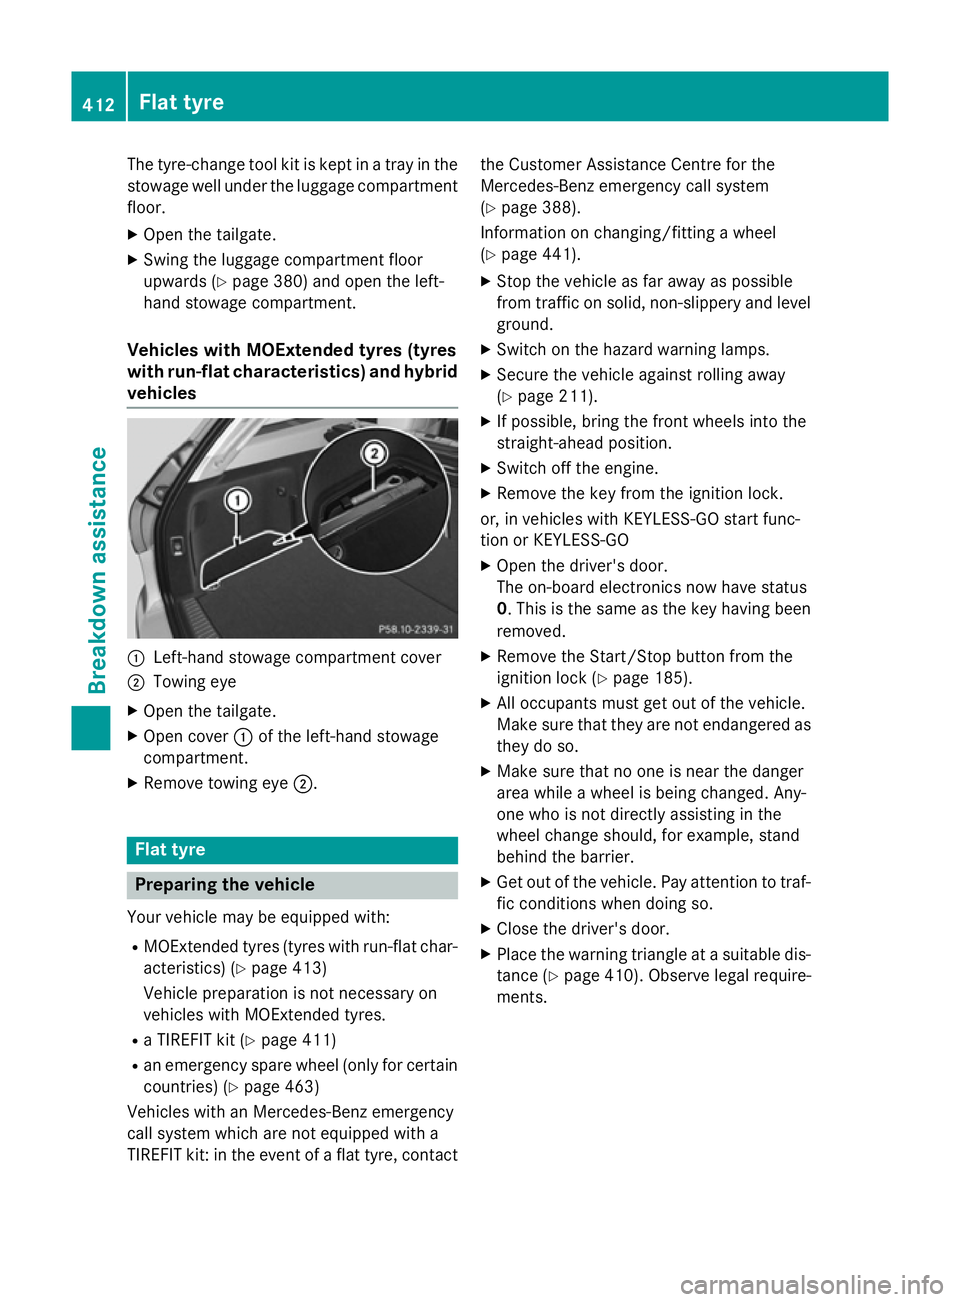
Vehicles with MOExtended tyres (tyres
with run-flat characteristics) and hybrid vehicles :
Left-hand stowage compartment cover
; Towing eye
X Open the tailgate.
X Open cover :of the left-hand stowage
compartment.
X Remove towing eye ;.Flat tyre
Preparing the vehicle
Your vehicle may be equipped with: R MOExtended tyres (tyres with run-flat char-
acteristics) (Y page 413)
Vehicle preparation is not necessary on
vehicles with MOExtended tyres.
R a TIREFIT kit (Y page 411)
R an emergency spare wheel (only for certain
countries) (Y page 463)
Vehicles with an Mercedes-Benz emergency
call system which are not equipped with a
TIREFIT kit: in the event of a flat tyre, contact the Customer Assistance Centre for the
Mercedes-Benz emergency call system
(Y
page 388).
Information on changing/fitting a wheel
(Y page 441).
X Stop the vehicle as far away as possible
from traffic on solid, non-slippery and level
ground.
X Switch on the hazard warning lamps.
X Secure the vehicle against rolling away
(Y page 211).
X If possible, bring the front wheels into the
straight-ahead position.
X Switch off the engine.
X Remove the key from the ignition lock.
or, in vehicles with KEYLESS-GO start func-
tion or KEYLESS ‑GO
X Open the driver's door.
The on-board electronics now have status
0. This is the same as the key having been
removed.
X Remove the Start/Stop button from the
ignition lock (Y page 185).
X All occupants must get out of the vehicle.
Make sure that they are not endangered as
they do so.
X Make sure that no one is near the danger
area while a wheel is being changed. Any-
one who is not directly assisting in the
wheel change should, for example, stand
behind the barrier.
X Get out of the vehicle. Pay attention to traf-
fic conditions when doing so.
X Close the driver's door.
X Place the warning triangle at a suitable dis-
tance (Y page 410). Observe legal require-
ments. 412
Flat tyreBreakdown assistance