2014 MERCEDES-BENZ C-CLASS ESTATE buttons
[x] Cancel search: buttonsPage 10 of 489
Brightness control (instrument
cluster lighting)
................................... 32
Buttons on the steering column ...... 295C
Calling up a fault see Display messages
Camera
see 360° camera
Car
see Vehicle
Car key
see Key
Car wash (care) ................................. 400
Care
360° camera ................................. 405
AIRPANEL ...................................... 404
Automatic car wash ....................... 400
Carpets .......................................... 408
Display ........................................... 406
Exhaust pipe .................................. 406
Exterior lighting ............................. 404
Gear or selector lever .................... 407
High-pressure cleaner .................... 402
Interior ........................................... 406
Matt paintwork .............................. 403
Note s............................................. 400
Paint .............................................. 402
Plastic trim .................................... 407
Reversing camera .......................... 405
Roof lining ...................................... 408
Seat belt ........................................ 408
Seat cove r..................................... 407
Sensors ......................................... 405
Steering wheel ............................... 407
Trim pieces .................................... 407
Washing by hand ........................... 402
Wheels ........................................... 403
Windows ........................................ 403
Wiper blades .................................. 404
Wooden trim .................................. 407
CD player/CD changer(on-board
computer) .......................................... 305
Central locking
Locking/unlocking (key) .................. 91
Centre console
Lower section .................................. 38 Upper section .................................. 37
Changing bulbs
Dipped-beam headlamp s............... 143
Main-beam headlamp s................... 143
Reversing lamps ............................ 144
Turn signals (front) ......................... 144
Turn signals (rear) .......................... 144
Charge status of high-voltage bat-
tery ..................................................... 276
Child seat
Forward-facing restraint system ...... 68
ISOFIX .............................................. 65
On the front-passenger sea t............ 66
Rearward-facing restraint system .... 67
Recommendations ........................... 72
Suitable positions ............................ 68
Top Tether ....................................... 65
Child-proof locks
Important safety notes .................... 74
Rear doors ....................................... 75
Children
In the vehicl e................................... 63
Restraint systems ............................ 64
Cigarette lighter ................................ 384
Cleaning
Mirror turn signal ........................... 404
Trailer tow hitch ............................. 406
Climate control
Auxiliary heating/ventilation .......... 176
Controlling automaticall y............... 162
Convenience opening/closing
(air-recirculation mode) ................. 168
Cooling with air dehumidification .. 161
Demisting the windows .................. 166
Demisting the windscreen ............. 166
ECO start/stop function ................ 160
ECO start/stop function
(THERMATIC 1-zone) ............. 153, 154
ECO start/stop function
(THERMATIC 2-zone) ............. 156, 157
Hybrid vehicle (THERMOTRONIC ).. 160
Hybrid vehicles (THERMATIC) ........ 156
Important safety notes .................. 152
Indicator lamp ................................ 162
Information about using
THERMATIC automatic climate
control (1 ‑zone) ............................. 153 Index
7
Page 23 of 489
Selecting ........................................ 224
Storing the current speed .............. 224
Variabl e......................................... 223
SRS (Supplemental Restraint Sys-
tem)
Warning lamp ................................. 285
Start/Stop button
Starting the engine ........................ 188
Start/stop function
see ECO start/stop function
Starting (engine) ................................ 187
Stationary vehicle ............................. 281
STEER CONTROL .................................. 86
Steering
Warning lamps ............................... 367
Steering (display message) .............. 351
Steering Assist and Stop&Go Pilot
(DISTRONIC PLUS)
Display message ............................ 344
Steering assistant STEER CON-
TROL
see STEER CONTROL
Steering wheel
Adjusting (electrically) ................... 126
Adjusting (manually) ...................... 125
Button overview ............................... 36
Buttons (on-board computer) ......... 295
Cleaning ......................................... 407
EASY ENTRY/EXIT feature ............. 126
Gearshift paddle s........................... 202
Important safety notes .................. 125
Storing settings (memory func-
tion) ............................................... 131
Steering wheel gearshift paddles .... 202
Stowage areas ................................... 370
Stowage compartment
Map pockets .................................. 372
Stowage compartments
Armrest (under) ............................. 372
Centre console .............................. 371
Cup holde r..................................... 381
Door ............................................... 372
Glove compartment ....................... 371
Important safety information ......... 370
Rear ............................................... 372
Spectacles compartment ............... 371
Stowage net ....................................... 372 Stowage space
Stowage net ................................... 372
Summer tyres
In winter ........................................ 434
Sun blind
Rear side window s......................... 383
Sun visor ............................................ 382
Suspension tuning
AIRMATIC ...................................... 239
Switching the auxiliary heating/
ventilation
On/off ........................................... 177 T
Tail lamps Display message ............................ 332
see Lights
Tailgate
Display message ............................ 349
Emergency unlocking ..................... 106
Important safety notes .................. 101
Limiting the opening angle ............. 105
Obstruction detectio n.................... 101
Opening dimensions ...................... 478
Opening/closing ............................ 101
Opening/closing (automatically
from inside) ................................... 105
Opening/closing (automatically
from outside) ................................. 102
Opening/closing (manually from
outside) ......................................... 102
Technical data
Capacities ...................................... 470
Emergency spare wheel ................. 465
Information .................................... 468
Trailer load s................................... 480
Tyres/wheels ................................. 448
Vehicle data ................................... 478
Telephone
Accepting a call (multifunction
steering wheel) .............................. 307
Display message ............................ 351
Introduction ................................... 306
Menu (on-board computer) ............ 306
Number from the phone book ........ 307
Redialling ....................................... 308
Rejecting/ending a call ................. 307 20
Index
Page 95 of 489
R
when the external door handles are
touched
R during convenience closing X
To unlock the vehicle: touch the inner
surface of the door handle.
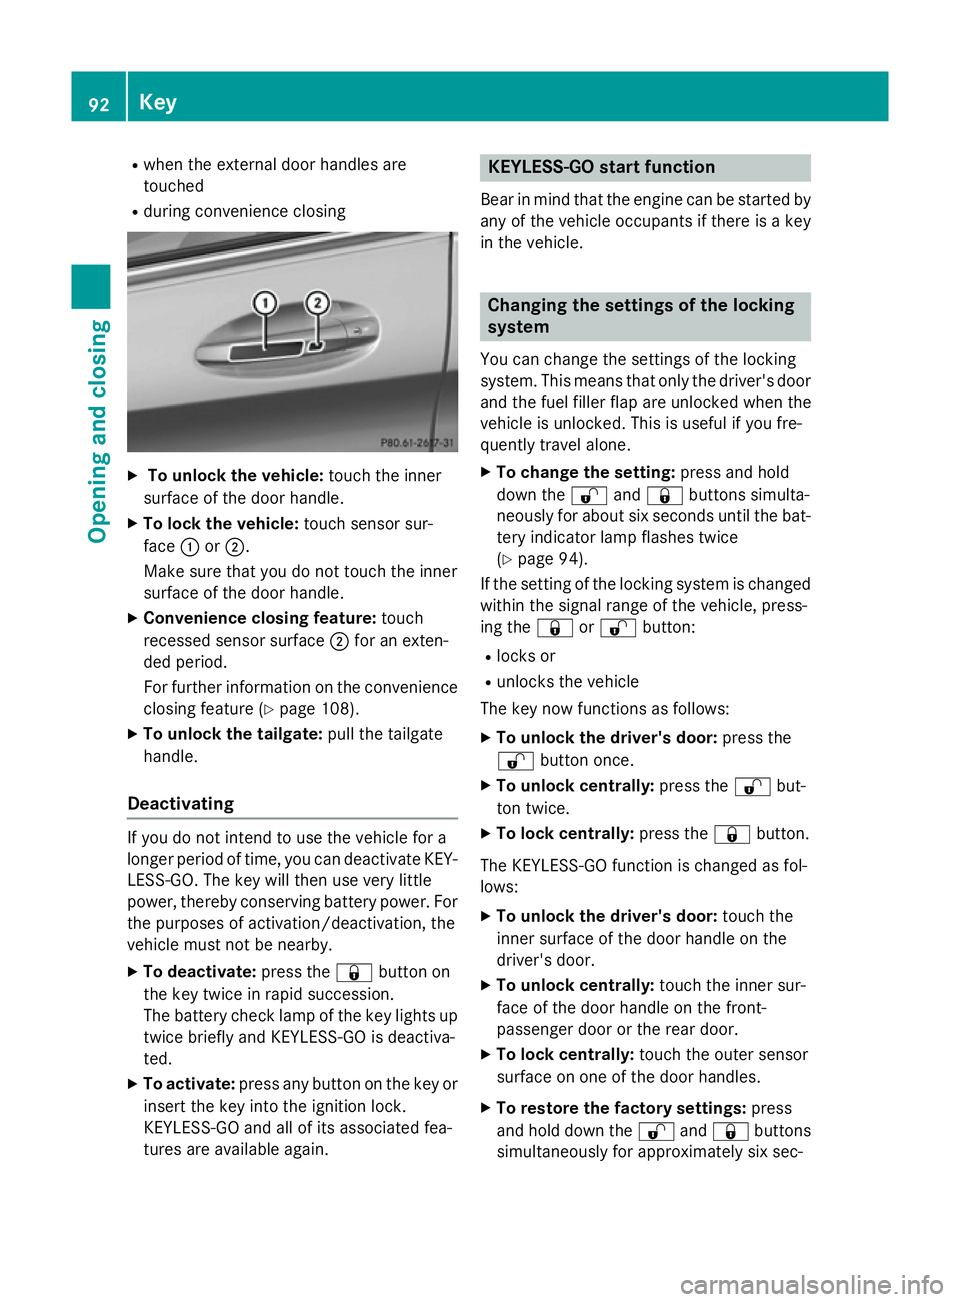
X To lock the vehicle: touch sensor sur-
face :or;.
Make sure that you do not touch the inner
surface of the door handle.
X Convenience closing feature: touch
recessed sensor surface ;for an exten-
ded period.
For further information on the convenience closing feature (Y page 108).
X To unlock the tailgate: pull the tailgate
handle.
Deactivating If you do not intend to use the vehicle for a
longer period of time, you can deactivate KEY- LESS-GO. The key will then use very little
power, thereby conserving battery power. For
the purposes of activation/deactivation, the
vehicle must not be nearby.
X To deactivate: press the&button on
the key twice in rapid succession.
The battery check lamp of the key lights up
twice briefly and KEYLESS-GO is deactiva-
ted.
X To activate: press any button on the key or
insert the key into the ignition lock.
KEYLESS-GO and all of its associated fea-
tures are available again. KEYLESS-GO start function
Bear in mind that the engine can be started by any of the vehicle occupants if there is a key
in the vehicle. Changing the settings of the locking
system
You can change the settings of the locking
system. This means that only the driver's door and the fuel filler flap are unlocked when the
vehicle is unlocked. This is useful if you fre-
quently travel alone.
X To change the setting: press and hold
down the %and& buttons simulta-
neously for about six seconds until the bat- tery indicator lamp flashes twice
(Y page 94).
If the setting of the locking system is changed
within the signal range of the vehicle, press-
ing the &or% button:
R locks or
R unlocks the vehicle
The key now functions as follows:
X To unlock the driver's door: press the
% button once.
X To unlock centrally: press the%but-
ton twice.
X To lock centrally: press the&button.
The KEYLESS-GO function is changed as fol-
lows:
X To unlock the driver's door: touch the
inner surface of the door handle on the
driver's door.
X To unlock centrally: touch the inner sur-
face of the door handle on the front-
passenger door or the rear door.
X To lock centrally: touch the outer sensor
surface on one of the door handles.
X To restore the factory settings: press
and hold down the %and& buttons
simultaneously for approximately six sec- 92
KeyOpening and closing
Page 97 of 489
Checking the battery
X
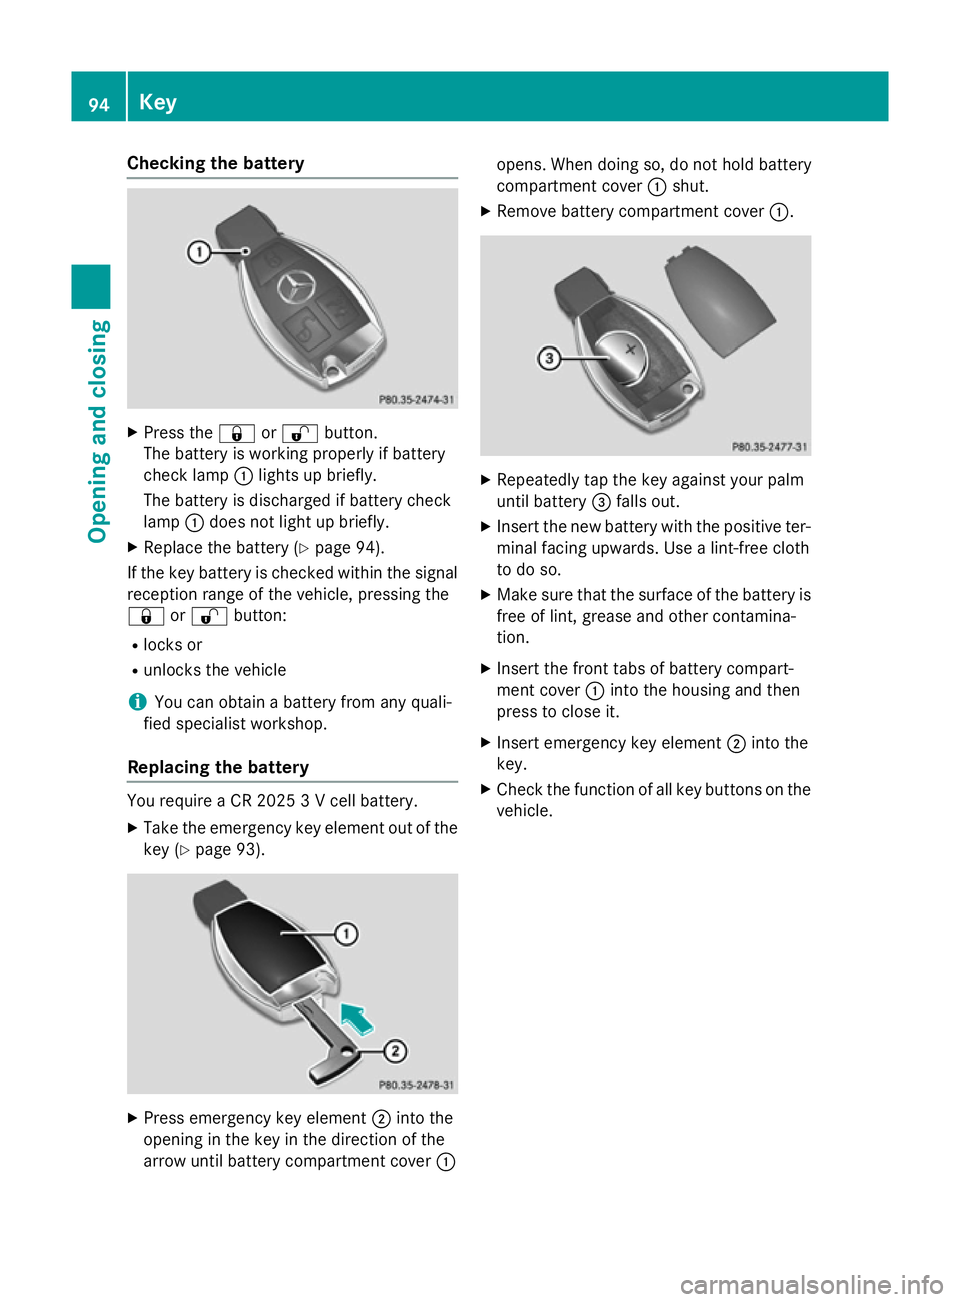
Press the &or% button.
The battery is working properly if battery
check lamp :lights up briefly.
The battery is discharged if battery check
lamp :does not light up briefly.
X Replace the battery (Y page 94).
If the key battery is checked within the signal reception range of the vehicle, pressing the
& or% button:
R locks or
R unlocks the vehicle
i You can obtain a battery from any quali-
fied specialist workshop.
Replacing the battery You require a CR 2025 3 V cell battery.
X Take the emergency key element out of the
key (Y page 93). X
Press emergency key element ;into the
opening in the key in the direction of the
arrow until battery compartment cover :opens. When doing so, do not hold battery
compartment cover
:shut.
X Remove battery compartment cover :. X
Repeatedly tap the key against your palm
until battery =falls out.
X Insert the new battery with the positive ter-
minal facing upwards. Use a lint-free cloth
to do so.
X Make sure that the surface of the battery is
free of lint, grease and other contamina-
tion.
X Insert the front tabs of battery compart-
ment cover :into the housing and then
press to close it.
X Insert emergency key element ;into the
key.
X Check the function of all key buttons on the
vehicle. 94
KeyOpening and closing
Page 101 of 489
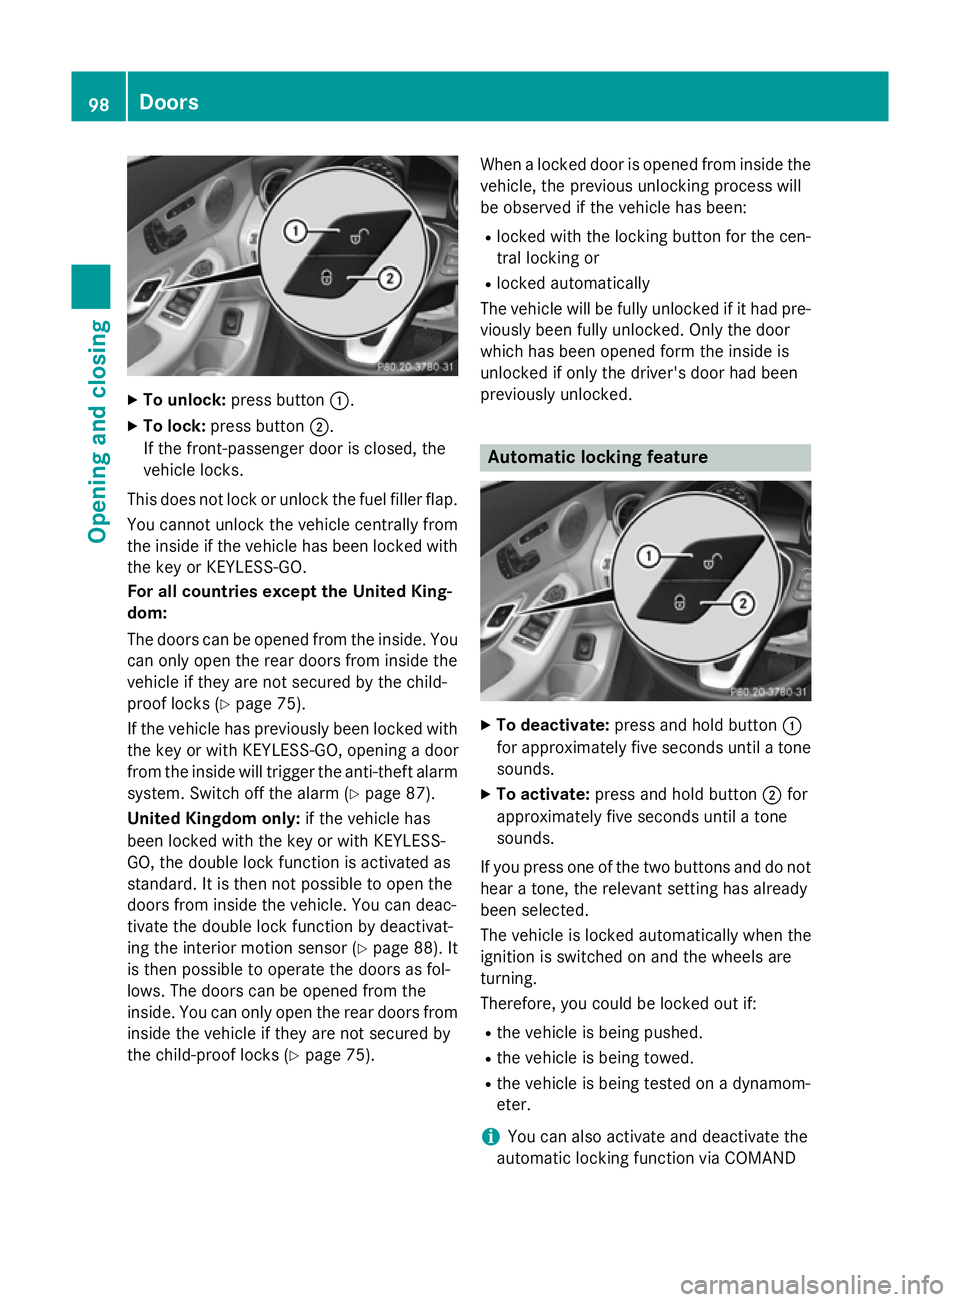
X
To unlock: press button :.
X To lock: press button ;.
If the front-passenger door is closed, the
vehicle locks.
This does not lock or unlock the fuel filler flap. You cannot unlock the vehicle centrally from
the inside if the vehicle has been locked with
the key or KEYLESS-GO.
For all countries except the United King-
dom:
The doors can be opened from the inside. You can only open the rear doors from inside the
vehicle if they are not secured by the child-
proof locks (Y page 75).
If the vehicle has previously been locked with the key or with KEYLESS-GO, opening a door
from the inside will trigger the anti-theft alarm system. Switch off the alarm (Y page 87).
United Kingdom only: if the vehicle has
been locked with the key or with KEYLESS-
GO, the double lock function is activated as
standard. It is then not possible to open the
doors from inside the vehicle. You can deac-
tivate the double lock function by deactivat-
ing the interior motion sensor (Y page 88). It
is then possible to operate the doors as fol-
lows. The doors can be opened from the
inside. You can only open the rear doors from
inside the vehicle if they are not secured by
the child-proof locks (Y page 75).When a locked door is opened from inside the
vehicle, the previous unlocking process will
be observed if the vehicle has been:
R locked with the locking button for the cen-
tral locking or
R locked automatically
The vehicle will be fully unlocked if it had pre- viously been fully unlocked. Only the door
which has been opened form the inside is
unlocked if only the driver's door had been
previously unlocked. Automatic locking feature
X
To deactivate: press and hold button :
for approximately five seconds until a tone sounds.
X To activate: press and hold button ;for
approximately five seconds until a tone
sounds.
If you press one of the two buttons and do not hear a tone, the relevant setting has already
been selected.
The vehicle is locked automatically when the
ignition is switched on and the wheels are
turning.
Therefore, you could be locked out if:
R the vehicle is being pushed.
R the vehicle is being towed.
R the vehicle is being tested on a dynamom-
eter.
i You can also activate and deactivate the
automatic locking function via COMAND 98
DoorsOpening and closing
Page 122 of 489
The seat belt should:
R fit snugly across your body
R be routed across the middle of your shoul-
der
R be routed across your hips in the pelvic
area
X Before starting off, adjust the rear-view mir-
ror and the exterior mirrors so that you
have a good view of the road and traffic
conditions (Y page 128).
X Vehicles with memory function: you can
store the seat, steering wheel, exterior mir-
ror and head-up display settings with the
memory function (Y page 131). Seats
Important safety notes
G
WARNING
If children adjust the seats, they could
become trapped, especially if they are unat-
tended. There is a risk of injury.
When leaving the vehicle, always take the key with you and lock the vehicle. Never leave
children unattended in the vehicle.
The seats can still be adjusted when there is
no key in the ignition lock. G
WARNING
When adjusting a seat, you or another vehicle occupant could become trapped by the guiderail of the seat, for instance. There is a risk of
injury.
Make sure that no one has any part of their
body within the sweep of the seat when
adjusting it.
Observe the safety notes on "Airbags"
(Y page 51) and "Children in the Vehicle"
(Y page 63). G
WARNING
If the driver's seat is not engaged, it can move unexpectedly while the vehicle is in motion. This could cause you to lose control of the
vehicle. There is a risk of an accident.
Always make sure that the driver's seat is
engaged before starting the engine.
G
WARNING
You could lose control of the vehicle while
driving if you:
R adjust the driver's seat, steering wheel or
mirrors
R fasten the seat belt
There is a risk of an accident.
Adjust the driver's seat, head restraint, steer-
ing wheel and mirrors and fasten your seat
belt before starting the engine. G
WARNING
If you adjust the seat height carelessly, you or other vehicle occupants could be trapped andthereby injured. Children in particular could
accidentally press the electrical seat adjust-
ment buttons and become trapped. There is a
risk of injury.
While moving the seats, make sure that your
hands or other body parts do not get under the
lever assembly of the seat adjustment sys-
tem. G
WARNING
The head restraints cannot provide the inten-
ded protection unless they are fitted and
adjusted correctly. There is an increased risk of injury to the head and neck in the event of
an accident or sudden braking, for example.
Always drive with the head restraints fitted.
Ensure that the centre of the head restraints
support the back of each vehicle occupant's
head at eye level before driving off. G
WARNING
The seat belt does not offer the intended level of protection if you have not moved the back-
rest to an almost vertical position. When brak-
ing or in the event of an accident, you could
slide underneath the seat belt and sustain Seats
119Seats, steering wheel and mirrors
Z
Page 127 of 489
Problems with the seat heating
Problem
Possible causes/consequences and
M
MSolutions The seat heating has
switched off prema-
turely or cannot be
switched on. The on-board voltage is too low because too many electrical con-
sumers are switched on.
X Switch off electrical consumers that you do not need, such as
the rear window heating or interior lighting.
Once the battery is sufficiently charged, the seat heating can be
switched back on manually. Switching the seat ventilation on/off
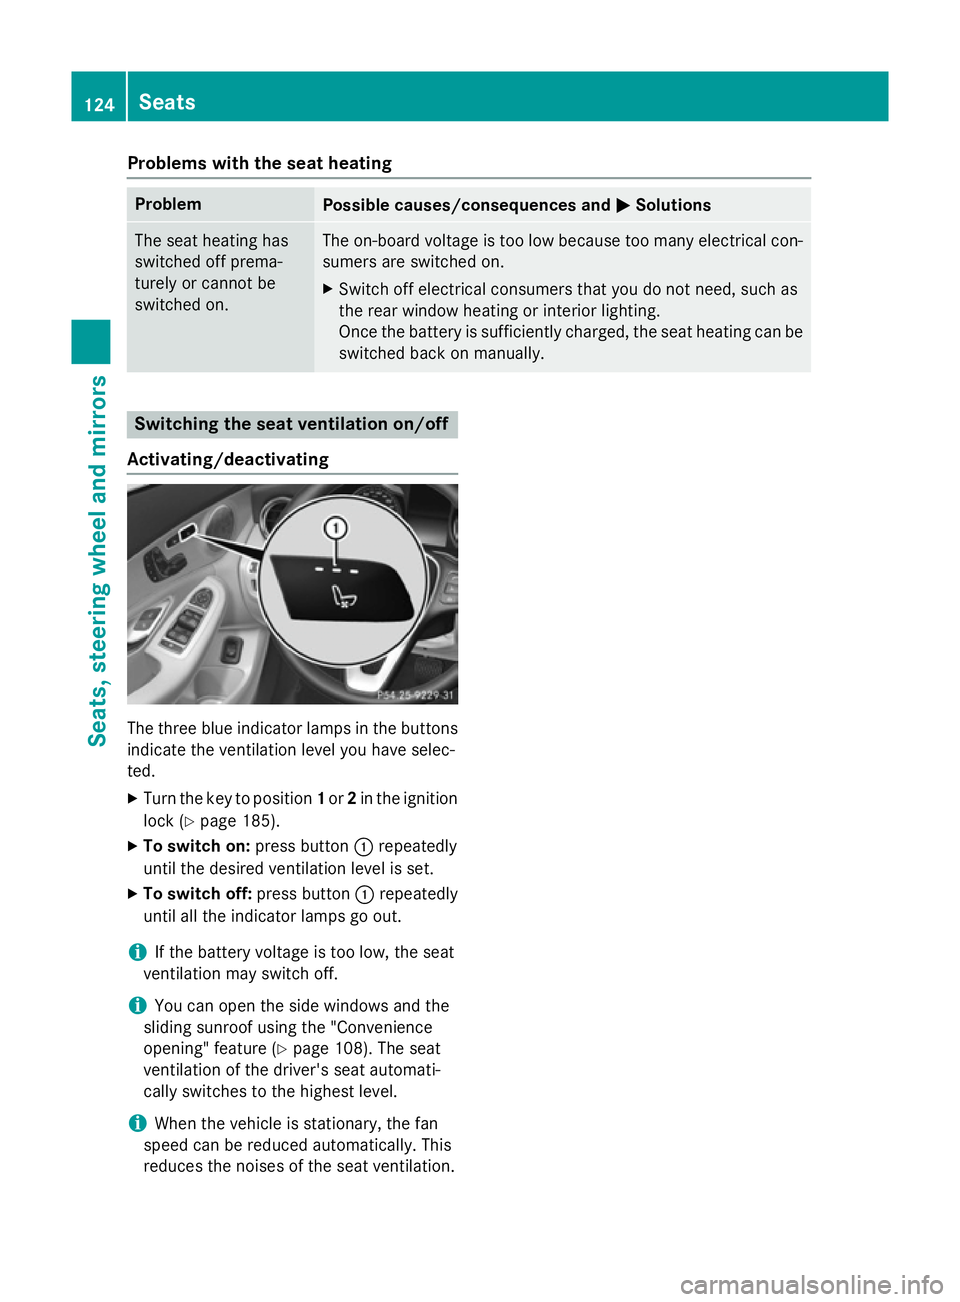
Activating/deactivating The three blue indicator lamps in the buttons
indicate the ventilation level you have selec-
ted.
X Turn the key to position 1or 2in the ignition
lock (Y page 185).
X To switch on: press button:repeatedly
until the desired ventilation level is set.
X To switch off: press button:repeatedly
until all the indicator lamps go out.
i If the battery voltage is too low, the seat
ventilation may switch off.
i You can open the side windows and the
sliding sunroof using the "Convenience
opening" feature (Y page 108). The seat
ventilation of the driver's seat automati-
cally switches to the highest level.
i When the vehicle is stationary, the fan
speed can be reduced automatically. This
reduces the noises of the seat ventilation. 124
SeatsSeats, steering wheel and mirrors
Page 129 of 489
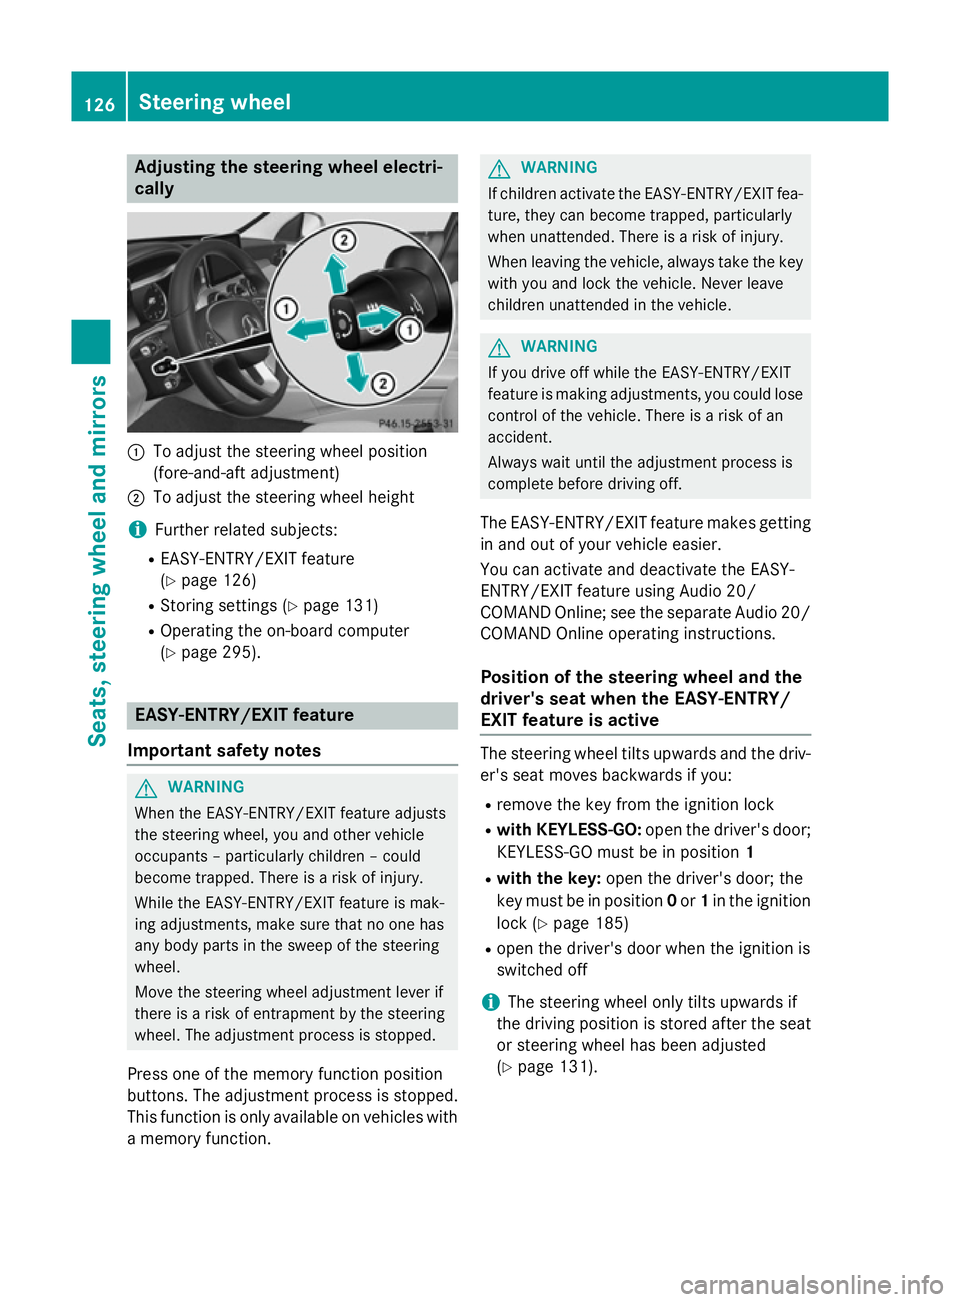
Adjusting the steering wheel electri-
cally :
To adjust the steering wheel position
(fore-and-aft adjustment)
; To adjust the steering wheel height
i Further related subjects:
R EASY-ENTRY/EXIT feature
(Y page 126)
R Storing settings (Y page 131)
R Operating the on-board computer
(Y page 295). EASY-ENTRY/EXIT feature
Important safety notes G
WARNING
When the EASY-ENTRY/EXIT feature adjusts
the steering wheel, you and other vehicle
occupants – particularly children – could
become trapped. There is a risk of injury.
While the EASY-ENTRY/EXIT feature is mak-
ing adjustments, make sure that no one has
any body parts in the sweep of the steering
wheel.
Move the steering wheel adjustment lever if
there is a risk of entrapment by the steering
wheel. The adjustment process is stopped.
Press one of the memory function position
buttons. The adjustment process is stopped.
This function is only available on vehicles with
a memory function. G
WARNING
If children activate the EASY-ENTRY/EXIT fea- ture, they can become trapped, particularly
when unattended. There is a risk of injury.
When leaving the vehicle, always take the key with you and lock the vehicle. Never leave
children unattended in the vehicle. G
WARNING
If you drive off while the EASY-ENTRY/EXIT
feature is making adjustments, you could lose
control of the vehicle. There is a risk of an
accident.
Always wait until the adjustment process is
complete before driving off.
The EASY-ENTRY/EXIT feature makes getting in and out of your vehicle easier.
You can activate and deactivate the EASY-
ENTRY/EXIT feature using Audio 20/
COMAND Online; see the separate Audio 20/ COMAND Online operating instructions.
Position of the steering wheel and the
driver's seat when the EASY-ENTRY/
EXIT feature is active The steering wheel tilts upwards and the driv-
er's seat moves backwards if you:
R remove the key from the ignition lock
R with KEYLESS-GO: open the driver's door;
KEYLESS-GO must be in position 1
R with the key: open the driver's door; the
key must be in position 0or 1in the ignition
lock (Y page 185)
R open the driver's door when the ignition is
switched off
i The steering wheel only tilts upwards if
the driving position is stored after the seat
or steering wheel has been adjusted
(Y page 131). 126
Steering wheelSeats
, steering wheel and mirrors