2014 MERCEDES-BENZ C-CLASS ESTATE washer fluid
[x] Cancel search: washer fluidPage 22 of 489
Seat belts
Adjusting the driver's and front-
passenger seat belt .........................50
Adjusting the height ......................... 49
Cleaning ......................................... 408
Display message ............................ 326
Fastening ......................................... 49
Important safety guidelines ............. 47
Introduction .................................... .47
Rear seat belt status indicato r .........50
Releasin g......................................... 49
Warning lamp ................................. 353
Warning lamp (function) ................... 50
Seats
Adjusting (electrically) ................... 121
Adjusting (manually and electri-
cally) .............................................. 120
Adjusting the 4-way lumbar sup-
port ................................................ 123
Adjusting the head restraint .......... 121
Cleaning the cover ......................... 407
Correct driver's seat position ........ 118
Important safety notes .................. 119
Seat heating .................................. 123
Seat heating problem .................... 124
Seat ventilation .............................. 124
Seat ventilation problem ................ 125
Storing settings (memory func-
tion) ............................................... 131
Switching seat heating on/of f....... 123
Switching the seat ventilation on/
off .................................................. 124
Selector lever
Cleaning ......................................... 407
see Automatic transmission
Sensors (cleaning instructions) ....... 405
Service
see ASSYST PLUS
Service Centre
see Qualified specialist workshop
Service menu (on-board com-
puter) .................................................. 308
Service products
AdBlue® special additive s............. 474
Brake fluid ..................................... 476
Coolant (engine) ............................ 476
Engine oil ....................................... 475
Fuel ................................................ 470 Important safety notes .................. 470
Washer fluid ................................... 477
Settings
Factory (on-board computer) ......... 315
On-board compute r....................... 309
Shifting to neutral (manual trans-
mission) ............................................. 195
Side lamps
Switching on/of f........................... 136
Side windows
Convenience closing ...................... 108
Convenience opening .................... 108
Important safety notes .................. 106
Opening/closing ............................ 107
Problem (malfunction) ................... 110
Resetting ....................................... 109
Sidebag ................................................ 53
Sliding sunroof
Opening/closing ............................ 111
Rain closing feature ....................... 112
Resetting ....................................... 112
see Panorama sliding sunroof
Snow chains ...................................... 435
Sockets
Centre console .............................. 385
General notes ................................ 385
Rear compartment ......................... 386
Specialist workshop ............................ 27
Spectacles compartment ................. 371
Speed, controlling
see Cruise control
Speedometer
Activating/deactivating the addi-
tional speedometer ........................ 314
Digital ............................................ 301
In the Instrument cluster ................. 34
Segments ...................................... 294
Selecting the unit of measure-
ment .............................................. 314
see Instrument cluster
SPEEDTRONIC
Deactivating variable ..................... 225
Display message ............................ 343
Function/note s............................. 223
Important safety notes .................. 223
LIM indicator lamp ......................... 223
Permanent ..................................... 225 Index
19
Page 26 of 489
Hybrid system ................................ 364
LIM (cruise control) ........................ 220
LIM (DISTRONIC PLUS) .................. 227
LIM (variable SPEEDTRONIC) ......... 223
Overview .......................................... 35
Parking brake ................................ 361
PASSENGER AIR BAG ...................... 46
RBS (Recuperative Brake Sys-
tem) ............................................... 364
Reserve fuel ................................... 362
Seat belt ........................................ 353
SRS ................................................ 285
Steering ......................................... 367
Tyre pressure monitor ................... 366
Warning triangle ................................ 410
Warnings
Stickers ........................................... 42
Washer fluid
Display messag e............................ 351
Wheel and tyre combinations
see Tyres
Wheel bolt tightening torque ........... 447
Wheel chock ...................................... 443
Wheels
Changing a whee l.......................... 441
Changing/replacing ....................... 442
Checking ........................................ 433
Cleaning ......................................... 403
Emergency spare wheel ................. 463
Fitting a new wheel ........................ 446
Fitting a wheel ............................... 442
Important safety notes .................. 432
Removing a whee l.......................... 446
Storing ........................................... 442
Tightening torque ........................... 447
Wheel size/tyre size ...................... 448
Windowbag
Display message ............................ 328
Operation ......................................... 53
Windows
Cleaning ......................................... 403
see Side windows
Windscreen
Demisting ...................................... 166
Windscreen washer fluid
see Windscreen washer system
Windscreen washer system
Notes ............................................. 477 Topping up ..................................... 398
Windscreen wipers
Problem (malfunction) ................... 150
Rear window wipe r........................ 147
Replacing the wiper blades ............ 147
Switching on/of f........................... 146
Winter operation
Important safety notes .................. 434
Radiator cover ............................... 396
Slippery road surfaces ................... 219
Snow chains .................................. 435
Summer tyres ................................ 434
Winter tyres
Limiting the speed (on-board com-
puter) ............................................. 315
M+S tyres ...................................... 434
Wiper blades
Cleaning ......................................... 404
Important safety notes .................. 147
Replacing ....................................... 147
Replacing (on the rear window )..... 149
Replacing (windscreen) .................. 147
Wooden trim (cleaning instruc-
tions) .................................................. 407
Workshop
see Qualified specialist workshop Index
23
Page 149 of 489
parts placed to one side: 2 clips
;in the
upper part of handle =and 4 clips Ain
trim B.
X If not, remove the missing metal clips from
the metal openings in the tailgate and
insert them in the appropriate places.
X Take trim Band connect plug connector
C to the surround lighting.
i The surround lighting only illuminates
when the tailgate has been shut and reop-
ened.
X Vehicles with EASY-PACK tailgate: insert
the connector for the operating switch.
X Vehicles with electrical fold-out trailer
hitch: insert the connector for the operat-
ing switch.
X Position trim Band engage it in place by
tapping it with your hand, starting from the outside.
X Clip in the lower section of handle :again.
X Insert and engage the upper section of han-
dle =into lower section :.Windscreen wipers
Switching the windscreen wipers on/
off
! Do not operate the windscreen wipers
when the windscreen is dry, as this could
damage the wiper blades. Moreover, dust
that has collected on the windscreen can
scratch the glass if wiping takes place when the windscreen is dry.
If it is necessary to switch on the wind-
screen wipers in dry weather conditions,
always operate them using washer fluid.
! If the windscreen wipers leave smears on
the windscreen after the vehicle has been
washed in an automatic car wash, this may
be due to wax or other residue. Clean the
windscreen with washer fluid after an auto- matic car wash. !
Intermittent wiping with rain sensor: due
to optical influences and the windscreen
becoming dirty in dry weather conditions,
the windscreen wipers may be activated
inadvertently. This could damage the wind- screen wiper blades or scratch the wind-
screen.
For this reason, you should always switch
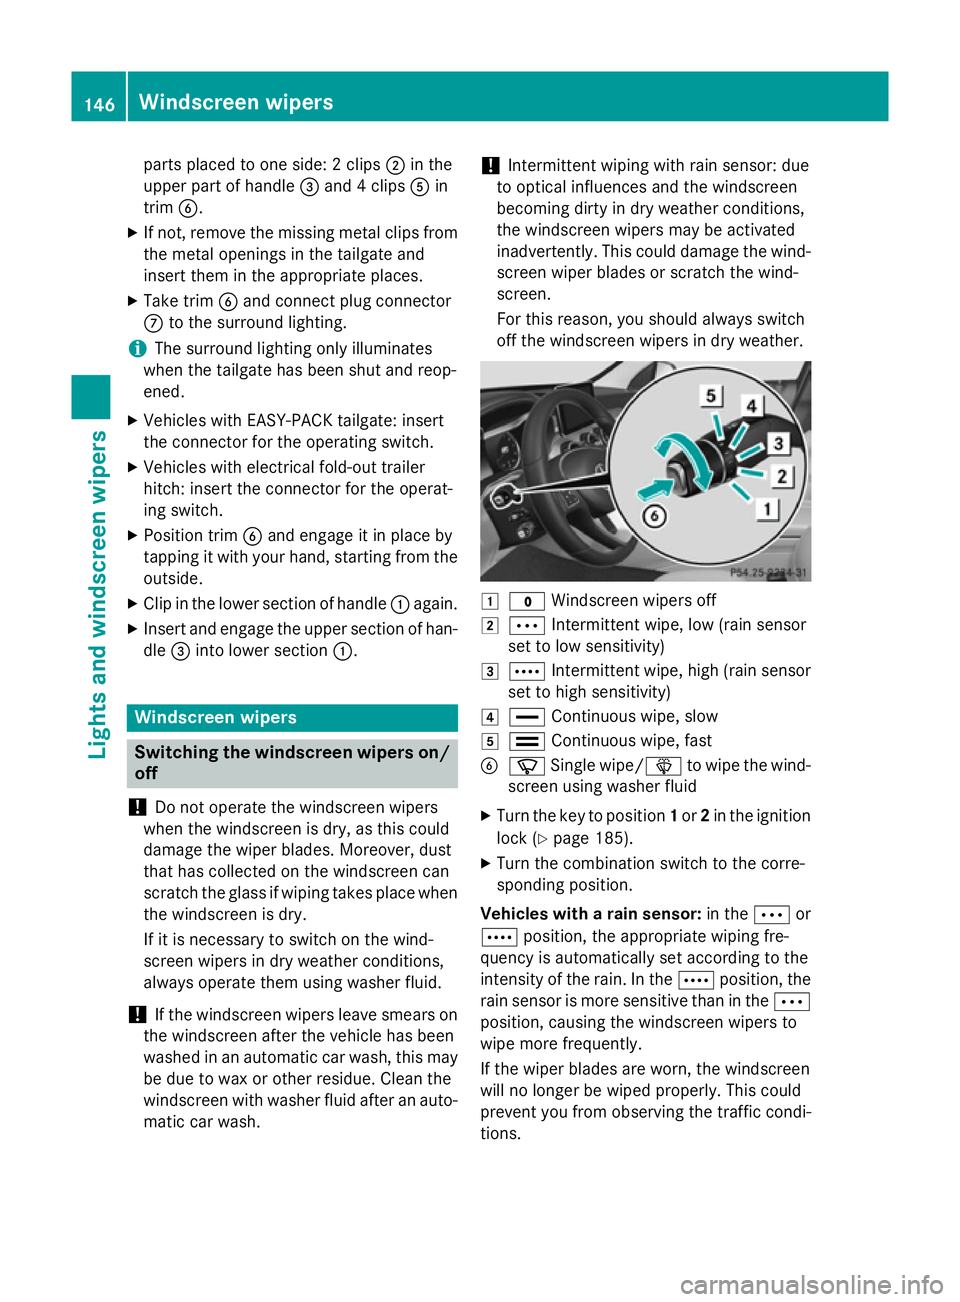
off the windscreen wipers in dry weather. 1
$ Windscreen wipers off
2 Ä Intermittent wipe, low (rain sensor
set to low sensitivity)
3 Å Intermittent wipe, high (rain sensor
set to high sensitivity)
4 ° Continuous wipe, slow
5 ¯ Continuous wipe, fast
B í Single wipe/ îto wipe the wind-
screen using washer fluid
X Turn the key to position 1or 2in the ignition
lock (Y page 185).
X Turn the combination switch to the corre-
sponding position.
Vehicles with a rain sensor: in theÄor
Å position, the appropriate wiping fre-
quency is automatically set according to the
intensity of the rain. In the Åposition, the
rain sensor is more sensitive than in the Ä
position, causing the windscreen wipers to
wipe more frequently.
If the wiper blades are worn, the windscreen
will no longer be wiped properly. This could
prevent you from observing the traffic condi-
tions. 146
Windscreen wipersLights and windscreen wipers
Page 150 of 489
Switching the rear window wiper on/
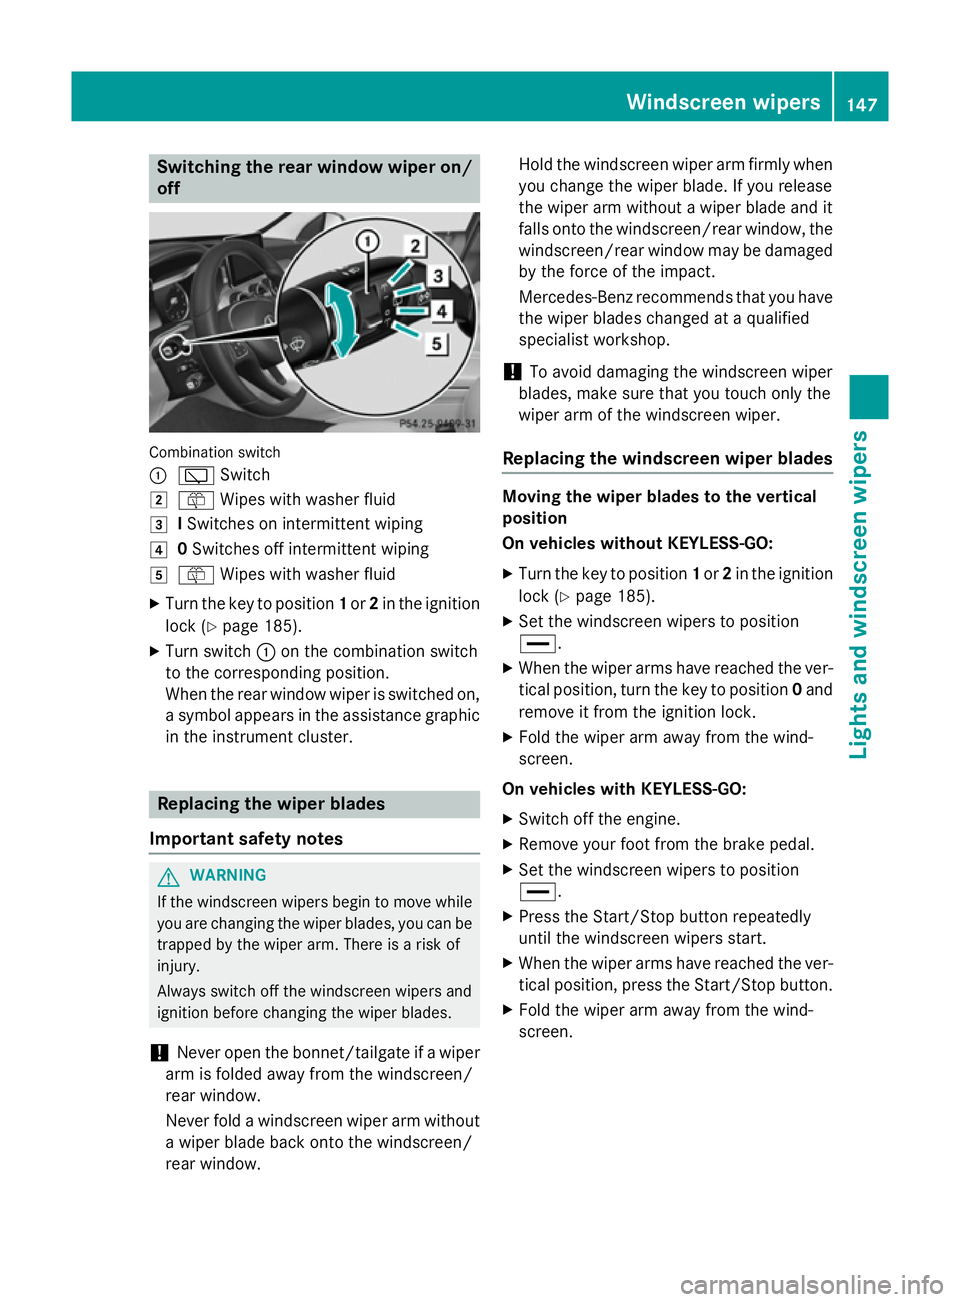
off Combination switch
:
è Switch
2 ô Wipes with washer fluid
3 ISwitches on intermittent wiping
4 0Switches off intermittent wiping
5 ô Wipes with washer fluid
X Turn the key to position 1or 2in the ignition
lock (Y page 185).
X Turn switch :on the combination switch
to the corresponding position.
When the rear window wiper is switched on,
a symbol appears in the assistance graphic
in the instrument cluster. Replacing the wiper blades
Important safety notes G
WARNING
If the windscreen wipers begin to move while
you are changing the wiper blades, you can be trapped by the wiper arm. There is a risk of
injury.
Always switch off the windscreen wipers and
ignition before changing the wiper blades.
! Never open the bonnet/tailgate if a wiper
arm is folded away from the windscreen/
rear window.
Never fold a windscreen wiper arm without a wiper blade back onto the windscreen/
rear window. Hold the windscreen wiper arm firmly when
you change the wiper blade. If you release
the wiper arm without a wiper blade and it
falls onto the windscreen/rear window, the windscreen/rear window may be damaged
by the force of the impact.
Mercedes-Benz recommends that you have the wiper blades changed at a qualified
specialist workshop.
! To avoid damaging the windscreen wiper
blades, make sure that you touch only the
wiper arm of the windscreen wiper.
Replacing the windscreen wiper blades Moving the wiper blades to the vertical
position
On vehicles without KEYLESS-GO:
X Turn the key to position 1or 2in the ignition
lock (Y page 185).
X Set the windscreen wipers to position
°.
X When the wiper arms have reached the ver-
tical position, turn the key to position 0and
remove it from the ignition lock.
X Fold the wiper arm away from the wind-
screen.
On vehicles with KEYLESS-GO:
X Switch off the engine.
X Remove your foot from the brake pedal.
X Set the windscreen wipers to position
°.
X Press the Start/Stop button repeatedly
until the windscreen wipers start.
X When the wiper arms have reached the ver-
tical position, press the Start/Stop button.
X Fold the wiper arm away from the wind-
screen. Windscreen wipers
147Lights and windscreen wipers Z
Page 153 of 489
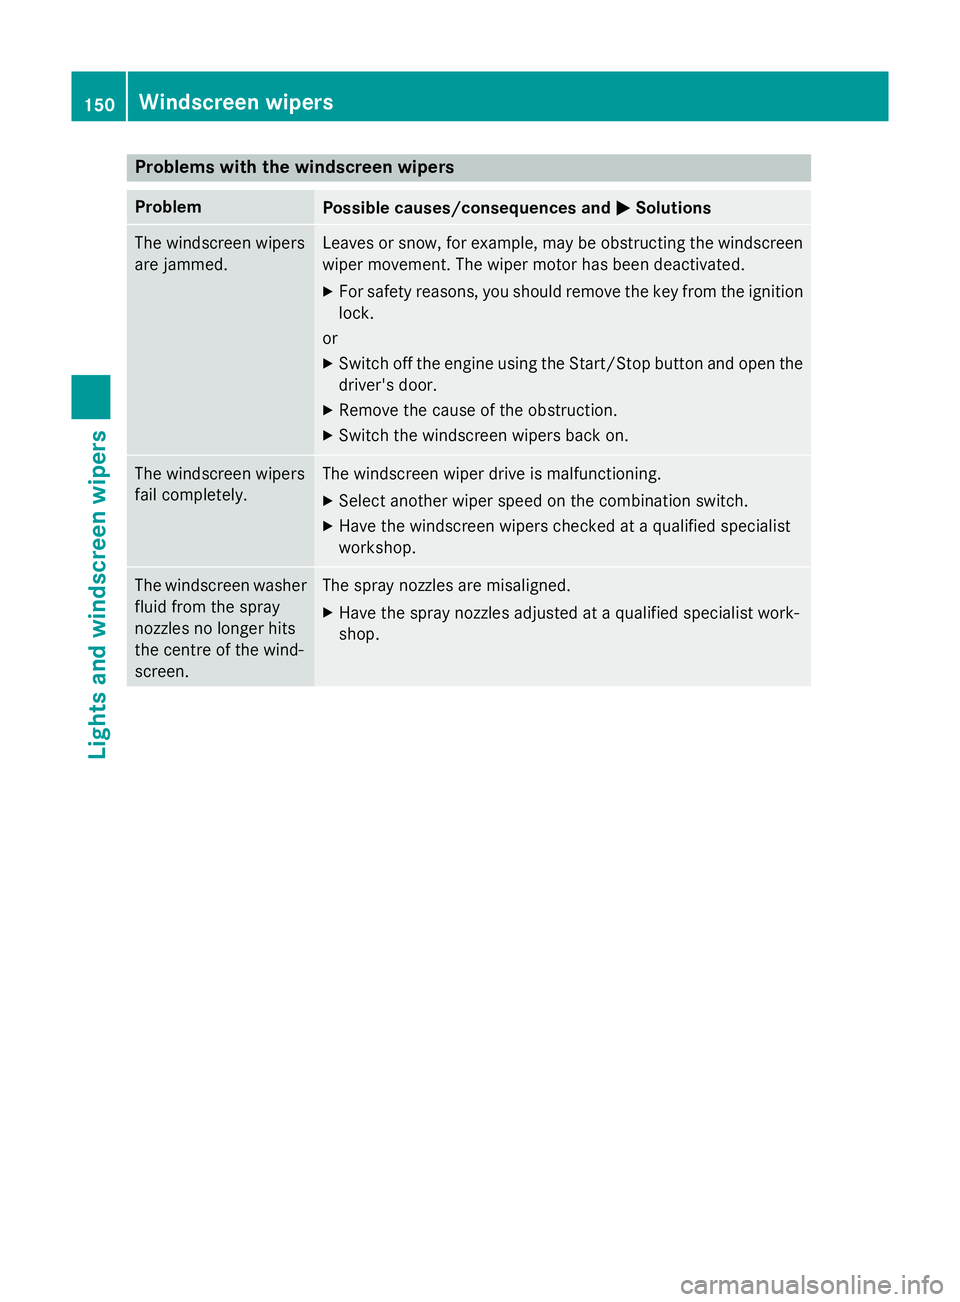
Problems with the windscreen wipers
Problem
Possible causes/consequences and
M
MSolutions The windscreen wipers
are jammed. Leaves or snow, for example, may be obstructing the windscreen
wiper movement. The wiper motor has been deactivated.
X For safety reasons, you should remove the key from the ignition
lock.
or
X Switch off the engine using the Start/Stop button and open the
driver's door.
X Remove the cause of the obstruction.
X Switch the windscreen wipers back on. The windscreen wipers
fail completely. The windscreen wiper drive is malfunctioning.
X Select another wiper speed on the combination switch.
X Have the windscreen wipers checked at a qualified specialist
workshop. The windscreen washer
fluid from the spray
nozzles no longer hits
the centre of the wind-
screen. The spray nozzles are misaligned.
X Have the spray nozzles adjusted at a qualified specialist work-
shop. 150
Windscreen wipersLights and windscreen wipers
Page 354 of 489
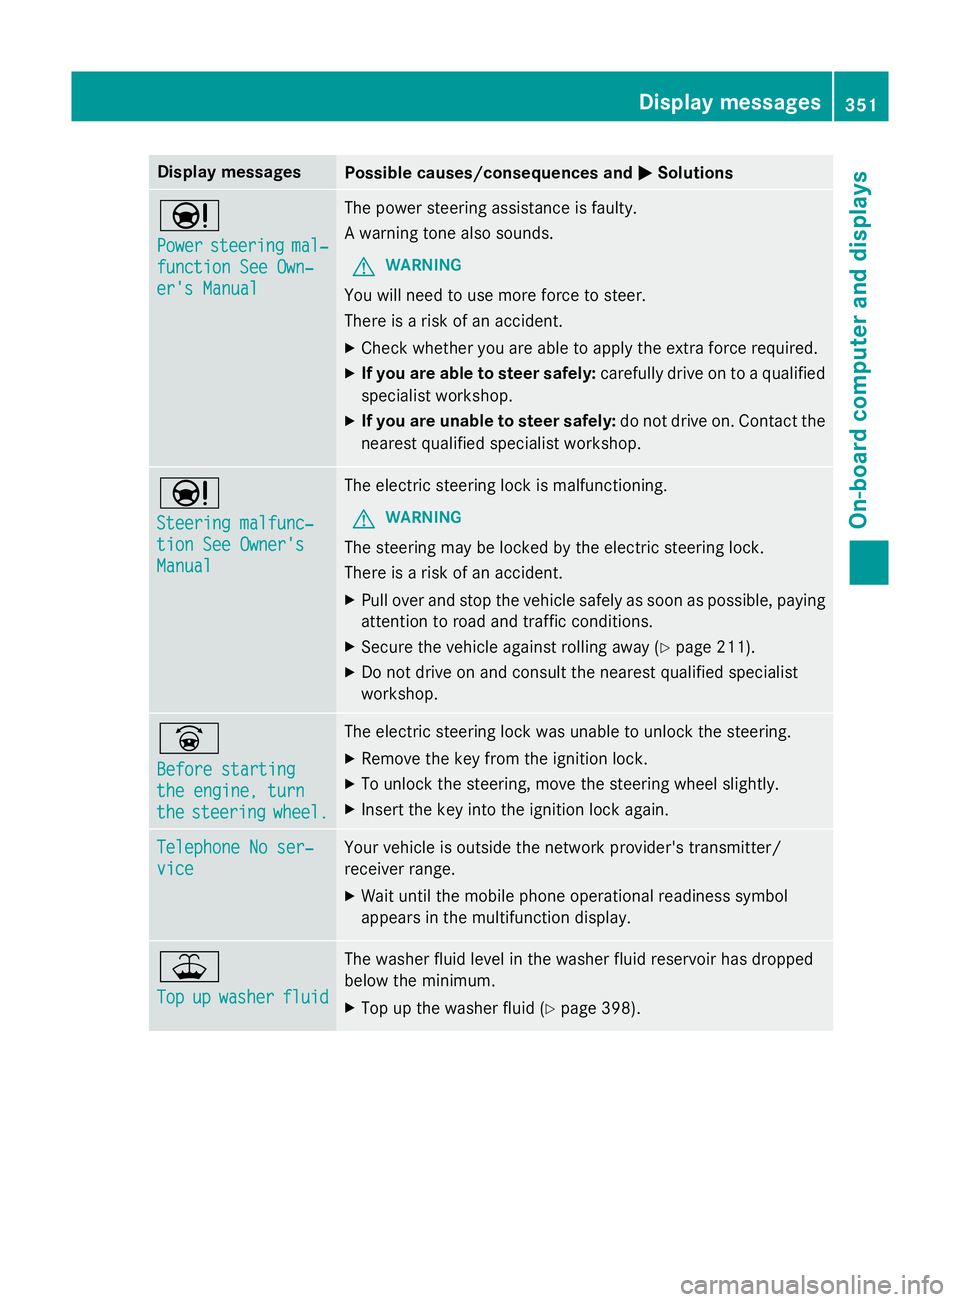
Display messages
Possible causes/consequences and
M
MSolutions Ð
Power Power
steering
steering mal‐
mal‐
function See Own‐
function See Own‐
er's Manual er's Manual The power steering assistance is faulty.
A warning tone also sounds.
G WARNING
You will need to use more force to steer.
There is a risk of an accident. X Check whether you are able to apply the extra force required.
X If you are able to steer safely: carefully drive on to a qualified
specialist workshop.
X If you are unable to steer safely: do not drive on. Contact the
nearest qualified specialist workshop. Ð
Steering malfunc‐ Steering malfunc‐
tion See Owner's tion See Owner's
Manual Manual The electric steering lock is malfunctioning.
G WARNING
The steering may be locked by the electric steering lock.
There is a risk of an accident. X Pull over and stop the vehicle safely as soon as possible, paying
attention to road and traffic conditions.
X Secure the vehicle against rolling away (Y page 211).
X Do not drive on and consult the nearest qualified specialist
workshop. _
Before starting Before starting
the engine, turn the engine, turn
the the
steering
steering wheel.
wheel. The electric steering lock was unable to unlock the steering.
X Remove the key from the ignition lock.
X To unlock the steering, move the steering wheel slightly.
X Insert the key into the ignition lock again. Telephone No ser‐
Telephone No ser‐
vice vice Your vehicle is outside the network provider's transmitter/
receiver range.
X Wait until the mobile phone operational readiness symbol
appears in the multifunction display. ¥
Top Top
up
upwasher
washer fluid
fluid The washer fluid level in the washer fluid reservoir has dropped
below the minimum.
X Top up the washer fluid (Y page 398). Display
messages
351On-board computer and displays Z
Page 402 of 489
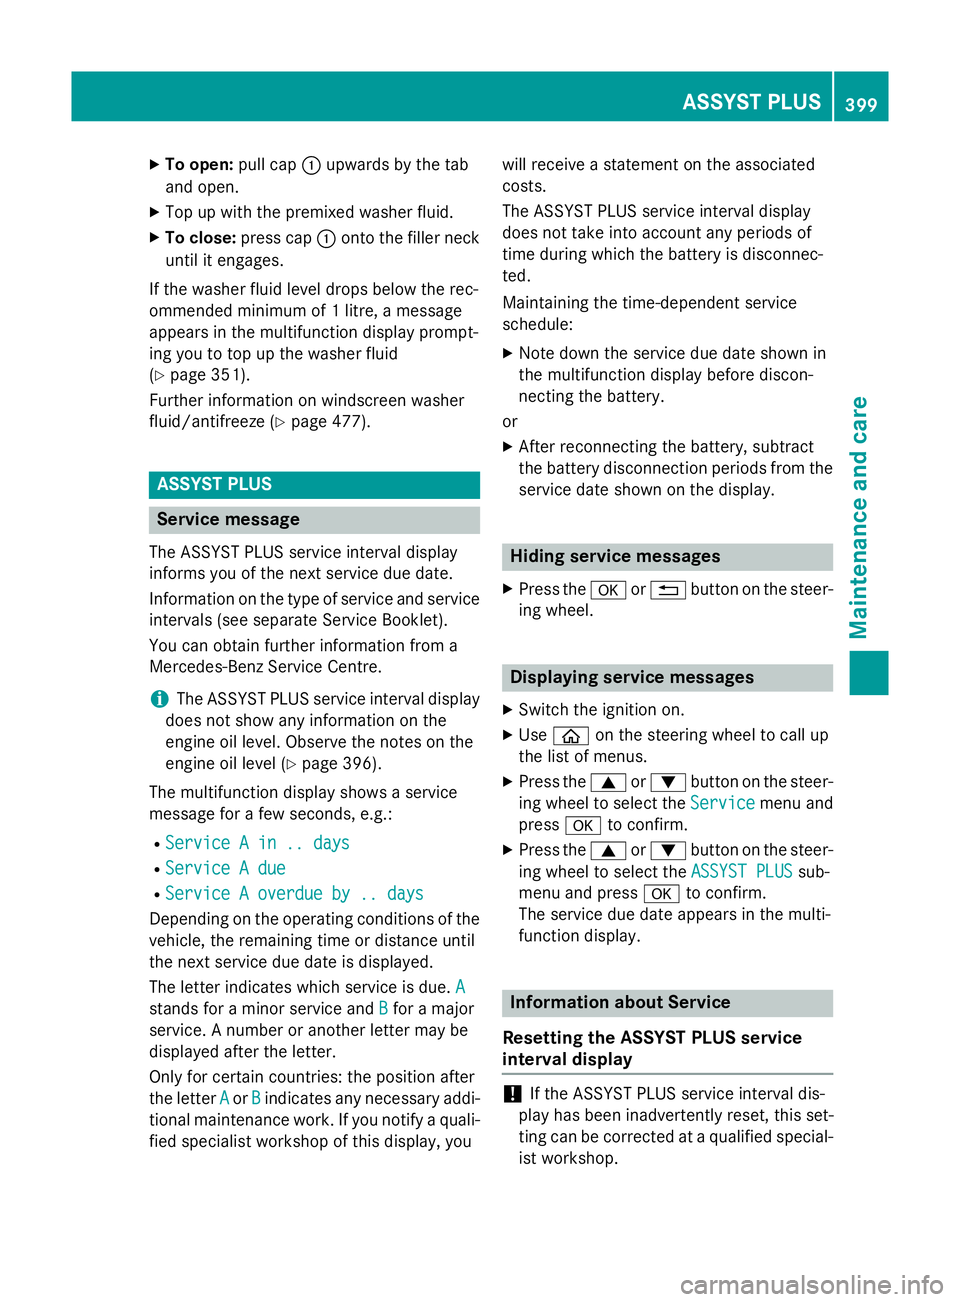
X
To open: pull cap:upwards by the tab
and open.
X Top up with the premixed washer fluid.
X To close: press cap :onto the filler neck
until it engages.
If the washer fluid level drops below the rec-
ommended minimum of 1 litre, a message
appears in the multifunction display prompt-
ing you to top up the washer fluid
(Y page 351).
Further information on windscreen washer
fluid/antifreeze (Y page 477). ASSYST PLUS
Service message
The ASSYST PLUS service interval display
informs you of the next service due date.
Information on the type of service and service intervals (see separate Service Booklet).
You can obtain further information from a
Mercedes-Benz Service Centre.
i The ASSYST PLUS service interval display
does not show any information on the
engine oil level. Observe the notes on the
engine oil level (Y page 396).
The multifunction display shows a service
message for a few seconds, e.g.:
R Service A in .. days
Service A in .. days
R Service A due Service A due
R Service A overdue by .. days
Service A overdue by .. days
Depending on the operating conditions of the vehicle, the remaining time or distance until
the next service due date is displayed.
The letter indicates which service is due. A
A
stands for a minor service and B
B for a major
service. A number or another letter may be
displayed after the letter.
Only for certain countries: the position after
the letter A
A or B Bindicates any necessary addi-
tional maintenance work. If you notify a quali- fied specialist workshop of this display, you will receive a statement on the associated
costs.
The ASSYST PLUS service interval display
does not take into account any periods of
time during which the battery is disconnec-
ted.
Maintaining the time-dependent service
schedule:
X Note down the service due date shown in
the multifunction display before discon-
necting the battery.
or
X After reconnecting the battery, subtract
the battery disconnection periods from the
service date shown on the display. Hiding service messages
X Press the aor% button on the steer-
ing wheel. Displaying service messages
X Switch the ignition on.
X Use ò on the steering wheel to call up
the list of menus.
X Press the 9or: button on the steer-
ing wheel to select the Service Servicemenu and
press ato confirm.
X Press the 9or: button on the steer-
ing wheel to select the ASSYST PLUS
ASSYST PLUS sub-
menu and press ato confirm.
The service due date appears in the multi-
function display. Information about Service
Resetting the ASSYST PLUS service
interval display !
If the ASSYST PLUS service interval dis-
play has been inadvertently reset, this set-
ting can be corrected at a qualified special-
ist workshop. ASSYST PLUS
399Maintenance and care Z
Page 474 of 489
Always keep service products out of the reach
of children. H
Environmental note
Dispose of service products in an environ-
mentally-responsible manner.
Service products include the following:
R fuels
R exhaust gas aftertreatment additives, e.g.
AdBlue ®
R lubricants (e.g. engine oil, transmission oil)
R coolant
R brake fluid
R windscreen washer fluid
R climate control system refrigerant
Components and service products must be
matched. Only use products recommended
by Mercedes-Benz. Damage which is caused
by the use of products which have not been
recommended is not covered by the
Mercedes-Benz warranty or goodwill ges-
tures. They are listed in this Mercedes-Benz
Owner's Manual in the appropriate section.
You can identify service products approved
by Mercedes-Benz by the following inscrip-
tions on the container:
R MB-Freigabe (e.g. MB-Freigabe 229.51)
R MB Approval (e.g. MB Approval 229.51)
Other designations or recommendations indi- cate a level of quality or a specification in
accordance with an MB Sheet Number (e.g.
MB 229.5). They have not necessarily been
approved by Mercedes-Benz.
Other identifications, for example:
R 0 W-30
R 5 W-30
R 5 W-40
Further information can be obtained from any
Mercedes-Benz Service Centre or on the
Internet at http://bevo.mercedes-benz.com. Fuel
Important safety notes G
WARNING
Fuel is highly flammable. If you handle fuel
incorrectly, there is a risk of fire and explo-
sion.
You must avoid fire, naked flames, creating
sparks and smoking. Switch off the engine
and, if applicable, the auxiliary heating before refuelling. G
WARNING
Fuels are poisonous and hazardous to health. There is a danger of injury.
Do not swallow fuel or let it come into contact
with skin, eyes or clothing. Do not inhale fuel
vapours. Keep fuels out of the reach of chil-
dren.
If you or others come into contact with fuel,
observe the following:
R Wash the fuel off any affected areas of skin
with water and soap immediately.
R If you get fuel in your eyes, rinse them thor-
oughly with clean water immediately. Seek immediate medical attention.
R If fuel is swallowed, seek immediate medi-
cal attention. Do not induce vomiting.
R Change any clothing that has come into
contact with fuel immediately.
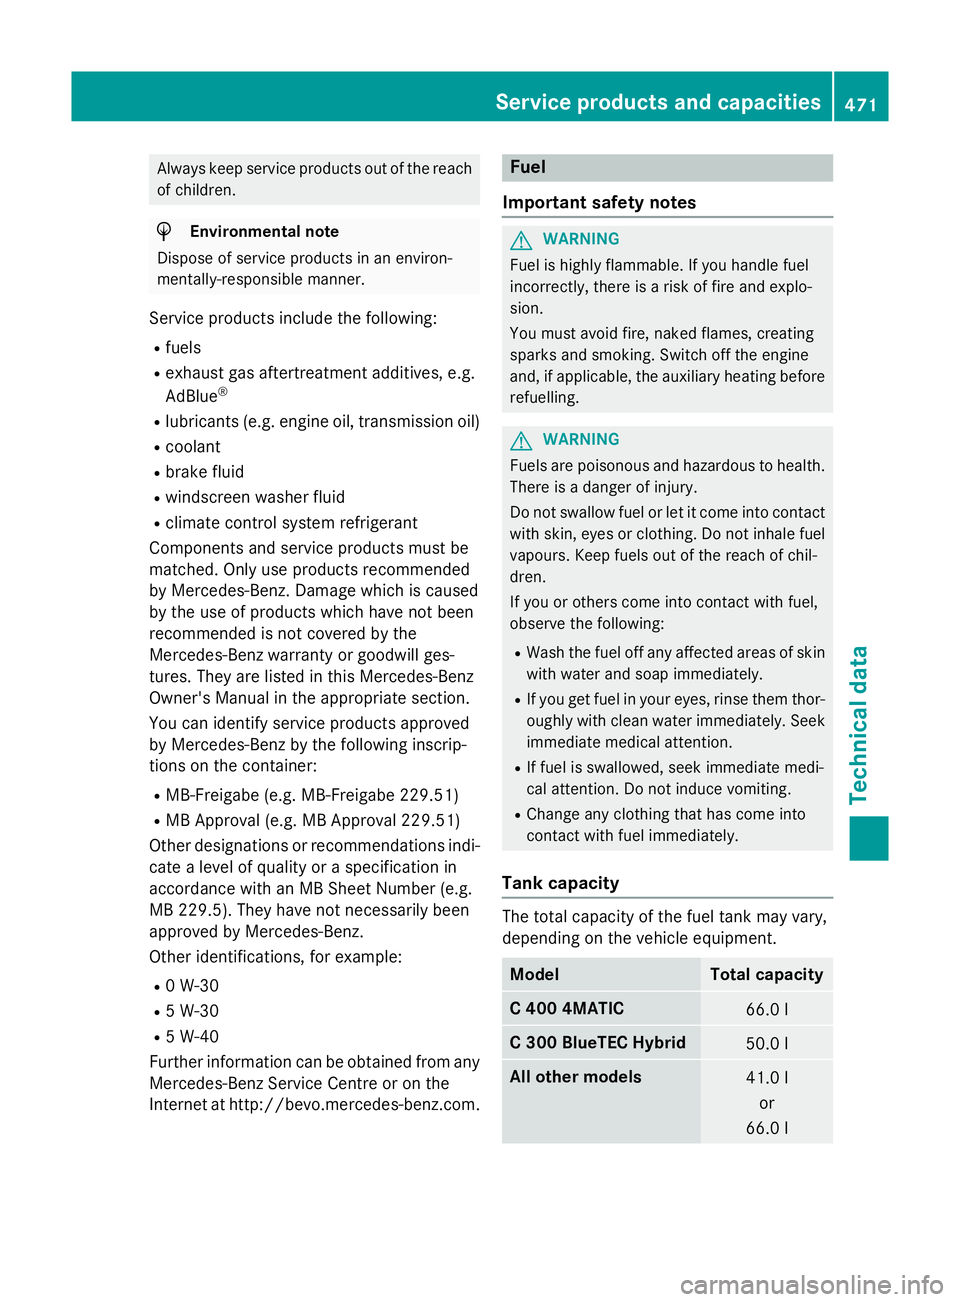
Tank capacity The total capacity of the fuel tank may vary,
depending on the vehicle equipment.
Model Total capacity
C 400 4MATIC
66.0 l
C 300 BlueTEC Hybrid
50.0 l
All other models
41.0 l
or
66.0 l Service products and capacities
471Technical data Z