2014 MERCEDES-BENZ B-CLASS SPORTS turn signal bulb
[x] Cancel search: turn signal bulbPage 8 of 360
Exhaus
tpipe .................................. 290
Exterior lights ................................ 289
Gea rors electo rlever .................... 290
Interior ........................................... 290
Matte finish ................................... 288
Notes ............................................. 285
Paint .............................................. 287
Plastic trim .................................... 290
Power washer ................................ 287
Rea rview camera .......................... 289
Roo flining ...................................... 291
Seat bel t........................................ 291
Seat cover ..................................... 291
Sensors ......................................... 289
Steering wheel ............................... 290
Trim pieces .................................... 290
Washing by hand ........................... 286
Wheels ........................................... 287
Windows ........................................ 288
Wiper blades .................................. 288
Wooden trim .................................. 290
Cargo compartment cover ...............258
Cargo compartment enlargement ...254
Important safety notes ..................254
Notes on use ................................. 256
Cargo compartment floor
Height adjustment .........................260
Important safety notes ..................259
Opening/closing ............................ 259
Stowag ewell (under) ..................... 259
Cargo net
Attaching ....................................... 259
Important safety information .........259
Cargo tie dow nrings ......................... 257
Car wash (care) ................................. 286
Center console Lowe rsection .................................. 35
Uppe rsection .................................. 34
Central locking
Automatic locking (on-board
computer) ...................................... 205
Locking/unlocking (SmartKey) ........74
Changing bulbs
Brake lamps ................................... 115
Cornering light function .................114
High-beam headlamps ...................113
License plate lighting .....................117
Low-beam headlamps ....................113Parking lamps
................................ 113
Rea rfog lamp ................................ 115
Reversing lamps ............................ 115
Standing lamps (front) ...................113
Tai llamps ...................................... 115
Turn signals (front) ......................... 114
Turn signals (rear) ..........................115
Child-proof locks
Important safety notes ....................61
Rea rdoors ....................................... 62
Children
In the vehicle ................................... 56
Restraint systems ............................ 56
Child seat
LATCH-typ e(ISOFIX) chil dseat
anchors ............................................ 60
On the front-passenger sea t............ 59
Top Tether ....................................... 60
Cigarette lighter ................................ 264
Climate control Automatic climate control .............123
Automatic climate control (dual-
zone) .............................................. 125
Controlling automatically ...............128
Cooling with aird ehumidification..126
Defrosting the windows .................130
Defrosting the windshield ..............130
Important safety notes ..................122
Indicator lamp ................................ 128
Notes on using automatic climate
control ........................................... 125
Notes on using dual-zone
automatic climate control ..............123
Overview of systems ......................122
Problems with cooling with air
dehumidification ............................ 128
Problem with the rear window
defroster ........................................ 132
Refrigerant ..................................... 352
Refrigerant filling capacity .............353
Setting the aird istribution.............129
Setting the airflow .........................129
Setting the airv ents...................... 133
Setting the temperature ................128
Switching air-recirculation mode
on/off ............................................ 132
Switching on/off ........................... 126
Switching residua lheato n/off ......132 6
Index
Page 14 of 360
Switching the surround lighting
on/of
f(on -board computer) ..........204
Turn signals ................................... 106
see Interior lighting
see Replacing bulbs
Light sensor (display message) .......223
Loading guidelines ............................250
Locking see Centra llocking
Locking (doors)
Automatic ........................................ 80
Emergency locking ........................... 81
From insid e(central locking
button) ............................................. 80
Locking centrally
see Centra llocking
Locking verification signal (on-
board computer) ............................... 205
Low-beam headlamps Changing bulbs .............................. 113
Display message ............................ 220
Setting for driving abroad
(symmetrical) ................................. 104
Switching on/off ........................... 105
Lumbar support
Adjusting the 4-way lumbar
support ............................................ 96M
M+S tires ............................................ 314
Malfunction message see Display messages
Matte finish (cleaning instructions) 288
mbrace Call priority .................................... 269
Display message ............................ 214
Downloading destinations
(COMAND) ..................................... 269
Downloading route s....................... 272
Emergency call .............................. 266
General notes ................................ 265
Geo fencing ................................... 273
Locating astolen vehicl e............... 271
MB info call button ........................268
Remote vehicle locking ..................271
Roadside Assistance button ..........267
Search &Send ............................... 270Self-test
......................................... 266
Speed alert .................................... 273
System .......................................... 266
Triggering the vehicle alarm ........... 273
Vehicle remote malfunction
diagnosi s....................................... 271
Vehicle remote unlocking ..............270
Mechanical key
Function/notes ................................ 75
Locking vehicle ................................ 81
Unlocking the driver's door ..............81
Memory card (audio) .........................197
Memory function ............................... 101
Message memory (on-board
computer) .......................................... 207
Messages see Display messages
Mirrors
see Exterior mirrors
see Rear-view mirror
see Vanity mirror (in the sun visor)
Mobile phone
Menu (on-board computer) ............197
Modifying the programming
(SmartKey) ........................................... 75
MOExtende dtires .............................. 295
Mounting wheels Lowerin gthe vehicle ...................... 339
Mounting anew wheel ................... 339
Preparing the vehicle .....................337
Raising the vehicle .........................337
Removing awheel .......................... 339
Securing the vehicle against
rolling away ................................... 337
MP3
Operation ....................................... 197
see separate operating instructions
Multifunctio ndisplay
Function/notes ............................. 192
Permanent displa y......................... 203
Multifunctio nsteering wheel
Operating the on-board computer .191
Overview .......................................... 3312
Index
Page 20 of 360
Labeling (overview)
........................329
Load bearing index (definition) ......335
Load index ..................................... 332
Load index (definition) ...................334
M+S tires ....................................... 314
Maximum loaded vehicle weight
(definition) ..................................... 334
Maximum loa donatire (definition) 334
Maximum permissible tire
pressure (definition) ....................... 334
Maximum tire loa d......................... 327
Maximum tire loa d(definition) .......334
MOExtended tires ..........................314
Optional equipment weight
(definition) ..................................... 335
PSI (pounds per square inch)
(definition) ..................................... 334
Replacing ....................................... 336
Service life ..................................... 314
Sidewall (definition) .......................335
Speed rating (definition) ................334
Storing ........................................... 336
Structure and characteristics
(definition) ..................................... 333
Summer tires ......................... 160, 314
Temperature .................................. 329
TIN (Tire Identification Number)
(definition) ..................................... 335
Tire bea d(definition) ...................... 335
Tire pressure (definition) ................335
Tire pressure s(recommended )...... 333
Tire size (data) ............................... 340
Tire size designation, load-bearing
capacity, spee drating .................... 330
Tire tread ....................................... 313
Tire tread (definition) .....................335
Total loa dlimit (definition) .............335
Traction ......................................... 328
Traction (definition) .......................335
Trea dwear ..................................... 328
Uniform Tire Quality Grading
Standard s...................................... 328
Uniform Tire Quality Grading
Standard s(definition) .................... 333
Unladen weight (definition) ............334
Wea rindicato r(definition) .............335
Whee lrim (definition ).................... 333
see Flat tire Top Tether
............................................ 60
Towing Important safety guidelines ...........305
Installing the towing eye. ...............306
Removing the towing eye. ..............306
Towing away
With both axle sonthe ground .......307
With front axle raised ..................... 307
Tow-starting
Emergency engine starting ............308
Important safety notes ..................305
Installing the towing eye. ...............306
Removing the towing eye. ..............306
Transmission
see Automatic transmission
Transmission position display .........144
Transporting the vehicle ..................307
Trim pieces (cleaning instructions) .290
Trip computer (on-board computer) 194
Trip odometer Calling up ....................................... 193
Resetting (on-board computer) ......195
Trunk
see Tailgate
Turn signals
Changing bulbs (front) ...................114
Changing bulbs (rear) ....................115
Display message ............................ 220
Switching on/off ........................... 106
Type identification plate
see Vehicle identification plate U
Unlocking Emergency unlocking .......................81
From insid ethe vehicle (central
unlocking button) ............................. 80 V
Vanity mirror (in the sun visor) ........263
Vehicle Correct use ...................................... 25
Data acquisition ............................... 26
Equipment ....................................... 22
Individua lsettings .......................... 202
Limited Warranty ............................. 2618
Index
Page 113 of 360
the Xenon bulb and touch the electrical
contacts. There is ariskoff atal injury.
Never touch the parts or the electrical
contacts of the Xenon bulb .Always have work
on the Xenon bulbs carried out at aqualified
specialist workshop.
If your vehicle is equipped with Xenon bulbs,
you can recognize this by the following: the
con eofl ight fro mthe Xenon bulbs moves
from the top to the bottom and back again
when you start the engine. For this to be
observed, the lights must be switched on
before startingt he engine.
Bulbs and lamps are an important aspect of
vehicle safety. You must therefore make sure
that these function correctly at all times.
Have the headlamp settingc hecked regularly.
Other bulbs G
WARNING
Bulbs, lamps and connectors can get very hot
when operating. If you change abulb, you
could burn yourself on these components.
There is arisk of injury.
Allow these components to cool down before
changing abulb.
Do not use abulb that has been dropped or if
its glass tube has been scratched.
The bulb may explode if:
R you touch it
R it is hot
R you drop it
R you scratchit
Only operate bulbs in enclosed lamps
designed for that purpose. Only install spare
bulbs of the same type and the specified
voltage.
Marks on the glass tube reduce the service
life of the bulbs. Do not touch the glass tube
with your bare hands. If necessary, clean the
glass tube when cold with alcohol or spirit and
rub it off with alint-free cloth. Protect bulbs from moisture during
operation. Do not allow bulbs to come into
contact with liquids.
There are bulbs other than the Xenon bulbs
that you cannot replace. Replace only the
bulbs listed (Y
page 111). Have the bulbs that
you cannot replace yourself changed at a
qualified specialist workshop.
If you require assistance changing bulbs,
consult aqualified specialist workshop.
If the new bulb still does not light up, consult
aq ualified specialist workshop.
Bulbs and lamps are an important aspect of
vehicle safety. You must therefore make sure
that these function correctly at all times.
Have the headlamp settingc hecked regularly. Overview: changing bulbs/bulb types
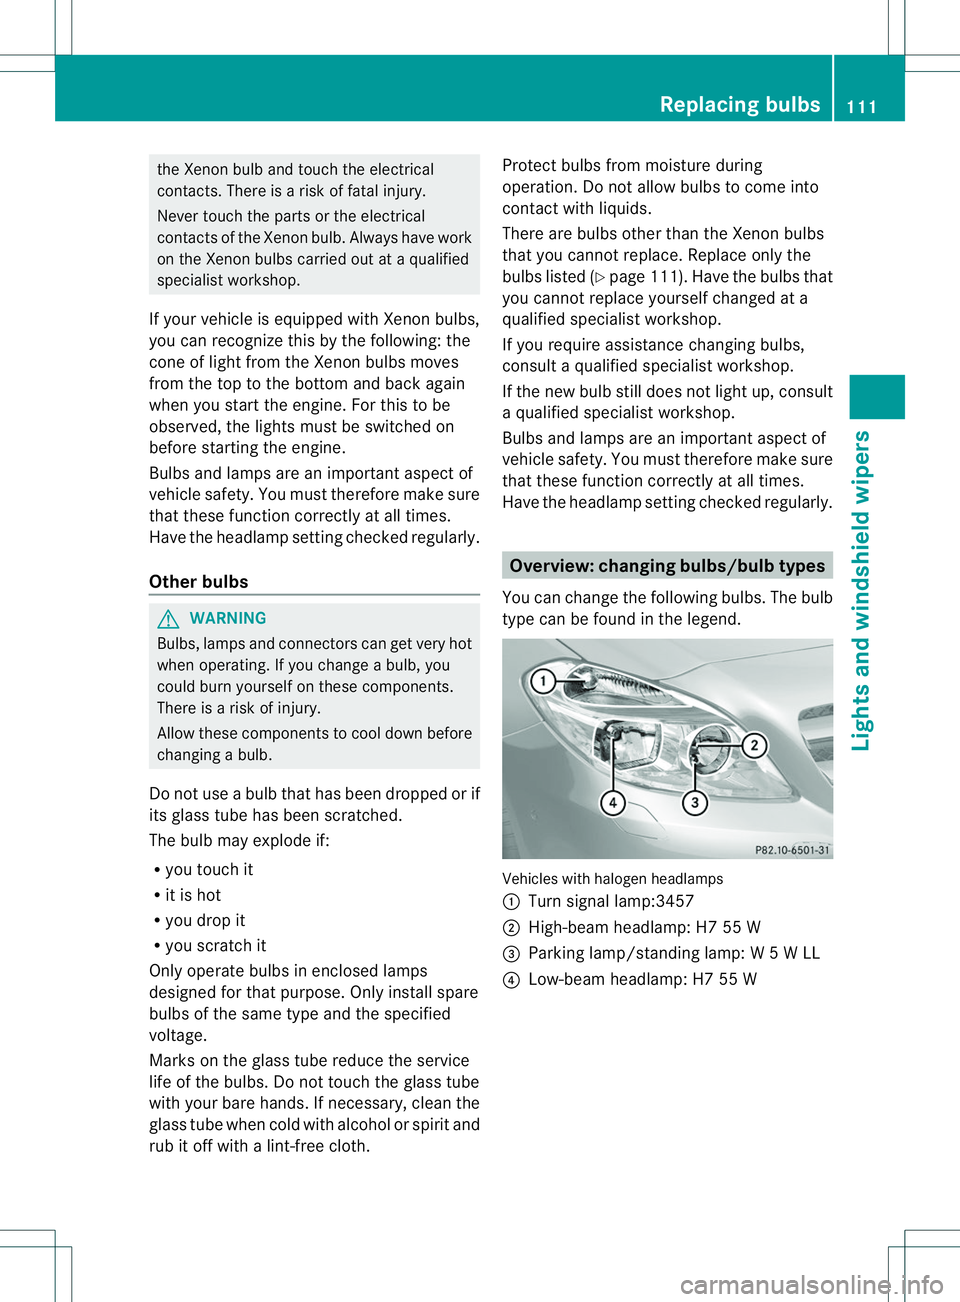
You can change the following bulbs. The bulb
type can be found in the legend. Vehicles with halogen headlamps
001A
Turn signal lamp:3457
0010 High-beam headlamp: H7 55 W
0023 Parking lamp/standing lamp: W5WLL
0021 Low-beam headlamp: H7 55 W Replacing bulbs
111Lights and windshield wipers Z
Page 114 of 360
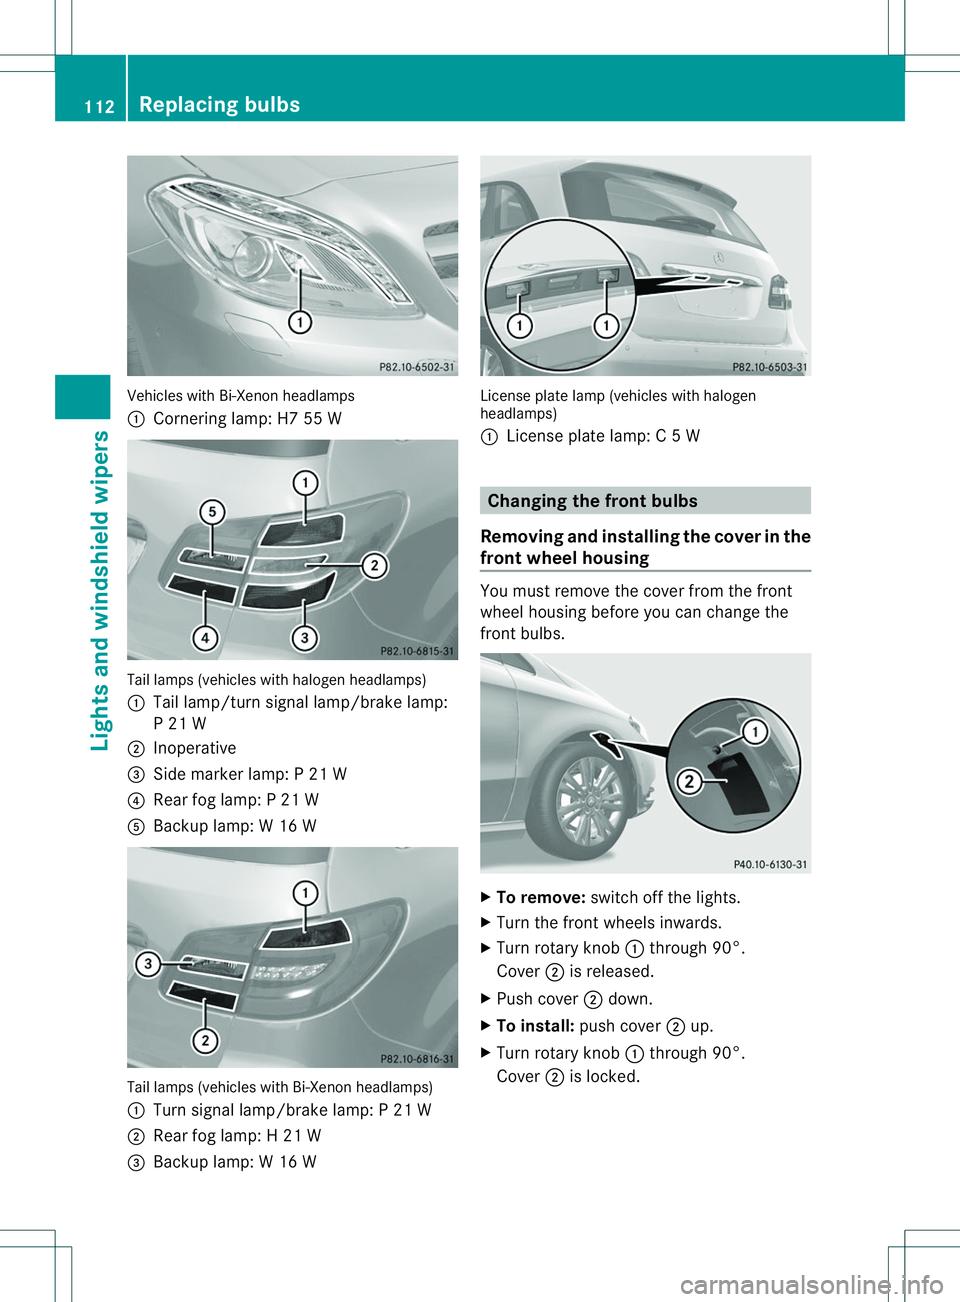
Vehicles with Bi-Xenon headlamps
001A
Cornering lamp: H7 55 W Tail lamps (vehicles with halogenh
eadlamps)
001A Tail lamp/turn signal lamp/brake lamp:
P21W
0010 Inoperative
0023 Side marker lamp: P21W
0021 Rear fog lamp: P21W
001E Backup lamp: W16W Tail lamps (vehicles with Bi-Xenon headlamps)
001A
Turn signal lamp/brake lamp: P21W
0010 Rear fog lamp: H21W
0023 Backup lamp: W16W License plate lamp (vehicles with halogen
headlamps)
001A
License plate lamp: C5W Changing th
efront bulbs
Removing and installin gthe cover in the
front wheel housing You must remove th
ecover from th efront
wheel housin gbefore you can change the
fron tbulbs. X
To remove: switch off thelights.
X Turn th efront wheel sinwards.
X Turn rotary knob 001Athrough 90°.
Cover 0010is released.
X Push cover 0010down.
X To install: push cover 0010up.
X Turn rotary knob 001Athrough 90°.
Cover 0010is locked. 112
Replacing bulbsLights and windshield wipers
Page 116 of 360
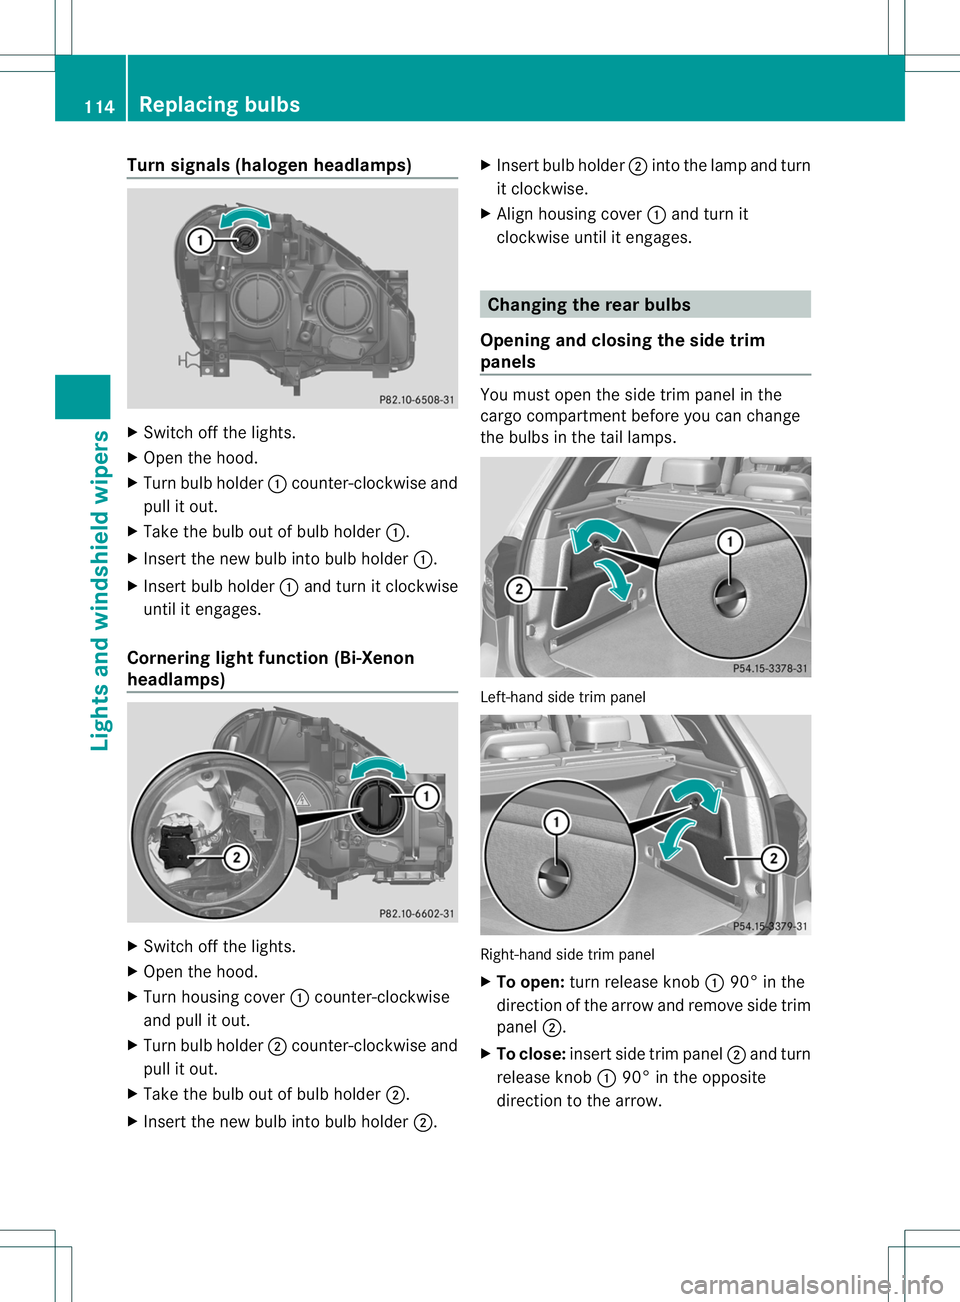
Turn signals (haloge
nheadlamps) X
Switch off the lights.
X Open the hood.
X Turn bulb holder 001Acounter-clockwis eand
pull it out.
X Take the bulb ou tofbulb holder 001A.
X Inser tthe new bulb into bulb holder 001A.
X Insert bulb holder 001Aand turn it clockwise
until it engages.
Cornering light function (Bi-Xenon
headlamps) X
Switch off the lights.
X Open the hood.
X Turn housing cover 001Acounter-clockwise
and pull it out.
X Turn bulb holder 0010counter-clockwise and
pull it out.
X Take the bulb out of bulb holder 0010.
X Insert the new bulb into bulb holder 0010.X
Insert bulb holder 0010into the lamp and turn
it clockwise.
X Align housing cover 001Aand turn it
clockwise until it engages. Changing the rear bulbs
Opening and closing the side trim
panels You must open the side trim panel in the
cargo compartmentb
efore you can change
the bulbs in the tail lamps. Left-hand side trim panel
Right-hand side trim panel
X
To open: turn release knob 001A90° in the
direction of the arrow and remove side trim
panel 0010.
X To close: insert side trim panel 0010and turn
release knob 001A90° in the opposite
direction to the arrow. 114
Replacing bulbsLights and windshield wipers
Page 117 of 360
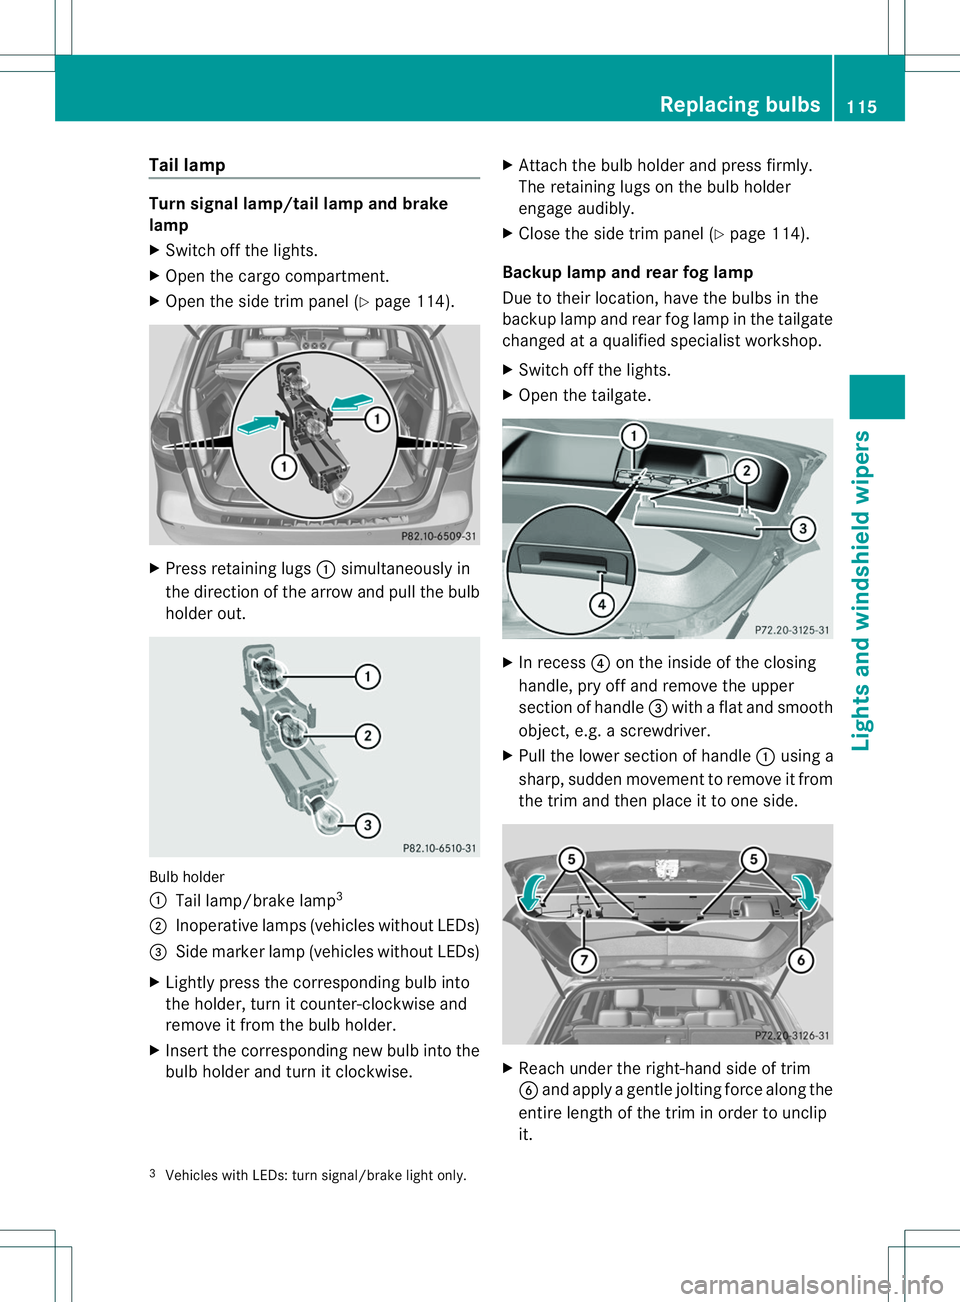
Tail lamp
Turn signal lamp/tail lamp and brake
lamp
X
Switch off the lights.
X Open the cargo compartment.
X Open the side trim panel (Y page 114).X
Press retaining lugs 001Asimultaneously in
the direction of the arrow and pull the bulb
holde rout. Bulb holder
001A
Tail lamp/brak elamp 3
0010 Inoperative lamps (vehicles without LEDs)
0023 Sidem arke rlamp (vehicle swithout LEDs)
X Lightly press the correspondin gbulb into
the holder ,tur nitc ounter-clockwise and
remove it from the bulb holder.
X Insert the corresponding new bulb into the
bulb holder and turn it clockwise. X
Attach the bulb holder and press firmly.
The retaining lugs on the bulb holder
engage audibly.
X Close the side trim panel (Y page 114).
Backup lamp and rear fog lamp
Due to their location, have the bulbs in the
backup lamp and rear fog lamp in the tailgate
changed at aqualified specialist workshop.
X Switch off the lights.
X Open the tailgate. X
In recess 0021on the inside of the closing
handle, pry off and remove the upper
section of handle 0023with aflat and smooth
object ,e.g. ascrewdriver.
X Pull the lower section of handle 001Ausing a
sharp, sudden movemen ttoremove it from
the trim and then place it to one side. X
Reach under the right-hand side of trim
0024 and apply agentle jolting forc ealong the
entire lengt hofthe trim in order to unclip
it.
3 Vehicles with LEDs: turn signal/brake light only. Replacing bulbs
115Lights and windshield wipers Z
Page 222 of 360
Display messages Possible causes/consequences and
000B Solutions
X
Wait fo raperiod of at least 60 seconds until the necessary
system checks have been completed.
X Make sure that the display messages do not appear in the
multifunction display.
If these condition sare fulfilled, the front-passenger seat can be
occupied again. Whether the PASSENGER AIR BAGO FF indicator
lamp remains lit or goes out depends on how OCS classifies the
occupant.
If the condition sare not fulfilled, the system is not operating
correctly.
X Visit aqualified specialist workshop immediately.
For further information about the Occupant Classification System,
see (Y page 47). Lights
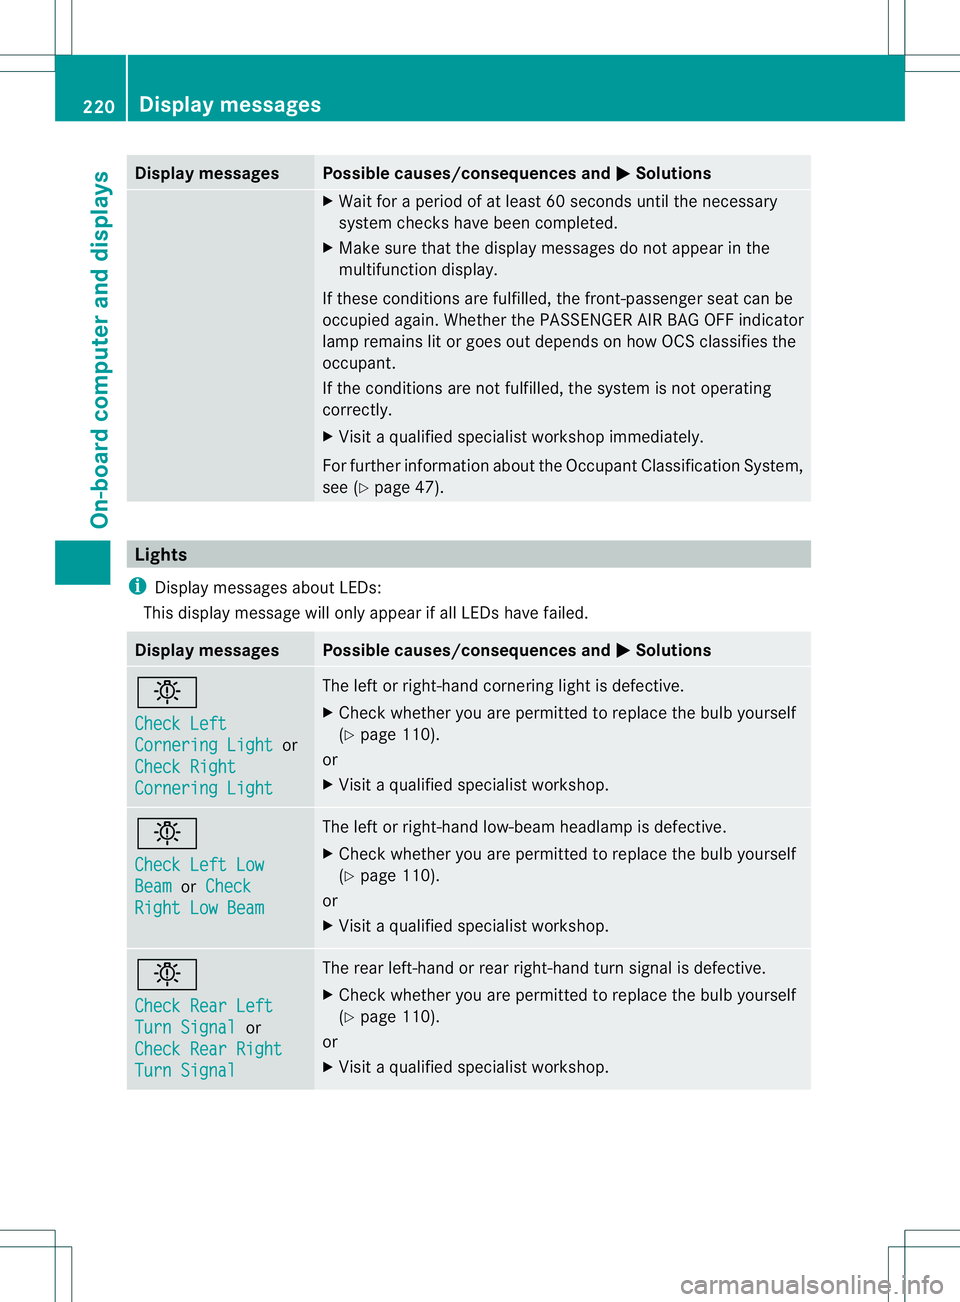
i Display messages about LEDs:
This display message will only appear if all LED shave failed. Display messages Possible causes/consequences and
000B Solutions
000D
Check Left
Cornering Light or
Check Right Cornering Light The left or right-han
dcornering light is defective.
X Check whether you are permitted to replace the bulb yourself
(Y page 110).
or
X Visit aqualified specialist workshop. 000D
Check Left Low
Beam or
Check Right Low Beam The left or right-han
dlow-beam headlamp is defective.
X Check whether you are permitted to replace the bulb yourself
(Y page 110).
or
X Visit aqualified specialist workshop. 000D
Check Rear Left
Turn Signal or
Check Rear Right Turn Signal The rear left-hand or rear right-han
dturn signal is defective.
X Check whether you are permitted to replace the bulb yourself
(Y page 110).
or
X Visit aqualified specialist workshop. 220
Display messagesOn-boar
dcomputer and displays