2014 LINCOLN MKZ HYBRID steering
[x] Cancel search: steeringPage 176 of 445

GENERAL INFORMATION
Note:
Occasional brake noise is normal.
If a metal-to-metal, continuous grinding or
continuous squeal sound is present, the
brake linings may be worn-out. Have the
system checked by an authorized dealer.
If the vehicle has continuous vibration or
shudder in the steering wheel while
braking, have it checked by an authorized
dealer.
Note: Brake dust may accumulate on the
wheels, even under normal driving
conditions. Some dust is inevitable as the
brakes wear and does not contribute to
brake noise. See Cleaning the Alloy
Wheels (page 272). See
Warning Lamps and
Indicators (page 91).
Wet brakes result in reduced braking
efficiency. Gently press the brake pedal a
few times when driving from a car wash
or standing water to dry the brakes.
Brake Over Accelerator
In the event the accelerator pedal
becomes stuck or entrapped, apply steady
and firm pressure to the brake pedal to
slow the vehicle and reduce engine power.
If you experience this condition, apply the
brakes and bring your vehicle to a safe
stop. Move the transmission selector lever
to position
P, switch the engine off and
apply the parking brake. Inspect the
accelerator pedal for any interference. If
none are found and the condition persists,
have your vehicle towed to the nearest
authorized dealer. Brake Assist
Brake assist detects when you brake
heavily by measuring the rate at which you
press the brake pedal. It provides
maximum braking efficiency as long as you
press the pedal. Brake assist can reduce
stopping distances in critical situations.
Anti-lock Brake System
This system helps you maintain steering
control during emergency stops by
keeping the brakes from locking.
This lamp momentarily
illuminates when you turn the
ignition on. If the light does not
illuminate during start up, remains on or
flashes, the anti-lock braking system may
be disabled. Have the system checked by
an authorized dealer. If the system is disabled, normal
braking is still effective. If the
brake warning lamp illuminates
when you release the parking brake, have
your system checked by an authorized
dealer.
Regenerative Braking System
This feature is used to simulate the engine
braking of an internal combustion engine
and assist the standard brake system while
recovering some of the energy of motion
and storing it in the battery to improve fuel
economy. The standard brake system is
designed to fully stop the car if
regenerative braking is not available.
During regenerative braking, the motor is
174
MKZ (CC9) BrakesE144522 E144522
Page 177 of 445

spun as a generator to create electrical
current. This recharges the battery and
slows the vehicle. In effect, once the
accelerator pedal is released, the motor
changes from an energy user to an energy
producer.
When you release the accelerator pedal
or press the brake pedal, the brake
controller automatically detects the
amount of deceleration requested and
optimizes how much of the deceleration
will be produced by regenerative braking.
The remaining portion is generated by
standard friction braking. When the battery
is almost fully charged, the amount of
regenerative braking is limited to avoid
overcharging, and the requested
deceleration is produced by standard
friction braking alone.
Regenerative braking does not take the
place of the standard friction brakes; it only
assists them. Regenerative braking has
also been designed to interact with the
anti-lock brake system. Regenerative
braking is disabled when the anti-lock
brake system is activated or the battery is
fully charged.
HINTS ON DRIVING WITH ANTI-
LOCK BRAKES
Note:
When the system is operating, the
brake pedal will pulse and may travel
further. Maintain pressure on the brake
pedal. You may also hear a noise from the
system. This is normal. The anti-lock braking system will not
eliminate the risks when:
•
you drive too closely to the vehicle in
front of you
• your vehicle is hydroplaning
• you take corners too fast
• the road surface is poor.
ELECTRIC PARKING BRAKE
The electric parking brake replaces the
conventional handbrake. The operating
switch is located on the instrument panel
to the left of the steering wheel. WARNING
Always set the parking brake and
leave your vehicle with the
transmission selector in position P. Note:
When you apply the electric parking
brake in certain conditions, for example
on a steep hill, the electric parking brake
may reapply the brakes within three to ten
minutes.
Note: You may notice various noises when
you apply and release the electric parking
brake. This is normal and no cause for
concern.
Applying the electric parking brake WARNING
If the brake system warning lamp
does not illuminate or flashes, there
could be a problem with your electric
parking brake. Have the system checked
by an authorized dealer as soon as
possible. 175
MKZ (CC9) Brakes
Page 182 of 445

PRINCIPLE OF OPERATION
WARNINGS
Vehicle modifications involving
braking system, aftermarket roof
racks, suspension, steering system, tire
construction and wheel and tire size may
change the handling characteristics of the
vehicle and may adversely affect the
performance of the AdvanceTrac system.
In addition, installing any stereo
loudspeakers may interfere with and
adversely affect the AdvanceTrac system.
Install any aftermarket stereo loudspeaker
as far as possible from the front center
console, the tunnel, and the front seats in
order to minimize the risk of interfering
with the AdvanceTrac sensors. Reducing
the effectiveness of the AdvanceTrac
system could lead to an increased risk of
loss of vehicle control, vehicle rollover,
personal injury and death. Remember that even advanced
technology cannot defy the laws of
physics. It’ s always possible to lose control
of a vehicle due to inappropriate driver
input for the conditions. Aggressive driving
on any road condition can cause you to
lose control of your vehicle increasing the
risk of personal injury or property damage.
Activation of the AdvanceTrac system is
an indication that at least some of the tires
have exceeded their ability to grip the
road; this could reduce the operator’ s
ability to control the vehicle potentially
resulting in a loss of vehicle control,
vehicle rollover, personal injury and death.
If your AdvanceTrac system activates,
SLOW DOWN. The AdvanceTrac Control system helps
you keep control of your vehicle when on
a slippery surface. The electronic stability
control portion of the system helps avoid
skids and lateral slides. The traction
control system helps avoid drive wheel
spin and loss of traction. See Using
Traction Control (page 179). Vehicle without AdvanceTrac
skidding off its intended route.
A
Vehicle with AdvanceTrac
maintaining control on a slippery
surface.
B
180
MKZ (CC9) Stability ControlE72903A
AA
B
BB
B
Page 187 of 445

When a suitable space is found, the touch
screen displays a message and a chime
sounds. Slow down and stop when the
touch screen displays a message and a
chime sounds (at approximately position
A), then follow the instructions on the
touch screen.
Note:
You must observe that the selected
space remains clear of obstructions at all
times in the maneuver.
Note: Vehicles with overhanging loads
(e.g. a bus or a truck), street furniture and
other items may not be detected by active
park assist. You must make sure the
selected space is suitable for parking.
Note: The vehicle should be driven as
parallel to other vehicles as possible while
passing a parking space. Note:
The system always offers the last
detected parking space (i.e. if the vehicle
detects multiple spaces while you are
driving, it offers the last one).
Note: If driven above approximately 20
mph (35 km/h), the touch screen shows a
message to alert you to reduce vehicle
speed.
Automatic Steering into Parking
Space
Note: If vehicle speed exceeds 6 mph (10
km/h), the system switches off and you
need to take full control of the vehicle.
When you shift the transmission into R
(Reverse), with your hands off the wheel
(and nothing obstructing its movement),
the vehicle steers itself into the space.
Instructions to safely move the vehicle
back and forward in the space are
displayed in the touch screen and
indicated by chimes.
185
MKZ (CC9) Parking AidsA
E130107
Page 188 of 445

When you think the vehicle has enough
space in front and behind it, or you hear a
solid tone from the parking aid
(accompanied by a touch screen display
message and a chime), bring the vehicle
to a complete stop.
When automatic steering is finished, the
touch screen displays a message and a
chime sounds, indicating that the active
park assist process is done. The driver is
responsible for checking the parking job
and making any necessary corrections
before putting the transmission in P (Park).
Deactivating the Park Assist Feature
The system can be deactivated manually
by:
•
pressing the active park assist button
• grabbing the steering wheel •
driving above approximately 50 mph
(80 km/h) for 30 seconds during an
active park search
• driving above 6 mph (10 km/h) during
automatic steering
• turning off the traction control system.
Certain vehicle conditions can also
deactivate the system, such as:
• Traction control has activated on a
slippery or loose surface.
• There is an anti-lock brake system
activation or failure.
• Something touches the steering wheel.
If a problem occurs with the system, a
warning message is displayed, followed
by a chime. Occasional system messages
may occur in normal operation. For
recurring or frequent system faults, contact
an authorized dealer to have your vehicle
serviced.
Troubleshooting the System The system does not look for a space
The traction control system may be off
The transmission is in R (Reverse); the vehicle must be moving forward to detect a
parking space
186
MKZ (CC9) Parking AidsE130108
Page 191 of 445

Note:
When towing, the camera only sees
what you are towing behind your vehicle.
This might not provide adequate coverage
and you might not see some objects. In
some vehicles, the guidelines may
disappear once you connect the trailer
tow connector.
The camera may not operate correctly
under the following conditions:
• Nighttime or dark areas if the reverse
lamps are not operating.
• Mud, water or debris obstructs the
camera's view. Clean the lens with a
soft, lint-free cloth and non-abrasive
cleaner.
• The camera is misaligned due to
damage to the rear of your vehicle.
To access any of the rear view camera
system settings, make the following
selections in the touch screen when the
transmission is not in Reverse (R):
• Menu > Vehicle > Rear View Camera
After changing a system setting, the touch
screen shows a preview of the selected
features.
Guidelines and the Centerline
Note: Active guidelines and fixed
guidelines are only available when the
transmission is in Reverse (R).
Note: The centerline is only available if
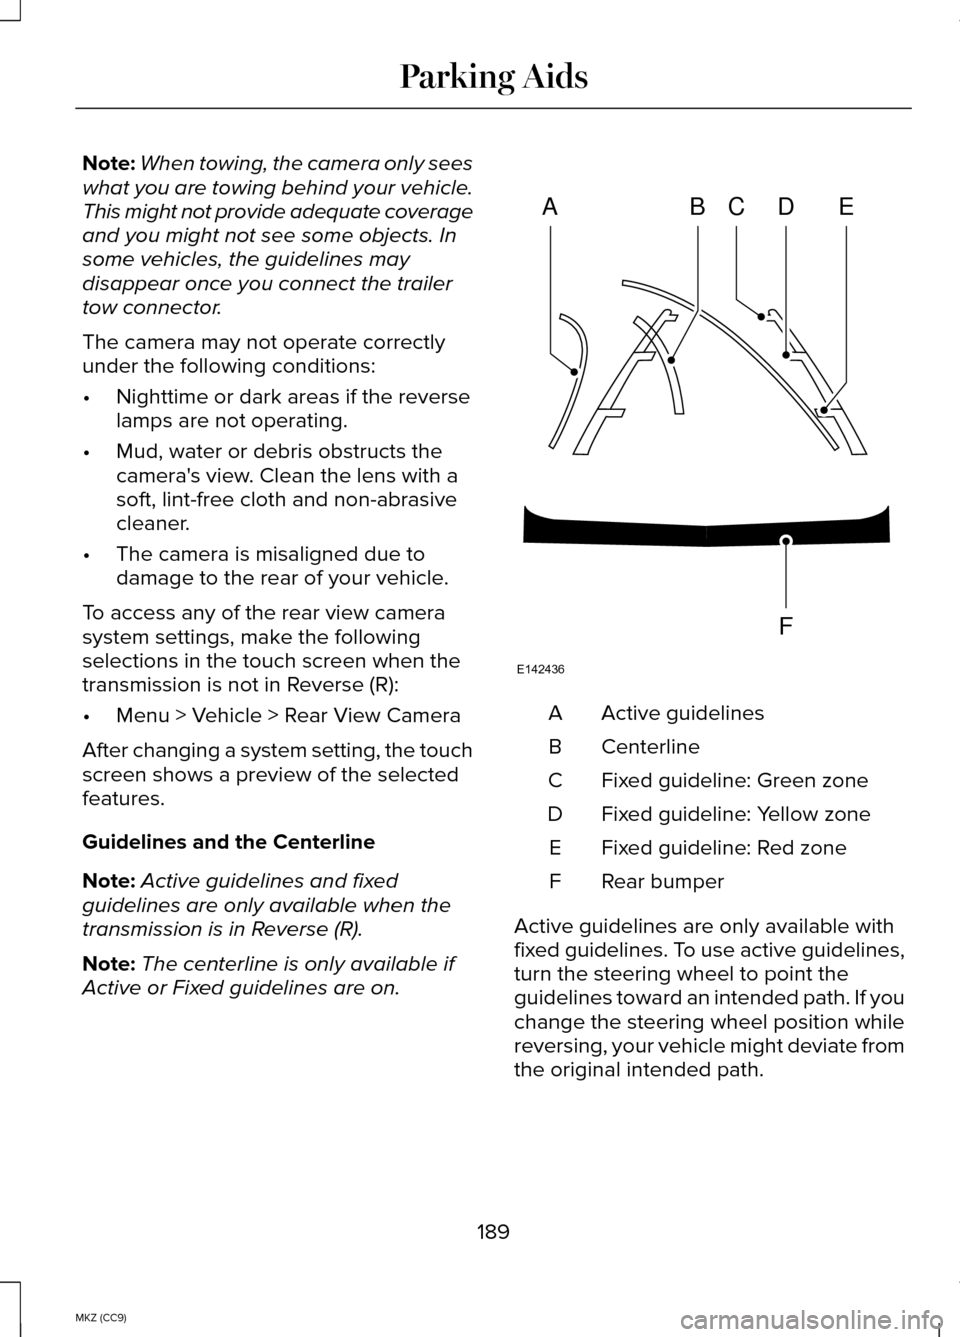
Active or Fixed guidelines are on. Active guidelines
A
Centerline
B
Fixed guideline: Green zone
C
Fixed guideline: Yellow zone
D
Fixed guideline: Red zone
E
Rear bumper
F
Active guidelines are only available with
fixed guidelines. To use active guidelines,
turn the steering wheel to point the
guidelines toward an intended path. If you
change the steering wheel position while
reversing, your vehicle might deviate from
the original intended path.
189
MKZ (CC9) Parking AidsABCD
F
E
E142436
Page 192 of 445

The fixed and active guidelines fade in and
out depending on your steering wheel
position. When your steering wheel
position is straight, the active guidelines
are not visible.
Always use caution while reversing.
Objects in the red zone are closest to your
vehicle and objects in the green zone are
farther away. Objects are getting closer to
your vehicle as they move from the green
zone to the yellow or red zones. Use the
side view mirrors and rear view mirror to
get better coverage on both sides and rear
of your vehicle.
Selectable settings for this feature are
ACTIVE + FIXED, FIXED and OFF.
Visual Park Aid Alert
Note:
Visual park alert is only available
when the transmission is in Reverse (R).
Note: The reverse sensing system is not
effective at speeds above 3 mph (5 km/h)
and may not detect certain angular or
moving objects.
The system uses red, yellow and green
highlights that appear on top of the video
image when the reverse sensing system
detects an object. The alert highlights the
closest object detected. You can disable
the reverse sensing alert if you have visual
park aid alert enabled, you will still see the
displayed highlighted areas.
Selectable settings for this feature are ON
and OFF. Manual Zoom WARNING
When manual zoom is on, the full
area behind your vehicle is not
shown. Be aware of your surroundings
when using the manual zoom feature. Note:
Manual zoom is only available when
the transmission is in Reverse (R).
Note: Only the centerline shows when you
enable manual zoom.
This allows you to get a closer view of an
object behind your vehicle. The zoomed
image keeps the bumper in the image to
provide a reference. The zoom is only
active while the transmission is in Reverse
(R). When you shift the transmission out of
Reverse (R), the feature automatically turns
off and you must enable it to use it used
again.
Selectable settings for this feature are ON
and OFF.
Rear Camera Delay
When shifting the transmission out of
Reverse (R) and into any gear other than
Park (P), the camera image remains in the
display until your vehicle speed reaches
5 mph (8 km/h or until you select a radio
button.
Selectable settings for this feature are ON
and OFF. The default setting for the rear
camera delay is OFF.
190
MKZ (CC9) Parking Aids
Page 193 of 445

PRINCIPLE OF OPERATION
Cruise control lets you maintain a set
speed without keeping your foot on the
accelerator pedal.
USING CRUISE CONTROL
WARNINGS
Do not use cruise control in heavy
traffic, on winding roads or when the
road surface is slippery. This could result
in loss of vehicle control, serious injury or
death. When you are going downhill, your
vehicle speed may increase above
the set speed. The system will not apply
the brakes. Change down a gear to assist
the system in maintaining the set speed.
Failure to do so could result in loss of
vehicle control, serious injury or death. Note:
Cruise control will disengage if the
vehicle speed decreases more than 10
mph (16 km/h) below your set speed while
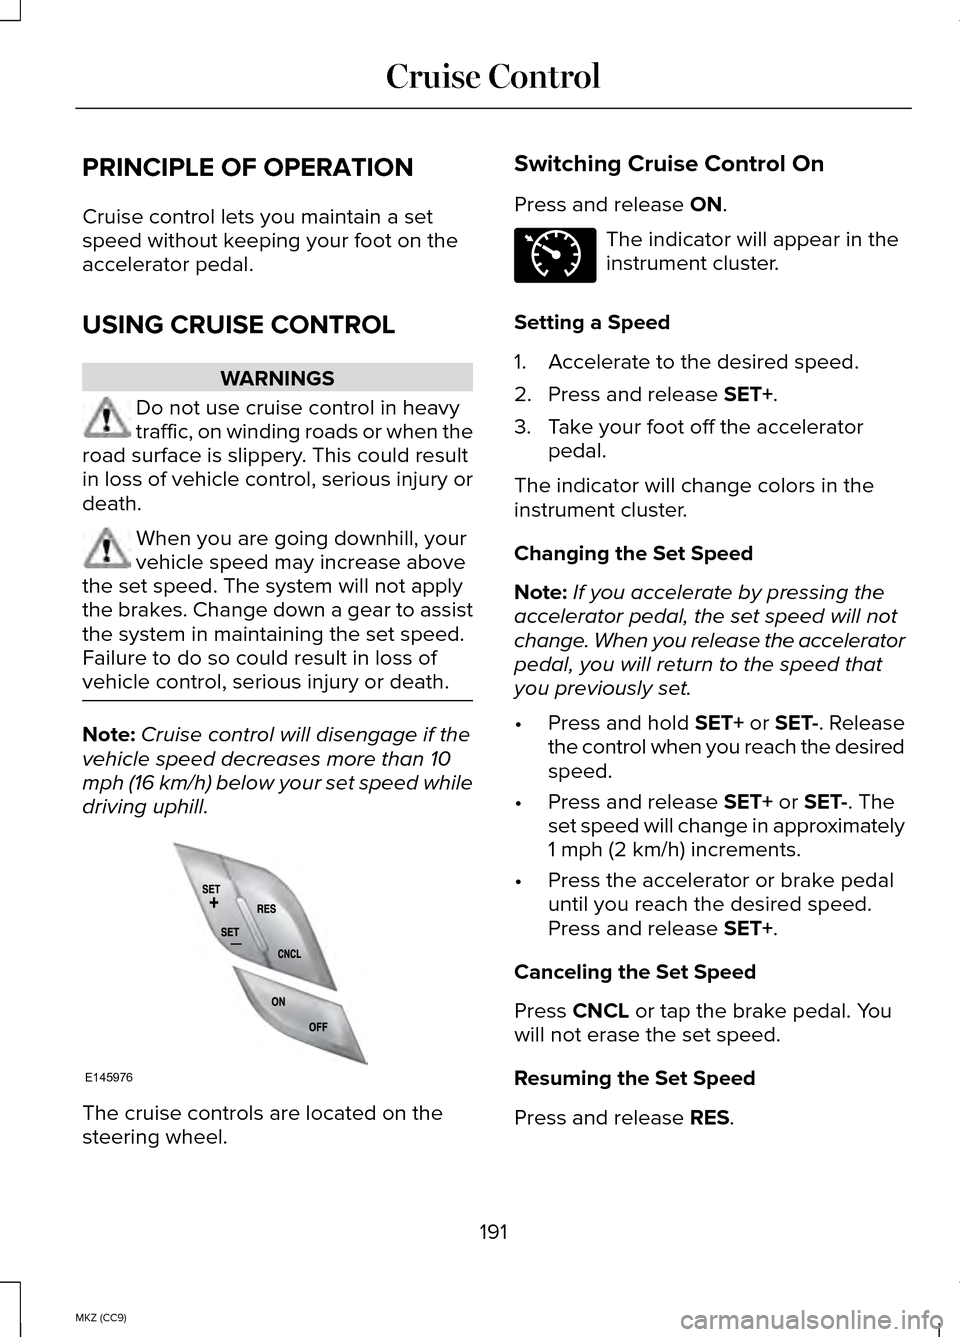
driving uphill. The cruise controls are located on the
steering wheel. Switching Cruise Control On
Press and release ON. The indicator will appear in the
instrument cluster.
Setting a Speed
1. Accelerate to the desired speed.
2. Press and release
SET+.
3. Take your foot off the accelerator pedal.
The indicator will change colors in the
instrument cluster.
Changing the Set Speed
Note: If you accelerate by pressing the
accelerator pedal, the set speed will not
change. When you release the accelerator
pedal, you will return to the speed that
you previously set.
• Press and hold
SET+ or SET-. Release
the control when you reach the desired
speed.
• Press and release
SET+ or SET-. The
set speed will change in approximately
1 mph (2 km/h) increments.
• Press the accelerator or brake pedal
until you reach the desired speed.
Press and release
SET+.
Canceling the Set Speed
Press
CNCL or tap the brake pedal. You
will not erase the set speed.
Resuming the Set Speed
Press and release
RES.
191
MKZ (CC9) Cruise ControlE145976 E71340