2014 Lancia Voyager clock
[x] Cancel search: clockPage 135 of 364

INTERIOR LIGHTING
Interior lights are turned on when a
door or liftgate is opened, the Remote
Keyless Entry (RKE) transmitter is
activated, or when the dimmer con-
trol is moved to the extreme top.
The interior lights will automatically
turn off in approximately 10 minutes
for the first activation and 90 seconds
every activation thereafter until the
engine is started, if one of the follow-
ing occur:
1. A door, sliding door or the liftgate
is left open
2. Any overhead reading light is left
on
NOTE: The key must be out of the
ignition switch or the ignition
switch must be in the OFF position
for this feature to operate.
Halo Lights (for versions/markets,
where provided)
Halo lights are strategically placed
soft lighting that help to illuminatespecific areas to aid the occupants in
locating specific features while driv-
ing at night.
The Halo control switch is located to
the right of the dimmer switch.
To activate the Halo lights,
rotate the Halo switch con-
trol upward or downward
to increase or decrease the
lighting.
PARKING LIGHTS
Turn the headlight switch
knob to the first detent to turn
the parking lights on. This also turns
on all instrument panel lighting.
HEADLIGHTS
Turn the headlight switch
knob to the second detent to
turn the headlights and
parking lights on. This also
turns on all instrument panel lighting.
To change the brightness of the in-
strument panel lights, rotate the dim-
mer control up or down.
AUTOMATIC HEADLIGHTS
(for versions/markets,
where provided)
This system automatically turns your
headlights on or off based on ambient
light levels. To turn the system on,
turn the headlight switch to the ex-
treme counterclockwise position
aligning the indicator with AUTO on
the headlight switch. When the sys-
tem is on, the Headlight Time Delay
feature is also on. This means your
headlights will stay on for up to 90
seconds after you turn the ignition
switch OFF. To turn the Automatic
System off, turn the headlight switch
clockwise to the O (Off) position.
Halo Control Switch
129
Page 138 of 364

from low beams to high beams. Pull-
ing back to the neutral position re-
turns the headlights to the low beam
operation.
FLASH-TO-PASS
You can signal another vehicle with
your headlights by lightly pulling the
multifunction lever toward you. This
will turn on the high beam headlights
until the lever is released.
AUTOMATIC HIGH BEAM
(for versions/markets,
where provided)
The Automatic High Beam system
provides increased forward lighting at
night by automating high beam con-
trol through the use of a digital cam-
era mounted on the inside rearview
mirror. This camera detects vehicle
specific light and automatically
switches from high beams to low
beams until the approaching vehicle
is out of view.
NOTE: Broken, muddy or ob-
structed headlights and taillights
of vehicles in the field of view willcause headlights to remain on lon-
ger (closer to the vehicle). Also,
dirt, film and other obstructions
on the windshield or camera lens
will cause the system to function
improperly.
To Activate
1. Select “Automatic High Beams —
ON” through the EVIC. Refer to
“Electronic Vehicle Information Cen-
ter (EVIC)/Customer-Programmable
Features” in “Understanding Your In-
strument Panel” for further informa-
tion.
2. Rotate the headlight switch coun-
terclockwise to the AUTO (A) posi-
tion.
3. Push the multifunction lever away
from you to switch the headlights to
the high beam position. Refer to
“Multifunction Lever” in this section
for further information.
NOTE: This system will not acti-
vate until the vehicle is at, or
above, 40 km/h.
HEADLIGHT LEVELING
SYSTEM (for versions/
markets, where provided)
Your vehicle may be
equipped with a headlight
leveling system. This sys-
tem allows the driver to
maintain proper headlight beam posi-
tion with the road surface regardless
of vehicle load. The control switch is
located on the instrument panel next
to the dimmer control.
To operate, rotate the control switch
until the appropriate number, which
corresponds to the load listed on the
chart, aligns with the indicator line on
the switch.
0 Driver only, or driver and
front passenger.
1 Driver, plus an evenly distrib-
uted load in the luggage com- partment. The total weight of the driver and load does not exceed the maximum load capacity of the vehicle.
132
Page 175 of 364

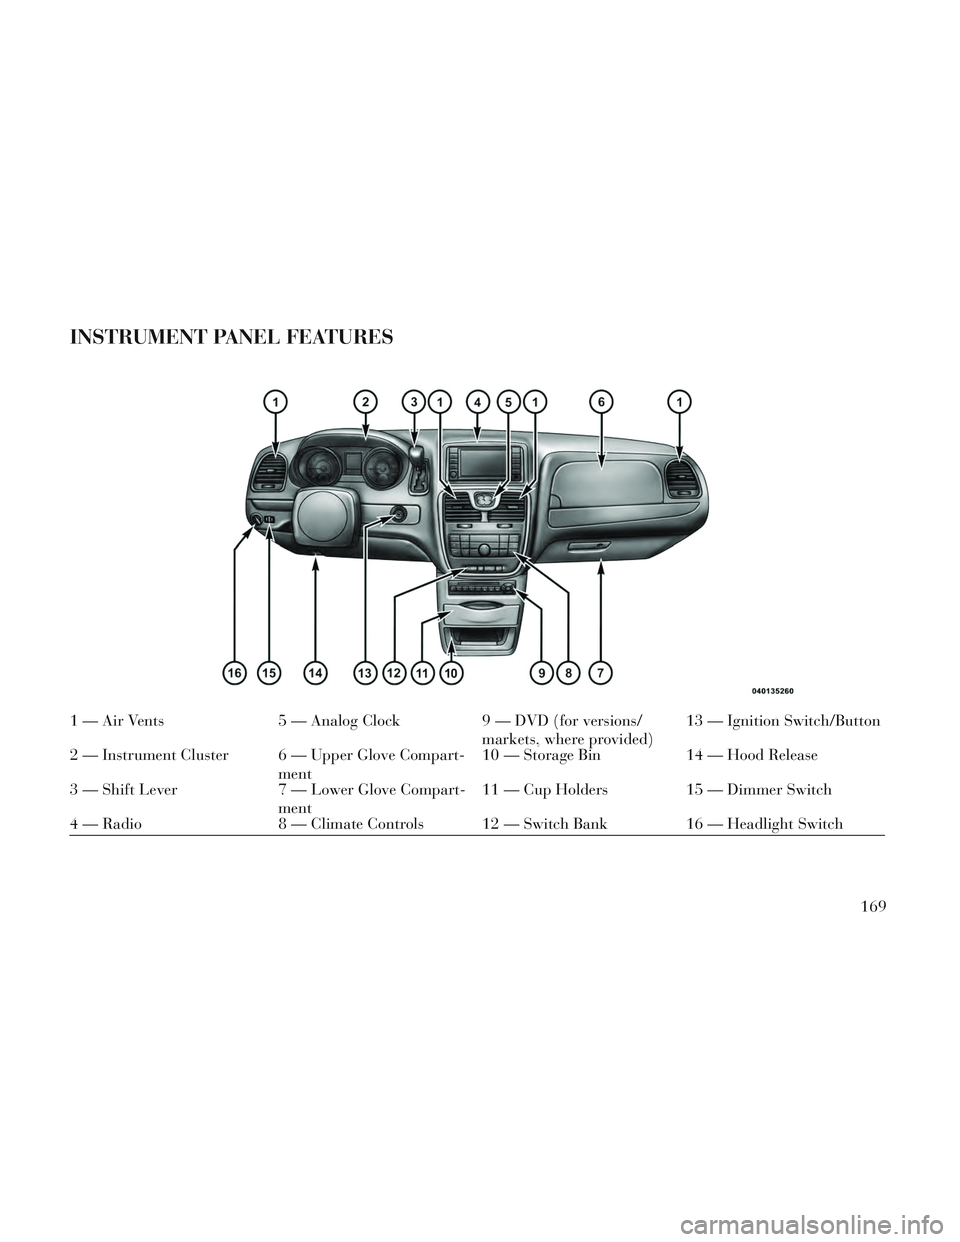
INSTRUMENT PANEL FEATURES
1 — Air Vents5 — Analog Clock9 — DVD (for versions/
markets, where provided)13 — Ignition Switch/Button
2 — Instrument Cluster 6 — Upper Glove Compart- ment10 — Storage Bin
14 — Hood Release
3 — Shift Lever 7 — Lower Glove Compart-
ment11 — Cup Holders 15 — Dimmer Switch
4 — Radio 8 — Climate Controls 12 — Switch Bank 16 — Headlight Switch
169
Page 201 of 364

mode. In Play mode, the following
buttons on the radio faceplate may be
used to control the iPod® or external
USB device and display data:
Use the TUNE control knob to se-lect the next or previous track.
Turning it clockwise (forward) by one click, while playing a
track, skips to the next track or
press the VR button and say
"Next Track".
Turning it counterclockwise (backward) by one click, will
jump to the previous track in the
list or press the VR button and
say "Previous Track"
Jump backward in the current track by pressing and holding the
<< RW button. Holding the << RW
button long enough will jump to the
beginning of the current track.
Jump forward in the current track by pressing and holding the FF>>
button. A single press backward <<
RWor
forward FF>> will jump backward
or forward respectively, for five sec-
onds.
Use the << SEEKandSEEK>>
buttons to jump to the previous or
next track. Pressing the SEEK>>
button during play mode will jump
to the next track in the list, or press
the VR button and say "Next or
Previous Track".
While a track is playing, press the INFO button to see the associated
metadata (artist, track title, album,
etc.) for that track. Pressing the
INFO button again jumps to the
next screen of data for that track.
Once all screens have been viewed,
the last INFObutton press will go
back to the play mode screen on the
radio.
Pressing the REPEATbutton will
change the audio device mode to
repeat the current playing track or
press the VR button and say "Re-
peat ON" or "Repeat Off". Press the
SCANbutton to use
iPod®/USB/MP3 device scan
mode, which will play the first 10
seconds of each track in the current
list and then forward to the next
song. To stop SCAN mode and start
playing the desired track, when it is
playing the track, press the SCAN
button again. During Scan mode,
pressing the << SEEKand
SEEK>> buttons will select the
previous and next tracks.
RND button (available on sales
code RES radio only): Pressing this
button toggles between Shuffle ON
and Shuffle OFF modes for the
iPod® or external USB device, or
press the VR button and say
"Shuffle ON" or "Shuffle Off". If
the RND icon is showing on the
radio display, then the shuffle mode
is ON.
LIST OR BROWSE MODE
During Play mode, pressing any of the
buttons described below, will bring up
List mode. List mode enables scroll-
ing through the list of menus and
tracks on the audio device.
195
Page 202 of 364

TUNE control knob: The TUNE
control knob functions in a similar
manner as the scroll wheel on the
audio device or external USB de-
vice.
Turning it clockwise (forward) and counterclockwise (back-
ward) scrolls through the lists,
displaying the track detail on the
radio display. Once the track to
be played is highlighted on the
radio display, press the TUNE
control knob to select and start
playing the track. Turning the
TUNE control knob fast will
scroll through the list faster. Dur-
ing fast scroll, a slight delay in
updating the information on the
radio display may be noticeable.
During all List modes, the iPod® displays all lists in “wrap-
around” mode. So if the track is
at the bottom of the list, just turn
the wheel backward (counter-
clockwise) to get to the track
faster. In List mode, the radio
PRESET
buttons are used as shortcuts to
the following lists on the iPod®
or external USB device.
Preset 1 – Playlists
Preset 2 – Artists
Preset 3 – Albums
Preset 4 – Genres
Preset 5 – Audiobooks
Preset 6 – Podcasts
Pressing a PRESET button will display the current list on the top
line and the first item in that list
on the second line.
To exit List mode without select- ing a track, press the same PRE-
SET button again to go back to
Play mode.
LIST button: The LISTbutton will
display the top level menu of the
iPod® or external USB device.
Turn the TUNEcontrol knob to list
the top-menu item to be selected
and press the TUNEcontrol knob.
This will display the next sub-menu
list item on the audio device, then
follow the same steps to go to the
desired track in that list. Not all iPod® or external USB device sub-
menu levels are available on this
system.
MUSIC TYPE button: TheMUSIC
TYPE button is another shortcut
button to the genre listing on your
audio device.
CAUTION!
Leaving the iPod® or external USB device (or any supported de-
vice) anywhere in the vehicle in
extreme heat or cold can alter the
operation or damage the device.
Follow the device manufacturer’s
guidelines.
Placing items on the iPod® or external USB device, or connec-
tions to the iPod® or external
USB device in the vehicle, can
cause damage to the device
and/or to the connectors.
196
Page 215 of 364

1. CD: Ability to Fast Forward, Re-
wind, Scan, and Track Up/Down.
2. CD Changer (in radio): Ability to
Disk Up/Down and program all listed
CD controls (Fast Forward, Rewind,
Scan, and Track Up/Down).
The VES™ can even control radio
modes or video modes while the radio
is turned off. The VES™ can access
the radio modes or disc modes by
navigating to those modes on the
VES™ and activating a radio mode or
disc mode.
INFORMATION MODE
DISPLAY
1. Channel 1 Mode2. Channel 1 Audio Only/Mute
3. Channel 2 Audio Only/Mute
4. Channel 2 Mode
5. Remote Control Lock Out
6. Clock
7. Source Mode
NUMERIC KEYPAD MENU
When the display for either Channel 1
or Channel 2 shows DIRECT TUNE,
pressing the remote control’s OK but-
ton activates a numeric keypad menu.
This screen makes it easy to enter a
specific tuner frequency, or track
number. To enter the desired digit:
1. Press the remote control’s naviga-
tion buttons (▲,
▼,►,◄) to navi-
gate to the desired digit.
2. When the digit is highlighted,
press the remote control’s
ENTER/OK button to select the digit.
Repeat these steps until all digits are
entered. 3. To delete the last digit, navigate to
the Del button and press the remote
control’s ENTER/OK button.
4. After all of the digits are entered,
navigate to the Go button and press
the remote control’s ENTER/OK but-
ton.
DISC MENU
When listening to a CD Audio or CD
Data disc, pressing the remote con-
trol’s POP UP/MENU button displays
a list of all commands which control
playback of the disc. Using the op-
tions you can activate or cancel Scan
play and Random play.
DISPLAY SETTINGS
When watching a video source (DVD
Video with the disc in Play mode, Aux
Video, etc.), pressing the remote con-
trol’s SETUP button activates the
Display Settings menu. These settings
control the appearance of the video on
the screen. The factory default set-
tings are already set for optimum
viewing, so there is no need to change
these settings under normal circum-
stances.
Information Mode Video Screen
Display
209
Page 223 of 364

Macrovision. Reverse engineering
or disassembly is prohibited.
Manufactured under license under U.S. Patent #’s: 5,451,942;
5,956,674; 5,974,380; 5,978,762;
6,487,535 & other U.S. and world-
wide patents issued & pending.
DTS is a registered trademark and
the DTS logos, Symbol and DTS
2.0 Channel are trademarks of
DTS, Inc. © 1996-2007 DTS, Inc.
All Rights Reserved.
Manufactured under license from Dolby Laboratories. Dolby and the
double-D symbol are trademarks of
Dolby Laboratories.
ABOUT DIVX VIDEO: DivX® is a
digital video format created by DivX,
LLC, a subsidiary of Rovi
Corporation. This is an official DivX
Certified® device that plays DivX
video. Visit divx.com for more infor-
mation and software tools to convert
your files into DivX videos.
ABOUT DIVX VIDEO-ON-
DEMAND: This DivX Certified® de-
vice must be registered in order to play purchased DivX Video-on-
Demand (VOD) movies. To obtain
your registration code, locate the
DivX VOD section in your device
setup menu. Go to vod.divx.com for
more information on how to complete
your registration.
DivX®, DivX Certified® and associ-
ated logos are trademarks of Rovi
Corporation or its subsidiaries and
are used under license.
Trademark
Blu-ray Disc™, Blu-ray™ and the
logos are trademarks of the Blu-ray
Disc Association.
Java is a registered trademark of Oracle and/or its affiliates.
CAUTION!
Use of controls or adjustments or
performance of procedures other
than those specified herein may re-
sult in hazardous radiation expo-
sure.
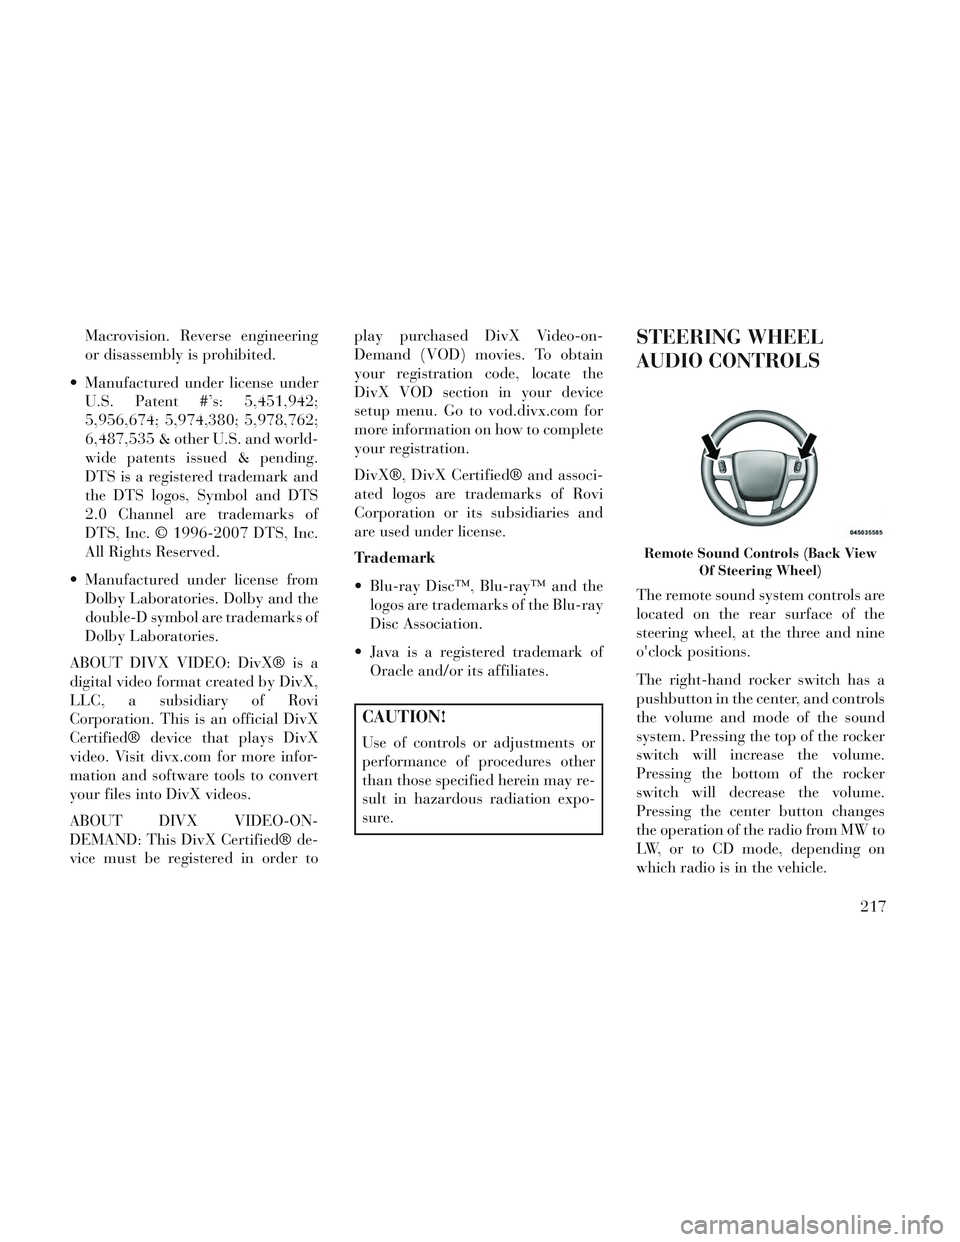
STEERING WHEEL
AUDIO CONTROLS
The remote sound system controls are
located on the rear surface of the
steering wheel, at the three and nine
o'clock positions.
The right-hand rocker switch has a
pushbutton in the center, and controls
the volume and mode of the sound
system. Pressing the top of the rocker
switch will increase the volume.
Pressing the bottom of the rocker
switch will decrease the volume.
Pressing the center button changes
the operation of the radio from MW to
LW, or to CD mode, depending on
which radio is in the vehicle.
Remote Sound Controls (Back View
Of Steering Wheel)
217
Page 229 of 364

Pressing the Rear Temperature Lock
button on the front ATC panel, illumi-
nates a lock symbol in the rear dis-
play. The rear temperature and air
source are controlled from the front
ATC panel.
Rear second row occupants can only
adjust the rear ATC control when the
Rear Temperature Lock button is
turned off.
The rear ATC system is located in the
headliner, near the center of the ve-
hicle.1. Press the Rear Temperature Lock
button on the front ATC panel. This
turns off the Rear Temperature Lock
icon in the rear temperature knob.
2. Rotate the Rear Blower, Rear Tem-
perature and the Rear Mode Control
knobs to suit your comfort needs.
3. ATC is selected by adjusting the
rear blower knob counterclockwise to
AUTO.
Once the desired temperature is dis-
played, the ATC System will auto-
matically achieve and maintain that
comfort level. When the system is set
up for your comfort level, it is not
necessary to change the settings. You
will experience the greatest efficiency
by simply allowing the system to
function automatically.NOTE:
It is not necessary to move the
temperature settings for cold or
hot vehicles. The system auto-
matically adjusts the tempera-
ture, mode and fan speed to pro-
vide comfort as quickly as
possible.
The temperature can be dis- played in English or Metric units
by selecting the “Display Units
of Measure in” customer-
programmable feature. Refer to
the “Electronic Vehicle Informa-
tion Center (EVIC) — Customer-
Programmable Features” in this
Section.
Rear Blower Control
The rear blower control knob can be
manually set to off, or any fixed
blower speed, by rotating the knob
from low to high. This allows the rear
seat occupants to control the volume
of air circulated in the rear of the
vehicle.
Rear ATC Control Features
1 - Blower Speed 3 - Rear Mode
2 - Rear Tem-
perature 4 - Rear Tem-
perature Lock
223